Welcome to Semarchy xDM Integrator.
This Getting Started document provides a step-by-step introduction to Semarchy xDM Integrator.
Preface
Audience
| If you want to discover Semarchy xDM, you can watch our tutorials. |
Document Conventions
This document uses the following formatting conventions:
| Convention | Meaning |
|---|---|
boldface |
Boldface type indicates graphical user interface elements associated with an action, or a product specific term or concept. |
italic |
Italic type indicates special emphasis or placeholder variable that you need to provide. |
|
Monospace type indicates code example, text or commands that you enter. |
Other Semarchy Resources
In addition to the product manuals, Semarchy provides other resources available on its web site: http://www.semarchy.com.
Obtaining Help
There are many ways to access the Semarchy Technical Support. You can call or email our global Technical Support Center (support@semarchy.com). For more information, see http://www.semarchy.com.
Feedback
We welcome your comments and suggestions on the quality and usefulness
of this documentation.
If you find any error or have any suggestion for improvement, please
mail support@semarchy.com and indicate the title of the documentation
along with the chapter, section, and page number, if available. Please
let us know if you want a reply.
Introduction to Semarchy xDM Integrator
Semarchy xDM Integrator is the next generation high performance data integration platform that enables your IT team to deliver the right data, at the right place, at the right time. Used in conjunction with Semarchy xDM, it manages the integration flows between the operational/analytic applications and the master data hub.
Semarchy xDM Integrator is designed with the following key features for better design-time productivity and higher run-time performances.
High-Performance E-LT Architecture
Traditional data integration products use an Extract-Transform-Load (ETL) architecture to run data transformations. In this architecture, a dedicated proprietary engine is in charge of the data processing.
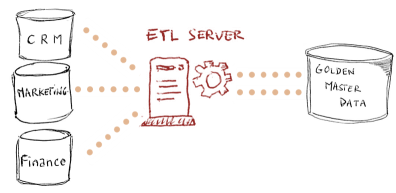
The E-LT (Extract-Load and Transform) architecture used in Semarchy xDM Integrator removes the need for this middle-tier engine. It leverages the data processing engines in place to run processes generated and optimized for these engines.

By removing the cost of the hardware, software, maintenance and tuning skills required for the ETL server, the E-LT architecture guarantees the best TCO. This architecture scales naturally with the source and target datastores. It guarantees the best performance and scalability for data integration at any time.
Powerful User Experience
Semarchy xDM Integrator uses an intuitive, familiar and robust Integrated Development Environment (IDE), the xDM Integrator Designer that contributes to the unified user experience of the Semarchy platform. This IDE is designed with features that ensure better productivity for development and higher efficiency for maintenance.
-
Metadata Driven Approach: The entire integration logic design is driven by metadata, supporting powerful cross-referencing and impact analysis capabilities that ease the development and maintenance of the data integration flows.
-
Declarative Design: Data mappings are designed graphically in a declarative way, focusing on the purpose of these mappings. The technical processes required for achieving the data movement and transformation are automatically generated using built-in process templates.
-
Integration Process Workflows: Complex process workflows are designed in diagrams, using a rich toolbox. Workflows support parallelism, conditional branching and event-based execution.
-
Components Reusability and Templating: The mappings as well as the workflows can be reused within the same project or in other projects. Processes can be converted into user-defined templates for reusability.
-
Seamless Team Collaboration: Standard source control systems such as Concurrent Versioning System (CVS) or Apache Subversion (SVN) are available from within the xDM Integrator Designer to safely share projects within the team or across teams in robust infrastructures.
Rationalized Production
Setting up and maintaining a production environment with Semarchy xDM Integrator is made fast and simple:
-
Lightweight Runtime Deployment: Semarchy xDM Integrator uses a single lightweight Java component – the Runtime Engine – to handle runtime execution and logging.
-
Rationalized Deployment Model: The deployment model for data integration processes is designed for production users. Package files generated by the development team are easily configured and deployed by the production teams, using graphical or command-line interfaces.
-
Comprehensive Monitoring: The entire execution flow is tracked in logs which are accessed using a Web-based administration dashboard. Live executions can be monitored and past executions can be replayed in diagrams that reflect the processes created at design-time.
Enterprise Data Integration
Semarchy xDM Integrator provides universal data access and enterprise-class capabilities for integration.
-
Extensible Connectivity Framework: In Semarchy xDM Integrator, connectivity is a fully extensible framework. Technology Descriptors can be added or customized to support any type of technology without restricting the capabilities to a subset. Built-in Process Templates can also be customized to generate processes optimized for specific use cases.
-
Built-in Technology Adapters: Out of the box adapters provide read/write access to a variety of systems and data formats including files, databases, XML, web services, applications, etc. They include both the technology descriptors and process templates for these technologies.
-
Real-Time and Batch Integration Patterns: Both the real-time (Using Changed Data Capture) and batch integration patterns are supported. These patterns cover the most common use cases for Enterprise Data Integration and Master Data Management.
-
Data Integration Services: Semarchy xDM Integrator provides out of the box access to web services for integration purposes. In addition, data integration flows designed in Semarchy xDM Integrator can be automatically exposed as web services and used as part of a Service Oriented Architecture (SOA).
-
Unified Product Suite: Semarchy xDM Integrator is fully integrated with the Semarchy Product Suite. Built-in process templates and patterns are provided to manage publishing and consuming master data in the Semarchy xDM golden data hub.
Through all these features, Semarchy xDM Integrator enables you to deliver master data where and when the business needs it, in a simple, fast and safe way.
Overview
This guide illustrates the features of Semarchy xDM Integrator in the context of a Semarchy xDM project. It explains how to use Semarchy xDM Integrator to Publish source data into a Semarchy xDM data location, and Consume the resulting golden data to distribute it to other applications.
Publish Data into the Hub
Semarchy xDM Integrator can publish data from operational sources into a data location managed by Semarchy xDM. Semarchy xDM will certify golden records from this data.
Publishing source data for certification into golden data is performed as a transaction. Such a publisher transaction is called an External Load.
The external load lifecycle is described below:
-
Initialize Load: Semarchy xDM Integrator uses a PL/SQL Interface to initialize an external load and request from the Semarchy xDM platform a Load ID identifying this external load.
-
Load Data: Semarchy xDM Integrator inserts data into the landing tables of the data location, using the Load ID.
-
Submit Load: Semarchy xDM Integrator uses a PL/SQL Interface to submit the external load to the Semarchy xDM platform using the Load ID. In the event of an error, Semarchy xDM Integrator can Cancel Load instead of submitting it. For example, when a problem occurs in the Load Data phase.
To perform the publishing task, you must:
-
Reverse-engineer the Metadata (data structures) involved in the data flows (tables, flat files and XML files). This task is described in the Reverse-Engineering the Metadata chapter.
-
Design the Mappings to load the data from these structure to the landing tables. This task is described in the Loading Data into the Hub chapter.
-
Design a Process to manage the external load. This task is described in the Assembling the Publishing Process chapter.
-
Run the Process and review its results, as described in the Running the Publishing Process
Consume Data from the Hub
In order to deliver golden records to operational applications, you will design mappings to consume golden data from the data location tables and deliver it to a target system of your choice. The consumption process will extract golden data from the data location’s entities.
This task is described in the Consuming Data from the Hub chapter.
Installation
Data Stores Involved
To integrate Semarchy xDM using Semarchy xDM Integrator, several data stores are involved:
-
The database schema that contains the Semarchy xDM Repository.
-
The database schema into which your Semarchy xDM data location is deployed.
-
The data store that contains the source data to consume and publish into Semarchy xDM.
-
The data store into which you want to push data from the Semarchy xDM.
-
The staging database schema used by Semarchy xDM Integrator for ELT processing.
For the rest of this guide, we assume that the repository and data location schemas, as well as the source and target data stores exist.
Installing Semarchy xDM Integrator
Install and Start Semarchy xDM Integrator
Semarchy xDM Integrator includes two key components:
-
The Designer is the Graphical User Interface (GUI) into which data developers create their integration jobs.
-
The Runtime Engine is the component that runs these integration jobs.
In the following section:
-
semarchy-di-designer.zipfile refers to the Semarchy xDM Integrator- Full Setup file that you can download to install Semarchy xDM Integrator. The name of this file varies as it includes the platform information, product version and build number. -
<semarchy_di>refers to the installation folder of Semarchy xDM Integrator.
To install Semarchy xDM Integrator:
-
Download the Semarchy xDM Integrator distribution (
semarchy-di-designer.zip) corresponding to your platform and to your default Java Machine (32 vs. 64 Bits). -
Uncompress the
semarchy-di-designer.zipfile in your machine. This will create asemarchy_disub-folder. This sub-folder will be referred to as<semarchy_di>(the Semarchy xDM Integrator installation directory). -
Start the Designer:
-
On Windows platforms:
-
Open Windows Explorer, and go to the
<semarchy_di>folder. -
Run
semarchy.exe. The Designer starts.
-
-
On UNIX/Linux platforms:
-
Open a shell window, and go to the
<semarchy_di>folder. -
Run
./semarchy. The Designer starts. -
In a shell window, go to the
<semarchy_di>/runtimefolder and runchmod 755 *.shto make the runtime scripts executable.
-
-
-
When the Designer starts, it prompts you for the license key.
-
In the Please validate your product dialog, enter in the Key the key string that was provided to you by Semarchy.
-
Click the Apply button.
-
After registering the license key, you must create the folder into which the Designer will store its data. This folder in your local machine is the Workspace. xDM Integrator Designer prompts creates by default a
workspacefolder in its installation directory.
To install it in a different location:-
In the Workspace Launcher window, click the Browse button.
-
In the Select Workspace Directory dialog, select the folder into which the workspace will be created.
-
Click OK to create the workspace and open it. The Semarchy xDM Integrator Designer window opens on the Introduction page. This page provides access Overview, Tutorials and Web Resource pages.
-
-
Click the Workbench link
 to open the newly created workbench.
Directories Contents
The <semarchy_di> directory contains the following sub-folders:
-
/workspacecontains the workspace that you have created. Note that you can have several workspaces for a single installation. You can locate these workspaces anywhere in your file system. -
/templatescontains the templates provided out of the box with Semarchy xDM Integrator. -
/runtimecontains the Semarchy xDM Integrator runtime engine binary and startup scripts. -
/pluginsandconfigurationcontain the binaries and configuration files for the Designer.
Creating the Staging Area Schema
The E-LT architecture leverages the capabilities of a database for data integration. For the purpose of data processing, it may create temporary tables in the database it uses.
To host these temporary tables, it is recommended to create a schema called the Staging Area. We will create a schema called SEMARCHY_STAGING as our staging area in the database hosting the Semarchy xDM data location.
-
Connect with a system account to the Database hosting the Semarchy xDM data location.
-
Run the following script to create the staging area schema:
CREATE USER SEMARCHY_STAGING IDENTIFIED BY SEMARCHY_STAGING DEFAULT TABLESPACE USERS TEMPORARY TABLESPACE TEMP;
GRANT CONNECT,RESOURCE,DBA TO SEMARCHY_STAGING;

-- The following command should be used for Oracle 12c and above
GRANT UNLIMITED TABLESPACE TO SEMARCHY_STAGING;/* Create the stage schema */
/* Make sure to change the password for this user */
CREATE USER SEMARCHY_STAGING WITH LOGIN NOSUPERUSER NOCREATEDB NOCREATEROLE INHERIT NOREPLICATION CONNECTION LIMIT -1 PASSWORD 'SEMARCHY_STAGING';
/* Use the following syntax for PostgreSQL 9 */
-- CREATE USER SEMARCHY_STAGING WITH LOGIN NOSUPERUSER NOCREATEDB NOCREATEROLE INHERIT NOREPLICATION CONNECTION LIMIT -1 UNENCRYPTED PASSWORD 'SEMARCHY_STAGING';
/*
* The following command is required only for PostgreSQL running on Amazon RDS.
* It grants access to the stage to the RDS super user.
*/
-- GRANT SEMARCHY_STAGING TO <rds_superuser_name>
CREATE SCHEMA SEMARCHY_STAGING AUTHORIZATION SEMARCHY_STAGING;
GRANT USAGE ON SCHEMA SEMARCHY_STAGING TO public;| In a production environment, if a schema already exists for storing temporary objects in a database, this schema can be specified and used as the staging area. The user attached to this schema should have read access to the tables used as sources of the data integration flows, and write access to the tables used as targets of the integration flows. The user should have full access to the staging area schema. |
The DBA privilege is required for the user connecting with Semarchy xDM Integrator for working with the SQLExplorer component in the Designer to list the objects of the database instance. In production, when only processes need to run, it is recommended to implement a reduced set of privileges for this user.
|
Introduction to the xDM Integrator Designer
The Semarchy xDM Integrator Designer appears as follows.
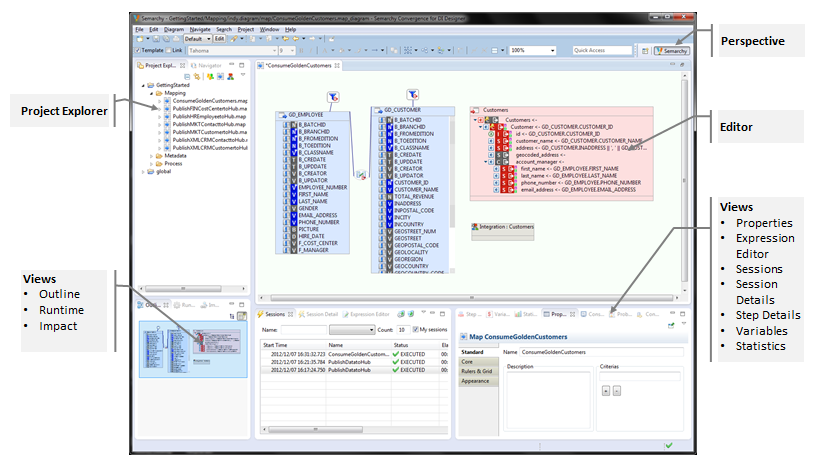
In the Designer, the following sections are available:
-
The Project Explorer view provides a hierarchical view of the resources. From here, you can open files for editing or select resources for operations such as exporting.
-
The Editors section contains the various objects being edited: mappings, metadata, processes, etc.
-
Various other Views are organized around the edition view and allow navigating, viewing and object properties.
Perspectives store the layout of the various views in the Designer. A default Semarchy perspective is provided and it is possible to customize your own perspectives.
Setting Up the Project
In Semarchy xDM Integrator, design-time resources are organized into projects and folders. A project can be used in a team environment and can be version-controlled using source control systems such as Concurrent Versioning System (CVS) or Apache Subversion (SVN).
Creating a Project
The Semarchy xDM Integrator design-time artifacts are stored in a project.
To create a new project:
-
Right-click in the Project Explorer and then select New > Project in the context menu. The New Project wizard opens.
-
In the Wizards filter, enter Project, and then select the General > Project item in the tree.
-
Click Next.
-
Enter a Project Name and then click Finish.
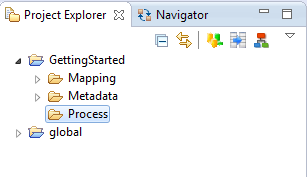
Projects are typically organized with three folders:
-
The Metadata folder includes one metadata definition for the various datastores to integrate.
-
The Mapping folder contains the mappings using these metadata definitions.
-
The Process folder contains the process sequencing your mappings' execution.
To keep the project organized, you can create these folders.
To create a folder:
-
Right-click the project in the Project Explorer and then select New > Folder in the context menu. The New Folder wizard opens.
-
In Folder Name, enter the name of the folder to create.

-
Click Finish.
The new folder appears under the project. -
Repeat the operations to create the three folders.
Importing the Templates
Semarchy xDM Integrator uses process templates to generate the processes from the mappings. For example, a mapping loading data from an XML file to an Oracle database server uses a process template that contains optimized technical steps for this particular situation.
Processes for handling integration load transactions with the Semarchy xDM platform are also provided.
A project named Global is automatically created in the workspace for hosting the built-in process templates. This project is a placeholder containing the configuration elements and templates shared by all projects in this workspace.
-
In the Project Explorer, right-click the global project and then select Import….
-
In the Import Wizard, select General > Archive File for the import source.
-
Click Next.
-
Use the Browse button to select the
<semarchy_di>/templates/templates.generic.yyyy-mm-dd.ziparchive file in the From Archive File: field. Note that the name of this file contains the release dates for the templates. -
Expand the tree view and make sure that all the templates and folders are selected.
-
Click Finish. The import process imports all the templates from the archive file into the global project.
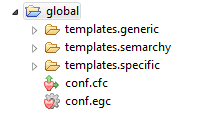
Import these 3 zip files from <semarchy_di>/templates into the Global project:
-
templates.generic.yyyy-mm-dd.zip -
templates.specific.yyyy-mm-dd.zip -
templates.semarchy.zip
The global project appears as shown below:
Reverse-Engineering the Metadata
Semarchy xDM Integrator moves and transforms data between datastores. These datastores are database tables, flat files, XML structures, web services, etc. The connection information to these datastores must be declared in Semarchy xDM Integrator, and their structure (the metadata) can be automatically reverse-engineered. The reverse-engineering process creates a definition of the datastores' structures in Semarchy xDM Integrator. Data flows are created at design-time using this metadata. Run-time execution will use the connection information to perform the extract-load and transform operations between the source and target systems.
Before starting the mappings, you must define the metadata for all your datastores involved in the mappings.
Defining metadata is explained for each type of datastore (RDBMS, file, XML, etc.) in the Working with Metadata chapter in the Semarchy xDM Integrator Developer’s Guide.
Make sure to define an Oracle or PostgreSQL metadata and data schemas pointing to:
-
the staging area schema.
-
the Semarchy xDM data location database schema.
-
This data schema should use the staging area schema as its Work Schema and Reject Schema.
-
For this schema, you should reverse engineer the tables starting with
SA_(for basic entities),SD_(for fuzzy-matching and ID-matching entities), andGD_for all entities.
-
-
the Semarchy xDM repository database schema
Loading Data into the Hub
Loading data using Semarchy xDM Integrator uses Mappings. A mapping is a flow which extracts data from source datastores, transforms and loads this data into target datastores. A mapping uses declarative rules defining the relations (joins) between the source datastores, the filters to apply to the source data and the column mappings (transformations) between source and target columns, in the context of the data flow.
| This section explains how to create a single mapping. You must create one mapping for each table that you wish to load in a data flow. Once you have prepared the mappings for a set of tables to load together, you can move to the Assembling the Publishing Process section. |
Creating a Mapping
This section gives a generic process for creating mappings targeting SD and SA table, to publish data into the data location.
| This process should be adapted to the type of the source datastore from which you extract your data. |
When creating a mapping, the first step is adding the source(s) and target(s).
-
Select the Mapping folder in your project.
-
Click the
 Create New Mapping button in the Project Explorer toolbar. The New Map Diagram wizard opens.
 -
Make sure that the Mapping folder is selected as the parent folder.
-
Profile a File Name and then click Finish. The mapping editor opens.
-
In the Project Explorer, expand the Metadata folder, data server and schema to locate the
SD_orSA_table that you want to load. For example,SD_CUSTOMER. -
Drag and drop this table from the project explorer to the mapping editor. This table will be the target of the mapping.
-
In the project explorer, expand the Metadata folder, data server and schema to locate the datastore(s) containing the source data.
-
Drag and drop these datastores from the project explorer into the mapping editor. These will be the source(s) of the mapping. When you have multiple source datastores you may have to join them. See the Working with Mappings chapter in the Semarchy xDM Integrator Developer’s Guide for more information.
Defining the Column Mappings
After adding the source and target datastores, it is possible to define the column mappings. Column Mappings are expressions used to load the target datastore’s columns. We use three main types of column mappings:
-
Mappings using the source datastores' values,
-
Mappings using literals (constant values),
-
Mappings using variables that are set at execution time.
This section does not detail the process for mapping columns, but explains the mappings required when loading a data locations' SD_ or SA_ tables. Refer to the Working with Mappings chapter in the Semarchy xDM Integrator Developer’s Guide for more information about column mapping creation and options.
|
Mapping Business Data Columns
Map the target columns expecting business data with source datastores' columns, literal or variables according to your data flow requirements.
Columns representing attributes set only by the Semarchy xDM certification process should not be loaded.
Mapping B_CLASSNAME and B_PUBID
The following Semarchy xDM system columns must be loaded as indicated:
-
B_CLASSNAMEmust be mapped to a literal value or a column containing the name of the entity that you want to load. For example,'Customer'. -
For fuzzy and ID Matched entities,
B_PUBIDmust be mapped to a literal value or a column containing the code of the publisher on behalf of which you publish data.
If using a literal, a mapping’s execution location should be set to  Target. Target.
|
Mapping B_LOADID
B_LOADID must be loaded with the Load ID, which is typically handled in a variable. The process to use this variable is given below.
To map the Load ID:
-
In the Project Explorer, expand the global > templates.semarchy > Semarchy xDM > Global Variables.variable > Semarchy Variables node.
-
Select the SEM_LOAD_ID variable from this node. Drag and drop this variable in the mapping diagram. The variable is added as a variable element in the diagram.
-
Select the SEM_LOAD_ID element in the diagram, drag and drop it on the B_LOADID column in the target table. This column’s mapping is set to:
%{SEM_LOAD_ID}%. This expression returns the value of the SEM_LOAD_ID variable.
| The SEM_LOAD_ID variable will be set in the process that will execute this mapping. |
Mapping the ID Column
The ID column to load depends on the type of entity:
-
Basic Entity: It is the column representing the primary key attribute for the entity.
-
ID Matched Entity: It is the column representing the primary key attribute for the entity.
-
Fuzzy Matched Entity: If the entity uses Fuzzy Matching, then you must load into the
B_SOURCEIDcolumn the value of the primary key coming from the source system. If this primary key is a composite key, then you must concatenate the values of the composite primary key and load them in theB_SOURCEIDcolumn.
A typical ID mapping had its execution location set to  Source. Source.
|
Mapping References Columns
When loading data for entities that are related by a reference relationship, you must load the referencing entity with the value of the referenced primary key. The columns to load (F_, FS_ and FP_ columns) depend on the Entity Type of the referenced entity.
Refer to the Load Data section in the Semarchy xDM Integration Guide for detailed information about how to load these columns.
Configuring the Mapping
Selecting the Template
In Semarchy xDM Integrator, the integration behavior is configured by parameterizing the process template that was automatically added for the technologies involved in the mapping.
To select the Semarchy xDM template:
-
In the mapping editor, click the INT icon
 in the upper-right corner target datastore box.
This graphical artifact represents the process template used for writing (integrating) data into the target table. Similarly, the LOAD icon represents the load template used for extracting (loading) data from the source datastore. -
In the Properties view, in the Standard tab, you can configure how data integration to the target table takes place.
Select the Semarchy xDM template and leave the template options to their default values.
Configuring the Template
This template supports two options:
-
Use Distinct (Default to False): Use this option to force a
DISTINCTclause when integrating records to the target. -
Skip Unchanged Records (Default True): Use this option to enable the comparison between the incoming flow and the existing master records in order to avoid integrating records that have not been changed.
With the Skip Unchanged Records option, the template compares the incoming data flow with the hub content (that is, the corresponding MI_ table for a fuzzy or ID matched entity and the GD_ table for a basic entity), and integrates only the data new or updated since the last run.
The following columns are not taken into account for the comparison:
-
Built-in Semarchy xDM columns (`B_xxx`columns),
-
Columns from the update key,
-
Unmapped columns,
-
Columns tagged with an
IGNOREtag. Binary Objects (LOB, CLOB) must be flagged asIGNOREas they cannot be used in the comparison.
To tag columns with an IGNORE tag:
-
Select the target column to flag.
-
In the Properties view, in the Tags field, enter
IGNOREand then click the "+" button.
TheIGNOREtag is added to this column, as in the example below: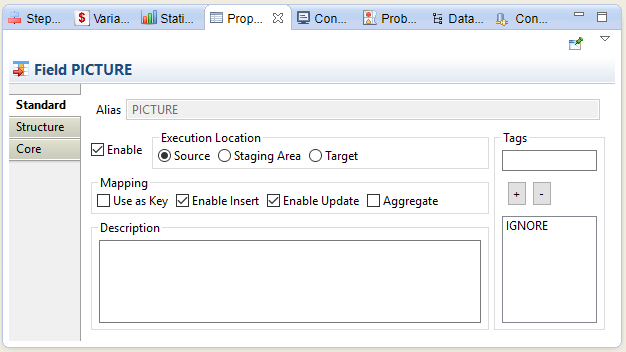
Setting the Update Key Columns
The Semarchy xDM template mandates a specific group of columns as the update key for the mapping.
The update key should include the following columns:
-
B_PUBIDfor a fuzzy or ID matched entity. -
B_SOURCEIDfor a fuzzy matched entity. -
The column representing the primary key attribute for an ID matched or basic entity.
To set the update key:
-
In the diagram, hold the CTRL key pressed and select the columns from the target datastore to use in the key.
-
Right-click and select the Use as Key option in the context menu.
These columns are marked with an key indicator.
| Make sure to only set the right columns for the key, and un-select the Use as Key option for any other target column. |
Assembling the Publishing Process
Data is published in the hub using a transaction named an external load. You implement the external load in Semarchy xDM Integrator as a Process. This process will create the external load, run the mappings designed in the previous chapter and then submit this external load to Semarchy xDM. The process will also manage issues and automatically cancel the external load in the event of an error.
Creating the Publishing Process
-
Select the Process folder in your project.
-
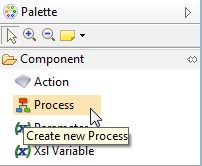
Click the
 Create New Process button in the Project Explorer toolbar. The New Process Diagram wizard opens.
 -
Make sure that the Process folder is selected as the parent folder.
-
Enter a File Name and then click Finish. The process editor opens.
Initializing the External Load
The first step of the external load process is the Initialization. This step requests a Load ID from the Semarchy xDM Repository using a PL/SQL function call and stores it into the SEM_LOAD_ID variable that you used in the mappings.
-
In the Project Explorer, expand the global > template.semarchy > Semarchy xDM node.
-
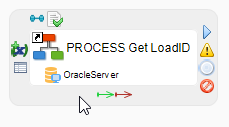
Drag and drop the Get LoadID process from the project explorer to the process editor.
This process must be configured with the connection information to the Repository and with information about the data location. -
Expand the Metadata node in your project, and then the metadata node corresponding to the repository database.
-
From the Project Explorer, drag and drop the data server from this metadata to the Get LoadID process reference in the process editor. This metadata link to the data server appears in the process reference as shown below.
-
Select the metadata link and then click on it again to make it editable.
-
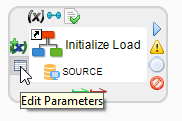
Rename it to
SOURCEand then press ENTER.

The Get LoadID process assumes that the repository data server is provided as a metadata link namedSOURCE. By adding this metadata link to the data server containing the repository and renaming it accordingly, you allow this process to use the data server configuration previously defined. -
Select the Get LoadID process reference in the process diagram.
-
In the Properties view, select the Standard tab.
-
In the Name, enter Initialize Load. The Get LoadID step in the diagram is renamed to Initialize Load.
-
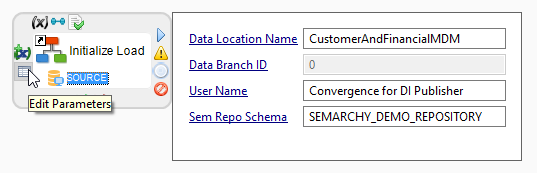
Click the Data Location Name link to unlock the field and then enter the name of the data location. This parameter of the process is the name of the data location hosting the Semarchy xDM data edition into which the publishing process takes place.
-
Click the User Name link to unlock the field and then enter a name identifying the load. For example,
xDM Integrator Publisher. This name is used to initialize the load and manage it afterward. -
Click the Sem Repo Schema link to unlock the field and then enter the name of the database schema hosting the repository in the database. For example,
SEMARCHY_DEMO_REPOSITORY. This value identifies the repository schema in the data server referred to as SOURCE.
-
-
Click the edit parameters icon to expand the content of the Initialize Load step and view all its parameters.
Loading Data
The second step of the external load process is the data load. For this step, the mappings created previously are directly re-used.
-
In the Publish Data to MDM process editor, in the Palette that appears on the right-hand side, select the Process tool in the Component accordion.
-
Click on the Publish Data to MDM process editor background. A new sub-process appears, and you can edit its name.
-
Enter a name for this subprocess (for example, Load All Data) and then press ENTER.

-
Double-click the sub-process. A new blank editor named after the sub-process opens to edit it.
-
In the Project Explorer Expand the Mapping node of your project.
-
Press the SHIFT key and select the mappings that you want to run as part of this external load. Drag and drop the selection into the sub-process editor.
The mappings are added to the process. -
Press CTRL+S to save the process.
-
Use the editor breadcrumb to return to the parent process.

Submitting the Load
After loading the data using the mappings, the external load must be submitted to Semarchy xDM. This step submits the Load using a PL/SQL function call to the Repository.
-
From the Project Explorer, drag and drop the global > template.semarchy > Semarchy xDM > Submit Load process into the process editor.
-
Expand the Metadata node in your project, and then the metadata node corresponding to the repository database.
-
From the Project Explorer, drag and drop the data server from this metadata to the Submit Load process reference in the process editor. This metadata link to the data server appears in the process reference as shown below.
-
Select the metadata link and then click on it again to make it editable.
-
Rename it to
SOURCEand then press ENTER. -
Select the Submit Load process reference in the process diagram.
-
In the Properties view, select the Standard tab.
-
In the Name, enter Submit Load. The step in the diagram is renamed to Submit Load.
-
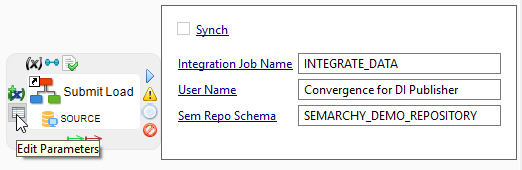
Click the Integration Job Name link to unlock the field and then enter the name of the Semarchy xDM integration job that must be started when the external load is submitted.
-
Click the User Name link to unlock the field and then enter the same user name that you provided when configuring the Get LoadID process.
-
Click the Sem Repo Schema link to unlock the field and then enter the name of the database schema hosting the repository in the database. For example,
SEMARCHY_DEMO_REPOSITORY.
-
-
Click the edit parameters icon to expand the content of the Submit Load step and view all its parameters.
-
Press CTRL+S to save the process.
Canceling the Load
In the event of an error while loading the data, the external load should be canceled. Canceling the load is also performed using a PL/SQL function call to the Repository.
-
From the Project Explorer, drag and drop the global > template.semarchy > Semarchy xDM > Cancel Load process into the process editor.
-
Expand the Metadata node in your project, and then the metadata node corresponding to the repository database.
-
From the Project Explorer, drag and drop the data server from this metadata to the Cancel Load process reference in the process editor. This metadata link to the data server appears in the process reference.
-
Select the metadata link and then click on it again to make it editable.
-
Rename it to
SOURCEand then press ENTER. -
Select the Cancel Load process reference in the process diagram.
-
In the Properties view, select the Standard tab.
-
In the Name, enter Cancel Load. The step in the diagram is renamed to Cancel Load.
-
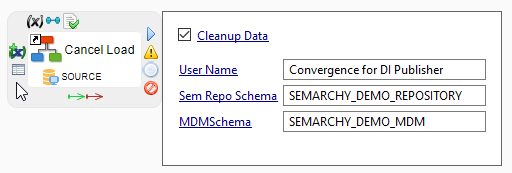
Click the Cleanup Data link to unlock the field and then select this option. This parameter forces this process to clean up the data loaded in the Load All Data step.
-
Click the User Name link to unlock the field and then enter the same user name that you provided when configuring the Get LoadID process.
-
Click the Sem Repo Schema link to unlock the field and then enter the name of the database schema hosting the repository in the database. For example,
SEMARCHY_DEMO_REPOSITORY. -
Click the MDM Schema link to unlock the field and then enter the name of the data location schema. For example,
SEMARCHY_DEMO_MDM. This value identifies the schema in the data server containing the data location.
-
-
Click the edit parameters icon to expand the content of the Cancel Load step and view all its parameters.
-
Press CTRL+S to save the process.
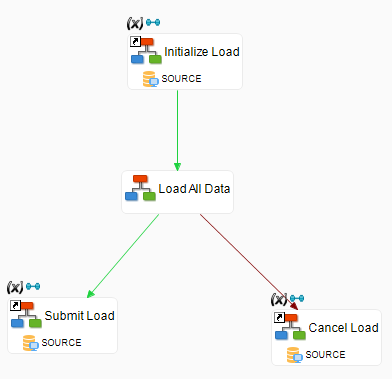
Designing the Publishing Process Flow
All the steps of the process are now created. It is time to link them together.
Creating the Publishing Process
-
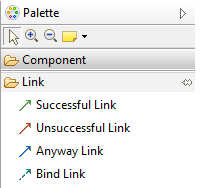
In the Publish Data to MDM process editor, in the Palette that appears on the right hand, select the Successful Link tool in the Link accordion.
-
Click and drag from the process that initialized the load ID (for example: Initialize Load) to the process that runs all the mappings (for example, Load All Data). A green arrow appears between these two steps.
-
Repeat the two previous steps to create a link from the mappings process (Load All Data) to the process that submits the data (SubmitLoad).
-
In the Palette, select the Unsuccessful Link tool.
-
Create a link from the mappings process (Load All Data) to the process that cancels the load (Cancel Load). This link will be followed if the Load All Data step fails, and appears in red.
-
Press CTRL+S to save the Publish Data to MDM process.
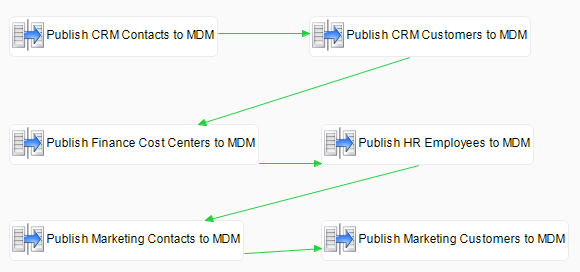
Editing the Load All Data Sub-Process
-
Double-click the mapping (Load All Data) sub-process to open it.
-
Use the Successful Link tool in the palette to link the steps of this sub-process. Note that these mappings target tables with no referential constraints implemented in the database. They can be executed in any order in the sub-process. The sub-process appears as shown below:
-
Press CTRL+S to save the overall process.
Running the Publishing Process
Starting the Runtime Engine
Processes are executed by the Runtime Engine component. This component must be started before running the process.
-
Select the Runtime view.
-
In the Runtime view, click the Environment button. The Environment dialog opens.
-
Click the Start Local Runtime button. On Windows, a Runtime Engine is started on your local machine in a command line window. On Linux, it starts as a background process.
-
Click OK to close the Environment dialog.
-
Select the Connect option. This option opens a communication channel between the xDM Integrator Designer and the Runtime Engine.
-
Select the Refresh Diagram option. This option refreshes the process diagram automatically while the process runs in the Runtime Engine and reflects the execution in real time.
The runtime dialog indicates that the runtime is Connected.
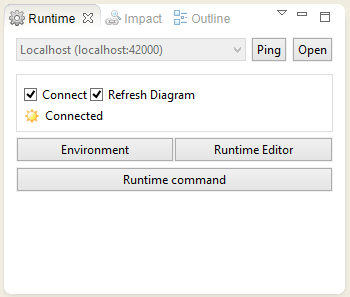
| The runtime engine starts on the port 42000. Make sure that no other process uses this same port. |
| For this tutorial, a local runtime is used and processes are started manually. In production environments, the runtime engine is deployed on a server and is able to serve execution requests remotely or run processes on a schedule. |
Testing the Process
Now that the Runtime Engine is running, we can test the process.
-
Select the background of the process diagram.
-
Right-click and select Execute.
-
The process is first built and then starts. You can see the steps running. When a step runs, it appears in green. A completed step appears in blue.
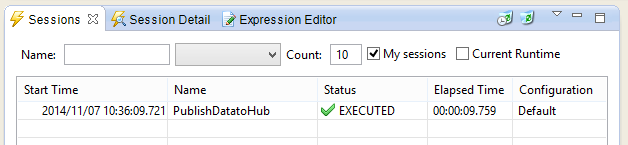
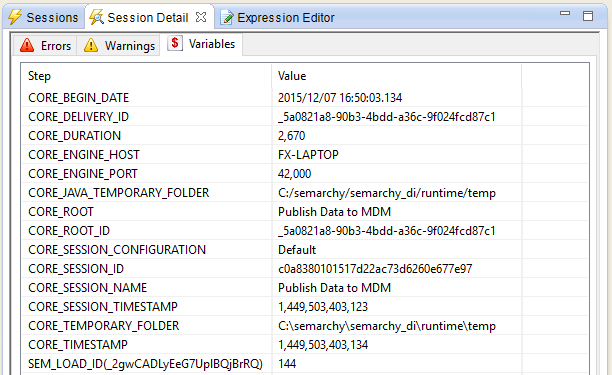
Drilling Down into the Session
It is possible to drill down into the details of this session.
-
In the Sessions view, select the latest session.
-
Select the Session Details view. This view displays the session’s information errors, warnings and the variables used in this session. The External Load ID (
SEM_LOAD_IDvariable) is displayed in this view.
-
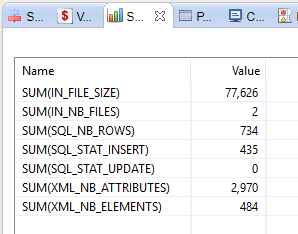
In the Publish Data to MDM process diagram, click the mappings sub-process step (Load All Data).
-
Select the Statistics view. This view shows the statistics of the selected process step. It shows the number of rows inserted, etc.
-
Double-click the mappings sub-process step (Load All Data), the sub-process opens and shows the executed mappings.
-
Click one of the mappings. The statistics show the number of lines inserted by the mapping:
SUM(SQL_STAT_INSERT).
Consuming Data from the Hub
Consuming data from the hub is performed through mappings using source tables from the hub. These tables contain the golden and master data.
A mapping to consume data from the hub does not differ from a regular Semarchy xDM Integrator mapping. Refer to the Consuming Data Using SQL chapter in the Semarchy xDM Integration Guide.
Going Further with Semarchy xDM
You have learned how to use Semarchy xDM Integrator in conjunction with Semarchy xDM for a typical project. Semarchy xDM Integrator also allows you to leverage the master data certified with Semarchy xDM in a variety of data integration projects, including data warehousing, data migration, application integration and B2B data exchange.
Go further with Semarchy xDM Integrator, you can read with the Semarchy xDM Integrator Developer’s Guide. To have a better understanding of the integration (publishing and consuming) mechanisms involved in Semarchy xDM, read the Semarchy xDM Integration Guide.