Welcome to Semarchy xDM Integrator.
This document is intended for users interested in installing and configuring the Semarchy xDM Integrator components.
Preface
Audience
Document Conventions
This document uses the following formatting conventions:
| Convention | Meaning |
|---|---|
boldface |
Boldface type indicates graphical user interface elements associated with an action, or a product specific term or concept. |
italic |
Italic type indicates special emphasis or placeholder variable that you need to provide. |
|
Monospace type indicates code example, text or commands that you enter. |
Other Semarchy Resources
In addition to the product manuals, Semarchy provides other resources available on its web site: http://www.semarchy.com.
Obtaining Help
There are many ways to access the Semarchy Technical Support. You can call or email our global Technical Support Center (support@semarchy.com). For more information, see http://www.semarchy.com.
Feedback
We welcome your comments and suggestions on the quality and usefulness
of this documentation.
If you find any error or have any suggestion for improvement, please
mail support@semarchy.com and indicate the title of the documentation
along with the chapter, section, and page number, if available. Please
let us know if you want a reply.
Overview
Using this guide, you will:
-
Discover the technical architecture of Semarchy xDM Integrator
-
Learn how to install the components of Semarchy xDM Integrator
-
Have a reference of the runtime parameters and commands
This guide contains information about using the product to manage installation and configuration tasks, such as:
-
Installing, deploying and configuring Semarchy xDM Integrator Analytics components
-
Upgrading existing environments
Semarchy xDM Integrator Architecture
Architecture Overview
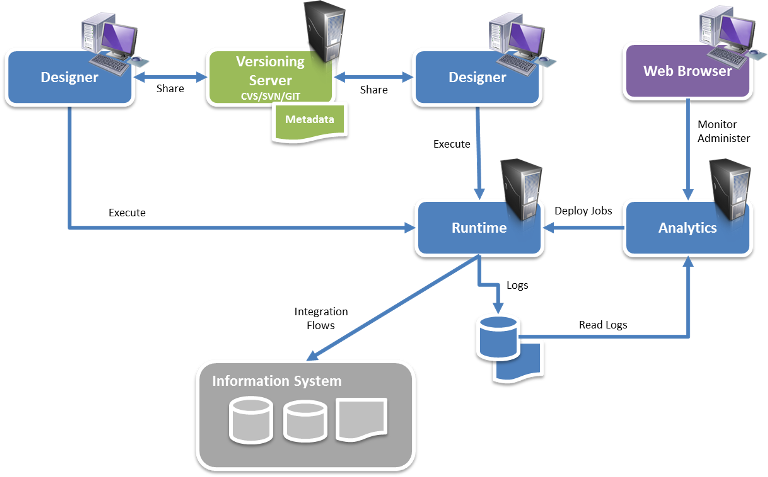
Semarchy xDM Integrator is composed of three components:
-
The Designer: This component is a thick client used for configuring and developing data integration flows.
-
The Runtime Engines (also called Runtimes): This component executes the data integration flows.
-
Analytics: This component enables deploying, configuring and monitoring data integration flows through a web interface.
The Runtime Engine
Overview
A runtime is a Java component in charge of executing the data integration flows. It handles the execution reports (session logs), as well as the schedules and saves them in a database.
Runtime Engine Services
The runtime exposes different services:
-
An RMI Service: this service enables Java applications (for example, the Designer or Analytics) to communicate with the runtime. Its default port is 42000.
-
A Database used as the default storage of log sessions and schedules. Its default ports are 42100 and 42101.
-
A Scheduler service
-
A Web Services API (REST or SOAP) available to start the execution of a delivery from a remote location. Its default port is 42200.
Runtime Engine Ports
The runtime may open several ports on startup:
-
The RMI port, by default 42000
-
The SOAP and REST port, by default 42200
-
The Database port for JDBC access, by default 42100
-
The Database HTTP port, by default 42101
Depending on the configuration and the runtime engine usage, these ports should be accessible from the network, and the network should be configured accordingly. Changing the default value for these ports is explained later in this document.
Configuring the Runtime
By default, the runtime stores session logs and schedules in an embedded H2 database.
The various parameters of the runtime are stored in files in the properties sub-folder:
-
properties\engineParameters.xmlcontains the location of all other runtime parameters (see below). -
properties\engineScheduler.propertiesdefines the location where schedules are saved. This file is optional.
The engineParameters.xml file refers to other configuration files, including:
-
properties\engineParameters.xml -
properties\engines\commonParameters.xml -
properties\engines\engineParameters42000.xml -
properties\logs\logH2.xml
When modifying these files, the runtime must be restarted. The parameters available in these files are described later in this document.
Configuring Debug Logs
The runtime also stores debug logs in the log folder. Logging uses Apache Log4J and is configured via the log4j.xml file. By default, the debug log files are rotating, which means that the log folder cannot exceed a certain size.
Debug Logs configuration may be changed by the administrator, or when Semarchy support requests it.
Semarchy xDM Integrator Analytics
The Semarchy xDM Integrator Analytics component runs in an Application Server such as Apache Tomcat.
It is used to:
-
Deploy and schedule deliveries
-
Consolidate the session logs from several runtime engines.
-
Manage the runtime engines
Semarchy xDM Integrator Analytics is provided as a WAR file to deploy in the application server.
| For more information about installing and configuring Semarchy xDM Integrator Analytics refer to this product’s documentation. |
System Requirements
Before installing Semarchy xDM Integrator, you should read the system requirements and certification documents to ensure that your environment meets the minimum installation requirements.
Designer
The designer has the following requirements:
-
Operating System:
-
Windows XP, Vista, 2008, 7, 8 or 10 (32-bits and 64-bits)
-
Linux (32-bits and 64-bits)
-
Mac OS X (64-bits)
-
-
1GB+ of RAM
-
300Mb available disk space.
-
A JDK (Java Development Kit) 1.6.07 or above.
Runtime Engine
The runtime engine has the following requirements:
-
A JDK (Java Development Kit) 1.6.07 or above.
-
80Mb available disk space.
| CPU and memory requirements depend on the data integration flows that are executed by the engine. |
| If using a JRE (Java Runtime Environment) instead of a JDK, advanced features such as Web Services generation will not be available. It is recommended to use the most recent Java Development Kit version. |
Semarchy xDM Integrator Analytics
Semarchy xDM Integrator Analytics has the following requirements:
-
A JEE Web Application Server such as Tomcat (7+) or JBoss (6+) is installed and configured.
-
A Java Virtual Machine or Java Development Kit version 1.7 and above, supported by the Application Server is installed.
-
A folder is available on the server to store parameters and data for Semarchy xDM Integrator Analytics.
| For more information about installing and configuring Semarchy xDM Integrator Analytics refer to this product’s documentation. |
Installation
Installing the Designer
In the following section:
-
semarchy-di-designer.zipfile refers to the Semarchy xDM Integrator- Full Setup file that you can download to install Semarchy xDM Integrator. The name of this file varies as it includes the platform information, product version, and build number. -
<semarchy_di>refers to the installation folder of Semarchy xDM Integrator.
To install the Designer:
-
Download the Semarchy xDM Integrator distribution (
semarchy-di-designer.zip) corresponding to your platform and to your default Java Machine (32 vs. 64 Bits). -
Uncompress the
semarchy-di-designer.zipfile in your machine. This will create asemarchy_disub-folder. This sub-folder will be referred to as<semarchy_di>(the Semarchy xDM Integrator installation directory). -
Start the Designer:
-
On Windows platforms:
-
Open Windows Explorer, and go to the
<semarchy_di>folder. -
Run
semarchy.exe. The Designer starts.
-
-
On UNIX/Linux platforms:
-
Open a shell window, and go to the
<semarchy_di>folder. -
Run
./semarchy. The Designer starts. -
In a shell window, go to the
<semarchy_di>/runtimefolder and runchmod 755 *.shto make the runtime scripts executable.
-
-
-
When the Designer starts, it prompts you for the license key.
-
In the Please validate your product dialog, enter in the Key the key string that was provided to you by Semarchy.
-
Click the Apply button.
-
After registering the license key, you must create the folder into which the Designer will store its data. This folder in your local machine is the Workspace. xDM Integrator Designer prompts creates by default a
workspacefolder in its installation directory.
To install it in a different location:-
In the Workspace Launcher window, click the Browse button.
-
In the Select Workspace Directory dialog, select the folder into which the workspace will be created.
-
Click OK to create the workspace and open it. The Semarchy xDM Integrator Designer window opens on the Introduction page. This page provides access Overview and Web Resource pages.
-
-
Click the Workbench link
 to open the newly created workbench.
Directories Contents
The <semarchy_di> directory contains the following sub-folders:
-
/samplescontains the files for running this getting started tutorial and other samples. -
/workspacecontains the workspace that you have created. Note that you can have several workspaces for a single installation. You can locate these workspaces anywhere in your file system. -
/templatescontains the templates provided out of the box with Semarchy xDM Integrator. -
/runtimecontains the Semarchy xDM Integrator runtime engine binary and startup scripts. -
/pluginsandconfigurationcontain the binaries and configuration files for the Designer.
Installing the Runtime Engine
The Runtime Engine is not shipped as a standalone installer or package. It is deployed the first time you start a Designer in the /runtime sub-folder. You must first install and start a designer in order to deploy runtime engines on your servers.
|
Before you begin the installation:
-
Install a supported version of the JDK (Java Development Kit)
-
Create or set the
STAMBIA_JAVA_HOMEenvironment variable to the folder located above thebinfolder of your JDK
Installing the Runtime Engine on Linux/UNIX
To install the runtime engine:
-
Transfer the
runtimedirectory from a Semarchy xDM Integrator Designer installation to the target folder. -
Grant execution permissions for the SH files in the target
runtimefolder. -
Grant write permission in the
temp,buildandsessionssub-directories. -
Create and set a
STAMBIA_HOMEenvironment variable pointing to theruntimefolder. -
Configure the engine by editing its configuration files (
engineParameters.xmlandengineScheduler.properties), as explained in the following sections. -
Start the engine using the
./startengine.shcommand from theruntimefolder.
Installing the Runtime on Windows
To install the runtime engine on Windows:
-
Transfer the
runtimedirectory from a Semarchy xDM Integrator Designer installation to the target folder. -
If required, edit the engine configuration, as explained in the following sections.
-
Start the engine using the
startengine.batcommand from theruntimefolder.
To configure the runtime engine as a windows service, use the following scripts available in the runtime directory:
-
installEngineAsService.bat –i [<service name>]installs the runtime as a service. -
installEngineAsService.bat –r [<service name>]removes the service
Specify a <service name> to install multiple runtime services on the same machine. If not set, a default service name is used.
|
Semarchy support services may request that you modify the service configuration using the external\stambiaService\conf\stambiaEngine.conf file. You do not need to edit this file for a standard configuration.
Any parameter change in the properties sub-folder requires that you remove and reinstall the Windows service to take these changes into account.
|
| The user used to start the Runtime Engine as a Windows service should be changed to a user with network abilities, usually a domain user. |
Installing and Configuring Additional Drivers
To connect or use database technologies with their own drivers, you must add these drivers to your xDM Integrator installation for each machine running a Runtime Engine or Designer.
To install and configure an additional driver:
-
Copy the driver file (.jar) into the
runtime/lib/jdbc/folder. -
Stop and restart the Runtime Engine or/and the Designer. The runtime automatically takes into account the new driver from that folder.
-
For the Designer, you must declare the driver into the workspace.
-
Open the Designer and connect to your workspace.
-
Select Window > Preferences
-
In the preferences, select SQL Explorer > JDBC Drivers.
-
Click the Add button.
-
In the Name field, enter the name of your driver.
-
In the Example URL field, enter an example URL for this driver.
-
Select the Extra Class Path tab and then click the Add JARs… button.
-
Browse and select the JAR File(s) required for your driver. They should be located in the
runtime/lib/jdbc/sub-folder of your xDM Integrator installation. -
Click List Drivers and then select your driver class name in the Driver Class Name field.
-
Click OK to create the new driver.
-
Click OK to close the preferences.
-
Configuring the Engine
Configuration Artifacts
Two environment variables are used by the runtime engine and may have to be set specifically for your configuration:
-
STAMBIA_JAVA_HOME: Path to the JVM used by the runtime. -
STAMBIA_PROPERTIES_LOCATION: Path to thepropertiesfolder, which contains the engine parameters file.
In order to facilitate future upgrades of the runtime engine, it is recommended to copy the properties sub-directory to another location and to set the STAMBIA_PROPERTIES_LOCATION environment variable to points to this new location. With such a configuration, an entire replacement of the runtime folder for an upgrade will not erase the configuration.
|
Most of the Runtime’s configuration is done in the properties/engineParameters.xml file
This file allows to manage:
-
The engine parameters (such as started services, listening ports, …)
-
The security of the Runtime (hostname and user/password restriction, roles)
-
The repositories where the deliveries are stored
-
The Java additional options to add at Runtime’s startup
-
The log database configuration
Services Startup
It is possible to select the services (Scheduler, SOAP, Embedded H2 Database) started with the runtime engine in the engineParameter.xml file, as shown in the example below.
<parameters>
        <...>
        <engineParameters>
                <...>
                <parameter name="launchSchedulerEngine" value="true"/>
                <parameter name="launchExecutionEngine" value="true"/>
                <parameter name="launchReportEngine" value="true"/>
                <parameter name="startInternalDb" value="true"/>
                <parameter name="startSoapServer" value="true"/>
                <...>
        </engineParameters>
        <...>
</parameters>
The following table describes the services which can be started.
| Parameter | Description |
|---|---|
|
Start the Embedded H2 Database |
|
Start SOAP Service |
|
Start the Scheduler |
|
Start the Execution Engine |
|
Start the Reporting |
| A standard runtime engine should at least start the Execution Engine and the Reporting. |
Listening Ports
Similarly, in the engineParamters.xml, You can configure the listening ports of the various services (RMI, SOAP, etc).
<parameters>
        <...>
        <engineParameters>
                <...>
                <parameter name="rmiPort" value="42000"/>
                <!--<parameter name="rmiCallbackPort" value="42000"/>-->
                <parameter name="internalDbTcpPort" value="42100"/>
                <parameter name="internalDbWebPort" value="42101"/>
                <parameter name="soapServerPort" value="42200"/>
                <...>
        </engineParameters>
        <...>
</parameters>
It is recommended when changing the ports to copy the file and name the copy with the number of the RMI port. For example: engineParameters5500.xml
|
Log Storage Database
The engine stores the sessions execution information in a log database.
This database is by default an internal H2 database, shipped with the Runtime and started with it.
This offers an environment that you can use immediately. We recommend changing this configuration to use a more robust database such as Oracle, Microsoft SQL Server (MSSQL), etc for production purposes. You will need to provide to the runtime a user having read and write permissions on the chosen database/schema.
To change the log database:
-
Edit the
engineParameters.xmlfile, and add thelogelement the database configuration. -
Restart the Designer. When starting, the Designer creates the necessary log tables in the configured database storage.
The following example shows the default built-in H2 database configuration.
<parameters>
        <...>
        <logs>
                <log userLogName="logDatabase" autoUpdate="true" userLogClass="com.indy.engine.userLog.RdbmsUserLog">
                        <parameter name="userLogRdbmsDriver" value="org.h2.Driver"/>
                        <parameter name="userLogRdbmsUrl" value="jdbc:h2:tcp://localhost:42100/sessions/internalDb/sessionLogs"/>
                        <parameter name="userLogRdbmsUser" value="sa"/>
                        <parameter name="userLogRdbmsPassword" value=""/>
                        <!--<parameter name="userLogRdbmsEncryptedPassword" value=""/>-->
                        <parameter name="userLogRdbmsVarcharType" value="varchar"/>
                        <parameter name="userLogRdbmsVarcharMaxSize" value="1000"/>
                        <parameter name="userLogRdbmsNumericType" value="numeric"/>
                        <parameter name="userLogRdbmsClobType" value="clob"/>
                        <parameter name="userLogRdbmsBlobType" value="blob"/>
                        <parameter name="userLogRdbmsSchemaName" value="logs"/>
                        <parameter name="userLogRdbmsUseSchemaNameForIndexCreation" value="true"/>
                        <parameter name="userLogRdbmsDeleteSyntaxe" value="Delete from"/>
                        <!--<parameter name="userLogRdbmsTablePrefix" value="STB_LOG_"/>-->
                        <!-- bestCompression / bestSpeed / default-->
                        <parameter name="userLogRdbmsCompressedLevel" value="bestCompression"/>
                        <!-- text / binary / compressed-->
                        <parameter name="userLogRdbmsDeliveryFormat" value="compressed"/>
                        <parameter name="userLogRdbmsPropertyMaxVarcharSize" value="1000"/>
                        <!-- -1 : infinite -->
                        <parameter name="userLogRdbmsPropertyMaxClobSize" value="10000"/>
                        <!-- binary / compressed-->
                        <parameter name="userLogRdbmsPropertyBinaryFormat" value="compressed"/>
                        <parameter name="userLogRdbmsTimestampQuery" value="select now()"/>
                        <parameter name="userLogRdbmsInactivityDetectionPeriod" value="90000"/>
                        <parameter name="userLogRdbmsActivityRefreshInterval" value="60000"/>
                        <parameter name="userLogRdbmsDeletionWithNotExists" value="true"/>
                        <!--<parameter name="userLogRdbmsIndexCreationOption" value=""/>-->
                        <!--<parameter name="userLogRdbmsTableCreationOption" value=""/>-->
                </log>
        </logs>
        <...>
</parameters>
The example below is a connection to an Oracle database.
<parameters>
        <...>
        <logs>
                <log userLogName="logDatabase" autoUpdate="true" userLogClass="com.indy.engine.userLog.RdbmsUserLog">
                        <parameter name="userLogRdbmsDriver" value="oracle.jdbc.driver.OracleDriver"/>
                        <parameter name="userLogRdbmsUrl" value="jdbc:oracle:thin:@[host]:[port]:[sid]"/>
                        <parameter name="userLogRdbmsUser" value="[USER]"/>
                        <parameter name="userLogRdbmsPassword" value="[PASSWORD]"/>
                        <parameter name="userLogRdbmsSchemaName" value="[SCHEMA_NAME]"/>
                        <parameter name="userLogRdbmsVarcharType" value="varchar2"/>
                        <parameter name="userLogRdbmsVarcharMaxSize" value="4000"/>
                        <parameter name="userLogRdbmsClobType" value="clob"/>
                        <parameter name="userLogRdbmsBlobType" value="blob"/>
                        <parameter name="userLogRdbmsNumericType" value="number"/>
                        <parameter name="userLogRdbmsDeleteSyntaxe" value="Delete from"/>
                        <parameter name="userLogRdbmsDeliveryFormat" value="text"/>
                        <parameter name="userLogRdbmsPropertyMaxVarcharSize" value="1000"/>
                        <parameter name="userLogRdbmsPropertyMaxClobSize" value="10000"/>
                        <parameter name="userLogRdbmsPropertyBinaryFormat" value="compressed"/>
                </log>
        </logs>
        <...>
</parameters>
In the example above, you can modify the following parameters to connect to your own Oracle database and schema:
-
userLogName
-
userLogRdbmsUrl
-
userLogRdbmsUser
-
userLogRdbmsPassword or userLogRdbmsEncryptedPassword
-
userLogSchemaName (if the schema to use is not the default one for the connected user)
Repositories
Repositories are the locations where the Runtime will look for the Delivery files at execution.
There are two types of repositories:
-
File Repositories: a location where .deliv files are stored in the file system.
-
HTTP Repositories: Used to retrieve deliveries via the HTTP protocol. the Runtime will connect to Semarchy xDM Integrator Analytics Deployment Managers in order to retrieve deliveries that are marked as Remotely Available.
Repositories are configured in the engineParameters.xml file.
<parameters>
<repositories>
        <fileRepository name="default" default="true" folder="build/deliveries/"/>
        <fileRepository name="webService" default="true" folder="build/deliveries/wsdl/" webService="true" synchPollingInterval="10000" scanMode="polling"/>
        <httpRepository name="PROD" default="false" url="http://localhost:8080/analytics" user="myuser" uncryptedPassword="mypassword" unreachableTolerancePeriod="30000"/>
</repositories>
</parameters>
Although is possible to define multiple repositories on a same runtime, only of them acts as the default one. The runtime seeks its deliveries by default in this repository. You can specify another repository when starting the delivery:
startdelivery.bat -name myDeliv -repository demo
File Repositories
Parameter |
Default Value |
Description |
name |
The name of the repository. This is the Repository name specified when starting a Delivery on a specific Repository. |
|
default |
false |
If set to true, the Runtime will by default try to get its deliveries from this repository. |
folder |
The folder containing the deliveries. |
|
webService |
false |
If set to true, the repository will be used for deliveries exposed as web service. |
scanMode |
polling |
Define the scan method used by the Runtime for synchronizing the content of the repository. This offers to automatically expose the web service deliveries that are manually added in the repository while the Runtime is running. scanMode value can be:
|
synchPollingInterval |
10000 |
The time interval in milliseconds to scan the repository for new deliveries. This applies only in polling scanMode. |
<parameters>
<repositories>
        <fileRepository name="defaultRepository" default="true" folder="build/deliveries"/>
        <fileRepository name="wsdlRepository" default="true" folder="build/deliveries/wsdl/" webService="true" synchPollingInterval="10000" scanmode="polling">
</repositories>
</parameters>
Http Repositories
Parameter |
Default value |
Description |
name |
The name of the repository (must match the name of the Deployment Manager in Analytics |
|
default |
false |
If set to true, the Runtime will by default try to get its deliveries from this repository. |
url |
URL of the Analytics application. |
|
user |
Login/Username of Analytics to use. |
|
password |
Encrypted password of the user. |
|
uncryptedPassword |
Unencrypted password of the user. |
|
unreachableTolerancePeriod |
Timeout in milliseconds to wait for the server when it’s unreachable. |
|
webService |
false |
If set to true, the repository will be used for deliveries exposed as web service. |
scanMode |
polling |
Define the scan method used by the Runtime for synchronizing the content of the repository. This offers to automatically expose the web service deliveries that are manually added in the repository while the Runtime is running. scanMode value can be:
|
synchPollingInterval |
10000 |
The time interval in milliseconds to scan the repository for new deliveries. This applies only in polling scanMode. |
Passwords are encrypted using the encrypt <password> command on the Runtime engine console (engine command line tool).
|
<parameters>
<repositories>
        <httpRepository name="PROD" default="false" url="http://localhost:8080/analytics" user="myuser" uncryptedPassword="mypassword" unreachableTolerancePeriod="30000"/>
</repositories>
</parameters>
Defining Java Additional Options
Java options are generally added to the Java command launching the Runtime with the -DmyOption01=value01 argument.
This part allows to set them directly in the Runtime’s Configuration file through the javaConfiguration node. The options specified inside will be loaded just after the Runtime’s start.
-
Edit the engineParameters.xml file
-
Set the additional options you want to add at Runtime’s startup, as shown in the example below.
<parameters>
        <...>
        <javaConfiguration>
                <property name="myOption01" value="value01"/>
                <property name="myOption02" value="value02"/>
                <...>
        </javaConfiguration>
        <...>
</parameters>
Securing the Runtime
An engine installed with the default configuration can be accessed by anyone.
Any user can connect and make operations on it, such as listing or executing sessions.
This behavior can be configured in the Runtime Properties (engineParmeters.xml), which offer the possibility to secure the connection through:
-
TLS secured RMI
-
User/Password system with roles (permissions)
-
Hostname / IP restriction
-
HTTPS for Web Service Endpoints
Simple security configurations are provided below
<parameters>
        <...>
        <engineParameters>
                <...>
                <parameter name="rmiEnableTls" value="true"/>
                <...>
        </engineParameters>
        <...>
</parameters><parameters>
<...>
<security>
<user anonymous="true" roles="Connect View"/>
<user name="admin" uncryptedPassword="admin" roles="Admin"/>
<user name="developer" uncryptedPassword="developer" roles="Connect View Execute"/>
<user name="consult" uncryptedPassword="consult" roles="Connect View"/>
<allow address="192.168.0.42"/>
</security>
<...>
</parameters>| The security node must contain at least one user, which can be a normal or anonymous user. |
<parameters>
        <...>
        <engineParameters>
                <...>
                <parameter name="webServiceSecureProtocol" value="TLSv1.1"/>
                <parameter name="webServiceKeyStoreFile" value="D:/keystore/mykeystore.jks"/>
                <parameter name="webServiceKeyStoreType" value="JKS"/>
                <parameter name="webServiceKeyStorePassword" value="password"/>
                <parameter name="webServiceKeyPassword" value="password"/>
                <...>
        </engineParameters>
        <...>
</parameters>
TLS enabled RMI
Set the following parameter to true if you the RMI connection to be secured through TLS.
The RMI connection is used for instance to connect to the Runtime from the Designer or Semarchy xDM Integrator.
<parameters>
        <...>
        <engineParameters>
                <...>
                <parameter name="rmiEnableTls" value="true"/>
                <...>
        </engineParameters>
        <...>
</parameters>
User/Password Restriction and Roles
You can define the users that can connect to the Runtime and their permissions.
The syntax is the following:
<parameters>
        <...>
        <security>
                <...>
                <user anonymous="true" roles="Connect View"/>
                <user name="user01"  password="encrypted password" uncryptedPassword="plain text password" roles="Connect View Execute"/>
                <user name="user02"  password="encrypted password" uncryptedPassword="plain text password" roles="Connect View Execute"/>
                <...>
        </security>
        <...>
</parameters>
The following parameters are available:
| Parameter | Description |
|---|---|
name |
User name, that will be used as the login credential |
password |
Encrypted password of the user |
uncryptedPassword |
Uncrypted (plain text) password of the user |
roles |
Space separated list of roles for the user |
The following roles are available:
| Role | Description |
|---|---|
Connect |
The user can connect to the Runtime (required) |
View |
The user can list and view all the sessions of the Runtime |
Execute |
The user can execute deliveries on the Runtime |
Admin |
The user has the full permissions on the Runtime. This is required for operations such as purging the sessions or scheduling deliveries. |
About the Anonymous User
An anonymous user can be set, to specify the permissions of the users that connect to the Runtime without specifying credentials.
<user anonymous="true" roles="Connect View"/>When the anonymous user is set, it is therefore not mandatory to specify credentials when connecting. The connected user will have the permissions of the anonymous user.
When the anonymous user is not set, specifying credentials when connecting is mandatory. Anonymous connections will then be rejected.
|
| The security node must contain at least one user, which can be a normal or anonymous user. |
Hostname / IP restriction
You can define the hostnames / IP addresses that are allowed to connect to the runtime.
The syntax is the following:
<parameters>
        <...>
        <security>
                <...>
                <allow address="Hostname or IP Address"/>
                <allow address="Another Hostname or another IP Address"/>
                <...>
        </security>
        <...>
</parameters>| The security node must also contain at least one user, which can be a normal or anonymous user. |
Enabling HTTPS on Web Services Endpoints
Deliveries published as Web Service can be accessed through the different Web Services Endpoints exposed by the Runtime. These endpoints can be accessed by default through HTTP using the URLs indicated on the console at Runtime’s startup. This default behavior can be modified easily in the Runtime configuration file to enable the use of HTTPS, as explained below.
The following sample shows how to configure HTTPS:
<parameters>
        <...>
        <engineParameters>
                <...>
                <parameter name="webServiceSecureProtocol" value="TLSv1.1"/>
                <parameter name="webServiceKeyStoreFile" value="D:/keystore/mykeystore.jks"/>
                <parameter name="webServiceKeyStoreType" value="JKS"/>
                <parameter name="webServiceKeyStorePassword" value="password"/>
                <parameter name="webServiceKeyPassword" value="password"/>
                <...>
        </engineParameters>
        <...>
</parameters>
The parameters are detailed in the following table
| Role | Description |
|---|---|
webServiceSecureProtocol |
Protocol to be used for securing the endpoints, like TLSv1.1 for instance. |
webServiceKeyStoreFile |
Path to the Java keystore containing the certificate to use for securing the endpoints. |
webServiceKeyStoreType |
Java keystore type, such as ‹JKS›. |
webServiceKeyStorePassword |
Password of the keystore file. |
webServiceKeyPassword |
Password of the certificate key. |
Schedules Storage
By default, the scheduler stores the schedules in an embedded database. It is possible to change this storage to another location.
When the org.quartz.jobStore.dataSource property is set to internal (which is the default value), the scheduler stores its schedules in the runtime embedded database.
To store schedules in a different database, you must first create a database schema and run in this schema the script to seed the storage structure. Scripts for the supported database technologies are available from the /scripts/scheduler/ sub-folder.
Then you must configure the /properties/engineScheduler.properties file to connect to this new storage, as shown in the example below for an Oracle Server.
org.quartz.jobStore.class=org.quartz.impl.jdbcjobstore.JobStoreTX
org.quartz.jobStore.driverDelegateClass=org.quartz.impl.jdbcjobstore.StdJDBCDelegate
org.quartz.jobStore.useProperties=false
# org.quartz.jobStore.dataSource=internal
org.quartz.jobStore.dataSource=database01
org.quartz.jobStore.tablePrefix=QRTZ_
org.quartz.jobStore.isClustered=false
#============================================================================
# Configure Datasources
#============================================================================
org.quartz.dataSource.database01.driver = oracle.jdbc.driver.OracleDriver
org.quartz.dataSource. database01.URL = jdbc:oracle:thin:@[host]:[port]:[sid]
org.quartz.dataSource.database01.user = oracle_user
org.quartz.dataSource.database01.password = oracle_password
org.quartz.dataSource.database01.maxConnections = 5
org.quartz.dataSource.database01.validationQuery=
Other Parameters
Folders Configuration
In the commonParameters.xml file, two folder parameters should be reviewed and modified as needed.
|
Location of the deliveries |
|
Runtime temporary folder |
Start an Engine with a Specific Configuration File
A runtime can start with a specific configuration file.
To specify this file, use the STAMBIA_CONF_FILE_LOCATION environment variable.
By default, the value configured in the file initvariable.sh|bat in the following line:
STAMBIA_CONF_FILE_LOCATION=$STAMBIA_PROPERTIES_LOCATION/engineParameters.xml
Automating Log Purge
You can configure an automatic purge of the runtime session logs.
This can be done in the Designer and in Analytics (in the Purge tab of the Runtime Editor) or from the command line.
To automate the log purge from the command line:
-
Run the
startcommand.sh(Linux/UNIX) orstartcommand.bat(Windows) script. -
Use the following command to schedule a log purge.
schedule  purge keep <number> <minute|hour|day|session>
			cron <cronExpression>
			[sessionname <name,name2,...>]
			[status <done,error,killed>]
			[on host <hostname>]
			[port <hostport>]
The command defines:
-
the amount of log information to keep, with a number of days, hours or minutes or a number of sessions,
-
which job is impacted,
-
the frequency at which the purge should be started.
For example, to keep 90 days of log history for all jobs and schedules and purge every evening at 23:00:
schedule purge keep 90 day cron "0 0 23 * * ?"
Upgrading Semarchy xDM Integrator
Using this guide, you will learn how to plan and perform the upgrade of Semarchy xDM Integrator for development and production environments.
Before the Upgrade
Before starting the upgrade, you should review the following documents:
-
The Semarchy xDM Integrator Release Notes provides the latest information about the Release, including new features and bug fixes.
-
Depending on your current version and the upgrade version, some actions may be required after the upgrade process. Review these Post-Upgrade Actions before starting the upgrade process.
Upgrading the Designer
The upgrade path is as follows:
-
Stop the local Runtime.
-
Exit Semarchy xDM Integrator Designer
-
Backup your existing Semarchy xDM Integrator Designer folder
-
Backup your workspace folder
-
Install the new version of Semarchy xDM Integrator Designer in a separate folder.
-
Start the new Designer and select your existing workspace directory. Execute all Post-Upgrade Actions required for your workspace.
-
Launch a "Rebuild Cache" operation from the Impact view’s menu
-
Re-install your specific versioning system plugins if any, as well as the JDBC drivers.
-
Install the updated templates into your workspace.
| You can check your Designer version in the Help > About Semarchy xDM Integrator menu. |
| Once a workspace has been opened with a newer version of the Designer, do not try to re-open it with a previous version. |
Upgrading Runtime Engines
We assume your current Runtime is installed into a directory named semarchy_runtime.
The upgrade path is as follows:
-
Backup your existing runtime
semarchy_runtimedirectory. -
Install the new Runtime in a new directory, for example,
semarchy_runtime_new
On UNIX/Linux systems make sure that all thesemarchy_runtime_new/*.shfiles are executable -
Stop the previous Runtime and backup its
semarchy_runtimeinstallation directory. -
Copy the content of the following directories from the
semarchy_runtimedirectory to the newsemarchy_runtime_newruntime directory:-
semarchy_runtime\build\deliveries -
semarchy_runtime\build\packages -
semarchy_runtime\lib\jdbc. Do not overwrite any file already present in the new runtime directory as they contain newer versions of the xDM Integrator drivers. -
semarchy_runtime\lib\addons, if you have additional libraries added to the Runtime. -
semarchy_runtime\properties, if you have performed specific configurations. -
semarchy_runtime\scheduler, if you are using the Runtime’s scheduler. -
semarchy_runtime\sessions, if you use the Runtime’s internal log database. -
semarchy_runtime\temp, if you use this temporary folder in your processes.
-
-
Rename the old Runtime directory to a different name, for example,
semarchy_runtime_backup -
Rename the new Runtime directory to
semarchy_runtime -
Restart the Runtime
| The Semarchy xDM Integrator runtime in version 3.2 is able to run deliveries produced with previous releases of Semarchy xDM Integrator designer. You do not necessarily need to re-deploy deliveries when you upgrade the runtime. |
Upgrading Semarchy xDM Integrator Analytics
The upgrade path is as follows:
-
Backup your existing Semarchy xDM Integrator Analytics SEMARCHY_DI_ANALYTICS_WEBAPP_HOME directory.
-
Backup your existing Semarchy xDM Integrator Analytics installation.
-
Install the new version of Semarchy xDM Integrator Analytics. See the Semarchy xDM Integrator Analytics User’s Guide for more information.
-
Open and Save your Semarchy xDM Integrator Analytics repositories in order to upgrade them.
| Once opened and saved into the new release of Semarchy xDM Integrator Analytics, a repository can no longer be opened with a previous release of Semarchy xDM Integrator Analytics. |
Post-Upgrade Actions
Upgrading from versions prior to 4.4.0
Mappings designed in previous versions of Semarchy xDM Integrator Designer must be upgraded to the latest designer version.
The mappings needing this upgrade appear in the Project Explorer with a warning overlay icon, and appear in the Problems view with a warning saying The model is outdated.
The mapping upgrade is performed in two ways:
-
On Save: Mappings are automatically upgraded to the latest model version when saved. The Designer checks if the version is up to date and upgrades the Mapping.
-
Using the Context menu: In the Project Explorer, right-click a project, a folder or individual mappings and select Upgrade Mapping Models to upgrade the mappings. When all Mappings in the selection are up to date, this menu does not appear.
Upgrading from versions prior to 3.2.x
Upgrading the Workspace
| Make sure to backup your workspace before opening it with the new product release. |
You do not need to start the new version of Semarchy xDM Integrator Designer with a new workspace. When launching the Designer on an existing workspace, it will automatically upgrade this workspace.
Switch to the New Internal Resource Management
The internal resources define how the Designer reverse-engineers a technology, transform Xpath expressions into SQL queries, convert datatypes, etc. Before version 3.2, these resources were stored in the ".tech" project and hidden by default. Designer introduces since version 3.2 a new storage for Internal Resources, which will give you more control over them.
When opening a workspace created with a previous version for the first time with Designer version 3.2, you will be prompted with the following options:
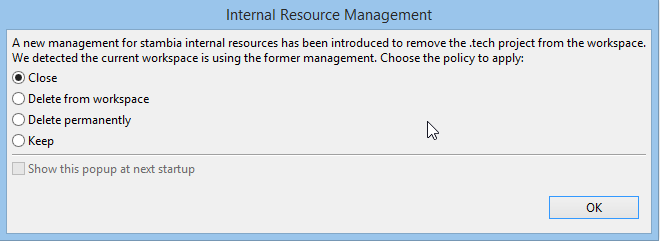
Choose the option for managing internal resources:
-
Close (Recommended): the .tech project will be preserved in your workspace in the "closed" state. Choose this option if you know that you made modifications in your .tech and you want to keep them for future reference.
-
Delete from Workspace: the .tech project is removed from your workspace, but not from your hard drive.
-
Delete permanently: the .tech project is removed from your hard drive and from your workspace. Choose this if you did not know that it existed or you know you never modified it.
-
Keep: the .tech project will remain untouched active. Choose this option if you mode changes in your .tech and you really need to keep them active.
| If you have never modified the content of the .tech folder. We recommend that you choose the Close option. You will be able to delete later the .tech project as needed. |
Upgrading the Semarchy xDM Template
Review the Semarchy xDM Integrator Release Notes for possible changes in the Semarchy xDM integration templates and the GetLoadID, Submit Load and Cancel Load process templates, and upgrade these templates accordingly.
|
The Semarchy xDM INTEGRATION Template provided in versions before 3.2.0 included an incorrect value in certain tasks for the Core > Nb Cycles parameter. When used in version 3.2.0 and above, the resulting process never executes the INTEGRATION task (it remains grey after execution). Upgrade the template to the latest version to fix this error. If you face similar symptoms with other templates, review the value of the Core > Nb Cycles parameter in the property view for the task. If this value is set to 0, the task will never execute. It should be set to -1 instead. |
To Upgrade the Semarchy xDM Templates:
-
In the Project Explorer, expand the global project.
-
Select the templates.semarchy folder, right-click and select Delete.
-
Click OK to confirm the deletion.
Note that removing the templates does not modify the mappings using this template but makes them invalid. -
In the Project Explorer, right-click the global project and then select Import….
-
In the Import Wizard, select General > Archive File for the import source.
-
Click Next.
-
Use the Browse button to select the
<semarchy_di>/templates/templates.semarchy.ziparchive file in the From Archive File: field. -
Expand the tree view and make sure that all the templates and folders are selected.
-
Click Finish. The import process imports all the templates from the archive file into the global project.
With this import, the mappings are now valid and can be executed, re-built and deployed.
Upgrading the Mappings
The following issues may appear on existing mapping:
-
Warning on all mappings: The upgrade process leaves your existing mapping files unchanged: only the internal files are re-generated. Warning icons appear on mappings that still use the previous version’s architecture. They can still execute (directly or by executing a parent process) and the generated code will remain unchanged and continue to work exactly as before.
If you edit and save them, the Designer will silently convert them to the new architecture and this warning icon will disappear. Note that the presence of non-migrated mappings in a workspace may produce errors when trying to Move Metadata nodes to Sub-metadata files. Therefore, we recommend to open and save all the mappings that use a metadata file before moving it. -
Source in more than one Load: In previous releases, when a source table was used in more than one Load Template, the mapping would silently compile - and sometimes produce unexpected behavior at execution. The new release prevents any error before compilation. The developer is now informed with a "Problem" icon on the join. Such a mapping must be fixed.
-
Cross Joins: In previous versions when adding source tables without an explicit join between them, a cross join was automatically created. In the new release, these mappings will display with a "Problem" icon (red triangle) on the target. The new mapping model requires that joins are designed explicitly. These mappings should be modified in order to design the join explicitly as a cross join.
-
Mappings referencing Process parameters: If a Mapping contains expressions (Filters, Mapped fields, Joins, etc.) that reference the parent process' parameters using a relative path scheme such as
${../../../../MY_PARAM}$, it should be updated in order to take into account a new level introduced during code generation:${../../../../../MY_PARAM}$.
We recommend switching those mapping from the relative path scheme to an absolute path scheme when referencing parameters. For example${~/MY_PARAM}$.
Upgrading the Processes
The following issues may appear on existing processes:
-
Processes referencing Template variables: Process which references a template variable, for example:
${~/mapping/I_TARGET_TABLE - INTEGRATION/T - Insertion of rows in target/SQL_STAT_INSERT}$
have to be modified in order to take into account a new depth level introduced during code generation. + In the example above, you may prefer to get the statistic usingctx.sumVariable("SQL_STAT_INSERT", "~/mapping").
Upgrading Version Controlled Workspaces
Semarchy xDM Integrator generates internal files in the indy.build folder. In previous releases, this folder existed as a sibling of each mapping in a Project. In previous releases, there is only a single indy.build folder under the root of each project.
If your versioning system required to ignore the indy.build folders, you now have to configure it to ignore the new indy.build folder located at the root of the project.
| All Designers sharing the same workspace through a version system should upgrade together. A Designer in a previous version cannot open mappings created or modified by a new Designer. |
Using Templates for Stages
Semarchy xDM Integrator introduces a new feature called Stages. In order to use this feature, the new templates supporting it must be imported into the workspace.
Appendix A: Runtime Engine Parameters Reference
This chapter provides a list of all parameters for the runtime engine.
The configuration of the Runtime is done in the engineParameters.xml file that can be found in the properties folder of the Runtime’s installation. This file allows to manage:
-
The engine parameters (such as started services, listening ports, …)
-
The security of the Runtime (hostname and user/password restriction, roles)
-
The repositories where the deliveries are stored
-
The Java additional options to add at Runtime’s startup
-
The log database configuration
Sample configurations are available in the properties/samples folder.
|
Engine Parameters
Common Parameters
| Parameter | Default value | Description |
|---|---|---|
userLogDefaultName |
internalDB |
Name of the log where session logs are written. This is the name defined in the userLogName attribute on the log database configuration. |
debugLevel |
0 |
Debug level in the Runtime |
sessionFolder |
sessions |
Folder (relative or absolute) used to store the session logs. Now used to store the data of the internal base. |
deliveryFolder |
build/deliveries Folders where the Runtime will find the deliveries |
|
temporaryFolder |
temp |
Temporary folder for the Runtime. Used by developers as a workspace, and by the Runtime to store some temporary files. |
deliveryExtension |
deliv |
Extension of the deliveries. Do not change this value. |
defaultFetchSize |
1000 |
Default fetch value for reading data in databases. This value may be overloaded by the developers or when putting into production directly in the deliveries. |
defaultBatchSize |
1000 |
Default batch update value for writing data into databases. This value may be overloaded by the developers or when putting into production directly in the deliveries. |
defaultJdbcConnectionTimeout |
100 |
Default timeout value for connections to databases, in seconds |
defaultJdbcQueryTimeout |
10 |
Default timeout value for queries to databases, in seconds |
defaultSessionReportNumber |
10 |
Default number of sessions for the reporting part of the Runtime. Usually overloaded by the graphical interface. |
memoryLogScanDelay |
10000 |
Scan delay of the logs that have been brought back to memory so as to be purged, in milliseconds. |
memoryLogCacheDelay |
300000 |
Time during which logs stay in memory, in milliseconds. |
Services Parameters
| Parameter | Default value | Description |
|---|---|---|
launchSchedulerEngine |
true |
Condition for starting the scheduler that is integrated into the Runtime. |
launchExecutionEngine |
true |
Condition for starting the execution part of the Runtime. This must stay true. |
launchReportEngine |
true |
Condition for starting the reporting part of the Runtime. This must stay true. |
startInternalDb |
true |
Condition for starting the internal database used for the session logs and the scheduler |
startSoapServer |
true |
Condition for starting the SOAP services that enable the runtime to expose web services |
rmiHost |
The RMI host is automatically calculated. If specified, this parameter skips this step. Useful when there are multiple domains, or address translations that generate different IP addresses for the same host. The host that is indicated (IP or name) must be reachable by the client |
|
soapHost |
See above. |
Services Ports Parameters
| Parameter | Default value | Description |
|---|---|---|
rmiPort |
42000 |
IP port of the Java RMI service used for communication between the Runtime and graphical interfaces |
rmiCallbackPort |
In the RMI protocol, the client can also receive queries from the server. In this case, it uses the rmiCallbackPort. The default value is that of the rmiPort. |
|
internalDbTcpPort |
42100 |
IP port of the internal database |
internalDbWebPort |
42101 |
IP port of the Web interface of the internal database |
soapServerPort |
42200 |
IP port used by the SOAP server |
Services Security
| Parameter | Default value | Description |
|---|---|---|
rmiEnableTls |
false |
Defines if the RMI service exposed for other tools to connect to the Runtime should be secured through TLS. |
passwordCipheringKeyName |
Name of the key that should be used for password encryption/decryption. It must match a key defined under a keystore in the Runtime configuration. Examples of keystores are documented further in the default configuration file. |
Services Miscellaneous Parameters
| Parameter | Default value | Description |
|---|---|---|
enableConnectionPoolForJdbcDatabases |
false |
If this parameter is set to true, connections created and used by the Runtime for exchanges with JDBC databases will be performed through a pool of connection. This can help to reduce the number of connections created to these databases, as they will be re-used instead of re-created each time. |
enableConnectionPoolForLogDatabase |
false |
If this parameter is set to true, connections created and used by the Runtime for exchanges with its Log Database will be performed through a pool of connection. This can help to reduce the number of connections created to the Log Database, as they will be re-used instead of re-created each time. |
Standard Output Parameters
| Parameter | Default value | Description |
|---|---|---|
stackTraceOnStdOutput |
true |
To write the stacktrace on the standard output, if there is an error. |
statisticsOnStdOutput |
true |
To write the statistics on the standard output, at the end of a session. |
sumVariables |
… |
List of the variables used to calculate the session’s statistics |
Web Services Parameters
| Parameter | Default value | Description |
|---|---|---|
soapServerUser |
Optional user for queries to the SOAP server |
|
soapServerPassword |
Optional password for queries to the SOAP server |
|
soapServerUncryptedPassword |
Optional unencrypted password for queries to the SOAP server |
|
soapServerThreadPoolSize |
Maximum number of concurrent threads on the SOAP server. If the number of threads exceeds this value, sessions are put on hold |
|
httpRestServerUser |
Optional user for queries to the REST server |
|
httpRestServerPassword |
Optional password for queries to the REST server |
|
httpRestServerUncryptedPassword |
Optional unencrypted password for queries to the REST server |
|
webServiceInputMessageKeep |
if_error |
Specifies if the input files created during web services invocations should be kept or not. The possible values are: yes, no, if_error |
webServiceOutputMessageKeep |
if_error |
Specifies if the output files created during web services invocations should be kept or not. The possible values are: yes, no, if_error |
webServiceFaultMessageKeep |
if_error |
Specifies if the fault files created during web services invocations should be kept or not. The possible values are: yes, no, if_error |
Logs parameters
In this part, the default values will be those used for the logs in H2 (the internal base). For other logs examples, please refer to the example files that are provided.
Log header
| Parameter | Example value | Description |
|---|---|---|
userLogName |
internalDB |
Name of the log, that must then be used in the userLogDefaultName engine Parameter |
autoUpdate |
true |
Condition for the automatic update of the log structures |
userLogClass |
com.indy.engine.userLog.RdbmsUserLog |
Java class that is used (do not change) |
Internal parameters
| Parameter | Example value | Description |
|---|---|---|
userLogRdbmsDriver |
org.h2.Driver |
Java driver which will be used (this file must be in the Runtime folder lib/jdbc) |
userLogRdbmsUrl |
jdbc:h2:tcp://localhost:42100/sessions/internalDb/sessionLogs |
Connection url |
userLogRdbmsUser |
sa |
Connection user |
userLogRdbmsPassword |
Connection password (Unencrypted, plain text) |
|
userLogRdbmsEncryptedPassword |
Connection password (encrypted) |
|
userLogRdbmsVarcharType |
varchar |
Type used when the data is a character string |
userLogRdbmsVarcharMaxSize |
1000 |
Maximum length of the character strings with the type defined above. |
userLogRdbmsNumericType |
numeric |
Type used when the data is numerical |
userLogRdbmsClobType |
clob |
Type used when the data is text (clob, limitless text) |
userLogRdbmsBlobType |
blob |
Type used when the data is binary (blob) |
userLogRdbmsSchemaName |
logs Database scheme used to create the tables |
|
userLogRdbmsUseSchemaNameForIndexCreation |
true |
Condition for adding a scheme to prefix indexes during creation |
userLogRdbmsDeleteSyntaxe |
Delete from |
Syntax of the delete commands. The name of the table will be added behind. |
userLogRdbmsCompressedLevel |
bestCompression |
Type of compression used (if activated). Possible values: bestCompression, bestSpeed or default |
userLogRdbmsDeliveryFormat |
compressed |
Gives the delivery’s storage format in the database. Possible values: text, binary or compressed |
userLogRdbmsPropertyMaxVarcharSize |
1000 |
Size of the character strings beyond which the data will be stored as CLOB |
userLogRdbmsPropertyMaxClobSize |
10000 |
Size of the CLOB beyond which the data will be stored as BLOB. -1 means «infinite» |
userLogRdbmsPropertyBinaryFormat |
compressed |
Specifies the compression of the BLOB. Possible values: binary or compressed |
userLogRdbmsTimestampQuery |
select now() |
SQL order to retrieve the current timestamp. |
userLogRdbmsInactivityDetectionPeriod |
90000 |
|
userLogRdbmsActivityRefreshInterval |
60000 |
|
userLogRdbmsIndexCreationOption |
Character string that is added after the SQL order which creates indexes. Useful to specify physical storage parameters such as «tablespaces» or underlying physical types. For example, with MysqlENGINE = InnoDB |
|
userLogRdbmsTableCreationOption |
Character string that is added after the SQL order which creates tables. Useful to specify physical storage parameters such as «tablespaces» or underlying physical types. For example, with MysqlENGINE = InnoDB |
Appendix B: Runtime Engine Commands Reference
General commands
connect
Once you are in the command line (using startcommand.bat, startcommand.sh, …), you need to connect to the Runtime with the connect command:
connect [to <host>] [port <port>] [silent]
Parameter |
Mandatory |
Description |
to <host> |
No |
Hostname or address of the host. If not set localhost is used. |
port <port> |
No |
Runtime port. |
silent |
No |
Avoids the feedback normally written on the standard output. |
runtime version
Return the version of the currently connected Runtime.
runtime version
execute commands in file
Execute a list of Runtime commands contained in a file.
execute commands in file <file>
Parameter |
Mandatory |
Description |
file <file> |
Yes |
Path to a file containing Runtime commands, separated with a line return |
Example of an executable file:
execute delivery myDelivery synch
execute delivery myDelivery2
stop runtime
encrypt
Encrypt a password. The result can be used in various places in ¤[product.name]¤, especially in Process actions, when providing passwords manually.
encrypt <password>
stop runtime
Stop the currently connected Runtime properly. The services are all stopped and by default, all running sessions are killed.
stop runtime [wait sessions]
Parameter |
Mandatory |
Description |
wait sessions |
No |
When set, the Runtime waits for all the sessions to be executed before stopping. No sessions can be started during this time (An exception will be thrown). |
kill runtime
Kill the currently connected Runtime.
kill runtime
help
Show a description and the list of parameters available for the Runtime commands.
help [on <commandName>]
Parameter |
Mandatory |
Description |
on <commandName > |
No |
Shows the help of a specific command. |
Service commands
Service management commands
Management of services. Stopping a service will not stop its running tasks. For example, stopping the execution service will not stop the currently running deliveries.
<start|stop|restart> <name> service
Example:
stop execution service
soap server
Management of soap server.
soap server [build|start|stop]
get services
Show information about the status and running time of services.
get services [name <name>] [format <format>]
Parameter |
Mandatory |
Description |
name <name> |
No |
Specifies a service with its name. |
format <format> |
No |
Columns to show on the output, separated with a comma. Available columns: %name, %status, %duration. |
Example:
get services format %name,%status
Result:
rmi,Running
rdbms,Running
execution,Stopped
soap,Running
listener,Running
scheduler,Running
versions
Return the version of the different services.
versions
Delivery management commands
execute delivery
Execute a delivery on the currently connected Runtime.
execute delivery <delivery> [configuration <configuration>] [var <varPath> <varName>] [synch] [sessionName <sessionName>] [format <format>]
Parameter |
Mandatory |
Description |
configuration |
No |
When working with multi-Configuration deliveries, the Configuration to use must be specified with this parameter. |
var <varPath> <varName> |
No |
Passes a Variable to the delivery. Multiple var parameters can be set. |
synch |
No |
Waits for a return before handing back the commands to the caller. |
sessionName |
No |
Can be used to customize the name of the session that will be executed, which defaults to the name of delivery if not set. |
format |
No |
This option can be used to customize the output of the command, which information to return and how. The following columns are available: %name,%status,%begindate,%enddate,%configuration,%id,%executionmode,%guesthost,%iter,%launchmode,%runtimehost,%runtimeport,%returncode,%errormessage |
Example:
execute delivery myDeliv var ~/myVar1 value1 var "~/my var 2" "value 2"
execute delivery myDeliv format "%name, %id, %returncode"
execute delivery myDeliv format "%name | %id | %begindate | %enddate | %status | %returncode | %errormessage"
schedule delivery
Schedule a delivery on the currently connected Runtime.
schedule delivery <delivery> [scheduleName <scheduleName>] [sessionName <sessionName>] [jobName <jobname>] [with command] [on host <hostname>] [port <hostport>] [start <startDate>] [end <endDate>] [var <path> <value>] [var ...] [configuration <configuration>] cron <cronExpression>
Parameter |
Mandatory |
Description |
scheduleName <scheduleName> |
No |
Name that will identify this schedule, automatically generated if not set. |
sessionName <sessionName> |
No |
Name of the session. If no set, the session is named after the delivery. |
jobName <jobname> |
No |
Internal name for the schedule job. This is by default the delivery name. See below for further information. |
with command |
No |
Executes the delivery with the command line tool. If no set, the delivery is invoked in memory in the currently connected Runtime. |
on host <hostname> |
No |
Hostname or address of the Runtime host. If not set the currently connected Runtime is used. |
port <hostport> |
No |
Runtime port. |
start <startDate> |
No |
Start date of the schedule. |
end <endDate> |
No |
End date of the schedule. |
configuration |
No |
When working with multi-Configuration deliveries, the Configuration to use must be specified with this parameter. |
var <varPath> <varName> |
No |
Passes a Variable to the delivery. Multiple var parameters can be set. |
cron <cronExpression> |
Yes |
Cron expression to plan the schedule. |
Example:
schedule delivery myDeliv start "2015/12/10 12:55:22" end "2015/12/25 12:55:22" var ~/myvar myValue cron "0 15 10 * * ? *"
About the jobName
The jobName is used to identify uniquely the schedules.
Multiple schedules with the same jobName cannot run at the same time. If this happens, only one of the two will be started. This is to avoid the start of multiple schedules if their execution at the same time is not functionally possible. This is, at purpose, the default behavior when having multiple schedules on the same delivery.
If you want to change that, specify a jobName when scheduling a delivery.
schedule delivery myDeliv var ~/myvar myValue01 cron "0 15 10 * * ? *"
schedule delivery myDeliv var ~/myvar myValue02 cron "0 15 10 * * ? *"
schedule delivery myDeliv jobName job01 var ~/myvar myValue01 cron "0 15 10 * * ? *"
schedule delivery myDeliv jobName job02 var ~/myvar myValue02 cron "0 15 10 * * ? *"
get repositories
Return the list of available Runtime delivery repositories.
get repositories
get deliveries
Return information about the deliveries contained on the currently connected Runtime.
get deliveries [id <id1,id2,idn>] [format <format>] [repository <repository>]
Parameter |
Mandatory |
Description |
id <id1,id2,idn> |
No |
Deliveries ids, separated with a coma. |
format <format> |
No |
Columns to show on the output, separated with a comma. Available columns: %name, %builduser, %configuration, %id, %packageid, %processid, %username, %version, %builddate, %exportdate. |
repository <repository> |
No |
Runtime delivery repository to search in. If not set, the deliveries are searched in the default repository. |
Example:
get deliveries format %name,%configuration,%builddate,%exportdate
get list deliveries
Retrieve the list of deliveries contained on the currently connected Runtime.
get list deliveries [to <file>]
Parameter |
Mandatory |
Description |
to <file> |
No |
Exports the result to a file. |
get delivery schedules
Retrieve information about delivery schedules, and optionally export it in a file. If a different job name has been specified during scheduling, it will not appear on the list.
get delivery schedules <deliveryName> [to <file>]
Parameter |
Mandatory |
Description |
to <file> |
No |
Exports the result to a file. |
Session management commands
get sessions
Return the list of sessions existing in the Log Database configured for this Runtime as well as the sessions currently in memory.
get sessions [name <name>] [id <id1,id2,idn>] [status <running,error,done,stopped>] [duration <min>] [to <max>] [limit <limit>] [format <format>]
Parameter |
Mandatory |
Description |
name <name> |
No |
Session Name. |
id <id> |
No |
Session Id. |
status <status> |
No |
Session status. Available: running, error, done, stopped. |
duration <min> |
No |
Session minimum duration in milliseconds. |
to <max> |
No |
Session maximum duration in milliseconds. |
limit <limit> |
No |
Number of sessions to retrieve. |
format <format> |
No |
Columns to show on the output, separated with a comma. Available columns %name, %status, %begindate, %enddate, %configuration, %id, %deliveryid, %runtimehost, %runtimeport, %executionmode, %guesthost |
stop | restart | wait session
Management of sessions.
<stop | restart | wait> session <id>
Example:
stop session c0a84b0b01513de0c511e38b414f0e6e
Result:
Session :c0a84b0b01513de0c511e38b414f0e6e is stopping
purge
Purge the Runtime’s sessions specified. All the information about these sessions will be deleted.
purge keep <number> <minute|hour|day|session> [sessionname <name,name2,...>] [status <done,error,killed>]
Parameter |
Mandatory |
Description |
keep <number> <minute|hour|day|session> |
Yes |
Number of sessions to keep. |
sessionname <name> |
No |
Sessions' names, separated by a comma. |
status <done,error,killed> |
No |
Sessions' status, separated by a comma. |
Example:
Keep only last 100 sessions:
purge keep 100 session
Keep only five of the sessions which name is mySession and which status is done.
purge keep 5 session sessionname mySession status done
Keep sessions from last 3 days:
purge keep 3 day
schedule purge
Schedule a purge of Runtime’s sessions.
schedule purge keep <number> <minute|hour|day|session> cron <cronExpression> [sessionname <name,name2,...>] [status <done,error,killed>] [on host <hostname>] [port <hostport>]
Parameter |
Mandatory |
Description |
keep <number> <minute|hour|day|session> |
Yes |
Number of sessions to keep. |
cron <cronExpression> |
yes |
Cron expression to planify the purge. |
sessionname <name> |
No |
Sessions' names, separated by a comma. |
status <done,error,killed> |
No |
Sessions' status, separated by a comma. |
on host <hostname> |
No |
Hostname or address of the Runtime host. If not set the currently connected Runtime is used. |
port <hostport> |
No |
Runtime port. |
Example:
schedule purge keep 10 session cron "0 15 10 * * ? *"
Trigger commands
A trigger is created when a delivery or purge schedule is added.
get list triggers
Retrieve the list of triggers contained in the Runtime.
get list triggers [to <file>]
Parameter |
Mandatory |
Description |
to <file> |
No |
Exports the result to a file. |
get trigger detail
Retrieve detail of a specific trigger.
get trigger detail <triggerName> [to <file>]
Parameter |
Mandatory |
Description |
to <file> |
No |
Exports the result to a file. |
get triggers
Retrieve the list of triggers contained in the Runtime with details.
get triggers [name <name1,name2,namen>] [format <format>]
Parameter |
Mandatory |
Description |
name <name1,name2,namen> |
No |
Trigger name. |
format <format> |
No |
Columns to show on the output, separated with a comma. Available columns %name, %cronexpression, %deliveryname, %executiontype, %starttime, %endtime, %nextexecution, %purgesize, %purgeunit, %jobname |
pause trigger
Pause the execution of a trigger.
pause trigger <name>
resume trigger
Resume the execution of a trigger.
resume trigger <name>
remove trigger
Remove a trigger.
remove trigger <triggerName>