Getting Started with HTTP REST
Overview
The HTTP REST metadata is shipped with a wizard to help users test and reverse HTTP REST API.
This wizard allows defining the input and output parameters, the URL to request, and the method to use and perform a test request with test values to see the response of the API. It also offers the possibility to determine what should be reverse-engineered in the metadata.
Create Metadata
To create metadata:
-
Right-click the project folder, then click New > Metadata.
-
In the Create Metadata dialog, select HTTP REST and click Next.
-
Name the data model and click Next.
-
Select the installed HTTP REST module and click Finish.
A wizard displays. It allows you to define the HTTP security and proxy settings as well as the reverse-engineer URL or files. -
In the Security Definition step, set the following fields:
-
HTTP Security: Select how the HTTP REST API can be accessed. Possible options are:
-
None (default): Select if credentials are not required to access the HTTP REST API.
-
User credentials: Select if user credentials are required to access the HTTP REST API. In this case, the credentials specified in Semarchy xDI Designer are used by default.
-
OAuth2 security: Select if the OAuth2 security protocol is required to access the HTTP REST API.
-
-
HTTP Proxy: Select the
The above fields display the metadata created using the Proxy Security and HTTP Security modules.
-
-
Click Next.
-
In the Reverse step, set the following fields:
-
Reverse URL or File: Specify a URL or use the browse button to specify the path to a file that you want to reverse-engineer.
-
HTTP Keystore: Specify the keystore information defined in the Certificate and Keys metadata.
-
HTTP Truststore: Specify the truststore information defined in the Certificate and Keys metadata.
-
-
Click Next.
-
In the Selective Reverse step, select the nodes that you want to reverse-engineer.
-
Click Finish.
The HTTP REST metadata node is created and the data is reverse-engineered. The main node contains path nodes. Path nodes contain operation nodes. Operation nodes contain parameter and response nodes.
Test the API Response and Reverse-Engineer the Data
You can also test the API response and reverse-engineer the data after ensuring that the API response corresponds to what is expected.
To test the API response:
-
Right-click an operation node. For example, the
GETnode. -
In the contextual menu, click Actions > Reverse REST.
The RESTFull Reverse window appears. -
Define the request parameters, headers, body, and authentication.
-
Once the API request is defined, click
 .
.
The API is called with the defined parameters, and the response appears in the Response section. -
Click Next after ensuring that the response corresponds to what is expected.
The Selective Reverse step appears. -
Select the nodes that you want to reverse-engineer and click Finish.
Request Parameters
In the Parameters section, you can define new parameters by clicking the ![]() button.
button.
Value
The value is a test value that is used when performing a test invocation to retrieve the response of the API. It is not stored in the Metadata at the end.
Type
The following table describes the types of parameters:
| Type | Description |
|---|---|
HEADER |
Parameter that is added as HTTP header when invoking the API. The HTTP header thus defined is reversed in the input metadata of the API and is specified dynamically in the mappings that invoke the API. |
QUERY |
Parameter that is added at the end of the request URL. |
PATH |
Parameter that replaces a user-defined mask in the request URL. When you select this option, add the mask to be replaced in the request URL. |
FORM |
When you select this option, the Allow Empty Value checkbox is automatically selected as its values are derived from the fields in the Input section. In the Input section:
|
COOKIE |
When you select this option, the specified cookies are sent each time a request is sent. The cookies are not stored. |
Request Body
The request body represents the input body of the HTTP request.
If the API expects an input body, select the associated type and fill in the body expression:
An option to link the selected Media Type with the Content-Type Header is available:
-
When the link is disabled, users can select Media Type and manually select the Content-Type Header.
-
When the link is enabled, after each Media Type selection, the Content-Type Header is automatically updated according to the selected Media Type. However, users can manually change the content type.
Request Authentication
The Authentication section allows you to define the mechanism that should be used to authenticate when invoking the API.
| Field | Description | ||
|---|---|---|---|
Authentication Type |
Type of authentication to use. Possible values are:
|
||
Security Reference |
HTTP security metadata node containing the authentication information. |
||
Security Proxy Reference |
Proxy security metadata node to use if the request is redirected through a proxy.
|
||
Keystore Reference |
Certificate and Keys metadata node to use as keystore reference. |
||
Truststore Reference |
Certificate and Keys metadata node to use as truststore reference. |
Create Mappings
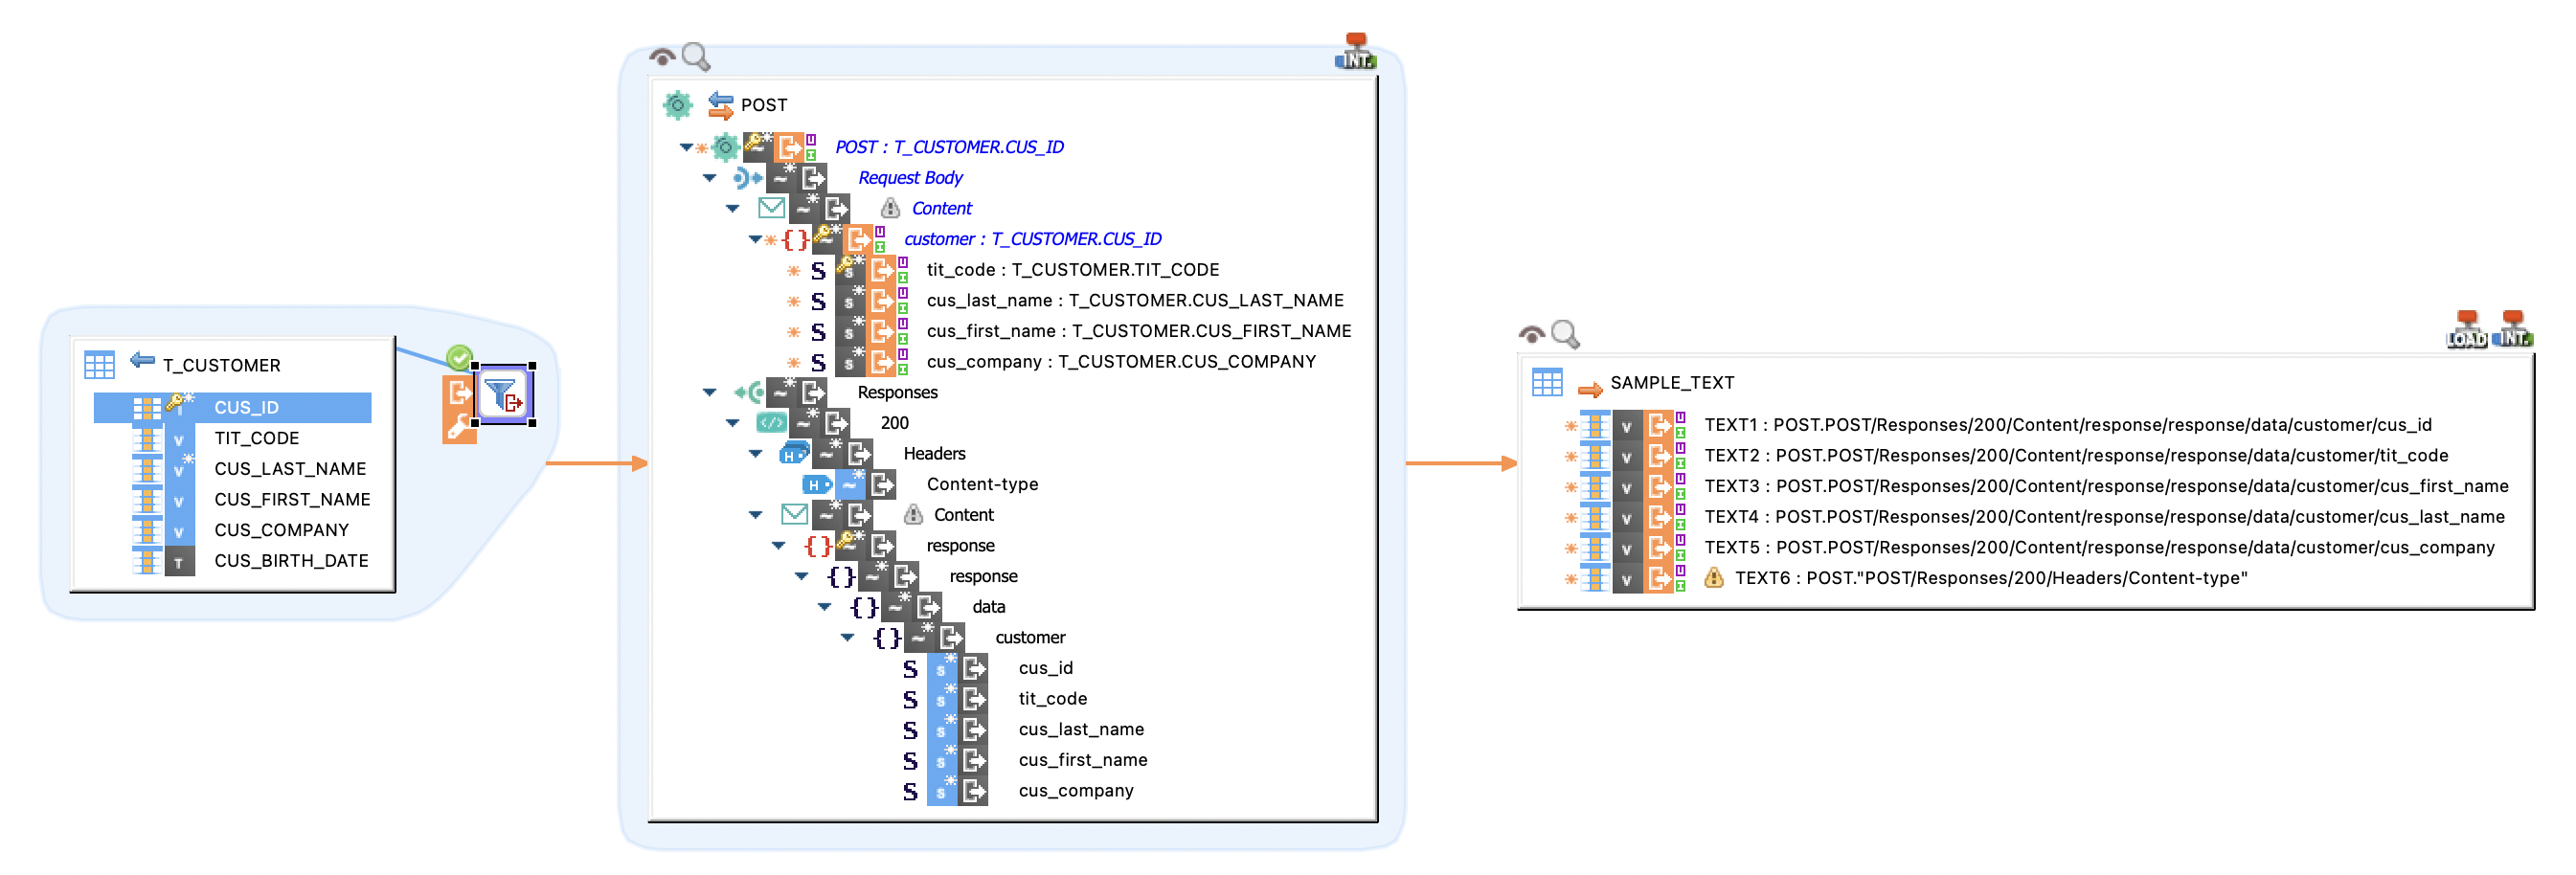
Once the HTTP REST metadata is ready, you can use it in mappings.
In the following example of mapping, the fields from the source table are mapped to the JSON nodes in the Request Body node of the POST function of the HTTP REST API. These fields are used as request parameters. The response received is stored in the Responses node. The response nodes are mapped to the fields in the target table.