Install the Semarchy xDI Designer
This document details how to install Semarchy xDI Designer.
Before the installation, make sure to understand the architecture and review carefully the system requirements.
Download the Designer
The Designer is shipped as an archive file, named after the operating system it should be used with.
| Make sure to download the archive corresponding to your operating system (Windows, macOS or Linux) |
You can uncompress this file and directly run the Designer application.
Install the Designer
Windows
To install and run Designer:
-
Uncompress the archive file to a temporary folder and copy its contents to your
Program Filesfolder or to any other folder. -
Run the Designer executable:
semarchy-xdi-designer-windows.exe
|
When installing Designer, you need to have write privileges on the installation directory. If you do not have such privileges, run the executable as an administrator:
Alternatively, you can install Designer in a folder on which you have write privileges. |
Linux
To install and run Designer:
-
Uncompress the archive file to a temporary folder and copy its contents to your user folder.
-
Run the Designer executable:
semarchy-xdi-designer-linux
|
Depending on your environement you may need to set the execution permission to this file. |
macOS
To install and run Designer:
-
Run the following command on the archive file:
xattr -dr com.apple.quarantine semarchy-xdi-designer-macos*.tar.gz -
Uncompress the archive file to a temporary folder and copy its contents to your
Applicationsfolder. -
Run the Semarchy xDI Designer app.
Depending on your macOS version, the following popup may open at startup:
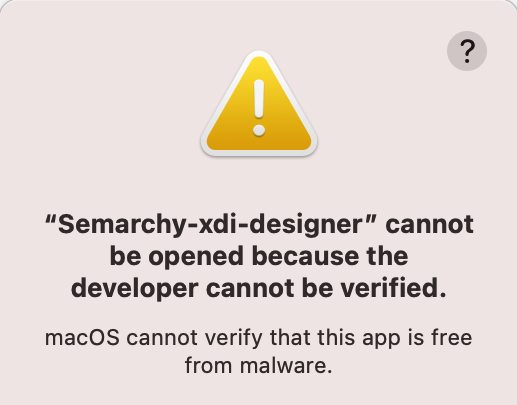
To resolve this issue:
-
In the
Applicationsfolder, press and hold control and then select the Semarchy xDI Designer app. -
Select Open in the contextual menu.
-
On the warning popup, click Open to open Semarchy xDI Designer.
-
Register the Designer
A newly installed Semarchy xDI Designer runs for a limited time - the grace period - without a license. Within that grace period, you should request an evaluation license from Semarchy or register a valid license to keep the Designer running.
| When the grace period is over, the Semarchy xDI Designer will stop working: the workspaces will no longer be available to you but will be preserved as-is. |
See Manage the Designer License for more information and detailed instructions to activate an instance and manage the license.
Advanced Configuration
Semarchy xDI Designer is configured to work in most situations. However, you can change its startup settings.
The startup settings are defined in the semarchy-xdi-designer-windows.ini (Windows) and semarchy-xdi-designer-linux.ini (Linux) file.
It is located in the folder into which you installed Semarchy xDI Designer:
-
For macOS, in the
/Contents/Eclipsesub-directory of the application. -
For Windows and Linux, in the same folder as the executable file.
Memory settings
The following set of parameters allow configuring the Designer memory settings.
#  Minimum Heap size
-Xms512m
#  Maximum Heap size.
-Xmx2048m| With the default configuration, these settings are undefined. The memory is therefore managed automatically by the JVM and Eclipse, which is recommanded and sufficient for most cases. |
Built-in Runtime location
The Designer built-in Runtime is deployed by default in the Designer installation folder, in a subfolder named runtime.
To change this location, edit the following property:
#  Runtime location
-Dxdi.designer.runtime.home=runtime
Module Generation
Modules generation is configured with the following properties:
# Generated modules location
# This path is relative to the Runtime location, but absolute path is also supported.
-Dxdi.designer.module.path.v1=runtime/modules
# Automatic modules creation
-Dxdi.designer.module.automaticCreation=true| If you change the modules location, all your modules will be managed in this folder. The local Runtime will therefore not be able to see and use those Modules unless you configure the Runtime to use the same Modules folder. Refer to Runtime’s installation and configuration guide to learn how to change Runtime’s Modules folder path. |
License Configuration
You can pre-configure the License Management for a Semarchy xDI Designer instance by setting the following environement variables prior to starting the Designer
-
XDI_DESIGNER_LICENSE_KEY: Set this variable to define your License Key string. When this variable is set, the Online mode is used by default. The Local Server mode is used instead ifXDI_DESIGNER_LICENSE_SERVER_URLis set. -
XDI_DESIGNER_LICENSE_SERVER_URL: Set this variable to define your local license server URL, and use the Local Server mode. -
XDI_DESIGNER_LICENSE_KEY_FILE: Set this variable to define your License Key File location and use the Offline mode. This variable is taken into account only ifXDI_DESIGNER_LICENSE_KEYis unset.
License Server Certificate
Semarchy xDI Designer validates its license from a License Server. This license server may be either the central license server managed by Semarchy or, optionally, a local license server that your install.
In both cases, Semarchy xDI Designer communicates with the License Server using HTTP secured with SSL/TLS.
You need to configure the local license server to use SSL/TLS, and specify a certificate that secures the communication. This certificate may be provided by an authority or manually created by you and self-signed.
With an SSL/TLS certificate signed by an authority, the communication will succeed, and the connections will be accepted automatically.
With a self-signed (manually generated) certificate, you must configure this certificate in Semarchy xDI Designer. Otherwise, the connections will be refused. The self-signed certificate can be provided with two methods:
-
The first method consists in providing a custom keystore containing the certificate to the Designer.
Add the certificate to a Java Keystore and then define its location by adding the following properties to thesemarchy-xdi-designer-<os-name>.inifile, located in the Designer installation directory.-Dlicense.service.keystore.path=<Path to keystore file location> -Dlicense.service.keystore.type=<keystore type> -Dlicense.service.keystore.password=<security password> -Dlicense.service.keystore.key.alias=<keystore alias>
-
The second method consists in adding the certificate to the truststore of the Java Virtual Machine (JVM) used by Semarchy xDI Designer. Note that this adds the certificate globally for any application using this JVM.
-
If the JVM’s truststore is in the default location, just add the certificate to the truststore.
-
If the JVM’s truststore is in a custom location, add the certificate to this location and specify this location in the
semarchy-xdi-designer-<os-name>.inifile, located in the Designer installation directory.-Djavax.net.ssl.trustStore=<Path to keystore file location> -Djavax.net.ssl.trustStoreType=<keystore type> -Djavax.net.ssl.trustStoreProvider=<provider> -Djavax.net.ssl.trustStorePassword=<keystore password>
-