Getting Started with AMQP
Overview
This article explains how to exchange data using the Advanced Message Queuing Protocol (AMQP).
Create AMQP metadata
The AMQP metadata holds information about:
-
The AMQP server (also known as message broker)
-
Queues
-
Exchanges
This metadata can be used in processes through AMQP actions with Semarchy xDI metadata features like referencing, configuration, etc.
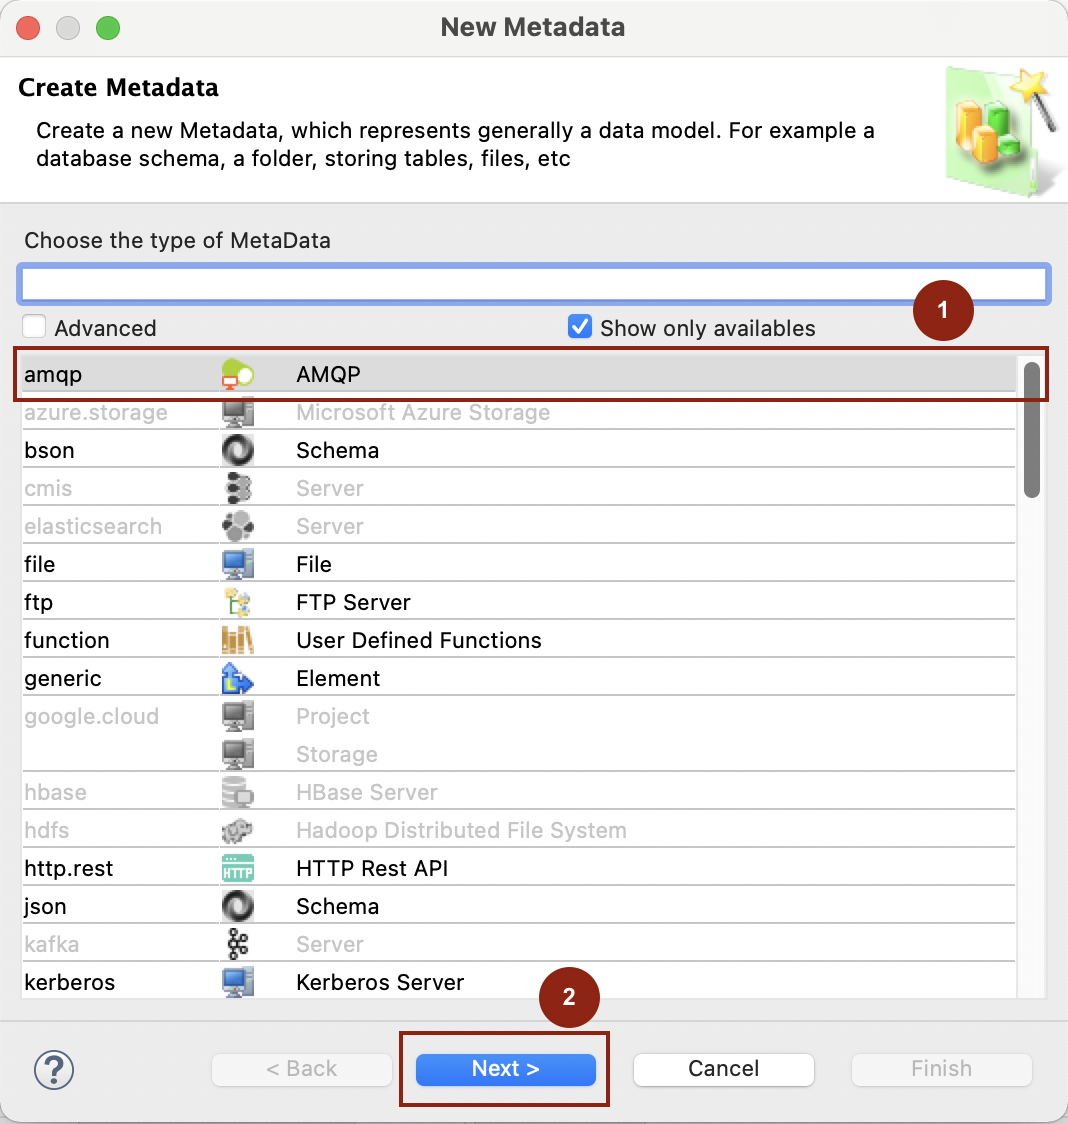
To create AMQP metadata:
-
Right-click the folder where you want to create the metadata, then click New > Metadata. The New Metadata window displays.
-
Select AMQP, then click Next.
-
Type a name for the metadata model and click Finish. The metadata is created.
Set metadata properties
Select the server node, and in the Standard tab set the values of the properties. 
The following table describes the properties:
Property |
Description |
Name |
Alias of the broker. |
Addresses |
A comma-separated list of AMQP broker addresses to be specified in the following pattern: |
User |
Identifier used to log in to the AMQP broker. |
Password |
Password used to log in to the AMQP broker. |
VirtualHost |
Name of the AMQP virtual host. |
Connection Timeout |
Duration in seconds for the connection timeout. |
Hand Shake Timeout |
Duration in seconds for the handshake timeout. |
Define exchanges
Right-click the server node, then click New > Exchange, and then set the values of the properties.
The following table describes the properties:
Property |
Description |
Name |
Logical name of the exchange. |
Physical Name |
Physical name of the exchange. If not set, then the Name property is used. |
Type |
Exchange type. Available types are:
|
Automatic Delete |
Allows configuring the exchange as auto-delete. The implementation of this functionality depends on the broker used. |
Durable |
Allows you to select whether the exchange should be kept upon restart. |
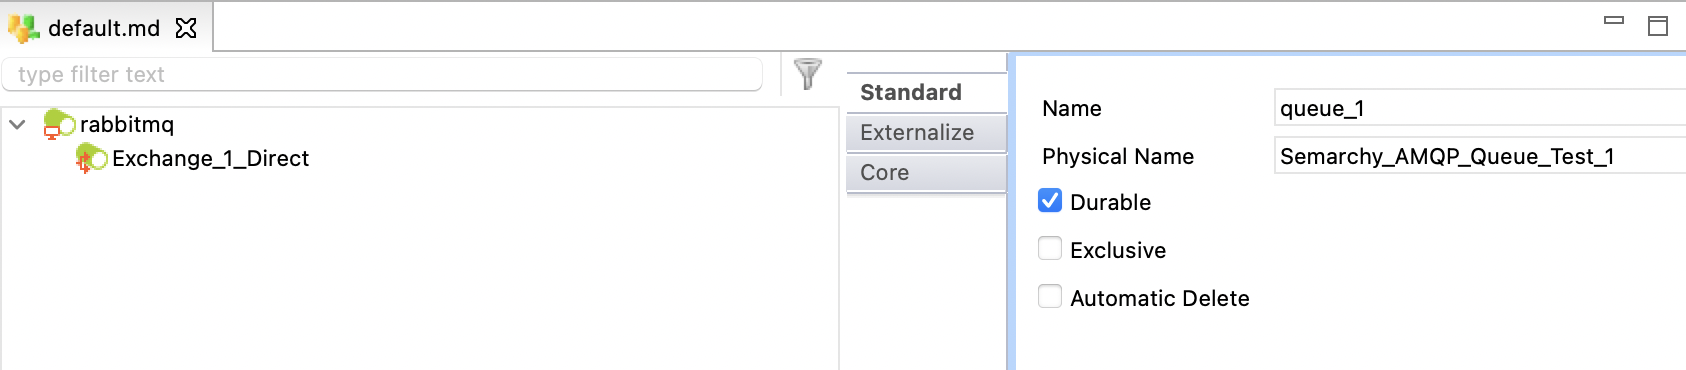
Define queues
Right-click the server node, then click New > Queue and set the values of the properties.

The following table describes the properties:
Property |
Description |
Name |
Logical name of the queue. |
Physical Name |
Physical name of the queue. If not set, the Name property is used. |
Durable |
Allows you to specify whether the queue should be kept upon restart. |
Exclusive |
Allows you to specify if the queue should only be used by one connection and deleted when the connection is closed. |
Automatic Delete |
Allows you to configure the queue as auto-delete. The implementation of this functionality depends on the broker used. |
Create processes
Actions
Processes can be created using the AMQP actions available in Palette > Internet & Network.
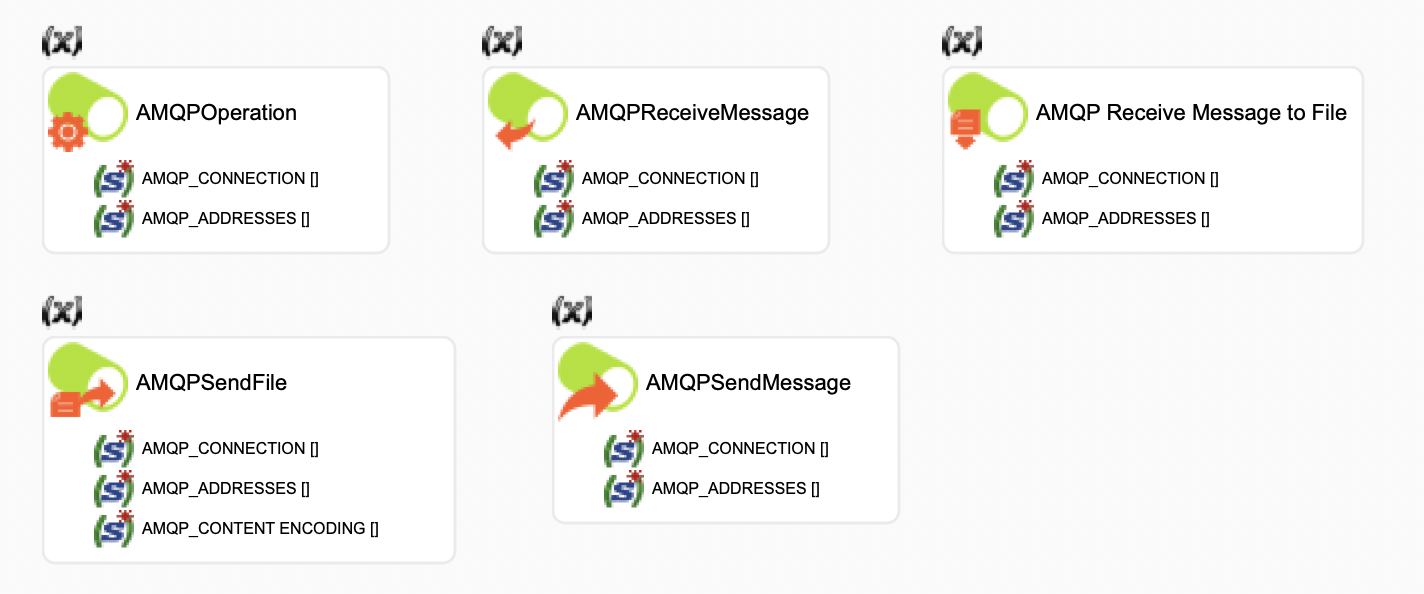
The following table describes the actions:
Action |
Description |
Performs operations on the broker. |
|
Receives messages. |
|
Sends messages to the broker. The message is defined in the body of the action. |
|
Receives messages and saves them to a file. |
|
Retrieves messages from a file and sends them to the broker. |
Declare exchanges, queues, and binds
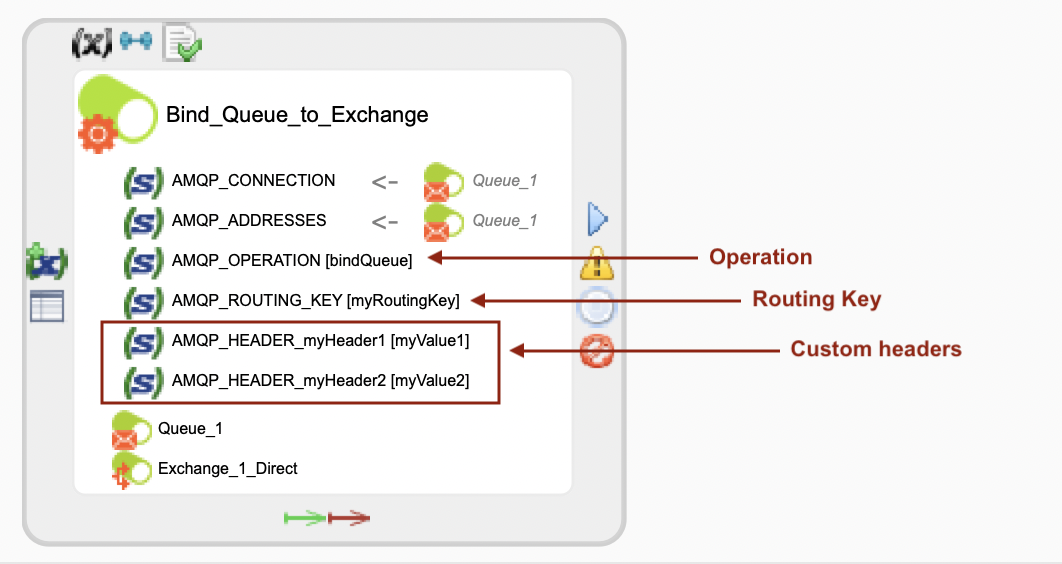
Use the AMQP Operation Action to declare queues, exchanges or binds on the broker.
Declare exchanges and queues
To declare an exchange or a queue, drag and drop the related metadata on the AMQP Operation Action. The required properties are set automatically:
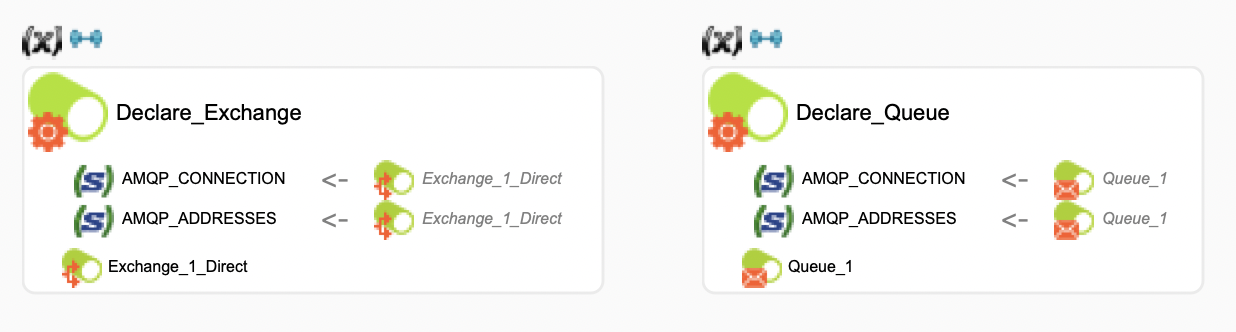
| If an exchange or a queue with the same properties already exists on the broker, the broker ignores the operation. If an exchange or a queue already exists but with different properties, an error is thrown. |
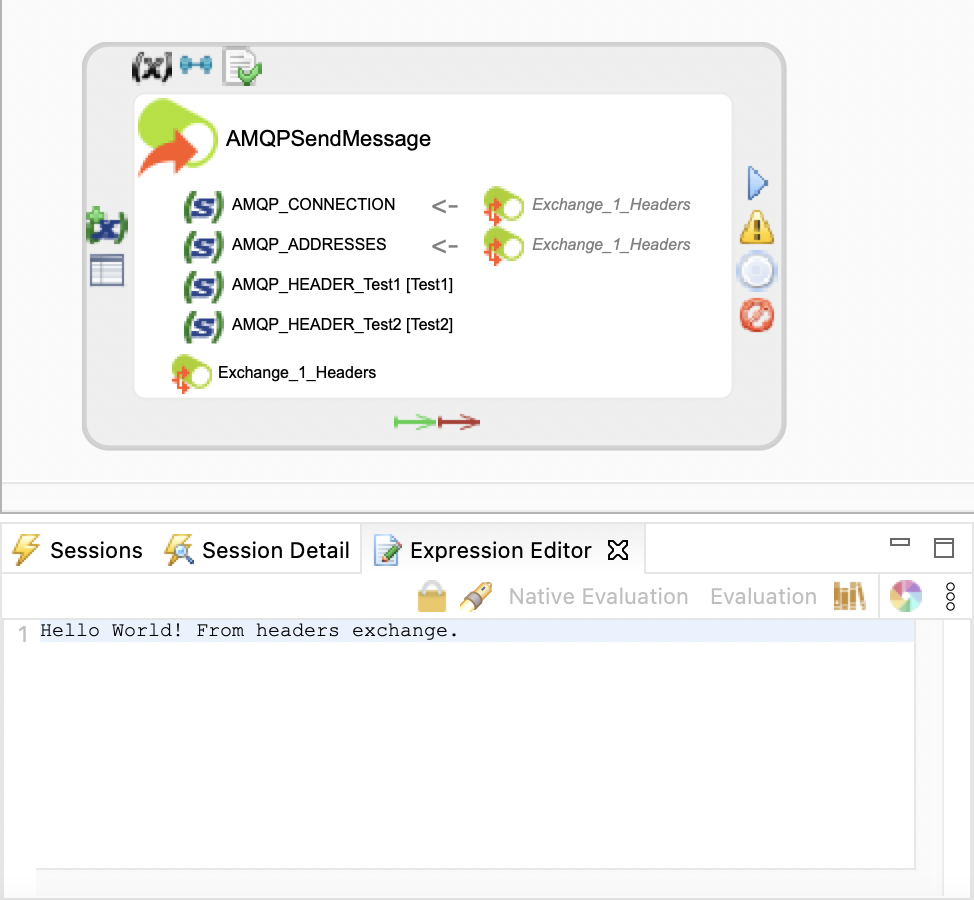
Send messages
To send messages, you can use any one of the following actions:
-
AMQP Send Message: In this action, the message is set in the body of the action.
-
AMQP Send File: In this action, the message is retrieved from a file.
To send a message with the actions mentioned above:
-
Drag and drop on the action the exchange on which the message is to be sent.
-
Optionally, set the Routing Key used for the sending.
-
Optionally, set headers by adding
AMQP_HEADER_<header-name>parameters.
The following image illustrates how a message is sent to a headers exchange. Since the Routing Key is ignored by this kind of exchange, only the headers have been specified.
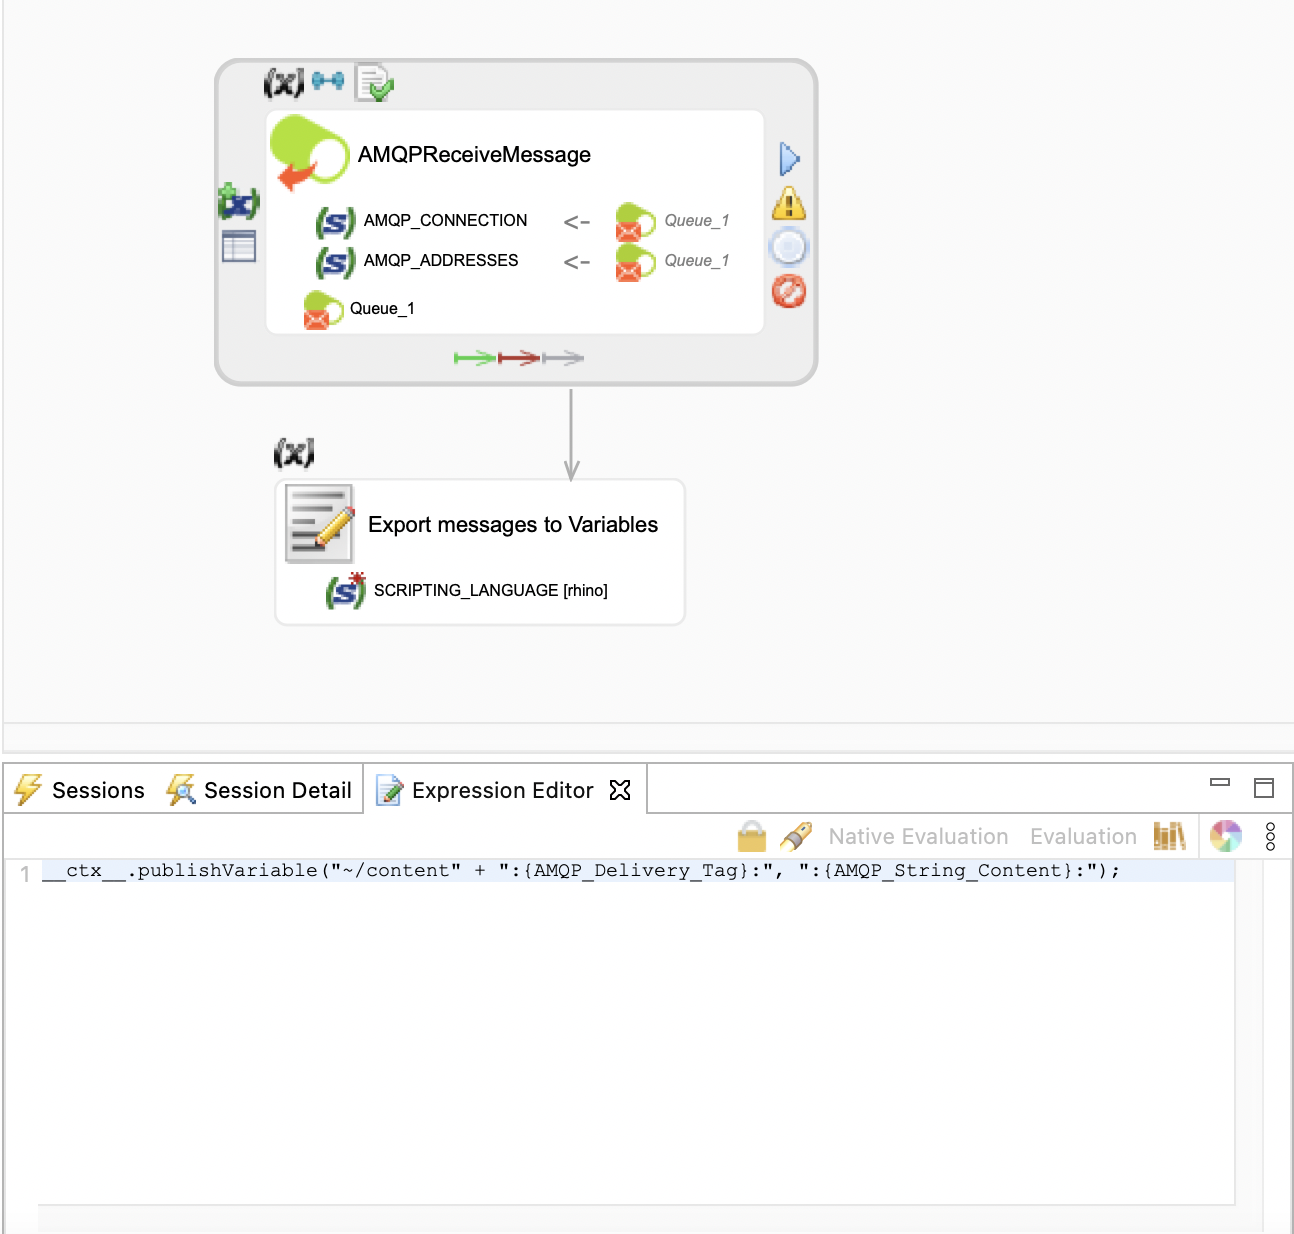
Receive messages
To receive messages, you can use any one of the following actions:
-
AMQP Receive Message: This action needs to be bound to another action that can receive the message details.
-
AMQP Receive File: This action stores messages in files.
To receive messages from a queue, drag and drop the corresponding metadata on the action.
The following image illustrates how the messages received using the AMQP Receive Message are passed on to a Scripting Action that exports it to process variables.
Sessions and parallelism
In AMQP Process Actions, the AMQP_SESSION_NAME parameter can be used to define a session used for each action.

You need to manage sessions when working with processes using multiple AMQP actions.
Sessions have the following characteristics:
-
Each session represents an AMQP channel on the broker.
For example, if you are using three different sessions on your process, this will result in three channels on the broker. -
A session can only be used by one action at a time.
If multiple actions are parallelly executed on the same session (for example, all of them on T1), only one will be executed and the others will wait for the session to be released.
In such a scenario, you should consider using a different session for each action that is executed parallelly. -
The acknowledge mode of a session is unique and cannot be changed.
For example, if you start T1 on SESSION_TRANSACTED, you cannot change it to AUTO_ACKNOWLEDGE in a subsequent action. -
If a session is closed with the closesession operation of the AMQP Operation action, then it cannot be reopened.
Miscellaneous
Statistics
The following statistic variables are available on the actions:
-
MQ_MESSAGE_SENT: Represents the number of messages sent using AMQP Send actions. -
MQ_MESSAGE_RECEIVED: Represents the number of messages received using AMQP Receive actions.
Apache Qpid and Routing Keys
Fanout and headers exchanges ignore Routing Keys. Thus, you are not required to define one when binding a queue to a fanout or headers exchange.
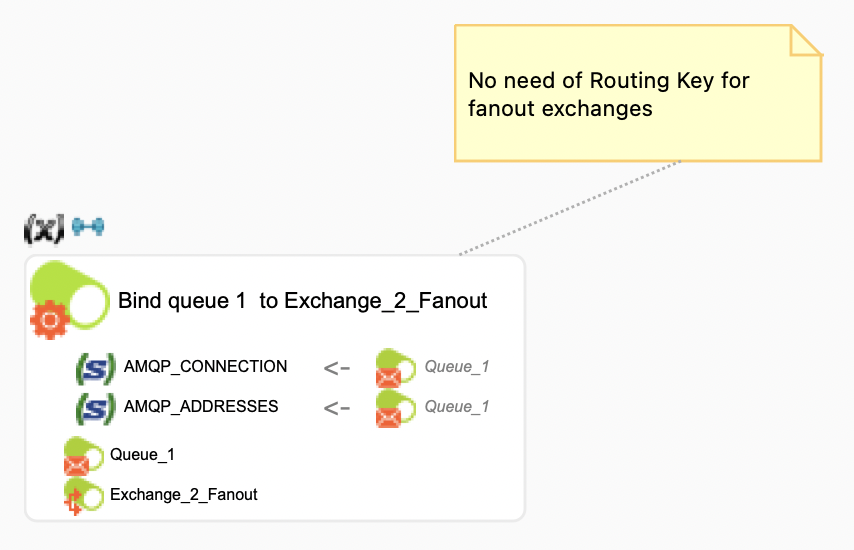
However, for the Apache Qpid broker, if a bind does not have a Routing Key, it is not possible to unbind it with the unbind AMQP Operation action.
Therefore, if you are using Apache Qpid, we recommend you always set a Routing Key when binding a queue, even on a fanout or headers exchange.
This does not change the final behavior of the exchanges as they do not take the key into account when routing messages through the bind. But in doing so, a key is at your disposal when you want to unbind the queue.