Welcome to Semarchy Convergence for MDM.
This guide contains information about installing Semarchy Convergence for MDM to design and develop an MDM project.
Preface
Audience
| If you want to learn about MDM or discover Semarchy Convergence for MDM, you can watch our tutorials. |
| The Semarchy Convergence for MDM Documentation Library, including the development, administration and installation guides is available online. |
Document Conventions
This document uses the following formatting conventions:
| Convention | Meaning |
|---|---|
boldface |
Boldface type indicates graphical user interface elements associated with an action, or a product specific term or concept. |
italic |
Italic type indicates special emphasis or placeholder variable that you need to provide. |
|
Monospace type indicates code example, text or commands that you enter. |
Other Semarchy Resources
In addition to the product manuals, Semarchy provides other resources available on its web site: http://www.semarchy.com.
Obtaining Help
There are many ways to access the Semarchy Technical Support. You can call or email our global Technical Support Center (support@semarchy.com). For more information, see http://www.semarchy.com.
Feedback
We welcome your comments and suggestions on the quality and usefulness
of this documentation.
If you find any error or have any suggestion for improvement, please
mail support@semarchy.com and indicate the title of the documentation
along with the chapter, section, and page number, if available. Please
let us know if you want a reply.
Overview
Using this guide, you will learn how to:
-
Plan the configuration of Semarchy Convergence for MDM for development and production environments.
-
Install and configure Semarchy Convergence for MDM as well as Convergence Pulse.
-
Start and connect to Semarchy Convergence for MDM.
Introduction to Semarchy Convergence for MDM
What is Semarchy Convergence for MDM?
Semarchy Convergence for MDM is designed to support any kind of Enterprise Master Data Management initiative. It brings an extreme flexibility for defining and implementing master data models and releasing them to production. The platform can be used as the target deployment point for all master data of your enterprise or in conjunction with existing data hubs to contribute to data transparency and quality with federated governance processes. Its powerful and intuitive environment covers all use cases for setting up a successful master data governance strategy.
Semarchy Convergence for MDM is based on a coherent set of features for all Master Data Management projects.
The Convergence Pulse component enables business users to collect metrics and measure - with dashboards and KPIs - the health of their Convergence for MDM Hub.
Architecture Overview
The Semarchy Convergence for MDM architecture includes:
-
The Semarchy Convergence for MDM Application: This JEE application is deployed and runs in an application server, and stores its information in a repository.
-
The Repository that stores all the MDM projects metadata and execution logs. This repository is hosted in a schema of an Oracle instance. A given Semarchy Convergence for MDM Application is attached to a single repository, and users connecting to this applications access only the content of this repository.
-
The Data Locations. Each data location contains a data hub. This hub contains the golden data, the source data pushed by publishers in the hub, and the various stages of this data in the certification process. A data location is hosted in a schema of an Oracle instance. Several data locations can be attached to a single repository.
-
The Semarchy Convergence for MDM Workbench: This web 2.0 application is served from the Semarchy Convergence for MDM Application and runs in a web browser.
If using Convergence Pulse Metrics, the following components are involved:
-
The Pulse Metrics Warehouse. This database schema stores the historical metrics gathered from the Convergence for MDM Repository and Data Locations. A Pulse Metrics Warehouse is associated to a single Repository.
-
The Convergence for MDM Application gathers the metrics from the Repository and its related Data Locations and loads the Pulse Metrics Warehouse. The same component serves Embedded Dashboards powered by Pulse as part of the business users' interfaces.
-
The MS Excel Metrics Dashboard are built-in sample Microsoft Excel dashboards that connect to the Pulse Metrics Warehouse and allow business users and data stewards to analyze the metrics. Alternately, you can connect a third party BI Platform to the Pulse Metrics Warehouse to create your own dashboards and visualizations.
Preparing to Install
Review the information in this section before you begin your installation.
System Requirements and Certification
Before installing Semarchy Convergence for MDM, you should read the system requirements and certification documents to ensure that your environment meets the minimum installation requirements.
Hardware Requirements
The Convergence for MDM server runs as an application in a supported
application server. The hardware requirements are those of the
application Server.
Refer to your application server documentation for more information
about the required hardware requirements.
Software Requirements
This section contains a list of software requirements for this release of Semarchy Convergence for MDM.
| It is recommended to ensure that all software involved in the installation has current patch applied. |
Server Requirements
Java
Supported Java Runtime Environment (JRE) or Development Kit (JDK) versions are:
-
Java 7 - version 1.7.0 or above.
-
Java 8 - version 1.8.0 or above.
The JAVA_HOME (for a JDK) or JRE_HOME (for a JRE) environment variable must be configured to point to this installation of Java.
Application Server
Convergence for MDM Server is a JEE6 web application certified with the following application servers:
-
Apache Geronimo 3.0.1
-
Apache Tomcat 7.0.x and 8.0.x
-
Eclipse Jetty 9.x
-
IBM Websphere Liberty Profile 8.5.x
-
JBoss Application Server 7.x, Wildfly 8.x
-
GlassFish 3.x, 4.x
-
Oracle WebLogic 12c Release 1 (12.1.1, 12.1.2, 12.1.3)
Database
Supported database versions for the repository and the data locations are:
-
Oracle Database 10g Release 2 - 10.2.0.1-10.2.0.5
-
Oracle Database 11g Release 1: 11.1.0.6–11.1.0.7
-
Oracle Database 11g Release 2: 11.2.0.1–11.2.0.4
-
Oracle Database 12c Release 1: 12.1.0.1.0 - 12.1.0.1.0
Getting the Oracle Database
Oracle Database can be downloaded for free for Linux and Windows at the following URL: http://www.oracle.com/technetwork/database/enterprise-edition/downloads/index-092322.html
| Convergence for MDM works with Oracle Express Edition (not available for Windows 64bit machines). It also is possible to use with any other edition of Oracle (Standard or Enterprise). These are free to use for the purpose of developing, testing and prototyping. Note also that Amazon Web Services offers Oracle as part of Cloud Relational Database Service. |
| If you have any difficulty figuring out a good solution for getting Oracle, please contact support@semarchy.com |
Client Requirements
Supported browsers for the Convergence for MDM Workbench are:
-
Internet Explorer 9 and later
-
Google Chrome 7 and later
-
Firefox 4 and later
-
Safari 4 and later
-
Opera 10 and later
-
iOs 5 and later (Safari)
-
Android 3 and later
License
To complete the installation and configuration of Semarchy Convergence for MDM, you will be requested for a license file.
Please contact support@semarchy.com if you run into licensing issues or
connect to
http://www.semarchy.com/download/ to
request a trial license of Semarchy Convergence for MDM.
| Make sure that you have the license file provided by Semarchy before starting the installation. |
Planning the Installation
Architecture Details
This section details the various components of the Semarchy Convergence for MDM architecture and their interactions.
Application
The Semarchy Convergence for MDM JEE application is deployed and runs in a supported application server.
This application provides several access methods:
-
Users access it via their web browser using the Convergence Workbench user interface.
-
Applications access the metadata and deployed hub content via web services
The Convergence for MDM application stores its information in a repository. One application is always attached to a single repository, and connects this repository using a JDBC datasource named SEMARCHY_REPOSITORY configured in the application server.
The Convergence for MDM application is used at design-time to design data models and deploy them. At run-time, it manages the processes involved to schedule and execute the certification processes in the hub.
The processes are managed by:
-
The Integration Batch Poller that polls for new data batches pushed in the hub by the publishing applications.
-
The Execution Engine that orchestrates the certification process to generate the golden data, and the collection process to load the Pulse Metrics Warehouse.
The application uses role-based security for accessing Convergence for MDM features. The users and roles used to connect to the application must be defined in the security realm of the application server. Configuring the roles and users is part of the application configuration.
Repository
The repository contains the information for a given Convergence for MDM application. It stores:
-
The models: entities, attributes, etc.
-
The version control information: branches, editions, etc.
-
The configuration & security information: roles, privileges, notification servers, notification policies, preferences, etc.
-
Data locations and data editions: branches, deployed model and data editions, job definitions, etc.
-
Run-time information: queues, logs
A repository is stored in an Oracle database schema accessed from the application using a JDBC datasource named SEMARCHY_REPOSITORY.
| The repository should never be accessed directly via SQL queries. Access to the Semarchy Convergence for MDM information must be performed through the Convergence Workbench user interface that is served by the application. |
Repository Types
There are two types of repositories. The repository type is selected at creation time and cannot be modified afterwards.
The repository types are:
-
Design: All design-time and run-time operations are possible in this repository.
-
Deployment: With this repository type, you can only import closed model editions and cannot edit them.
The deployment repositories are suitable for production sites. Model transfer from design to deployment repositories is handled via incremental export/import of closed model editions.
Data Locations
When a MDM hub must be available for run-time (for testing or production
purposes), it is generated from a data model defined in the repository,
and deployed in a data location.
Data Locations contain the deployed data hubs. Each hub
contains the golden data, the source data pushed by publishers in the
hub, and the various stages of this data in the certification process.
The data location content is hosted in an Oracle database schema and accessed via a JDBC datasource defined in the application server. A data location refers to the datasource via its JNDI URL.
Data Location Content
A Data Location stores several Model Editions of the same model and several Data Editions.
A Deployed Model Edition is a model version deployed at a given time in a data location. As an MDM Hub model evolves over time, for example to include new entities or functional areas, new model editions are created then deployed. Deployed Model Editions reflect this evolution in the structure of the MDM Hub. Similarly, a Data Edition reflects the evolution of the data stored in the hub over time. You can perform snapshots (editions) of the master data at given points in time. Data Editions reflect the evolution in the content of the MDM Hub.
Data Locations, Repositories and Models
A data location is attached to a repository: You can declare as many
data locations as you want in a repository, but a data location is
always attached to a single repository. It is not possible to have a
data location attached to two repositories at the same time.
A data location can contain several editions of a single model from this
repository. It is not possible to store two different models in the same
data location.
Data Location Types
There are two types of data locations. The type is selected when the data location is created and cannot be changed afterwards:
The data location types are:
-
Development Data Locations: A data location of this type supports installing closed model editions (closed to changes) and installing/updating open model editions (subject to changes). This type of data location is suitable for testing models in development and quality assurance environments.
-
Production Data Location: A data location of this type supports only installing closed model editions. Updating is not allowed, and deploying an open model edition is not allowed. This type of data location is suitable for deploying MDM hubs in production environments.
Convergence Pulse Metrics Warehouse
Convergence Pulse is an optional component that captures metrics from the Data Locations and the Repository and stores them in a Pulse Metrics Warehouse. The metrics from this warehouse can be displayed into dashboards available from Convergence for MDM.
The Pulse Metrics Warehouse is stored in an Oracle database schema accessed from the Convergence for MDM application using a JDBC datasource named SEMARCHY_PULSE_METRICS.
If you plan to use Convergence Pulse Metrics dashboards in Convergence for MDM, you must plan and configure Convergence Pulse.
If you do not plan to use Convergence Pulse, skip the creation of the Pulse Metrics Warehouse datasource in the installation process.
Installation Patterns
This section provides patterns for deploying Semarchy Convergence for MDM in real-life environments.
Pattern #1: Single Repository and Project
This pattern assumes that a single project is designed through a development/QA/Production lifecycle. For this pattern:
-
A single Design repository is created.
-
Three data locations, DEV, QA and PROD are created:
-
DEV is a Development data location into which open model editions are deployed or updated during the development phase. This location is used by the development team to test their work.
-
QA is a Development data location into which the model edition closed by development is deployed for QA consumption. Possibly, open data locations can be deployed directly from development for immediate testing. This location contains QA data, and allows for example limit values testing.
-
PROD is a Production data location. Only closed and finalized editions can be deployed. The real golden data is generated here.
-
In this pattern, a single repository contains the development, QA and production editions of the models. Model versioning allows freezing and delivering to the next stage (and next deployment location) a model as it moves along its lifecycle.
Pattern #2: Single Repository, Multiple Projects.
This pattern is similar to the previous one, but assumes that several
projects/models are managed in the same repository.
For this pattern,
-
A single design repository is created.
-
Three data locations are created per project: DEV1, QA1 and PROD1, then DEV2, QA2, PROD2, etc.
The organization is the same as in pattern 1, but a set of data locations exists for each project managed in the single repository.
Pattern #3: Development and Production in Different Sites
This pattern is similar to Pattern #1, but assumes that the development/QA and production sites are located on different networks or sites.
For this pattern, two repositories are created instead of one:
-
A REPO_DEV Design repository for the development and QA site. The DEV and QA Development data locations are attached to this repository.
-
A REPO_PROD Deployment repository for the production site. The PROD Production data location is attached to this repository.
With this configuration, when the QA phase is finished, the closed models editions are exported to files from the REPO_DEV Design repository and imported in the REPO_PROD Deployment repository. From this repository these closed models are deployed to the PROD Production data location.
| With this configuration, you need to deploy two instances of the Semarchy Convergence for MDM Application, one per repository. These two instances are located on two different networks with possibly different security, scalability and high availability requirements. |
Although patterns #1 and #2 work in most cases, this last may be preferable in environment where the production is clearly separated from the development side.
High-Availability Configuration
Semarchy Convergence for MDM can be configured to support enterprise-scale deployment and high-availability.
Convergence for MDM supports the clustered deployment of the Convergence for MDM web application for high-availability and failover. A clustered deployment can be set up for example to support a large number of concurrent users performing data access, entry or duplicate management operations.
Reference Architecture for High-Availability
In a clustered deployment, only one instance of the Convergence for MDM application manages and runs the certification processes. This instance is the Active Instance. A set of clustered Convergence for MDM applications serves users accessing the Workbench (for modeling, administration or data stewardship) as well as applications accessing data locations via web services. These are Passive Instances. The back-end databases hosting the repository and data locations are deployed in a database cluster, and an HTTP load balancer is used as a front-end for users and applications.
The reference architecture for such a configuration is described in the
following figure: 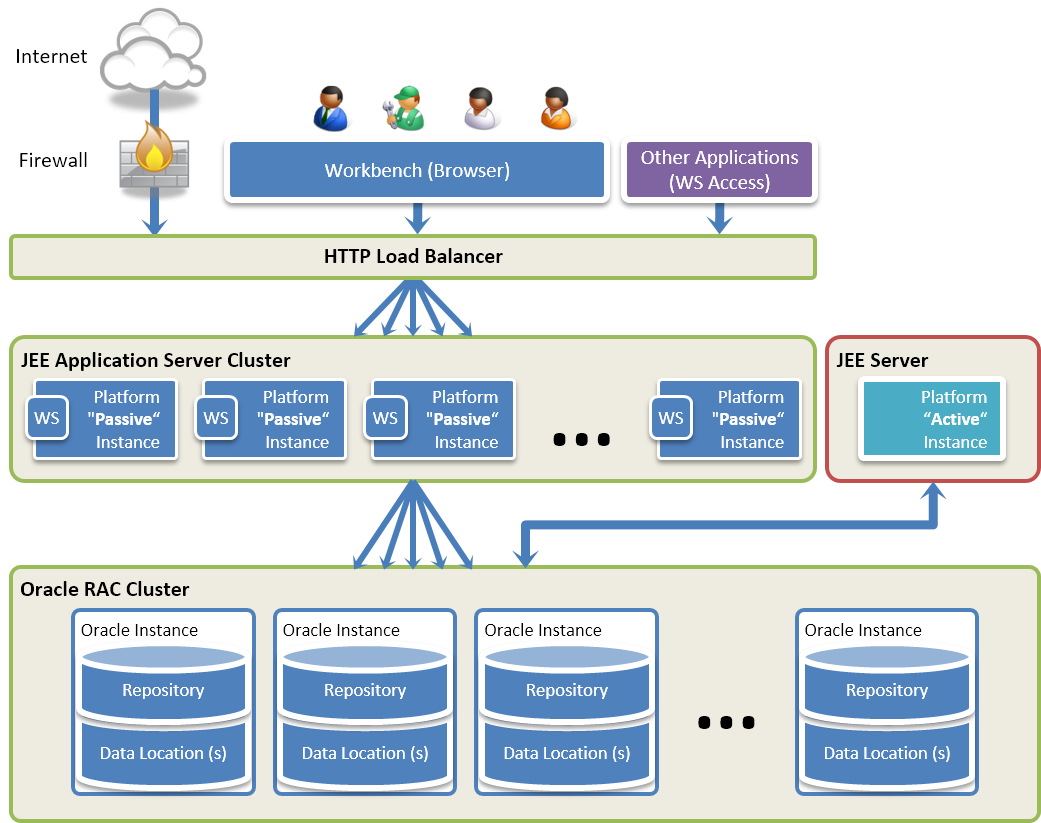
This architecture is composed of the following components:
-
HTTP Load Balancer: This component manages the sessions coming from within the enterprise network or from the Internet (typically via a Firewall). This component may be a dedicated hardware load balancer or a software solution, which distributes the incoming sessions on the passive instances running in the JEE application server cluster.
-
JEE Application Server Cluster + Passive Convergence for MDM Platforms: A Convergence for MDM application instance is deployed on each node of this cluster, which is scaled to manage the volume of incoming requests. In the case of a node failure, the other nodes remain able to serve the sessions. The Convergence for MDM applications deployed in the cluster are Passive Instances. Such instance is able to process user access to the Convergence Workbench, or application access to the web services, but is unable to manage the batches and the jobs.
-
JEE Server + Active Convergence for MDM Platform: This single JEE server hosts the only complete Convergence for MDM platform of the architecture. This Active Instance is not accessible to users or applications. Its sole purpose is to poll the submitted batches and process the Jobs.
-
Oracle RAC Cluster: This component hosts the Convergence for MDM Repository and the Data Locations schemas in a clustered environment. Both active and passive instances of the Convergence for MDM Platform connect to this cluster using Oracle RAC JDBC datasources.
In this architecture:
-
Design-time or administrative operations are processed by the passive instances in the JEE application server cluster.
-
Operations performed on the MDM Hubs (data access, workflows or external loads) are also processed by the passive instances, but the resulting batches and jobs are always processed by the single active instance.
| In this architecture, only one Active Instance must be configured. Multiple active instances are not supported. |
Load Balancing
In the architecture, load balancing ensures an optimal usage of the resources for a large number of users and applications accessing simultaneously Semarchy Convergence for MDM.
Load balancing is performed at two levels:
-
The HTTP load balancer distributes the incoming requests on the nodes of the JEE application server cluster.
-
The Oracle RAC JDBC datasource configuration distributes database access to the repository and the data locations on the RAC cluster nodes.
Failure and Recovery
In the reference architecture, failover is managed for both user sessions (connections through the Convergence Workbench) and application sessions (via the web services). This section describes the behavior in case of a failure at the various points of the architecture.
Database Failure
In the event of a RAC node failure, other nodes are able to recover and process the incoming database requests.
Passive Instance Failure
If one of the nodes of the JEE application server cluster fails:
-
Web service sessions are moved to the other active nodes.
-
User sessions to this node are automatically restarted on other active nodes. The only information not recovered is the content of the un-saved editors for the user sessions. All the other content is saved in the repository or the data locations. Transactions attached to activities (workflow instances) for example, are saved in the data locations and not lost.
Active Instance Failure
The single point of failure in this architecture is the Active Instance, which sole purpose is to process batches and jobs.
If this server fails:
-
Jobs running the queues are halted.
-
Queued jobs remain in their queue.
-
Incoming batches remain pending for the batch poller to process them.
The active instance must be restarted automatically or manually to
recover from a failure.
When it is restarted, the platform resumes its normal course of activity
with no user action required.
| A Failure of the Active Instance does not impact the overall activity of users or applications, as these rely on the (clustered) Passive Instances. The only impact of such a failure may be a delay in the processing of data changes. |
Configuring Convergence for MDM for High-Availability
The Semarchy Convergence for MDM application comes in two flavors
corresponding to two WAR (Web Application Archive) files. Both these
files are in the semarchy-mdm-install-<version tag>.zip
archive file, in the mdm-server folder:
-
semarchy-passive.warincludes the passive application to deploy on all the passive nodes of the cluster. This war does not include the Batch Poller and Engine services, and is not able to trigger or process submitted batches. -
semarchy.warincludes the active application to deploy on the single active server. This war includes the Batch Poller and the Engine, and is able to trigger and process the submitted batches.
The overall installation process for a high-availability configuration is similar to the general installation process:
-
Create the repository and data location schemas in the RAC cluster.
-
Configure the application server security for both the cluster and the active node.
-
Configure the Oracle RAC JDBC Datasources for the nodes/cluster. Refer to your Oracle Database and Application Server documentation for more information about configuring RAC JDBC Datasources.
-
Deploy the applications:
-
Deploy the active instance (
semarchy.war) in the active node. -
Deploy the passive instances (
semarchy-passive.war) in the JEE cluster according to the recommendations given in the application server documentation.
-
Configuring the Database Schemas
This section explains how to configure the database schemas for the repository and data locations.
Configuring the Repository Schema
Before installing Semarchy Convergence for MDM, you must create an Oracle schema for the repository. You can create it manually or use your database administration interface for this purpose. In this section, we provide a sample script for creating this schema. Make sure to adapt this script to your database configuration.
CREATE USER <repository_user_name> IDENTIFIED BY <repository_user_password>
 DEFAULT TABLESPACE USERS TEMPORARY TABLESPACE TEMP;
GRANT CONNECT, RESOURCE TO <repository_user_name>;

-- The following command should be used for Oracle 12c and above
GRANT UNLIMITED TABLESPACE TO <repository_user_name>;
Store the values of the <repository_user_name> and
<repository_user_password> as you will need them later for creating
the datasource to access the repository.
|
Configuring the Data Locations Schemas
You do not need to create the data locations schemas at installation time, but it is recommended to plan them as part of the installation and configuration effort. You can create them manually or use your database administration interface for this purpose. In this section, we provide a sample script for creating a data location schema. Make sure to adapt this script to your database configuration and duplicate it to create the schemas for all data locations.
CREATE USER <data_location_user_name> IDENTIFIED BY <data_location_user_password>
 DEFAULT TABLESPACE USERS TEMPORARY TABLESPACE TEMP;
GRANT CONNECT, RESOURCE TO <data_location_user_name>;

-- The following command should be used for Oracle 12c and above
GRANT UNLIMITED TABLESPACE TO <data_location_user_name>;
Store the values of the <data_location_user_name> and
<data_location_user_password> as you will need them later for creating
the datasource to access the data location.
|
| The repository and data locations do not necessary need to be located in the same Oracle instance. The same schema should not be used for the repository and a data location, and you cannot use the same schema for several data locations. |
Creating the Pulse Metrics Warehouse Schema
To use Convergence Pulse Metrics, you must create an Oracle schema storing the Pulse Metrics Warehouse. You can create it manually or use your database administration interface for this purpose. In this section, we provide a sample script for creating this schema. Make sure to adapt this script to your database configuration.
CREATE USER <pulse_user_name> IDENTIFIED BY <pulse_user_password>
 DEFAULT TABLESPACE USERS TEMPORARY TABLESPACE TEMP;
GRANT CONNECT, RESOURCE, SELECT ANY TABLE, CREATE ANY VIEW TO <pulse_user_name>;

-- The following command should be used for Oracle 12c and above
GRANT UNLIMITED TABLESPACE TO <pulse_user_name>;
Store the values of the <pulse_user_name> and
<pulse_user_password> as you will need them later for creating the
datasource to access the Pulse Metrics Warehouse.
|
@demo-schemas-prefix@PULSE for the Pulse Metrics Warehouse user nameCREATE USER @demo-schemas-prefix@PULSE IDENTIFIED BY MyPassword
DEFAULT TABLESPACE USERS TEMPORARY TABLESPACE TEMP;
GRANT CONNECT, RESOURCE, SELECT ANY TABLE, CREATE ANY VIEW TO @demo-schemas-prefix@PULSE;
-- The following command should be used for Oracle 12c and above
GRANT UNLIMITED TABLESPACE TO @demo-schemas-prefix@PULSE;| The repository and the Pulse Metrics warehouse should be located in the same Oracle instance. The same schema should not be used for the repository and the warehouse. |
Sizing and Maintaining the Schemas
Repository Schema
The following considerations should be taken into account when sizing the repository schema:
-
The repository contains a small volume of information if you exclude the execution log. It can be sized by default from 100 to 200Mb depending on the number of models and number of model versions stored in it.
-
The execution log is the larger part of the data stored in the repository. The volume of data generated in the log depends on the number of job executions executed daily. It is recommended to monitor the job execution and resize the repository according to the log history that you want to preserve.
-
In order to maintain the logs to a reasonable volume, it is recommended to regularly perform a purge of the log.
To purge the logs:
-
Connect to the Convergence Workbench.
-
Select the Administration Console perspective.
-
In the Administration view, double-click the Job Logs node. The Job Logs list editor opens.
-
In the editor toolbar, select the Purge Using a Filter… button.
-
Select and existing filter or define a new filter.
-
Click the Finish button to purge using the selected filter.
| It is possible to trigger job logs purges through web services. The Administration Service exposes such operations. |
Data Location Schemas
The following considerations should be taken into account when sizing the data location schema:
-
The data location schema contains for each entity of the deployed model several tables that correspond to the data in the various stages of the certification process. Some of these tables contain also the history of the previous iterations of the process.
-
Although the data version management optimizes the storage to not duplicate all the records at each data edition, data editions mandates that old versions of records are kept in the schema.
-
The volume required in the data location depends on the following factors:
-
Number of entities
-
Number of source records pushed for these entities
-
Number of new or updated source records pushed for these entities.
-
Number of data versions maintained for the model.
-
A recommended original sizing is to add the source data volume pushed for each entity by all publishers (the overall input) and multiply it by a factor of 10. It is recommended after the original sizing to monitor the size of the data location schema in the normal course of operations and adjust the sizing appropriately.
| The same sizing considerations applies to both the data and temporary tablespaces in the case of the data locations, as the database engine is used for most of the processing effort in the certification process. |
Data Retention Policies can be created to define the volume of data to retain in the data locations, and Data Purges can be scheduled to trigger the pruning of unnecessary data. Defining Retention Policies is covered in the Securing Data chapter of the Semarchy Convergence for MDM Developer’s Guide. Data Purges are described in the Managing Execution chapter of the Semarchy Convergence for MDM Administration Guide.
Pulse Metrics Warehouse Schema
The following considerations should be taken into account when sizing the Pulse Metrics Warehouse schema:
-
Number of workflows started and their frequency.
-
Frequency of the metrics gathering process.
-
Metrics History to preserve.
The Pulse Metrics warehouse can be sized like the repository when starting the project.
Deployment and Configuration Overview
The Semarchy Convergence for MDM Application is a Java EE application that can be deployed to a number of environments. It requires a Java EE applications server (for example: Tomcat, Glassfish, JBoss, etc). This section details the steps required to configure the application server and deploy the application in the application server.
| The instructions provided in the following chapters detail one method and approach to configure the application server. Note that the method may vary depending on the application server version. Please refer to the application server documentation for the up-to-date instructions and instruction details. Approaches also differ depending on the best practices used in your information system. Please contact the application server administrator and review these instructions to adapt them to your practices. |
Conventions
In the following chapters, the following variables names are used in the tasks:
-
The
semarchy-mdm-install-xxx.zipfile refers to the Semarchy Convergence for MDM - Installation file that you have downloaded to install Convergence for MDM. The name of this file varies as it includes the Convergence for MDM version and build number. -
The
semadminuser refers to the first user created for connecting to Convergence for MDM. This user is named by default semadmin. This name can be changed in the installation process. -
<semadmin_password>refers to the password you want to set for thesemadminuser. This password must comply with the password policy defined for your application server. -
The
tempfolder refers to a temporary folder of your choice.
Security
The application configuration includes the security in the application
server.
The goal of this task is to create:
-
A
semarchyConnectrole. This built-in role grants the privilege to connect to the application. -
A
semarchyAdminrole. This built-in role grants full privileges in the application. -
A user called
semadminwithsemarchyConnectandsemarchyAdminroles. This user is the administrator for the Semarchy Convergence for MDM application.
Depending on the application server, users are directly mapped to roles, or are mapped to roles via a Group concept. When an application server uses groups:
-
The
semarchyConnectGroupandsemarchyAdminGroupgroups are created -
The
semarchyConnectGroupgroup is mapped to the built-insemarchyConnectrole. -
The
semarchyAdminGroupgroup is mapped to the built-insemarchyAdminrole. -
The
semadminuser is added to both thesemarchyConnectGroupandsemarchyAdminGroupgroups.
This basic configuration allows you to connect with the semadmin user
and have full privileges for the application.
It is recommended to tune and enhance the security by:
-
Creating new users, roles and groups dedicated to Semarchy Convergence for MDM in the application server security realm according to your organization. Refer to your application server’s security guide for more information.
-
Declaring these roles in Semarchy Convergence for MDM and granting privileges to the application’s features to these roles. For more information, refer to the Semarchy Convergence for MDM Administration Guide.
Datasources
The configuration of the application includes creating datasources to connect to the repository, data locations and Pulse Metrics Warehouse that will be used by your MDM projects.
To configure the repository datasource, make sure that you have the following information:
-
<oracle_instance_hostname>: host name or IP address of the database server -
<oracle_listener_port>: number of the port where the server listens for requests. -
<oracle_SID_name>or<oracle_service_name>: name of a database on the server. This is the SID or ServiceName in the Oracle terminology. Note that the JDBC URL used for oracle varies depending on the value used:-
SID:
jdbc:oracle:thin:@<oracle_instance_hostname>:<oracle_listener_port>:<oracle_SID_name> -
Service Name:
jdbc:oracle:thin:@<oracle_instance_hostname>:<oracle_listener_port>/<oracle_service_name>
-
-
<repository_user_name>: name for the user created when configuring the repository schema. -
<repository_user_password>: this user’s password.
The JNDI Name of the repository datasource must always
be jdbc/SEMARCHY_REPOSITORY. Make sure to set this name for the
repository datasource as it is referred to with that name by the
application.
|
To configure the data location datasources, make sure that you have the following information for each data location schema:
-
<data_location_name>: name for the data location. You can use this name as the JNDI name for the datasource in which this data location will be hosted. -
<oracle_instance_hostname>: host name or IP address of the database server -
<oracle_listener_port>: number of the port where the server listens for requests. -
oracle_SID_name>or<oracle_service_name>: name of a database on the server. This is the SID or ServiceName in the Oracle terminology. -
<data_location_user_name>: name for the user created when configuring the data location schema. -
<data_location_user_password>: this user’s password.
If you are planning to use Convergence Pulse Metrics, make sure to have the same connection information for your Pulse Metrics Warehouse schema:
-
<oracle_instance_hostname>: host name or IP address of the database server -
<oracle_listener_port>: number of the port where the server listens for requests. -
<oracle_SID_name>or<oracle_service_name>: name of a database on the server. This is the SID or ServiceName in the Oracle terminology. Note that the JDBC URL used for oracle varies depending on the value used:-
SID:
jdbc:oracle:thin:@<oracle_instance_hostname>:<oracle_listener_port>:<oracle_SID_name> -
Service Name:
jdbc:oracle:thin:@<oracle_instance_hostname>:<oracle_listener_port>/<oracle_service_name>
-
-
<pulse_user_name>: name for the user created when configuring the repository schema. -
<pulse_user_password>: this user’s password.
The JNDI Name of the Pulse Metrics Warehouse datasource must always
be jdbc/SEMARCHY_PULSE_METRICS. Make sure to set this name for the
warehouse datasource as it is referred to with that name by the
application.
|
JavaMail Session
Semarchy Convergence for MDM uses email servers for example to send
email notifications.
For the email features to work, you must configure an email notification server.
A notification server can be configured either:
-
By entering the mail server SMTP configuration the Semarchy Convergence for MDM.
-
By referring Convergence for MDM to a JavaMail Session resource configured in the application server.
This latter option is described in the next chapters for each application server.
| If a JavaMail Session resource is already configured in the application server, you can skip these steps. You will reuse the existing JavaMail Session resource when configuring the notification server. |
The resource name used for the JavaMail session resource is
set to mail/Session. This value can be changed when running the
installation process, and the changed value must be used when
configuring the notification server.
|
Application Deployment
The application is deployed by default with the semarchy context.
Therefore it is accessible on the application server on the following
URL: http://<application_server_host>:<application_server_port>/semarchy/.
During the application deployment, it is possible to use a different context than semarchy. If you use a different context, make sure to take it into account in the URL to test and connect to the application.
Downloading Convergence for MDM
The installation files for Convergence for MDM are available in the semarchy-mdm-install-xxx.zip archive, which is available from the Semarchy website (http://www.semarchy.com).
-
Uncompress this file in the
tempfolder.
The semarchy-mdm-install-xxx.zip archive contains the following files and folders:
| File/Folder | Description |
|---|---|
|
File describing the package |
|
This folder contains the installation files for Convergence for MDM. |
|
Semarchy Convergence for MDM deployable WAR file. |
|
Semarchy Convergence for MDM deployable WAR file for Passive Instances. Use this version for deploying Convergence for MDM in an existing supported application server for High-Availability Configurations. |
|
Sample configuration file deploying Convergence for MDM in Apache Tomcat. |
|
This folder contains libraries used with Convergence for MDM, listed below. |
|
Oracle JDBC Driver |
|
Library to install to enable JavaMail for Apache Tomcat Servers. Ignore this file if you are using a different application server. |
|
Tomcat tools for authentication and role mapping. See Advanced Tomcat Configuration for more information. |
|
This folder contains Convergence Pulse binaries, documentation and sample dashboards. Refer to the Convergence Pulse User’s Guide for more information about this component. |
Deploying and Configuring with Apache Tomcat
This section explains how to configure and deploy the Semarchy Convergence for MDM Application with Apache Tomcat.
In this section, <tomcat> refers to the Apache Tomcat installation
folder.
| Refer to the Tomcat Documentation for more details about the deployment and configuration processes for Apache Tomcat. |
Installing Additional Libraries
Before adding libraries, you must stop the Apache Tomcat
server using <tomcat>/bin/shutdown.bat (Windows) or
<tomcat>/bin/shutdown.sh (UNIX/Linux).Similarly, after installing the libraries, restart the Apache Tomcat server using <tomcat>/bin/startup.bat (Windows) or
<tomcat>/bin/startup.sh (UNIX/Linux)
|
Installing the Oracle JDBC Driver
To install the Oracle JDBC driver:
-
Copy the oracle driver file (
temp/mdm-server/additional-libraries/ojdbc6.jar) to the<tomcat>/libdirectory.
Installing the Mail Session Libraries
This configuration is required for mail notifications using JEE Mail Session.
To install the Java Mail Libraries:
-
Copy the
temp/mdm-server/additional-libraries/geronimo-javamail-xxx.jarfile to the<tomcat>/lib/folder
Configuring the Security
To configure the Convergence for MDM administrator user:
-
Stop the Apache Tomcat server.
-
Edit the
<tomcat>/conf/tomcat-users.xmlfile. -
In the
<tomcat-users>section, add the following line:
<user username="semadmin" password="<semadmin_password>" roles="semarchyConnect,semarchyAdmin"/>-
Save the file.
-
Restart the Apache Tomcat server.
This operation adds to Apache Tomcat a semadmin user with its password. This user has full privileges to the Convergence for MDM application. Make sure to use a strong password for this user.
Deploying the Application
To deploy the application:
-
Connect to the Apache Tomcat Manager (
http://<tomcat_host>:<tomcat_port>/manager/). -
In the Deploy War File section, click the Select File button, then select the
temp/mdm-server/semarchy.warfile. -
Click the Deploy button.
The Convergence for MDM application is uploaded and deployed in the server.
Setting Up the Datasources
It is recommended to keep a backup copy of the semarchy.xml
file. If you un-deploy the application, this file is removed and the
changes performed are lost.
|
To configure the repository datasource:
-
Edit the
<tomcat>/conf/Catalina/localhost/semarchy.xmlfile. -
In the
<context>configuration element, search the jdbc/SEMARCHY_REPOSITORY datasource and edit the following parameters:-
url:
jdbc:oracle:thin:@<oracle_instance_hostname>:<oracle_listener_port>:<oracle_SID_name> -
username:
<repository_user_name> -
password:
<repository_user_password>
-
-
Save the
semarchy.xmlfile.
| Do not change the name of the SEMARCHY_REPOSITORY datasource. The application refers to a datasource with this name for the repository. |
To configure a data location datasources:
-
Edit the
<tomcat>/conf/Catalina/localhost/semarchy.xmlfile. -
In the
<context>configuration element, copy and un-comment the datasource sample definition called jdbc/DATA_LOCATION_1. -
Rename and edit the copy of the datasource settings with the following parameters:
-
name:
jdbc/<data_location_datasource_name> -
url:
jdbc:oracle:thin:@<oracle_instance_hostname>:<oracle_listener_port>:<oracle_SID_name> -
username:
<data_location_user_name> -
password:
<data_location_user_password>
-
-
Repeat the two previous steps for each data location’s datasource.
-
Save the
semarchy.xmlfile.
If you want to use Convergence Pulse Metrics, configure the Pulse Metrics Warehouse datasource.
To configure the Pulse Metrics Warehouse datasource:
-
Edit the
<tomcat>/conf/Catalina/localhost/semarchy.xmlfile. -
In the
<context>configuration element, search the jdbc/SEMARCHY_PULSE_METRICS datasource and edit the following parameters:-
url:
jdbc:oracle:thin:@<oracle_instance_hostname>:<oracle_listener_port>:<oracle_SID_name> -
username:
<pulse_user_name> -
password:
<pulse_user_password>
-
-
Save the
semarchy.xmlfile.
| Do not change the name of the SEMARCHY_PULSE_METRICS datasource. The application refers to a datasource with this name for the Pulse Metrics Warehouse. |
The repository and data location datasources are now configured, pointing to the schemas previously created.
| Depending on the Tomcat server configuration, you may have to restart the Convergence for MDM application for refreshing the application configuration with your changes. |
Configuring JavaMail Session
This configuration is required for mail notifications using JEE Mail Session.
To configure JavaMail Session:
-
Edit the
<tomcat>/conf/Catalina/localhost/semarchy.xmlfile. -
In the
<context>configuration element add the entry given below and then save thesemarchy.xmlfile. Change the entry below to match your SMTP server configuration.
<Resource name="mail/Session" auth="Container" type="javax.mail.Session"
 mail.smtp.host="<mail_server_host>"
 mail.port="<mail_server_port>"
 mail.smtp.user="<mail_user_name>"
 mail.transport.protocol="smtp"
 password="<mail_user_password>"
 mail.smtp.auth="true"
/>
Testing the Application
To test the application:
-
Open a web browser.
-
In the URL, enter:
http://<tomcat_host>:<tomcat_port>/semarchy/.
The Semarchy Convergence for MDM Login page appears.
| Proceed directly to the Installing the Repository task. |
Advanced Tomcat Configuration
This section provides advanced configuration information for Apache Tomcat.
Delegating Authentication and Roles to LDAP
Convergence for MDM support authenticating as well as roles retrieval from an external directory, such as LDAP or Active Directory. The information entered in the login form is passed to the external directory, which returns the list of roles if the user is valid.
To delegate the authentication to an LDAP directory, add to the semarchy.xml configuration file a JNDI Realm definition as shown in the example below. This configuration must be customized to match your LDAP directory configuration.
For more information about configuring LDAP with Tomcat, see Tomcat Realm Documentation.
<Realm         className="org.apache.catalina.realm.JNDIRealm"
        connectionURL="ldap://ldaphost.mydomain.com:389" (1)
        userPattern="uid={0},ou=users,ou=people,dc=myCompany,dc=com" (2)
        roleBase="ou=groups,ou=people,dc=myCompany,dc=com" (3)
        roleName="cn" (3)
        roleSearch="(member={0})" /> (3)
The parameters of the realm must be customized to your configuration:
| 1 | connectionURL: Connection URL to the LDAP server |
| 2 | Users log in to Convergence for MDM with their LDAP uid. The password passed in the login form must the one of the user found in the LDAP tree using the userPattern. |
| 3 | Roles are searched in the roleBase point in the LDAP tree. roleSearch defines the LDAP search filter used to search roles attached to a user name (represented by {0}). The roles returned are the attribute identified by roleName. |
Delegating Authentication to OpenID 2.0 and OpenID Connect
OpenID is mechanism used to delegate authentication to another provider.
With OpenID configured, you can use Google, Yahoo, Facebook or Twitter accounts to authenticate to Convergence for MDM, instead or in addition to Convergence for MDM Login Form.
There two main "implementations" of OpenID used by the authentication providers: OpenID 2.0 and OpenID Connect. OpenID Connect is a newer implementation, and authentication providers move over time from OpenID 2.0 to OpenID Connect.
This section explains how to configure OpenID 2.0 or OpenID Connect for Tomcat, and explain how to mix the OpenID authentication scheme with the Convergence for MDM Login Form in both cases.
| OpenID is an authentication service. It does not support roles. A realm (LDAP, File, or other) must be defined to retrieve roles for users identified with OpenID. |
Configuring OpenID 2.0 Authentication
The following configuration steps apply to Tomcat 7 and 8.
To configure authentication with use OpenID:
-
Download the Open ID SSO connector.
-
Edit the
semarchy.xmlconfiguration file and create the OpenID valve and realm configuration.
A sample OpenID configuration using Yahoo authentication is provided below.
<!-- OpenID Valve configuration for Authentication -->
<Valve         className="com.boylesoftware.catalina.authenticator.openid.OpenIDAuthenticator"
        singleProviderURI="https://me.yahoo.com"
        loginNameAttributeType="http://axschema.org/contact/email"
        allowedClaimedIDPattern="https://me.yahoo.com/a/.+"
        hostBaseURI="http://mdm_host:port" />         (1)

<!--Realms configuration -->
<Realm className="com.boylesoftware.catalina.authenticator.openid.OpenIDRealm">
        <!--
        The Following LDAP realm is used for the sole purpose role mapping.
        Any Tomcat realm can be used for this purpose.
        -->
        <Realm  className="org.apache.catalina.realm.JNDIRealm"
                connectionURL="ldap://ldaphost.mydomain.com:389"                (2)
                userPattern="uid={0},ou=users,ou=people,dc=myCompany,dc=com"        (3)
                userPassword="uid"        (3)
                roleBase="ou=groups,ou=people,dc=myCompany,dc=com"
                roleName="cn"
                roleSearch="(member={0})" />
</Realm>
The parameters of the valve and realm must be customized to your configuration:
| 1 | The OpenID connector will return to the original server after authentication. In most cases (when the server uses HTTPS), this mechanism works. If the server does not use HTTPS, it is recommended to set the host and port of the Semarchy Convergence for MDM instance in hostBaseURI. |
| 2 | This LDAP host corresponds to the LDAP server containing your user and roles mappings. |
| 3 | LDAP Realms configuration. See Tomcat Realm Documentation for more information. Note that in this realm configuration the userPassword must point to the LDAP uid (user id). The LDAP user ID must be equal to the OpenID Connect User ID (in that case, the email) |
Mixing OpenID 2.0 with Local Authentication
Mixing OpenID 2.0 with a Local authentication renders a login page that provides the possibility to login using an OpenID account and to login by entering a login and password stored locally.
The following configuration steps apply to Tomcat 7 and 8.
The following semarchy.xml configuration sample can be used as a starting point for such a configuration:
<!-- OpenID Valve configuration for Authentication -->
<Valve         className="com.boylesoftware.catalina.authenticator.openid.OpenIDAuthenticator"
        loginNameAttributeType="http://axschema.org/contact/email"
        singleProviderURI="https://me.yahoo.com"
        allowedClaimedIDPattern="https://me.yahoo.com/a/.+"
        hostBaseURI="http://mdm_host:myport" />

<!--
        Login form configuration, allowing to display a OpenID authentication button
        pointing to OpenID Provider (Google) given by parameter value
-->
<Parameter name="SingleSignOn"
           value="openid_identifier=https://me.yahoo.com"
           override="true" />

<!--Realms configuration -->
<Realm className="com.boylesoftware.catalina.authenticator.openid.OpenIDRealm">
        <!--
        The Following LDAP realm is used for the sole purpose role mapping.
        Any Tomcat realm can be used for this purpose.
        -->
        <Realm  className="org.apache.catalina.realm.JNDIRealm"
                connectionURL="ldap://ldaphost.mydomain.com:389"
                userPattern="uid={0},ou=users,ou=people,dc=myCompany,dc=com"
                userPassword="uid"
                roleBase="ou=groups,ou=people,dc=myCompany,dc=com"
                roleName="cn"
                roleSearch="(member={0})" />

        <!--
        Local realms can be used as local authentication providers,
        or fallback providers if the OpenID authentication fails.
        -->
        <Realm         className="org.apache.catalina.realm.JNDIRealm"
                connectionURL="ldap://ldaphost.mydomain.com:389"
                userPattern="uid={0},ou=users,ou=people,dc=myCompany,dc=com"
                roleBase="ou=groups,ou=people,dc=myCompany,dc=com"
                roleName="cn"
                roleSearch="(member={0})" />

</Realm>
Configuring OpenID Connect Authentication
The following configuration steps apply to Tomcat 8. OpenID Connect is not support for Tomcat 7.
To configure authentication with OpenID Connect:
-
Download the Open ID Connect Connector for Tomcat 8. The file is named
tomcat8-oidcauth-<version_number>.jar -
Copy the
tomcat8-oidcauth-<version_number>.jarfile to the$TOMCAT_HOME/libdirectory. -
Edit the
semarchy.xmlconfiguration file and create the OpenID valve and realm configuration.
A sample OpenID Connect configuration using Google authentication is provided below.
<!-- Valve configuration for OpenID Connect authentication -->

<Valve className="org.bsworks.catalina.authenticator.oidc.OpenIDConnectAuthenticator"
       discoveryDocumentURL="https://accounts.google.com/.well-known/openid-configuration"
       clientId="GOOGLE_CLIENT_ID"                        (1)
       clientSecret="GOOGLE_CLIENT_SECRET_KEY"                (1)
       usernameClaim="email"
       hostBaseURI="http://mdm_host:port"        (2)
       landingPage="/"/>

<!--Realms configuration -->

<!--
The following LDAP realm stores the roles of the OpenID-authenticated users.
In this LDAP, each user has a name equal to the OpenID Connect user name.
Any Tomcat realm can be used for this purpose.
-->
<Realm  className="org.apache.catalina.realm.JNDIRealm"
        connectionURL="ldap://ldaphost.mydomain.com:389"                (3)
        userPattern="uid={0},ou=users,ou=people,dc=myCompany,dc=com"        (4)
        userPassword="uid"                                                (4)
        roleBase="ou=groups,ou=people,dc=myCompany,dc=com"
        roleName="cn"
        roleSearch="(member={0})" />
The parameters of the valve and realm must be customized to your configuration:
| 1 | The Google Client ID and Google Client Key are retrieved from the Google Developer Console. Refer to the Google Identity Platform site for detailed instructions. |
| 2 | The OpenID Connect connector will return to the original server after authentication. In most cases (when the server uses HTTPS), this mechanism works. If the server does not use HTTPS, it is recommended to set the host and port of the Semarchy Convergence for MDM instance in hostBaseURI. You must declare this redirect URI in the Google Developer Console. See the Google Identity Platform site for detailed instructions. |
| 3 | This LDAP host corresponds to the LDAP server containing the roles for your users. See Tomcat Realm Documentation for more information about LDAP configuration. |
| 4 | Note that in this realm configuration the userPassword must point to the LDAP uid (user id). The LDAP user ID must be equal to the OpenID Connect User ID (in that case, the email) |
Mixing OpenID Connect with Local Authentication
Mixing OpenID Connect with a Local authentication renders a login page that provides the possibility to login using an OpenID account and to login by entering a login and password stored locally.
The following configuration steps apply to Tomcat 8. OpenID Connect is not support for Tomcat 7.
To configure mixed authentication with OpenID Connect:
-
Download the Open ID Connect Connector for Tomcat 8. The file is named
tomcat8-oidcauth-<version_number>.jar -
Copy the
tomcat8-oidcauth-<version_number>.jarfile to the$TOMCAT_HOME/libdirectory. -
Copy the
temp/mdm-server/additional-libraries/com.semarchy.tool.jee.tomcat-<version>.jarfile to the$TOMCAT_HOME/libdirectory. This file is available from thesemarchy-mdm-install-xxx.ziparchive file that you downloaded. -
Edit the
semarchy.xmlconfiguration file and create an the OpenID valve and realm configuration.
Sample OpenID Connect configurations using Google authentication are provided below.
Sample Configuration with LDAP Realms
This sample uses LDAP Realms pointing to a directory for storing the users authenticating through the login form as well as the user/role mapping for OpenID Connect-authenticated users.
semarchy.xml for OpenID Connect Authentication with Google and LDAP Realms.<!-- Valve configuration for mixed OpenID Connect authentication -->
<Parameter name="SingleSignOn" value="openid_identifier=https://www.google.com/accounts/o8/id" override="true"/>
<Valve className="com.semarchy.tool.jee.tomcat.OpenIdConnectAuthenticator"
discoveryDocumentURL="https://accounts.google.com/.well-known/openid-configuration"
clientId="GOOGLE_CLIENT_ID" (1)
clientSecret="GOOGLE_CLIENT_SECRET_KEY" (1)
usernameClaim="email"
hostBaseURI="http://mdm_host:port" (2)
landingPage="/"/>
<!--Realms configuration -->
<Realm className="com.semarchy.tool.jee.tomcat.OpenIdRealm">
<!--
The following LDAP realm stores the roles of the OpenID-authenticated users.
In this LDAP, each user has a name equal to the OpenID Connect user name.
Any Tomcat realm can be used for this purpose.
-->
<Realm className="org.apache.catalina.realm.JNDIRealm"
connectionURL="ldap://ldaphost.mydomain.com:389" (3)
userPattern="uid={0},ou=users,ou=people,dc=myCompany,dc=com" (4)
userPassword="uid" (4)
roleBase="ou=groups,ou=people,dc=myCompany,dc=com"
roleName="cn"
roleSearch="(member={0})" />
<!--
The following LDAP realm is used for authenticating users via the login form.
-->
<Realm className="org.apache.catalina.realm.JNDIRealm"
connectionURL="ldap://ldaphost.mydomain.com:389" (5)
userPattern="uid={0},ou=users,ou=people,dc=myCompany,dc=com"
roleBase="ou=groups,ou=people,dc=myCompany,dc=com"
roleName="cn"
roleSearch="(member={0})"
/>
</Realm>The parameters of the valve and realm must be customized to your configuration:
| 1 | The Google Client ID and Google Client Key are retrieved from the Google Developer Console. Refer to the Google Identity Platform site for detailed instructions. |
| 2 | The OpenID Connect connector will return to the original server after authentication. In most cases (when the server uses HTTPS), this mechanism works. If the server does not use HTTPS, it is recommended to set the host and port of the Semarchy Convergence for MDM instance in hostBaseURI. You must declare this redirect URI in the Google Developer Console. See the Google Identity Platform site for detailed instructions. |
| 3 | This LDAP host corresponds to the LDAP server containing the roles for your users. See Tomcat Realm Documentation for more information about LDAP configuration. |
| 4 | Note that in this specific configuration the user uid and password stored in LDAP are equal to the OpenID Connect user name. |
| 5 | This realm configuration points to the same LDAP server but is used to authenticate users when they log in without using OpenID Connect. |
Sample Configuration with UserDatabase Realms
This sample uses Tomcat’s UserDataBase Realm to store into the tomcat-users.xml file the users authenticating through the login form and in a openid-users.xml file the user/role mappings for OpenID Connect-authenticated users.
semarchy.xml for OpenID Connect Authentication with Google and UserDataBase realms.<!-- Valve configuration for mixed OpenID Connect authentication -->
<Parameter name="SingleSignOn" value="openid_identifier=https://www.google.com/accounts/o8/id" override="true"/>
<Valve className="com.semarchy.tool.jee.tomcat.OpenIdConnectAuthenticator"
discoveryDocumentURL="https://accounts.google.com/.well-known/openid-configuration"
clientId="GOOGLE_CLIENT_ID"
clientSecret="GOOGLE_CLIENT_SECRET_KEY"
usernameClaim="email"
hostBaseURI="http://mdm_host:port"
landingPage="/"/>
<!--Realms configuration -->
<Realm className="com.semarchy.tool.jee.tomcat.OpenIdRealm">
<!--
The following realm stores the roles of the OpenID-authenticated users
in an "OpenIDDatabase" file resource, declared in server.xml.
In this file, each user has a name and a password equal to the OpenID Connect user name.
-->
<Realm className="org.apache.catalina.realm.UserDatabaseRealm" resourceName="OpenIDDatabase"/>
<!--
The following realm is used for authenticating users via the login form.
It uses the default /conf/tomcat-users.xml file.
-->
<Realm className="org.apache.catalina.realm.UserDatabaseRealm" resourceName="UserDatabase"/>
</Realm>/conf/server.xml to declare the file resource containing the OpenID Roles.<Resource name="OpenIDDatabase" auth="Container"
type="org.apache.catalina.UserDatabase"
description="User database for OpenID Connect Roles"
factory="org.apache.catalina.users.MemoryUserDatabaseFactory"
pathname="conf/openid-users.xml" />/conf/openid-users.xml file. Note that user names and password are equal. This file should be used only for mapping roles to user names, and not for authentication.<user username="user01@domain.com" password="user01@domain.com" roles="semarchyConnect,semarchyAdmin"/>
<user username="user01@domain.com" password="user01@domain.com" roles="semarchyConnect,dataSteward"/>Using Windows Authentication (SSO)
Windows Authentication (SSO) is supported in Tomcat using the Waffle (Windows Authentication Framework) component.
Using this mechanism, the user connected to the windows machine is used to authenticate to Convergence for MDM.
| The following configuration only works when the machine running the Convergence for MDM Server is a Windows server joined to the domain that you want to use for authentication. |
To configure Windows Authentication:
-
Download and Uncompress Waffle.
-
Copying the
waffle-jna.jar,guava-*.jar,jna-*.jar,platform-*.jar,slf4j*.jarandwaffle-tomcat7.jarfiles to the$TOMCAT_HOME/libdirectory. -
Edit the
semarchy.xmlfile and add the valve and realm configuration and then restart the server.
<Valve className="com.semarchy.tool.jee.tomcat.RoleMappingNegotiateAuthenticator"
        principalFormat="fqn"
        roleFormat="fqn" />

<Realm className="waffle.apache.WindowsRealm" />
To mix Login Form and SSO authentication use the following configuration:
<parameter name="SingleSignOn"
           value="action=j_negotiate_check"
           override="true" />

<Valve className="com.semarchy.tool.jee.tomcat.RoleMappingNegotiateAuthenticator"
        principalFormat="fqn"
        roleFormat="fqn" />

<Realm className="waffle.apache.WindowsRealm" />
Note that browsers must be configured to work with Windows Authentication:
-
Internet Explorer: The Tomcar server must be considered as Intranet host.
-
Chrome: The configuration is shared with Internet Explorer.
-
Firefox:
-
Open a new Tab.
-
Enter
about:configin the address bar. -
Enter
network.negotiate-auth.trusted-urisin the Filter box. -
Enter the Convergence for MDM server name as the value. If you have multiple servers, enter a comma separated list.
-
Close the tab.
-
Using the Tomcat Role Mapper
When the directory manages Groups of users and does not support Roles, you may need to configure a Group/Role mapping to convert directory’s Groups into Convergence for MDM Roles. Convergence for MDM provides a specific realm for this purpose.
This component is available as a jar named com.semarchy.tool.jee.tomcat-<version>.jar in your Semarchy Convergence for MDM installation package.
To configure the role mapper:
-
Copy the
temp/mdm-server/additional-libraries/com.semarchy.tool.jee.tomcat-<version>.jarfile to the$TOMCAT_HOME/libdirectory. -
Create a
$TOMCAT_HOME/conf/roles-mapping.propertiesfile to define the role mapping. -
Edit the
semarchy.xmlfile and add the following valve and realm configuration:
<Realm className="com.semarchy.tool.jee.tomcat.RoleMapping.Realm">
        <!-- This is the Realm for which role mapping is required. -->
        <Realm ClassName="org.apache.catalina.realm.JNDIRealm"
        ...
        />
</Realm>| The role mapper realm must enclose (Combined Realm) the realm for which is does the role mapping. |
Role Mapping File format
The role mapping file contains one line per role mapping, in the format:
<directory_group>=<semarchy_role_1>,<semarchy_role_2>,...The group names may contain spaces. In this situation, it should be kept as is and NOT enclosed into single or double quotes.
AdministratorsGroup=semarchyConnect,semarchyAdmin
UsersGroup=semarchyConnect
Data Stewards=demoDataStewards
In certain cases with Microsoft Active Directory, group names with spaces require that you escape them as shown below:
MDM\u0020Users=semarchyConnect
Advanced Role Mapping Configuration
You can use the following attributes to configure the role mapper:
-
replaceRole: Set to true to entirely replace the roles from the original realm by the mapped roles. Set to false (default value) to add the mapped roles to the list of roles. -
rolesMappingPathName: Location of to the role mapping file. By default this file is located in$TOMCAT_HOME/conf/roles-mapping.properties
<Realm className="com.semarchy.tool.jee.tomcat.RoleMappingRealm"
       replaceRole="true"
       rolesMappingPathName="/home/user/map.properties">
Deploying and Configuring with JBoss
This section explains how to configure and deploy the Semarchy Convergence for MDM Application with JBoss Application Server.
In this section, <jboss_home> refers to the JBoss server installation
folder.
| Refer to the JBoss Documentation for your JBoss version for more details about the deployment and configuration processes in JBoss. |
Installing Additional Libraries
Installing the Oracle JDBC Driver
To install the Oracle JDBC driver:
-
Copy the oracle driver file (
temp/mdm-server/additional-libraries/ojdbc6.jar) to the<jboss_home>/standalone/deploymentsdirectory.
Configuring the Security
| The configuration in this section uses the UsersRolesLoginModule (properties file based login module) and may be changed to a stronger authentication mechanism. |
The following example explains how to configure the semadmin user for JBoss in the default configuration.
To configure the security realm:
-
Go to the
<jboss_home>/binfolder and start theadd-user.shoradd_user.batscript -
Selection option b) Application User.
-
Select a realm or press Enter.
-
Enter
semadminfor the Username and then press Enter. -
Enter this user password and then press Enter.
-
Re-enter the password and then press Enter.
-
Enter the following list of roles:
semarchyConnect,semarchyAdminand then press Enter. -
Enter y to confirm the user creation.
-
Enter n as this user is not used for one AS process to connect another AS process.
Setting up the Datasources
To configure the repository datasource:
-
Connect to the JBoss Console.
-
In the Profile section, select Connector > Datasources.
-
Configure a datasource with the following parameters:
-
Name:
SEMARCHY_REPOSITORY -
JNDI:
jdbc/SEMARCHY_REPOSITORY -
Driver: odjcb6.jar (deployed Oracle driver)
-
Username:
<repository_user_name> -
Password:
<repository_user_password> -
Connection URL:
jdbc:oracle:thin:@<oracle_instance_hostname>:<oracle_listener_port>:<oracle_SID_name>
-
-
Save this configuration and make sure it is enabled.
To configure a data location datasource:
-
Connect to the JBoss Console.
-
In the Profile section, select Connector > Datasources.
-
Configure a datasource with the following parameters:
-
Name:
<data_location_datasource_name> -
JNDI:
jdbc/<data_location_datasource_name> -
Driver: odjcb6.jar (deployed Oracle driver)
-
Username:
<data_location_user_name> -
Password:
<data_location_user_password> -
Connection URL:
jdbc:oracle:thin:@<oracle_instance_hostname>:<oracle_listener_port>:<oracle_SID_name>
-
-
Save this configuration and make sure it is enabled.
-
Repeat this operation for each data location’s datasource.
To optionally configure the Pulse Warehouse Metrics datasource:
-
Connect to the JBoss Console.
-
In the Profile section, select Connector > Datasources.
-
Configure a datasource with the following parameters:
-
Name:
SEMARCHY_PULSE_METRICS -
JNDI:
jdbc/SEMARCHY_PULSE_METRICS -
Driver: odjcb6.jar (deployed Oracle driver)
-
Username:
<pulse_user_name> -
Password:
<pulse_user_password> -
Connection URL:
jdbc:oracle:thin:@<oracle_instance_hostname>:<oracle_listener_port>:<oracle_SID_name>
-
-
Save this configuration and make sure it is enabled.
The repository and data location datasources are now configured, pointing to the schemas previously created.
Deploying the Application
To deploy the application:
-
Copy the
temp/mdm-server/semarchy.warfile to the<jboss_home>/standalone/deployments/folder.
The Convergence for MDM application is deployed in the server.
Configuring JavaMail Session
This configuration is required for mail notifications using JEE Mail Session.
To configure JavaMail Session:
-
Edit the the
domain.xmlorstandalone-full.xmlconfiguration file and create the mail subsystem to match your configuration. See https://docs.jboss.org/author/display/AS71/Mail+Subsystem for more information.
Testing the Application
To test the application:
-
Open a web browser.
-
In the URL, enter:
http:/<jboss_host>:<jboss_port>/semarchy/.
| Proceed directly to the Installing the Repository task. |
Deploying and Configuring with GlassFish
This section explains how to configure and deploy the Semarchy Convergence for MDM Application with Glassfish Application Server.
In this section, <glassfish_home> refers to the Glassfish server
installation folder.
| Refer to the Glassfish Documentation for more details about the deployment and configuration processes in Glassfish. |
Installing Additional Libraries
Installing the Oracle JDBC Driver
To install the Oracle JDBC driver:
-
Copy the oracle driver file (
temp/mdm-server/additional-libraries/ojdbc6.jar) in the<glassfish_home>/glassfish/libdirectory.
| After installing the libraries, restart the Glassfish server. |
Configuring the Security
| The configuration in this section uses the default File Realm and may be changed to your enterprise’s type of realm. |
Configuring the Security Realm and Convergence for MDM Administrator
To configure the security realm:
-
Open the Glassfish WebAdmin interface (
http://<glassfish_host>:4848). -
In the Common Tasks panel, select Configuration > Server-config > Security > Realms.
-
Click the New button to create a new realm with the following properties:
-
Name:
semarchyRealm -
ClassName:
com.sun.entreprise.security.auth.realm.file.FileRealm -
JAAS Context:
fileRealm -
Key file:
${com.sun.aas.instanceRoot}/config/keyfile
-
-
Click OK to save the new realm.
To configure the semadmin user:
-
Click the new semarchyRealm and then select the Manage Users button.
-
Click the New button to create a new user with the properties:
-
User ID:
semadmin -
Group List:
semarchyAdminGroup,semarchyConnectGroup -
Password:
<semadmin_password>
-
-
Click OK to save the new user.
Configuring Groups/Roles Mappings
The configured realm uses the default Java Authorization Contract for Containers (JACC) provider included in Glassfish. This JACC provider does not support dynamic roles, and mandates that the mappings between Groups and Roles are defined in the deployed application descriptor file.
To define the groups/roles mappings:
-
Uncompress the
/temp/mdm-server/semarchy.warfile into thetemp/semarchy_war/folder. -
Edit the
temp/semarchy_war/semarchy/WEB-INF/glassfish-web.xmlfile. -
Add the section given below in
<glassfish-web-app>element and then save the file.
<security-role-mapping>
 <role-name>semarchyConnect</role-name>
 <group-name>semarchyConnectGroup</group-name>
</security-role-mapping>
<security-role-mapping>
 <role-name>semarchyAdmin</role-name>
 <group-name>semarchyAdminGroup</group-name>
</security-role-mapping>| To add new Convergence for MDM roles after the initial setup and map them to Glassfish groups, you must modify this file and redeploy the application. |
Setting up the Datasources
To configure the repository datasource:
-
Open the Glassfish WebAdmin interface (
http://<glassfish_host>:4848). -
In the Common Tasks panel, select Resources > JDBC > JDBC Connection Pools.
-
Click the New button to create a new connection pool with the following properties:
-
Pool Name:
SEMARCHY_REPOSITORY -
Resource Type:
java.sql.ConnectionPoolDataSource -
Database Driver Vendor:
Oracle
-
-
Click Next. Set the following additional properties:
-
User:
<repository_user_name> -
Password:
<repository_user_password> -
URL:
jdbc:oracle:thin:@<oracle_instance_hostname>:<oracle_listener_port>:<oracle_SID_name> -
MaxStatements:
50
-
-
Click Finish.
-
Select the new connection pool and click the Ping button to test it.
-
In the Common Tasks panel, select Resources > JDBC > JDBC Resources.
-
Click the New button to create a new JDBC resource with the following properties:
-
JNDI Name:
jdbc/SEMARCHY_REPOSITORY -
Pool Name:
SEMARCHY_REPOSITORY -
Status:
Enabled
-
-
Click OK.
| In the Pool Settings, it is recommended to tune the Minimum Pool Size and Maximum Pool Size properties according to your needs. Having a pool size between 1 and 8 connections is typically sufficient for testing purposes. |
| Do not change the JNDI Name of the SEMARCHY_REPOSITORY datasource. The application refers to a datasource with this name for the repository. |
To configure a data location datasource:
-
Open the Glassfish WebAdmin interface (
http://<glassfish_host>:4848). -
In the Common Tasks panel, select Resources > JDBC > JDBC Connection Pools.
-
Click the New button to create a new connection pool with the following properties:
-
Pool Name:
<data_location_datasource_name> -
Resource Type:
java.sql.ConnectionPoolDataSource -
Database Driver Vendor:
Oracle
-
-
Click Next. Set the following additional properties:
-
User:
<data_location_user_name> -
Password:
<data_location_user_password> -
URL:
jdbc:oracle:thin:@<oracle_instance_hostname>:<oracle_listener_port>:<oracle_SID_name> -
MaxStatements:
50
-
-
Click Finish.
-
Select the new connection pool and click the Ping button to test it.
-
In the Common Tasks panel, select Resources > JDBC > JDBC Resources.
-
Click the New button to create a new JDBC resource with the following properties:
-
JNDI Name:
jdbc/<data_location_datasource_name> -
Pool Name:
<data_location_datasource_name> -
Status:
Enabled
-
-
Click OK.
| In the Pool Settings, it is recommended to tune the Minimum Pool Size and Maximum Pool Size properties according to your needs. Having a pool size between 1 and 8 connections is typically sufficient for testing purposes. |
Repeat this operation for each data location’s datasource.
To optionnally configure the Pulse Metrics Warehouse datasource:
-
Open the Glassfish WebAdmin interface (
http://<glassfish_host>:4848). -
In the Common Tasks panel, select Resources > JDBC > JDBC Connection Pools.
-
Click the New button to create a new connection pool with the following properties:
-
Pool Name:
SEMARCHY_PULSE_METRICS -
Resource Type:
java.sql.ConnectionPoolDataSource -
Database Driver Vendor:
Oracle
-
-
Click Next. Set the following additional properties:
-
User:
<pulse_user_name> -
Password:
<pulse_user_password> -
URL:
jdbc:oracle:thin:@<oracle_instance_hostname>:<oracle_listener_port>:<oracle_SID_name> -
MaxStatements:
50
-
-
Click Finish.
-
Select the new connection pool and click the Ping button to test it.
-
In the Common Tasks panel, select Resources > JDBC > JDBC Resources.
-
Click the New button to create a new JDBC resource with the following properties:
-
JNDI Name:
jdbc/SEMARCHY_PULSE_METRICS -
Pool Name:
SEMARCHY_PULSE_METRICS -
Status:
Enabled
-
-
Click OK.
| In the Pool Settings, it is recommended to tune the Minimum Pool Size and Maximum Pool Size properties according to your needs. Having a pool size between 1 and 8 connections is typically sufficient for testing purposes. |
| Do not change the JNDI Name of the SEMARCHY_PULSE_METRICS datasource. The application refers to a datasource with this name for the Pulse Metrics Warehouse. |
The repository and data location datasources are now configured, pointing to the schemas previously created.
Configuring JavaMail Session
This configuration is required for mail notifications using JEE Mail Session.
To configure JavaMail Session:
-
Open the Glassfish WebAdmin interface (
http://<glassfish_host>:4848). -
In the Common Tasks panel, select Resources > JavaMail Sessions.
-
Click the New button to create a new JavaMail Session with the following properties:
-
JNDI Name:
mail/Session -
Mail Host:
<mail_server_host> -
Default User:
<mail_user_name> -
Transport Protocol:
smtp
-
-
Add the following additional property to enable SMTP authentication:
-
mail.smtp.auth:
true -
password:
<mail_user_password>
-
-
Click OK.
Deploying the Application
To deploy the application:
-
Open the Glassfish WebAdmin interface (
http://<glassfish_host>:4848). -
In the Common Tasks panel, select Applications.
-
Click the Deploy… button.
-
Select Local Packaged File or Directory …, and then click Browse Folders…
-
Select the
temp/semarchy_war/semarchy/folder in the folder browser and click Choose Folder. -
Select
Web Applicationfor the Type and make sure the Status isEnabled. -
Click OK to deploy the application.
The Convergence for MDM application is deployed in the server.
Testing the Application
To test the application:
-
Open a web browser.
-
In the URL, enter:
http:/<glassfish_host>:<glassfish_port>/semarchy/.
| Proceed directly to the Installing the Repository task. |
Deploying and Configuring with Jetty
This section explains how to configure and deploy the Semarchy Convergence for MDM Application with the Eclipse Jetty Application Server.
In this section, <jetty_home> refers to the Jetty server installation folder.
| Refer to the Jetty Documentation for more details about the deployment and configuration processes in Jetty. |
Installing Additional Libraries
Installing the Oracle JDBC Driver
To install the Oracle JDBC driver:
-
Copy the oracle driver file (
temp/mdm-server/additional-libraries/ojdbc6.jar) to the<jetty>/lib/extdirectory.
Installing the Pooling Libraries
This configuration uses connection pooling available in DBCP.
To install the Connection Pooling Libraries:
-
Download the Apache DBCP and Apache Common Pool.
-
Uncompress both these files and then and copy the
commons-dbcp-1.4.jarandcommons-pool-1.6.jarfiles to the<jetty>/lib/extdirectory.
Configuring the Security
To create the Convergence for MDM Realm:
-
Edit the
<jetty>/etc/jetty.xmlfile and add the realm definition as described in the example below.
<Call name="addBean">
  <Arg>
    <New class="org.eclipse.jetty.security.HashLoginService">
      <Set name="name">semarchyRealm</Set>
      <Set name="config"><SystemProperty name="jetty.home" default="."/>/etc/realm.properties</Set>
      <Set name="refreshInterval">0</Set>
    </New>
  </Arg>
</Call>
This realm uses file storage for the users and roles.
To add the semadmin user to the realm:
-
Create or edit the
<jetty>/etc/realm.propertiesfile and add the users in the following format:<user_name>: <password>[,<role_1>, <role_2>]
An example is given below:
semadmin: <semadmin_password>, semarchyAdmin,semarchyConnect
myuser: <my_password>,semarchyConnect, dataSteward| All passwords configured in Jetty can be obfuscated. See the Secure Password Obfuscation chapter in the Jetty Documentation for more information. |
Setting up the Datasources
To configure the repository, data location and Pulse Metrics datasources using DBCP connection pooling:
-
Edit the
<jetty>/etc/jetty.xmlfile and add the new JNDI resources shown in the template below.
<!-- Repository Datasource -->
<New id="SEMARCHY_REPOSITORY" class="org.eclipse.jetty.plus.jndi.Resource">
   <Arg></Arg>
   <Arg>jdbc/SEMARCHY_REPOSITORY</Arg>
   <Arg>
    <New class="org.apache.commons.dbcp.BasicDataSource">
          <Set name="driverClassName">oracle.jdbc.OracleDriver</Set>
          <Set name="url">jdbc:oracle:thin:@<oracle_instance_hostname>:<oracle_listener_port>:<oracle_SID_name></Set>
          <Set name="username"><repository_user_name></Set>
          <Set name="password"><repository_user_password></Set>
     </New>
   </Arg>
  </New>


<!-- Repeat the following element for each data location -->
<New id="<data_location_datasource_name>" class="org.eclipse.jetty.plus.jndi.Resource">
   <Arg></Arg>
   <Arg>jdbc/<data_location_datasource_name></Arg>
   <Arg>
    <New class="org.apache.commons.dbcp.BasicDataSource">
          <Set name="driverClassName">oracle.jdbc.OracleDriver</Set>
          <Set name="url">jdbc:oracle:thin:@<oracle_instance_hostname>:<oracle_listener_port>:<oracle_SID_name></Set>
          <Set name="username"><data_location_user_name></Set>
          <Set name="password"><data_location_user_password></Set>
     </New>
   </Arg>
  </New>


<!-- Pulse Metrics -->
<New id="SEMARCHY_PULSE_METRICS" class="org.eclipse.jetty.plus.jndi.Resource">
   <Arg></Arg>
   <Arg>jdbc/SEMARCHY_PULSE_METRICS</Arg>
   <Arg>
    <New class="org.apache.commons.dbcp.BasicDataSource">
          <Set name="driverClassName">oracle.jdbc.OracleDriver</Set>
          <Set name="url">jdbc:oracle:thin:@<oracle_instance_hostname>:<oracle_listener_port>:<oracle_SID_name></Set>
          <Set name="username"><pulse_user_name></Set>
          <Set name="password"><pulse_user_password></Set>
     </New>
   </Arg>
  </New>
Configuring JavaMail Session
-
Edit the
<jetty>/etc/jetty.xmlfile and add the new JavaMail resource as described in the template below.
<New id="mail" class="org.eclipse.jetty.plus.jndi.Resource">
     <Arg><Ref refid="wac"/></Arg>
     <Arg>mail/Session</Arg>
     <Arg>
       <New class="org.eclipse.jetty.jndi.factories.MailSessionReference">
         <Set name="user"><mail_user_name></Set>
         <Set name="password"><mail_user_password></Set>
         <Set name="properties">
           <New class="java.util.Properties">
             <Put name="mail.transport.protocol">smtp</Put>
             <Put name="mail.smtp.host"><mail_server_host></Put>
             <Put name="mail.smtp.port"><<mail_server_port></Put>
             <Put name="mail.from"><mail_from_user_name></Put>
             <Put name="mail.debug">true</Put>
           </New>
          </Set>
       </New>
     </Arg>
</New>
Deploying the Application
To deploy the application:
-
Copy the
temp/mdm-server/semarchy.warfile to the<jetty>/webapp/folder. -
Open a command line in the
<jetty>folder and then runjava -jar start.jarto start the Jetty Server.
The Convergence for MDM application is deployed and the server started.
Testing the Application
To test the application:
-
Open a web browser.
-
In the URL, enter:
http:/<jetty_host>:<jetty_port>/semarchy/.
| Proceed directly to the Installing the Repository task. |
Deploying and Configuring with Apache Geronimo
This section explains how to configure and deploy the Semarchy Convergence for MDM Application with Apache Geronimo Application Server.
In this section, <geronimo_home> refers to the Glassfish server
installation folder.
| Refer to the Geronimo Documentation for more details about the deployment and configuration processes in Geronimo. |
Installing Additional Libraries
To install the Oracle JDBC Driver:
-
Connect to the Apache Geronimo Console (
http://<geronimo_host>:8080/console). -
Switch the Navigator to the Advanced view.
-
Select Resources > Repository.
-
In the Add Archive to Repository section, select the Oracle driver file (
ojdbc6.jar). -
Check the Specify other parts option and enter the following values:
-
Group:
oracle -
Artifact:
jdbc -
Version:
11.2.0(set here the oracle driver version) -
Type:
jar
-
-
Click the Install button. The driver is added to the repository.
Configuring the Security
To create the groups:
-
Connect to the Apache Geronimo Console (
http://<geronimo_host>:8080/console). -
Switch the Navigator to the Advanced view.
-
Select Security > Users and Groups.
-
Click the Create New Group link, and create a new group with the following parameters:
-
Group Name:
semarchyAdminGroup
-
-
Click Add
-
Click the Create New Group link, and create a new group with the following parameters:
-
Group Name:
semarchyConnectGroup
-
-
Click Add
To create the semadmin user:
-
Connect to the Apache Geronimo Console (
http://<geronimo_host>:8080/console). -
Switch the Navigator to the Advanced view.
-
Select Security > Users and Groups.
-
Click the Create New User link, and create a new user with the following parameters:
-
UserID:
semadmin -
Group:
semarchyAdminGroup -
Password:
<semadmin_password>
-
-
Click Add to add this new user.
-
In the list of groups, click the Edit link on the
semarchyConnectGroupline. -
Select the
semadminuser in the list of users and click the Add >> button. -
Click Update.
The semadmin user is created and added to the two groups.
| With Geronimo, the roles/groups mappings are performed at a later stage in the application deployment plan. |
Setting up the Datasources
To configure the repository datasource:
-
Connect to the Apache Geronimo Console (
http://<geronimo_host>:8080/console). -
Switch the Navigator to the Advanced view.
-
In the Navigator panel, select Resources Datasources.
-
Click the Using the Geronimo database pool wizard link.
-
Enter the following information:
-
Name of Database Pool:
SEMARCHY_REPOSITORY -
Database Type:
Oracle Thin
-
-
Click Next.
-
In the Driver Jar, select the
oracle/jdbc/11.2.0/jardriver previously added in the repository. -
Enter the following parameters:
-
DB User Name:
<repository_user_name> -
DB Password:
<repository_user_password> -
Host:
<oracle_instance_hostname> -
SID:
<oracle_SID_name> -
Port:
<oracle_listener_port>
-
-
Click Next.
-
Click the Test Connection button to test your connection.
-
Click Deploy.
To configure a data location datasource:
-
Connect to the Apache Geronimo Console (
http://<geronimo_host>:8080/console). -
Switch the Navigator to the Advanced view.
-
In the Navigator panel, select Resources Datasources.
-
Click the Using the Geronimo database pool wizard link.
-
Enter the following information:
-
Name of Database Pool:
<data_location_datasource_name> -
Database Type:
Oracle Thin
-
-
Click Next.
-
In the Driver Jar, select the
oracle/jdbc/11.2.0/jardriver previously added in the repository. -
Enter the following parameters:
-
DB User Name:
<data_location_user_name> -
DB Password:
<data_location_user_password> -
Host:
<oracle_instance_hostname> -
SID:
<oracle_SID_name> -
Port:
<oracle_listener_port>
-
-
Click Next.
-
Click the Test Connection button to test your connection.
-
Click Deploy.
Repeat this operation for each data location’s datasource.
To optionally configure the Pulse Metrics Warehouse datasource:
-
Connect to the Apache Geronimo Console (
http://<geronimo_host>:8080/console). -
Switch the Navigator to the Advanced view.
-
In the Navigator panel, select Resources Datasources.
-
Click the Using the Geronimo database pool wizard link.
-
Enter the following information:
-
Name of Database Pool:
SEMARCHY_PULSE_METRICS -
Database Type:
Oracle Thin
-
-
Click Next.
-
In the Driver Jar, select the
oracle/jdbc/11.2.0/jardriver previously added in the repository. -
Enter the following parameters:
-
DB User Name:
<pulse_user_name> -
DB Password:
<pulse_user_password> -
Host:
<oracle_instance_hostname> -
SID:
<oracle_SID_name> -
Port:
<oracle_listener_port>
-
-
Click Next.
-
Click the Test Connection button to test your connection.
-
Click Deploy.
The repository and data location datasources are now configured, pointing to the schemas previously created.
Deploying the Application
To deploy the application:
-
Connect to the Apache Geronimo Console (
http://<geronimo_host>:8080/console). -
Switch the Navigator to the Advanced view.
-
In the Navigator panel, select Applications > Plan Creator.
-
Select the
/temp/mdm-server/semarchy.wararchive file. -
Click Configure.
-
Leave the fields as is and click Next.
-
Map the JDBC Ref for
jdbc/SEMARCHY_REPOSITORYby selecting theSEMARCHY_REPOSITORYJDBC pool. -
Click Next.
-
In the Security Role Mappings, for the
semarchyConnectrole, select the following options:-
Add:
Principal -
Name:
semarchyConnectGroup -
Class:
Group Principal
-
-
Click Add.
-
Click Next and then Next again.
-
In the deployment plan, replace the
<sec:role-mappings>with the section given below and click Deploy WAR to deploy the application.
<sec:role-mappings>
 <sec:role role-name="semarchyConnect">
 <sec:principal name="semarchyConnectGroup" class="org.apache.geronimo.security.realm.providers.GeronimoGroupPrincipal"/>
 </sec:role>
 <sec:role role-name="semarchyAdmin">
 <sec:principal name="semarchyAdminGroup" class="org.apache.geronimo.security.realm.providers.GeronimoGroupPrincipal"/>
 </sec:role>
</sec:role-mappings>
Testing the Application
To test the application:
-
Open a web browser.
-
In the URL, enter:
http:/<geronimo_host>:<geronimo_port>/semarchy/.
| Proceed directly to the Installing the Repository task. |
Deploying and Configuring with Oracle WebLogic
This section explains how to configure and deploy the Semarchy Convergence for MDM Application with Oracle WebLogic Application Server.
| Refer to the WebLogic Documentation for more details about the deployment and configuration processes in WebLogic. |
| Prior to configuring Convergence for MDM, configure and start the WebLogic domain into which you plan to deploy and configure the Convergence for MDM application. |
Configuring the Security
To create the groups:
-
Connect to the WebLogic Server Administration Console.
-
Select Security Realms from the left pane and then click the realm you are configuring.
-
Select the Users and Groups tab, then Groups.
-
Click New.
-
In the Create a New Group page provide the following information:
-
Name:
semarchyConnectGroup -
Provider:
DefaultAuthenticator
-
-
Click OK. The group is added to the Groups table.
-
Click New.
-
In the Create a New Group page provide the following information:
-
Name:
semarchyAdminGroup -
Provider:
DefaultAuthenticator
-
-
Click OK. The group is added to the Groups table.
To create the semadmin user:
-
Connect to the WebLogic Server Administration Console.
-
Select Security Realms from the left pane and then click the realm you are configuring.
-
Select the Users and Groups tab, then Users.
-
Click New.
-
In the Create a New User page provide the following information:
-
Name:
semadmin -
Provider:
DefaultAuthenticator -
Password:
<semadmin_password>
-
-
Click OK. The user is added to the Users table.
-
Click the
semadminuser from the Users table, then select the Groups tab. -
Select the
semarchyAdminGroupandsemarchyConnectGroupgroups in the Available group list, then click the Add button to add them to the Chosen list. -
Click Save to save the group membership.
To configure the roles mappings:
-
Connect to the WebLogic Server Administration Console.
-
Select Security Realms from the left pane and then click the realm you are configuring.
-
Select Providers > Role Mapping.
-
Select New to create a new role with the following properties:
-
Name:
semarchyConnect -
Provider Name:
XACMLRoleMapper
-
-
Click OK.
-
Select the
semarchyConnectrole in the Role Mapping Providers table. -
Click Add Conditions.
-
Select
Groupfor the Predicate List and then click Next. -
In the Group Argument Name, enter
semarchyConnectGroupand then click Add. -
Click Finish.
-
Click Save.
-
Select Security Realms from the left pane and then click the realm you are configuring.
-
Select Providers > Role Mapping.
-
Select New to create a new role with the following properties:
-
Name:
semarchyAdmin -
Provider Name:
XACMLRoleMapper
-
-
Click OK.
-
Select the
semarchyAdminrole in the Role Mapping Providers table. -
Click Add Conditions.
-
Select
Groupfor the Predicate List and then click Next. -
In the Group Argument Name, enter
semarchyAdminGroupand then click Add. -
Click Finish.
-
Click Save.
Setting up the Datasources
To configure the repository datasource:
-
Connect to the WebLogic Server Administration Console.
-
Select Services > Data Sources from the left pane.
-
Select New > Generic Data Source in the Data Sources table.
-
Enter the following JDBC datasource properties:
-
Name:
SEMARCHY_REPOSITORY -
JNDI Name:
jdbc/SEMARCHY_REPOSITORY -
Database Type:
Oracle
-
-
Click Next.
-
In the Database Driver select
Oracle’s Driver (Thin) for Instance connections: Version:9.0.1 and later. -
Click Next.
-
De-select the Supports Global Transaction option.
-
Click Next.
-
Enter the following connection properties:
-
Database Name:
<oracle_SID_name> -
Host Name:
<oracle_instance_hostname> -
Port:
<oracle_listener_port> -
Database User Name:
<repository_user_name> -
Password:
<repository_user_password>
-
-
Click Next.
-
Click Test Configuration to validate the connection information.
-
In the Properties field, add the following line:
defaultAutoCommit=false -
Click Next.
-
Select a deployment target (by default
Admin Server) and then clickFinish.
| Do not change the JNDI Name of the SEMARCHY_REPOSITORY datasource. The application refers to a datasource with this name for the repository. |
To configure the data location datasource:
-
Connect to the WebLogic Server Administration Console.
-
Select Services > Data Sources from the left pane.
-
Select New > Generic Data Source in the Data Sources table.
-
Enter the following JDBC datasource properties:
-
Name:
<data_location_datasource_name> -
JNDI Name:
jdbc/<data_location_datasource_name> -
Database Type:
Oracle
-
-
Click Next.
-
In the Database Driver select
Oracle’s Driver (Thin) for Instance connections: Version:9.0.1 and later. -
Click Next.
-
De-select the Supports Global Transaction option.
-
Click Next.
-
Enter the following connection properties:
-
Database Name:
<oracle_SID_name> -
Host Name:
<oracle_instance_hostname> -
Port:
<oracle_listener_port> -
Database User Name:
<data_location_user_name> -
Password:
<data_location_user_password>
-
-
Click Next.
-
Click Test Configuration to validate the connection information.
-
In the Properties field, add the following line:
defaultAutoCommit=false -
Click Next.
-
Select a deployment target (by default
Admin Server) and then clickFinish.
Repeat this operation for each data location’s datasource.
To optionally configure the Pulse Metrics Warehouse datasource:
-
Connect to the WebLogic Server Administration Console.
-
Select Services > Data Sources from the left pane.
-
Select New > Generic Data Source in the Data Sources table.
-
Enter the following JDBC datasource properties:
-
Name:
SEMARCHY_PULSE_METRICS -
JNDI Name:
jdbc/SEMARCHY_PULSE_METRICS -
Database Type:
Oracle
-
-
Click Next.
-
In the Database Driver select
Oracle’s Driver (Thin) for Instance connections: Version:9.0.1 and later. -
Click Next.
-
De-select the Supports Global Transaction option.
-
Click Next.
-
Enter the following connection properties:
-
Database Name:
<oracle_SID_name> -
Host Name:
<oracle_instance_hostname> -
Port:
<oracle_listener_port> -
Database User Name:
<pulse_user_name> -
Password:
<pulse_user_password>
-
-
Click Next.
-
Click Test Configuration to validate the connection information.
-
In the Properties field, add the following line:
defaultAutoCommit=false -
Click Next.
-
Select a deployment target (by default
Admin Server) and then clickFinish.
| Do not change the JNDI Name of the SEMARCHY_PULSE_METRICS datasource. The application refers to a datasource with this name for the Pulse Metrics Warehouse. |
The repository and data location datasources are now configured, pointing to the schemas previously created.
Deploying the Application
To deploy the application:
-
Connect to the WebLogic Server Administration Console.
-
Select Deployments from the left pane.
-
Click the Install button.
-
Click the
Upload your file(s)link. -
Select for the Deployment Archive the
temp/mdm-server/semarchy.warfile on your local disk. -
Click Next and then Next.
-
In the Choose target style page select Install this deployment as an application and then click Next.
-
In the Optional Settings page, in the Security option group, select Custom Roles: Use roles that are defined in the Administration Console; use policies that are defined in the deployment descriptor.
-
Click Next.
-
In the Review your choices and click Finish page Select No, I will review the configuration later.
-
Click Finish.
The Convergence for MDM application is deployed in the server.
Configuring JavaMail Session
This configuration is required for mail notifications using JEE Mail Session.
To configure JavaMail Session:
-
Connect to the WebLogic Server Administration Console.
-
Select Services > Mail Sessions from the left pane.
-
Click the New button.
-
In the Mail Session Properties page, enter the following properties:
-
Name:
MailSession -
JNDI Name:
mail/Session
-
-
In the JavaMail Properties, enter the following lines:
-
mail.transport.protocol=smtp -
mail.smtp.host=<mail_server_host> -
mail.port=<mail_server_port> -
mail.smtp.auth=true -
mail.smtp.user=<mail_user_name> -
password=<mail_user_password>
-
-
Click Save to save the mail session configuration.
Testing the Application
To test the application:
-
Open a web browser.
-
In the URL, enter:
http:/<weblogic_host>:<weblogic_port>/semarchy/.
| Proceed directly to the Installing the Repository task. |
Installing the Repository
| Make sure that you have the license file provided by Semarchy before running the following steps. |
| The repository type cannot be modified after installation, make sure to choose a repository type adapted to your installation. Review carefully the description of the Repository Types. |
Convergence for MDM holds all its information in a repository stored in a database schema. The first task when connecting to Convergence for MDM is to create this repository structure in the database schema previously created.
Repository installation is done the first time an administrator connects to the Semarchy Convergence for MDM application. The repository installation process also performs the license registration.
-
Open your web browser and connect to the following URL:
http://<application_server_host>:<application_server_port>/semarchy/. -
In the login prompt, enter the following:
-
User:
semadmin -
Password:
<semadmin_password>
-
-
The Convergence for MDM Workbench opens with the license agreement. Review the End-User License Agreement.
-
Check the I have read and accept Semarchy’s End-User License Agreement box and then click Next.
-
In the License Key File page, select a valid license key by clicking the Load a License Key File button and then click Next.
-
In the Repository Creation wizard, select the type of repository.
-
Optionally enter a customized name for your repository.
-
Click Finish to create the repository.
-
Click OK when the Repository Successfully Created message appears.
The repository is created and Convergence for MDM is now up and running.
Configuring Convergence Pulse Metrics
After the repository configuration, it is recommended to create the Pulse Metrics Warehouse. This operation allows you to check that all the items related to Pulse Metrics are correctly configured.
To create the Pulse Metrics Warehouse:
-
Open your web browser and connect to the following URL:
http://<application_server_host>:<application_server_port>/semarchy/. -
In the login prompt, enter the following:
-
User:
semadmin -
Password:
<semadmin_password>
-
-
Click the Convergence for MDM Workbench button. The Convergence for MDM workbench opens on the Overview perspective.
-
Click the Administration Console link.
-
In the Administration view, double-click the Pulse Configuration node. The systems prompts you for creating the Pulse Warehouse.
-
Click Yes to proceed and create the warehouse.
Next Steps
Semarchy Convergence for MDM is now up and running.
This section describes the next recommended tasks for the Administrators and Project Managers.
Administrators
Administrators should proceed with the following tasks:
-
Setting up the Security:
-
Create users, groups and roles in the application server realm. Refer to the application server documentation for more information.
-
Declare the roles in Semarchy Convergence for MDM and grant platform-level privileges to these roles. Refer to the Semarchy Convergence for MDM Administration Guide for more information.
-
-
Configuring Notification Servers for sending emails and job notification. Refer to the Semarchy Convergence for MDM Administration Guide for more information.
-
Configuring Pulse Metrics and schedule regular metrics collection.
Project Managers
Project Managers should proceed to the following tasks:
-
Creating a new model. Refer to the Models Management chapter in the Semarchy Convergence for MDM Developer’s Guide for more information.
-
Creating data locations using to the datasources configured when installing Convergence for MDM.