Semarchy xDM Installation Guide
version 5.1 Rev 1, 2019-09-10
Welcome to Semarchy xDM.
This guide contains information about installing Semarchy xDM to design and develop an MDM project.
Using this guide, you will learn how to:
This document uses the following formatting conventions:
| Convention | Meaning |
|---|---|
boldface | Boldface type indicates graphical user interface elements associated with an action, or a product specific term or concept. |
italic | Italic type indicates special emphasis or placeholder variable that you need to provide. |
| Monospace type indicates code example, text or commands that you enter. |
In addition to the product manuals, Semarchy provides other resources available on its web site: http://www.semarchy.com.
There are many ways to access the Semarchy Technical Support. You can call or email our global Technical Support Center (support@semarchy.com). For more information, see http://www.semarchy.com.
We welcome your comments and suggestions on the quality and usefulness
of this documentation.
If you find any error or have any suggestion for improvement, please
mail support@semarchy.com and indicate the title of the documentation
along with the chapter, section, and page number, if available. Please
let us know if you want a reply.
Semarchy xDM is the Intelligent Data Hub platform for Master Data
Management (MDM), Reference Data Management (RDM), Application Data Management
(ADM), Data Quality, and Data Governance.
It provides all the features for data
quality, data validation, data matching, de-duplication, data authoring,
workflows, and more.
Semarchy xDM brings extreme agility for defining and implementing data management applications and releasing them to production. The platform can be used as the target deployment point for all the data in the enterprise or in conjunction with existing data hubs to contribute to data transparency and quality.
Its powerful and intuitive environment covers all use cases for setting up a successful data governance strategy.
The Semarchy xDM architecture includes:
Review the information in this section before you begin your installation.
Before installing Semarchy xDM, you should read the system requirements and certification documents to ensure that your environment meets the minimum installation requirements.
The Semarchy xDM server runs as an application in a supported
application server. The hardware requirements are those of the
application Server.
Refer to your application server documentation for more information
about the required hardware requirements.
This section contains a list of software requirements for this release of Semarchy xDM.
Supported Java Runtime Environment (JRE) or Development Kit (JDK) versions are:
The JAVA_HOME (for a JDK) or JRE_HOME (for a JRE) environment variable must be configured to point to this installation of Java.
Semarchy xDM Server is a JEE6 web application certified with the following application servers:
Supported database versions for the repository and the data locations are:
Supported browsers for the Semarchy xDM:
A newly installed Semarchy xDM instance runs for a limited time - the grace period - without a license. Within that grace period, you must request an evaluation license from Semarchy to activate that instance.
This section details the various components of the Semarchy xDM architecture and their interactions.
The Semarchy xDM Server is a Java EE application deployed and running in a supported application server.
This server provides several access methods:
The Semarchy xDM server stores its information in a repository. One application is always attached to a single repository, and connects this repository using a JDBC datasource named SEMARCHY_REPOSITORY configured in the application server.
The Semarchy xDM application is used at design-time to design models and applications, and deploy them. At run-time, it also manages the processes involved to schedule and execute the certification process in the hub.
The application uses role-based security for accessing Semarchy xDM features. The users and roles used to connect to the application must be defined in the security realm of the application server. Configuring the roles and users is part of the application configuration.
The repository stores the following information:
A repository is stored in an database/schema accessed from the application using a JDBC datasource named SEMARCHY_REPOSITORY.
There are two types of repositories. The repository type is selected at creation time and cannot be modified afterwards.
The repository types are:
The deployment repositories are suitable for production sites. Model transfer from design to deployment repositories is handled via incremental export/import of closed model editions.
Data managed by Semarchy is stored in a data location. The data location contains data structured after the model entities and attributes, and runs certification jobs generated after the rules (enricher, validation, matching, etc) defined in the model. A given model edition is deployed into a data location to host data matching the model structure and rules. At run-time, the data location contains the the golden, master and source data, with all the lineage and history.
The data location is hosted in an database/schema and accessed via a JDBC datasource defined in the application server. A data location refers to the datasource via its JNDI URL.
A Data Location contains the hub data, stored in the database/schema accessed using the data location’s datasource. This schema contains database tables and other objects generated from the model edition.
The data location also refers three type of jobs (stored in the repository):
A data location is attached to a repository: You can declare as many data locations as you want in a repository, but a data location is always attached to a single repository. It is not possible to have a data location attached to two repositories at the same time.
You may deploy several model editions successively in a data location, but only one model edition is deployed and is active in the data location at a certain point in time.
There are two types of data locations. The type is selected when the data location is created and cannot be changed afterwards:
The data location types are:
This section provides patterns for deploying Semarchy xDM in real-life environments.
This pattern assumes that the development, QA/UAT (Quality Assurance, User Acceptance Tests), and production sites are located on different networks or sites.
For this pattern, three repositories are created instead:
With this configuration:
This pattern is similar to Pattern #1 but assumes that development and QA/UAT are co-located in one site, and production is located in a remote location.
For this pattern, two repositories are created:
With this configuration:
This pattern assumes that a single project is designed through a development/QA/Production lifecycle.
For this pattern:
In this pattern, a single repository contains the development, QA and production editions of the models. Model versioning allows freezing and delivering to the next stage (and next deployment location) a model as it moves along its lifecycle.
This pattern is similar to the previous one but assumes that several projects/models are managed in the same repository.
For this pattern:
The organization is the same as in pattern #3, but a set of data locations exists for each project managed in the single repository.
Semarchy xDM can be configured to support enterprise-scale deployment and high-availability.
Semarchy xDM supports the clustered deployment of the Semarchy xDM web application for high-availability and failover. A clustered deployment can be set up for example to support a large number of concurrent users performing data access and authoring operations.
In a clustered deployment, only one instance of the Semarchy xDM application manages and runs the certification processes. This instance is the Active Instance. A set of clustered Semarchy xDM applications serves users accessing the user interfaces (Application Builder, Dashboard Builder, xDM Discovery, Configuration or the data management applications) as well as applications accessing data locations via integration points. These are Passive Instances. The back-end databases hosting the repository and data locations are deployed in a database cluster, and an HTTP load balancer is used as a front-end for users and applications.
The reference architecture for such a configuration is described in the following figure: 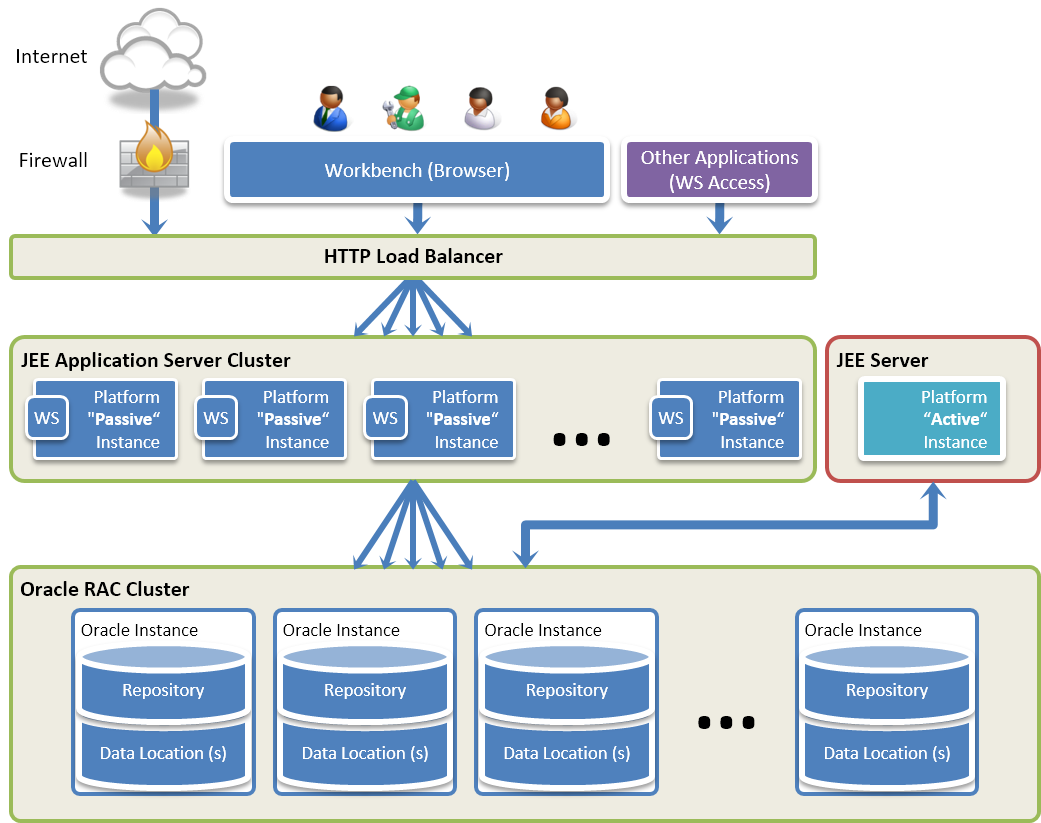
This architecture is composed of the following components:
In this architecture:
Load balancing ensures optimal usage of the resources for a large number of users and applications accessing simultaneously Semarchy xDM.
Load balancing is performed at two levels:
In the reference architecture, fail-over is managed for both user and application sessions.
The following table describes the behavior and the required recovery actions in case of a failure in the various points of the architecture.
| Failure Type | Behavior and required actions |
|---|---|
Database Failure | In the event of a database cluster node failure, other nodes are able to recover and process the incoming database requests. |
Passive Instance Failure | If one of the nodes of the JEE application server cluster fails:
The only information not recovered is the content of the un-saved editors for the user sessions. All the other content is saved in the repository or the data locations. Transactions attached to steppers, for example, are saved in the data locations and not lost. |
Active Instance Failure | The purpose of the active instance is to process batches and jobs.
The active instance must be restarted automatically or manually to fully recover from a failure. When it is restarted, the platform resumes its normal course of activity with no user action required. A Failure of the Active Instance does not impact the overall activity of users or applications, as these rely on the (clustered) Passive Instances. The only impact of such a failure may be a delay in the processing of data changes. |
The Semarchy xDM server comes in two flavors corresponding to two WAR (Web Application Archive) files:
semarchy.war) includes the active application to deploy on the single active server. This war includes the batch poller and the engine, and is able to trigger and process the submitted batches.semarchy-passive.war) includes the passive application to deploy on all the passive nodes of the cluster. This war does not include the batch poller and engine services, and is unable to trigger or process submitted batches.Both these files are in the semarchy-xdm-install-<version tag>.zip archive file, in the mdm-server folder.
The overall installation process for a high-availability configuration is similar to the general installation process:
semarchy context using the semarchy.war and semarchy.xml files.https://active-host:active-host-port/semarchy/ URL.semarchy-passive.war, rename this file to semarchy.war before deployment,and use and the semarchy.xml files used for the active node deployment. This keeps the same deployment name (semarchy) for the active and the passive nodes, and usually simplifies load balancing configuration.https://load-balancer-host:load-balancer-post/semarchy/ URL.semarchy-passive.war, keep the semarchy-passive.war file name and use a copy of semarchy.xml, renamed to semarchy-passive.xml.https://load-balancer-host:load-balancer-port/semarchy-passive/ URL.Semarchy xDM requires that you configure HTTP Load Balancing with Sticky Sessions (also known as session persistence or session affinity). In this mode, requests from existing sessions are consistently routed to the same server. This is mandatory for the Semarchy xDM user interfaces, but not for integration points.
For example, for Amazon Web Services (AWS) deployments, sticky sessions are configured in the Load Balancer.
By default, changes performed on a running node in a cluster only apply to that node and are not propagated to the other running nodes, since each node reads its configuration only at startup.
As a consequence, in the default configuration, a configuration change or a model deployment is effective only on the node where this change was performed, while other nodes still use old configurations or old deployed models.
A change in configuration or a model deployment mandates that all nodes in the cluster are restarted to read their entire configuration.
The Clustered Mode enabled nodes to automatically retrieve configuration changes and model deployments.
To enable this mode, add the com.semarchy.xdm.cluster.enabled=true system property to your application server startup for each node. Nodes started with this flag automatically retrieve configurations changes from the repository without having to restart.
To configure this system property on a Tomcat server:
<tomcat>/bin/setenv.sh (UNIX/Linux) or <tomcat>/bin/setenv.bat (Windows) file with a text editor.CATALINA_OPTS variable:
-Dcom.semarchy.xdm.cluster.enabled=trueWith this flag enabled, the following changes are retrieved:
The engine, batch poller, purge schedules, continuous loads, notifications & notification server configurations are not affected since they run and can be configured only on the active instance.
This section explains how to configure the databases/schemas for the repository and data locations.
Before installing Semarchy xDM, you must create a storage for the repository. You can create it manually or use your database administration interface for this purpose. In this section, we provide sample scripts for creating this storage. Make sure to adapt this script to your database configuration.
CREATE USER <repository_user_name> IDENTIFIED BY <repository_user_password>
 DEFAULT TABLESPACE USERS TEMPORARY TABLESPACE TEMP;
GRANT CONNECT, RESOURCE TO <repository_user_name>;

-- The following command should be used for Oracle 12c and above
GRANT UNLIMITED TABLESPACE TO <repository_user_name>;/* Create a database for the repository and data locations */
CREATE DATABASE <postgresql_database_name> WITH ENCODING 'UTF8';
/*
* Disconnect and then reconnect using:
* the JDBC URL: jdbc:postgresql://<host>:<port>/<postgresql_database_name>
* or using psql with the following command: psql -U postgres <postgresql_database_name>
*/
CREATE SCHEMA extensions;
GRANT USAGE ON SCHEMA extensions TO PUBLIC;
ALTER DEFAULT PRIVILEGES IN SCHEMA extensions GRANT EXECUTE ON FUNCTIONS TO PUBLIC;
ALTER DATABASE <postgresql_database_name> SET SEARCH_PATH TO "$user",public,extensions;
CREATE EXTENSION IF NOT EXISTS "uuid-ossp" with schema extensions;
CREATE EXTENSION IF NOT EXISTS "fuzzystrmatch" with schema extensions;
/* Create the repository user and schema */
CREATE USER <repository_user_name> WITH PASSWORD '<repository_user_password>';
/* Use the following syntax for PostgreSQL 9 */
-- CREATE USER <repository_user_name> WITH UNENCRYPTED PASSWORD '<repository_user_password>';
/*
* The following command is required only for PostgreSQL running on Amazon RDS.
* It grant access to the repository to the RDS super user.
*/
-- GRANT <repository_user_name> TO <rds_superuser_name>
CREATE SCHEMA <repository_user_name> AUTHORIZATION <repository_user_name>;/* Create a database for the repository and data locations */
CREATE DATABASE <repository_database_name>
GO
/* Configuring the database */
ALTER DATABASE <data_location_database_name> SET READ_COMMITTED_SNAPSHOT ON;
GO
ALTER DATABASE <data_location_database_name> SET QUOTED_IDENTIFIER ON;
GO
/* Create a login to connect the database */
CREATE LOGIN <repository_user_name> WITH PASSWORD='<repository_user_password>', DEFAULT_DATABASE=<repository_database_name>
GO
/* Add a user for that login in the database */
USE <repository_database_name>
GO
CREATE USER <repository_user_name> FOR LOGIN <repository_user_name>
GO
/* Make this user database owner */
ALTER ROLE db_owner ADD MEMBER <repository_user_name>
GO<repository_user_name> and <repository_user_password> as you will need them later for creating the datasource to access the repository.You do not need to create the data locations' databases/schemas at installation time, but it is recommended to plan them as part of the installation and configuration effort. You can create them manually or use your database administration interface for this purpose. In this section, we provide a sample script for creating a data location databases/schema. Make sure to adapt this script to your database configuration and duplicate it to create the storage for all data locations.
CREATE USER <data_location_user_name> IDENTIFIED BY <data_location_user_password>
 DEFAULT TABLESPACE USERS TEMPORARY TABLESPACE TEMP;
GRANT CONNECT, RESOURCE TO <data_location_user_name>;

-- The following command should be used for Oracle 12c and above
GRANT UNLIMITED TABLESPACE TO <data_location_user_name>;CREATE USER <data_location_user_name> WITH PASSWORD '<data_location_user_password>';
/* Use the following syntax for PostgreSQL 9 */
-- CREATE USER <data_location_user_name> WITH UNENCRYPTED PASSWORD '<data_location_user_password>';
/*
* The following command is required only for PostgreSQL running on Amazon RDS.
* It grant access to the data location to the RDS super user.
*/
-- GRANT <data_location_user_name> TO <rds_superuser_name>
CREATE SCHEMA <data_location_user_name> AUTHORIZATION <data_location_user_name>;/* Create a database for the repository and data locations */
CREATE DATABASE <data_location_database_name>
GO
/* Configuring the database */
ALTER DATABASE <data_location_database_name> SET READ_COMMITTED_SNAPSHOT ON;
GO
ALTER DATABASE <data_location_database_name> SET QUOTED_IDENTIFIER ON;
GO
/* Create a login to connect the database */
CREATE LOGIN <data_location_user_name> WITH PASSWORD='<data_location_user_password>', DEFAULT_DATABASE=<data_location_database_name>
GO
/* Add a user for that login in the database */
USE <data_location_database_name>
GO
CREATE USER <data_location_user_name> FOR LOGIN <data_location_user_name>
GO
/* Make this user database owner */
ALTER ROLE db_owner ADD MEMBER <data_location_user_name>
GO<data_location_user_name> and <data_location_user_password> as you will need them later for creating the datasource to access the data location.Configure the database with a charset that supports all languages, such as AL32UTF8 for Oracle and UTF8 for PostgreSQL. Semarchy xDM uses specific characters for storing internal information, and applications in Semarchy xDM natively support multi-lingual data without preventing users from entering accented characters (or Cyrillic or Arabic or Chinese). A database configured for a specific language or with a limited charset may not function optimally with Semarchy xDM.
Repositories and data locations should be located in separate schemas. However, they do not necessary need to be located in the same database.
Semarchy xDM ships with an Oracle JDBC driver (ojdbc8.jar) for Oracle Database version 12c Release 2 (12.2.x). This driver is strongly recommended for all recent database versions. If you are using an older Oracle version (11g), it is recommended to review the compatibility of this driver with your Oracle database version and possibly install to an older driver version instead (ojdbc6 or ojdbc7).
Oracle JDBC Datasource Configuration
The JDBC connections to an Oracle Database hosting a repository or data location must be made with the oracle.jdbc.J2EE13Compliant property set to true.
When this option is not set, errors such as the following one will be raised in the application log.
com.semarchy.mdm.runtime.data.InvalidDataAccessResourceUsageException: java.lang.RuntimeException: Unexpected DB value .... (Class oracle.sql.TIMESTAMP for logicalType TIMESTAMP)
Make sure to configure the datasources with this property configured.
For example, for a Tomcat datasource, the resource must contain the following:
<Resource
	name="...
	...
	connectionProperties="oracle.jdbc.J2EE13Compliant=true"
	...
/>
Repositories and data locations should be located in separate schemas.
The configuration presented above uses logins defined in the database. Change this script to use Windows or AD logins as needed.
Semarchy xDM does not support schemas for SQL Servers. One database is required for each repository and data location, and each user used to connect these databases should have the db_owner (dbo) role.
Be cautious of the collation when configuring the database instance:
SEM_NORMALIZE function used is made collation-proof and forces the Latin1_General_100_CS_AS_KS_WS_SC collationSQL Server repository and data locations databases should also be configured as follows for Semarchy xDM:
QUOTED_IDENTIFIER should be set to ON to force SQL Server to follow the ISO rules for identifiers and literal values quoting, using the following command:ALTER DATABASE <database_name> SET QUOTED_IDENTIFIER ON;
READ_COMMITTED_SNAPSHOT should be set to ON to allow connections to access previous (committed) version of records being modified instead of waiting for them to be unlocked, using the following command:ALTER DATABASE <database_name> READ_COMMITTED_SNAPSHOT ON;
The following considerations should be taken into account when sizing the repository database/schema:
The following considerations should be taken into account when sizing the data location databases/schema:
A recommended original sizing is to add the source data volume pushed for each entity by all publishers plus one data authoring (the overall input) and multiply it by a factor of 10. It is recommended after the original sizing to monitor the size of the data location in the normal course of operations and adjust the sizing appropriately.
Data Retention Policies can be created to define the volume of data to retain in the data locations, and Data Purges can be scheduled to trigger the pruning of unnecessary data. Defining Retention Policies is covered in the Securing Data chapter of the Semarchy xDM Developer’s Guide. Data Purges are described in the Managing Execution chapter of the Semarchy xDM Administration Guide.
The Semarchy xDM Server is a Java EE application that can be deployed to a number of environments. It requires a Java EE applications server (for example: Tomcat, Glassfish, JBoss/WildFly, etc). This section details the steps required to configure the application server and deploy the application in the application server.
In the following chapters, the following variables names are used in the tasks:
semarchy-xdm-install-xxx.zip file refers to the Semarchy xDM - Server Installation file you have downloaded to
install Semarchy xDM. The name of this file varies as it includes the
Semarchy xDM version and build number.semadmin user refers to the first user created for connecting to
Semarchy xDM. This user is named by default semadmin. This
name can be changed in the installation process.<semadmin_password> refers to the password you want to set for the
semadmin user. This password must comply with the password policy
defined for your application server.temp folder refers to a temporary folder of your choice.The application configuration includes the security in the application
server.
The goal of this task is to create:
semarchyConnect role. This built-in role grants the privilege to
connect to the application.semarchyAdmin role. This built-in role grants full privileges in
the application.semadmin with semarchyConnect and semarchyAdmin
roles. This user is the administrator for Semarchy xDM.Depending on the application server, users are directly mapped to roles, or are mapped to roles via a Group concept. When an application server uses groups:
semarchyConnectGroup and semarchyAdminGroup groups are createdsemarchyConnectGroup group is mapped to the built-in
semarchyConnect role.semarchyAdminGroup group is mapped to the built-in
semarchyAdmin role.semadmin user is added to both the semarchyConnectGroup and
semarchyAdminGroup groups.This basic configuration allows you to connect with the semadmin user
and have full privileges for the application.
It is recommended to tune and enhance the security by:
The configuration of the application includes creating datasources to connect to the repository and data locations that will be used by your MDM projects.
Datasources are also to access datasets from Semarchy xDM Dashboards to run queries and render charts and dashboard on top of these datasets. Similarly, datasources are used to gather profiling statistics with Semarchy xDM Discovery.
To configure the repository datasource, make sure you have the following information:
<oracle_instance_hostname>: host name or IP address of the database server<oracle_listener_port>: number of the port where the server listens for requests.<oracle_SID_name> or <oracle_service_name>: name of a database on the server. This is the SID or ServiceName in the Oracle terminology.jdbc:oracle:thin:@<oracle_instance_hostname>:<oracle_listener_port>:<oracle_SID_name>jdbc:oracle:thin:@<oracle_instance_hostname>:<oracle_listener_port>/<oracle_service_name><repository_user_name>: name for the user created when configuring the repository schema.<repository_user_password>: this user’s password.<postgresql_hostname>: host name or IP address of the database server<postgresql_port>: number of the port where the server listens for requests.<postgresql_database_name>: name of a database on the server.<repository_user_name>: name for the user created when configuring the repository schema.<repository_user_password>: this user’s password.<sqlserver_hostname>: host name or IP address of the database server<sqlserver_port> or <instance_name>: number of the port where the instance listens for requests, or the name of this instance.<repository_database_name>: name of a database on the server.<repository_user_name>: name for the user used to connect repository database.<repository_user_password>: this user’s password.jdbc/SEMARCHY_REPOSITORY. Make sure to set this name for the repository datasource as it is referred to with that name by the application.To configure the data location datasources, make sure you have the following information for each data location:
<data_location_name>: name for the data location. You can use this name as the JNDI name for the datasource in which this data location will be hosted.<oracle_instance_hostname>: host name or IP address of the database server<oracle_listener_port>: number of the port where the server listens for requests.oracle_SID_name> or <oracle_service_name>: name of a database on the server. This is the SID or ServiceName in the Oracle terminology.<data_location_user_name>: name for the user created when configuring the data location schema.<data_location_user_password>: this user’s password.<postgresql_hostname>: host name or IP address of the database server<postgresql_port>: number of the port where the server listens for requests.<postgresql_database_name>: name of a database on the server.<data_location_user_name>: name for the user created when configuring the data location schema.<data_location_user_password>: this user’s password.<sqlserver_hostname>: host name or IP address of the database server<sqlserver_port> or <sql_server_instancename>: number of the port where the instance listens for requests, or the name of this instance.<data_location_database_name>: name of a database on the server.<data_location_user_name>: name for the user used to connect data location database.<data_location_user_password>: this user’s password.To configure datasources for xDM Dashboards or xDM Discovery, make sure that you have the same information as above to connect each database/schema containing the data you want to run queries against.
When configuring datasources for Semarchy xDM, more specifically in production environments, you must take into account several considerations listed below.
Datasources configured for Semarchy should use connection pools, sized according to the expected usage.
In the normal course of operation of Semarchy:
You must configure the pool size as a trade-off between two directions:
To configure the pool size, the application servers provide a series of parameters.
| Application Server | Relevant Parameters |
|---|---|
Other parameters to consider: timeBetweenEvictionRunsMillis, minEvictableIdleTimeMillis and maxWait. | |
Other parameters to consider: Pool Resize Quantity and Shrink Frequency. | |
Other parameter to consider: idle-timeout-minutes. |
When Semarchy takes a connection from the connection pool, it assumes that this connection is a valid one. In certain situations, the connection may be invalid at the database side (for maintenance reasons, etc.). It is a good practice to configure the pool to test connections before serving them.
This capability is typically enabled in application servers using a query that is executed before serving the connection from the pool.
Similarly, connections in the pool should be configured not in auto-commit mode. When a connection is released to the pool, the configuration should ensure that this connection rollbacks any uncommitted statement.
| Application Server | Relevant Parameters |
|---|---|
Make sure to set defaultAutoCommit to false and rollbackOnReturn to `true in PostgreSQL connection pools.Another parameter to consider: validationQueryTimeout. | |
| |
|
Semarchy xDM sometimes executes long-running queries to the data location. For example, an integration job that processes large data volumes may have queries that run for several minutes or hours.
Application servers have a mechanism to consider connection borrowed from the pool for a long time as "leaked" or "stale". When such connection is detected, the connection is reclaimed by the pool and the query failed. This mechanism must be disabled for Semarchy xDM long-running queries to work properly.
| Application Server | Relevant Parameters |
|---|---|
| |
| |
|
Semarchy xDM uses email servers for example to send
email notifications.
For the email features to work, you must configure an email notification server.
A notification server can be configured either:
This latter option is described in the next chapters for each application server.
mail/Session. This value can be changed when running the
installation process, and the changed value must be used when
configuring the notification server.The application is deployed by default with the semarchy context.
Therefore it is accessible on the application server on the following
URL: http://<application_server_host>:<application_server_port>/semarchy/.
During the application deployment, it is possible to use a different context than semarchy. If you use a different context, make sure to take it into account in the URL to test and connect to the application.
The Server Installation files for Semarchy xDM can be downloaded from the Semarchy website, at the following URL: http://www.semarchy.com/get/semarchy-xdm-install/.
The Semarchy xDM Server Installation file you download is referred to as semarchy-xdm-install-xxx.zip.
temp folder.The semarchy-xdm-install-xxx.zip archive contains the following files and folders:
| File/Folder | Description |
|---|---|
| File describing the package |
| This folder contains the installation files for Semarchy xDM. |
| Semarchy xDM deployable WAR file. |
| Semarchy xDM deployable WAR file for Passive Instances. Use this version for deploying Semarchy xDM in an existing supported application server for High-Availability Configurations. |
| This folder contains sample configuration files. |
| Sample configuration file for deploying Semarchy xDM in Apache Tomcat with an Oracle database. |
| Sample configuration file for deploying Semarchy xDM in Apache Tomcat with a PostgreSQL database. |
| Sample configuration file for deploying Semarchy xDM in Apache Tomcat with a SQL Server database. |
| This folder contains libraries used with Semarchy xDM, listed below. |
| Oracle JDBC driver for Oracle Database version 12c. If you are using an older Oracle version, it is recommended to review the compatibility of this driver with your Oracle database version and possibly install to an older driver version instead (ojdbc6 or ojdbc7). |
| PostgreSQL JDBC Driver. |
| SQL Server JDBC Driver. |
| Library to install to enable JavaMail for Apache Tomcat Servers. Ignore this file if you are using a different application server. |
| Tomcat tools for authentication and role mapping. See Delegating Authentication and Authorization in Tomcat for more information. Note that this component is provided for a given version of Tomcat, corresponding in the two first digits of the |
mdm-server/additional-libraries/
    com.sun.activation.jakarta.activation_*.jar
    com.sun.istack.commons-runtime_*.jar
    com.sun.xml.fastinfoset.FastInfoset_*.jar
    jakarta.jws-api_*.jar
    jakarta.xml.bind-api_*.jar
    jakarta.xml.soap-api_*.jar
    org.apache.servicemix.specs.jaxws-api-*.jar
    org.glassfish.jaxb.runtime_*.jar
    org.glassfish.jaxb.txw2_*.jar
org.jvnet.staxex.stax-ex_*.jar | Additional libraries required for Tomcat when running with a JDK 11. |
This section explains how to configure and deploy the Semarchy xDM Server with Apache Tomcat.
In this section, <tomcat> refers to the Apache Tomcat installation folder.
The installation file includes additional libraries which are not part of the Semarchy xDM code but which are required by the application server where Semarchy is running :
<tomcat>/bin/shutdown.bat (Windows) or <tomcat>/bin/shutdown.sh (UNIX/Linux).<tomcat>/bin/startup.bat (Windows) or <tomcat>/bin/startup.sh (UNIX/Linux)Install the JDBC drivers to connect the repository and data location databases, as well as the additional drivers required for the databases accessed by the xDM Dashboards charts and dashboards, or profiled by xDM Discovery.
To install the JDBC drivers:
temp/mdm-server/additional-libraries/ to the <tomcat>/lib directory.This configuration is required for mail notifications using JEE Mail Session.
To install the Java Mail Libraries:
temp/mdm-server/additional-libraries/com.sun.mail.jakarta.mail_<version>.jar file to the <tomcat>/lib/ folderIf running Tomcat with a JDK 11, you must copy to the <tomcat>/lib/ folder libraries required for Semarchy that are not provided in this version of the JDK. This step is not required for a JDK 8.
You will find these libraries, listed below, in the `temp/mdm-server/additional-libraries/`folder.
com.sun.activation.jakarta.activation_*.jar
com.sun.istack.commons-runtime_*.jar
com.sun.xml.fastinfoset.FastInfoset_*.jar
jakarta.jws-api_*.jar
jakarta.xml.bind-api_*.jar
jakarta.xml.soap-api_*.jar
org.apache.servicemix.specs.jaxws-api-*.jar
org.glassfish.jaxb.runtime_*.jar
org.glassfish.jaxb.txw2_*.jar
org.jvnet.staxex.stax-ex_*.jar
To configure the Semarchy xDM administrator user:
<tomcat>/conf/tomcat-users.xml file.<tomcat-users> section, add the following line: <user username="semadmin" password="<semadmin_password>" roles="semarchyConnect,semarchyAdmin"/>This operation adds to Apache Tomcat a semadmin user with its password. This user has full privileges to the Semarchy xDM application. Make sure to use a strong password for this user.
It recommended to change the default configuration of the Tomcat server to benefit from the logging configuration directly from the Semarchy xDM Configuration user interface and prevent useless logging at server startup.
To configure the logging:
<tomcat>/bin/setenv.sh (UNIX/Linux) or <tomcat>/bin/setenv.bat (Windows) file with a text editor.CATALINA_OPTS variable:
-Dorg.ops4j.pax.logging.DefaultServiceLog.level=WARN<tomcat>/conf/logging.properties file with a text editor.com.sun.xml.level = INFO javax.xml.bind.level = INFO org.apache.cxf.level = WARNING org.ops4j.pax.logging.internal.Activator.level = WARNING org.apache.aries.blueprint.level = WARNING
The Semarchy xDM application deployed in a Tomcat server is configured using a semarchy.xml that you modify and provide as part of the application deployment process.
The configuration file used after deployment by a running application is located in the <tomcat>/conf/Catalina/localhost/ folder. Such a file may be directly modified on the server machine. This triggers automatically an application restart with the updated configuration. Note that if you un-deploy the application, this file is deleted and lost.
semarchy-<database-name>.xml, are available in the mdm-server/ folder of the server installation files you downloaded. Use these configuration files to get started with your instance configuration.To configure the repository datasource:
semarchy.xml file.<context> configuration element, search the
jdbc/SEMARCHY_REPOSITORY datasource and edit the following
parameters:oracle.jdbc.OracleDriverorg.postgresql.Drivercom.microsoft.sqlserver.jdbc.SQLServerDriverjdbc:oracle:thin:@<oracle_instance_hostname>:<oracle_listener_port>:<oracle_SID_name>jdbc:postgresql://<postgresql_hostname>:<postgresql_port>/<postgresql_database_name>jdbc:sqlserver://<sqlserver_hostname>:<sqlserver_port>;databaseName=<repository_database_name>;jdbc:sqlserver://<sqlserver_hostname>;instanceName=<sqlserver_instancename>;databaseName=<repository_database_name>;<repository_user_name><repository_user_password>validationQuery value by SELECT 1.semarchy.xml file.To configure a data location datasources:
semarchy.xml file.<context> configuration element, copy and un-comment the
datasource sample definition called jdbc/DATA_LOCATION_1.jdbc/<data_location_datasource_name>oracle.jdbc.OracleDriverorg.postgresql.Drivercom.microsoft.sqlserver.jdbc.SQLServerDriverjdbc:oracle:thin:@<oracle_instance_hostname>:<oracle_listener_port>:<oracle_SID_name>jdbc:postgresql://<postgresql_hostname>:<postgresql_port>/<postgresql_database_name>jdbc:sqlserver://<sqlserver_hostname>:<sqlserver_port>;databaseName=<repository_database_name>;jdbc:sqlserver://<sqlserver_hostname>;instanceName=<sqlserver_instancename>;databaseName=<rdata_location_database_name>;<data_location_user_name><data_location_user_password>validationQuery value by SELECT 1.semarchy.xml file.The repository and data location datasources are now configured, pointing to the storage previously created.
To configure a datasource for xDM Dashboards or xDM Discovery, use the same configuration steps that you used to configure a data location datasource.
This configuration is required for mail notifications using JEE Mail Session.
To configure JavaMail Session:
semarchy.xml file.<context> configuration element add the entry given below
and then save the semarchy.xml file. Change the entry below to match
your SMTP server configuration. See the SMTP package documentation for a description of the properties.<Resource name="mail/Session" auth="Container" type="javax.mail.Session"
mail.smtp.host="<mail_server_host>"
mail.port="<mail_server_port>"
mail.smtp.user="<mail_user_name>"
mail.transport.protocol="smtp"
password="<mail_user_password>"
mail.smtp.auth="true" />
<!-- Add the following to the configuration in case of a SASL Authenticator error:
mail.smtp.socketFactory.class="javax.net.ssl.SSLSocketFactory"
mail.smtp.socketFactory.port="<mail_server_port>"
mail.smtp.socketFactory.fallback="false"
-->semarchy-passive.war should be deployed renamed to semarchy.war and deployed using the instructions below.To deploy the application:
semarchy.war war file and the semarchy.xml configuration file to a temporary directory on the Tomcat server machine, for example /temp/.http://<tomcat_host>:<tomcat_port>/manager/).http://<application_server_host>:<application_server_port>/<context>/.semarchy for the context./temp/semarchy.xml/temp/semarchy.warThe Semarchy xDM application is deployed in the server.
To test the application:
http://<tomcat_host>:<tomcat_port>/<context>/.The Semarchy xDM Login page appears.
In its default configuration, Tomcat stores users, passwords and roles on the server’s filesystem, in the <tomcat>/conf/tomcat-users.xml file.
This section provides advanced configuration information for delegating authentication and authorization in Apache Tomcat:
The following sections detail configuration aspects for:
A strong knowledge of Tomcat concepts and options is required to configure authentication and authorization according to each situation. Please read carefully the following documents to learn about these subjects:
Semarchy xDM supports authenticating as well as roles retrieval from an external directory, such as LDAP or Active Directory. The information entered in the login form is passed to the external directory, which returns, if the user is valid one, this user’s roles.
To delegate the authentication to an LDAP directory, add to the semarchy.xml configuration file a Tomcat JNDI Realm definition as shown in the example below. This configuration must be customized to match your LDAP directory configuration.
<Realm className="org.apache.catalina.realm.JNDIRealm"
	connectionURL="ldap://ldaphost.mydomain.com:389"		(1)
	userPattern="uid={0},ou=users,ou=people,dc=myCompany,dc=com"	(2)
	roleBase="ou=groups,ou=people,dc=myCompany,dc=com"		(3)
	roleName="cn"							(3)
	roleSearch="(member={0})" />					(3)
The parameters of the realm must be customized to your configuration:
| 1 | connectionURL: Connection URL to the LDAP server |
| 2 | Users log in to Semarchy xDM with their LDAP UID. The password passed in the login form must the one of the user found in the LDAP tree using the userPattern. |
| 3 | Roles are searched in the roleBase point in the LDAP tree. roleSearch defines the LDAP search filter used to search roles attached to a username (represented by {0}). The roles returned are the attribute identified by roleName. |
OpenID is a mechanism used to delegate authentication to another provider. With OpenID configured, you can use Google, Yahoo, Facebook or Twitter accounts to authenticate to Semarchy xDM, to replace or in addition to the login form.
There are two main "implementations" of OpenID supported by the authentication providers: OpenID 2.0 and OpenID Connect.
The next sections explain how to configure OpenID 2.0 or OpenID Connect for Tomcat, and how to mix these authentication schemes with a Login Form.
OpenID is used as an authentication service, which does not includes the roles. A realm (LDAP, File, or other) is usually defined to manage and serve the roles of the users identified with OpenID.
Configuring OpenID 2.0 with Tomcat requires the Open ID Authenticator for Tomcat, which extends Tomcat authentication to support OpenID 2.0.
To configure authentication with OpenID:
<tomcat>/lib directory.semarchy.xml configuration file to define the authentication.In this configuration, you define:
OpenIDAuthenticator valve for the authentication.OpenIDRealm, which contains a JNDI sub-realm for the authorizations.<!-- OpenID Valve configuration for Authentication -->
<Valve className="org.bsworks.catalina.authenticator.openid.OpenIDAuthenticator"
singleProviderURI="https://me.yahoo.com"
loginNameAttributeType="http://axschema.org/contact/email"
allowedClaimedIDPattern="https://me.yahoo.com/a/.+"
hostBaseURI="http://mdm_host:port" /> (1)
<!--Realms configuration -->
<Realm className="org.bsworks.catalina.authenticator.openid.OpenIDRealm">
<!--
This realm provides authorizations for the OpenID-authenticated users.
It uses LDAP with each username equal to the OpenID username.
Any Tomcat realm can be used for this purpose.
-->
<Realm className="org.apache.catalina.realm.JNDIRealm"
connectionURL="ldap://ldaphost.mydomain.com:389" (2)
userPattern="uid={0},ou=users,ou=people,dc=myCompany,dc=com" (3)
userPassword="uid" (3)
roleBase="ou=groups,ou=people,dc=myCompany,dc=com"
roleName="cn"
roleSearch="(member={0})" />
</Realm>The parameters of the valve and realm must be customized to your configuration:
| 1 | The OpenID connector will return to the original server after authentication. In most cases (when the server uses HTTPS), this mechanism works. If the server does not use HTTPS, it is recommended to set the host and port of the Semarchy xDM instance in hostBaseURI. |
| 2 | This LDAP host corresponds to the LDAP server containing your user and roles mappings. |
| 3 | LDAP Realms configuration. see the Tomcat JNDI Realm Documentation for more information. Note that in this realm configuration, the userPassword must point to the LDAP uid (user id). The LDAP user ID must be equal to the OpenID Connect User ID (in that case, the email). |
Mixing OpenID 2.0 with a form authentication provides the possibility to log in using an OpenID account or a login form. Authentication via the login form is made against an authentication provider, for example an LDAP directory or a database of users stored in the application server’s disk.
<!-- OpenID Valve configuration for Authentication -->
<Valve className="org.bsworks.catalina.authenticator.openid.OpenIDAuthenticator"
	loginNameAttributeType="http://axschema.org/contact/email"
	singleProviderURI="https://me.yahoo.com"
	allowedClaimedIDPattern="https://me.yahoo.com/a/.+"
	hostBaseURI="http://mdm_host:myport" />

<!--
	Login form configuration, allowing to display a OpenID authentication button
	pointing to OpenID Provider (Yahoo) given by parameter value
-->
<Parameter name="SingleSignOn"
           value="openid_identifier=https://me.yahoo.com"
           override="true" />

<!--Realms configuration -->
<Realm className="org.bsworks.catalina.authenticator.openid.OpenIDRealm">
	<!--
	The first realm provides authorizations for the OpenID-authenticated users.
	This realm uses LDAP with each username equal to the OpenID username.
	Any Tomcat realm can be used for this purpose.
	-->
	<Realm  className="org.apache.catalina.realm.JNDIRealm"
		connectionURL="ldap://ldaphost.mydomain.com:389"
		userPattern="uid={0},ou=users,ou=people,dc=myCompany,dc=com"
		userPassword="uid"
		roleBase="ou=groups,ou=people,dc=myCompany,dc=com"
		roleName="cn"
		roleSearch="(member={0})" />

	<!--
	The second realm (and subsequent ones) are used as fallbacks for
	authentication and authorization.
	Local realms can be used as local authentication providers,
	or fallback providers if the OpenID authentication fails.
	-->
	<Realm 	className="org.apache.catalina.realm.JNDIRealm"
		connectionURL="ldap://ldaphost.mydomain.com:389"
		userPattern="uid={0},ou=users,ou=people,dc=myCompany,dc=com"
		roleBase="ou=groups,ou=people,dc=myCompany,dc=com"
		roleName="cn"
		roleSearch="(member={0})" />

</Realm>OpenID Connect is a newer implementation, and authentication providers move over time from OpenID 2.0 to OpenID Connect. It is supported by example by Google, Amazon Cognito, Microsoft Azure AD, ADFS, and OKTA.
Configuring OpenID Connect with Tomcat requires the OpenID Connect Authenticator for Tomcat, which extends Tomcat authentication to support OpenID Connect.
To configure authentication with OpenID:
tomcat8-oidcauth-<version_number>.jar<tomcat>/lib directory.In this configuration, you define:
providers JSON payload.<!-- Valve configuration for OpenID Connect authentication -->
<Valve className="org.bsworks.catalina.authenticator.oidc.tomcat85.OpenIDConnectAuthenticator"
providers="[{ (1)
name: Google,
issuer: https://accounts.google.com,
clientId: xxxxx, (2)
clientSecret: xxxxxx (2)
}]"
additionalScopes="email" (3)
usernameClaim="email" (4)
noForm="true" (5)
hostBaseURI="http://mdm_host:port" (6)
<!-- logoutUrl="http://myhost.myport/semarchy/logout.do" --> (7)
landingPage="/"/>The parameters of the valve must be customized to your configuration:
| 1 | The list of OpenID Connect providers. In this example, only Google is defined. |
| 2 | The Google Client ID and Google Client Key are retrieved from the Google Developer Console. Refer to the Google Identity Platform site for detailed setup instructions. |
| 3 | The additionalScopes property lists the additional scopes to request to the provider. |
| 4 | The usernameClaim property indicates which of the claims returned by the provider should be used as a user id when looking for the authorizations. |
| 5 | This property indicates whether the login form should be available or not, in addition to the OpenID Connect providers. |
| 6 | The OpenID Connect connector will return to the original server after authentication. In most cases (when the server uses HTTPS), this mechanism works. If the server does not use HTTPS, it is recommended to set the host and port of the Semarchy xDM instance in hostBaseURI. You must declare this redirect URI in the Google Developer Console. See the Google Identity Platform site for detailed instructions. |
| 7 | Optional Logout URL. Specify this URL as required by the OpenID Connect provider. |
<!--
The following LDAP realm provides the authorizations of the OpenID Connect-authenticated users.
Any Tomcat realm can be used for this purpose.
-->
<Realm className="org.apache.catalina.realm.JNDIRealm"	(1)
	connectionURL="ldap://ldaphost.mydomain.com:389"
	userPattern="uid={0},ou=users,ou=people,dc=myCompany,dc=com"
	roleBase="ou=groups,ou=people,dc=myCompany,dc=com"
	roleName="cn"
	roleSearch="(member={0})"

    <CredentialHandler className="com.semarchy.tool.jee.tomcat.CaseInsensitiveCredentialHandler"/> (2)
	/>
The parameters of the realm must be customized to your configuration:
| 1 | This JNDI Realm (LDAP Server) contains the roles of the authenticated users. Roles are searched in the roleBase point in the LDAP tree. roleSearch defines the LDAP search filter used to search roles attached to a user id (represented by {0}). The roles returned are the attribute identified by roleName.Note that the LDAP user id, referred to with {0}, must be equal to the value requested to the OpenID provider via the usernameClaim (in that case, the email). |
| 2 | This optional credential handler is configured in the realm to automatically handle the possible case-sensitivity differences between the authentication provider and the authorization provider. It may be used in other realm configurations. |
Semarchy xDM provides an extension to the OpenID Connect Authenticator for Tomcat that supports reading roles the ID Token. This token is a JSON Web Token (JWT) returned after a successful authentication, with user profile information (user’s name, email, roles, etc), represented in the form of claims.
If the OpenID Provider supports it, this configuration allows reading roles served directly by the OpenID provider.
To configure authentication with OpenID and authorization with the ID Token:
<tomcat>/lib directory.temp/mdm-server/additional-libraries/com.semarchy.tool.jee.tomcat-<tomcat_version>.jar file to the $TOMCAT_HOME/lib directory. This file is available from the semarchy-xdm-install-xxx.zip archive file you downloaded.In this configuration, you define:
com.semarchy.tool.jee.tomcat.OpenIdConnectAuthenticator class, which supports the ID Token.com.semarchy.tool.jee.tomcat.OpenIdConnectRealm to use the roles extracted from the ID Token by the valve.<Valve className="com.semarchy.tool.jee.tomcat.OpenIdConnectAuthenticator"
providers="[{ (1)
name: 'Microsoft Azure AD',
issuer: xxxx, (2)
clientId: xxxx, (2)
clientSecret: xxxxx (2)
}]"
usernameClaim="email" (3)
additionalScopes="email groups" (4)
hostBaseURI="http://myhost:myport"
noForm="true"
groupClaim="groups" (5)
groupSeparator=","
<!-- Role mapping is supported if required -->
roleMappingEnabled = "true" (6)
keepMappedRoles="false"
keepUnmappedRoles="false"
regexEnabled="true"
landingPage="/"
<!-- logoutUrl="http://myhost.myport/semarchy/logout.do" --> (7)
/>
<!-- Realm using the roles extracted from the ID Token -->
<Realm className="com.semarchy.tool.jee.tomcat.OpenIdConnectRealm" />| 1 | The list of OpenID Connect providers. In this example, only Microsoft Azure AD is defined. |
| 2 | These parameters are configured in Azure AD. Refer to the OpenID Connect and Azure Active Directory documentation for more information. |
| 3 | The usernameClaim corresponds to the claim in the ID Token containing the user name. |
| 4 | The additionalScopes is a space-separated list of scopes that are requested for the ID Token. Note that one of them is groups. |
| 5 | The groupClaim property tells the valve which of the additionalScopes (in that case, groups) contains the list of groups. This list is split using the groupSeparator character. |
| 6 | Each group from the groupClaim list is optionally processed by the Semarchy xDM role mapper if this property is set to true, to create a list of roles meaningful for Semarchy xDM. See Using the Tomcat Role Mapper for more information about these parameters. |
| 7 | Optional Logout URL. Specify this URL as required by the OpenID Connect provider |
Mixing OpenID Connect with a form authentication provides the possibility to log in using an OpenID Connect account or a login form. Authentication via the login form is made against a realm, for example an LDAP directory or a database of users stored in the application server’s disk.
To configure OpenID Connect and Form authentication:
<tomcat>/lib directory.temp/mdm-server/additional-libraries/com.semarchy.tool.jee.tomcat-<tomcat_version>.jar file to the $TOMCAT_HOME/lib directory. This file is available from the semarchy-xdm-install-xxx.zip archive file you downloaded.In this configuration, you define:
providers JSON payload. Make sure to set noForm="false" in this configuration to enable the form.<!-- Valve configuration for mixed OpenID Connect authentication -->
<Valve className="org.bsworks.catalina.authenticator.oidc.tomcat85.OpenIDConnectAuthenticator"
providers="[{ (1)
name: Google,
issuer: https://accounts.google.com,
clientId: xxxxx,
clientSecret: xxxxxx
}]"
usernameClaim="email"
additionalScopes="email"
noForm="false" (2)
hostBaseURI="http://mdm_host:port"
landingPage="/"/>
<!--
This realm provides authentication for form-authenticated users as well as authorization
for OpenID Connect and form-authenticated users.
These users are stored in an "OpenIDDatabase" file resource, declared in server.xml.
This file contains username and roles for all users. Only users authenticated by form
will use the passwords stored in this files.
-->
<Realm className="org.apache.catalina.realm.UserDatabaseRealm" resourceName="OpenIDDatabase"/>| 1 | The list of OpenID Connect providers. In this example, only Google is defined. See OpenID Connect Authentication & LDAP Authorization for a more detailed example. |
| 2 | This property indicates that the login form should be available in addition to the OpenID Connect providers. If you set it to false, there is no login form. However, the UserDatabaseRealm will still be used for the OpenID Connect user’s authorizations. |
/conf/server.xml to declare the file resource containing the user database.<!--
The resource named "OpenIDDatabase" used in the realm configuration
must be declared as the /conf/openid-users.xml file stored in the
application server's file system.
-->
<Resource name="OpenIDDatabase" auth="Container"
type="org.apache.catalina.UserDatabase"
description="User database"
factory="org.apache.catalina.users.MemoryUserDatabaseFactory"
pathname="conf/openid-users.xml" />/conf/openid-users.xml file containing user, passwords and roles.<user username="john.doe@mydomain.com" password="xxxx" roles="semarchyConnect,businessUser"/>
<user username="local_admin" password="xxxx" roles="semarchyConnect,semarchyAdmin"/>The first time a user logs in using OpenID Connect, its profile information is automatically seeded with the information provided, according to the standard, by the OpenID Connect provider in the UserInfo endpoint response.
This information includes the following profile properties: email, first name, last name, picture, primary phone, address, city, postal code, country, language and time zone.
profile phone address to the additionalScopes parameter of the valve to have this information returned in the UserInfo endpoint.Profile information that does not exist in the standard claims may also be seeded in the user profile using the following custom claims that should be returned by the provider in the UserInfo response:
| Profile property | Custom claim name |
|---|---|
Company Name | |
Job Tile | |
Department | |
Secondary Phone |
Windows Authentication (SSO) is supported in Tomcat using the Waffle (Windows Authentication Framework) component.
Using this mechanism, the user connected to the windows machine is used to authenticate to Semarchy xDM.
To configure Windows Authentication:
$TOMCAT_HOME/lib directory:waffle-tomcat(version)-*.jar corresponding to your Tomcat version.waffle-jna-*.jarcaffeine-*.jar, jna-*.jar, jna-platform-*.jar, logback-core-*.jar, logback-classic-*.jar, slf4j-api-*.jar, jcl-over-slf4j-*.jar.temp/mdm-server/additional-libraries/com.semarchy.tool.jee.tomcat-<tomcat_version>.jar file to the $TOMCAT_HOME/lib directory.semarchy.xml file and add the valve and realm configuration and then restart the server.To enable Windows authentication, use the following configuration.
<Valve className="com.semarchy.tool.jee.tomcat.RoleMappingNegotiateAuthenticator"
	principalFormat="fqn"
	roleFormat="fqn"
	protocols="NTLM"
	/>

<Realm className="waffle.apache.WindowsRealm" />
To mix Login Form and Windows authentication use the following configuration:
<parameter name="SingleSignOn"
           value="action=j_negotiate_check"
           override="true" />

<Valve className="com.semarchy.tool.jee.tomcat.RoleMappingMixedAuthenticator"
	principalFormat="fqn"
	roleFormat="fqn"
	protocols="NTLM"
	/>

<Realm className="waffle.apache.WindowsRealm" />NegotiateAuthenticator or MixedAuthenticator valves instead.protocols="NTML" element by disableNegociate=”true".Browser Configuration
Browsers must be specifically configured to work with Windows Authentication:
about:config in the address bar.network.negotiate-auth.trusted-uris in the Filter box.When the service providing the authorizations returns groups of users (if it does not support the concept of Roles) or role names that cannot exactly match the roles declared in Semarchy xDM (for example, if they include spaces or special characters), you have to configure a mapping between these role names and the Semarchy xDM role names.
Semarchy xDM provides a specific component for this purpose, called the Role Mapper.
To configure the Role Mapper:
temp/mdm-server/additional-libraries/com.semarchy.tool.jee.tomcat-<tomcat_version>.jar file to the $TOMCAT_HOME/lib directory.$TOMCAT_HOME/conf/roles-mapping.properties file to define the role mappings.semarchy.xml file and add a wrapper realm around the realm for which you want to perform role mapping, as shown below.<Realm className="com.semarchy.tool.jee.tomcat.RoleMappingRealm">
<!-- This is the Realm to which role mapping is applied. -->
<Realm ClassName="org.apache.catalina.realm.JNDIRealm"
...
/>
</Realm>Role mapping is natively supported:
RoleMappingNegotiateAuthenticator and RoleMappingMixedAuthenticator valves support natively role mapping and do not require additional realm configuration.OpenIdConnectAuthenticator valve configuration.The role mappings are stored in a file contains one line per role mapping, in the format:
<directory_group>=<semarchy_role_1>,<semarchy_role_2>,...The group names may contain spaces. In this situation, it should be kept as is and NOT enclosed in single or double quotes.
AdministratorsGroup=semarchyConnect,semarchyAdmin
UsersGroup=semarchyConnect
Data Stewards=demoDataStewards
In certain cases with Microsoft Active Directory, group names with special characters such as spaces or backslashes require that you replace them with their Unicode equivalent them as shown below:
\u0020) and backslashes (\u005C)MDM\u0020Users=semarchyConnect Global\u005CStewards=semarchySteward
The role mapper supports role mapping using regular expressions and match groups patterns to convert input roles into different roles.
This requires setting the role mapping realm’s regexEnabled attribute to true.
SUPP_.* = Supplier 	(1)
SUPP_(.*) = $1		(2)
(.*) = $1		(3)
If the example above, an incoming role named SUPP_Premium would convert into the Supplier, Premium `and `SUPP_Premium roles, due to the following rules:
| 1 | If a role starts with SUPP_, then the Supplier role is mapped as the output. |
| 2 | If a role starts with SUPP_, then the rest of the role string captured as a group is returned as a role. For example: SUPP_Premium as an input role would return Premium as the output. |
| 3 | The entire input role is captured as a group and returned as an output. |
You can use the following properties to configure the role mapper:
regexEnabled: Set to true to enable role replacement using regular expressions. This option defaults to "false".keepMappedRoles: Set to true to preserve in the user roles list the original roles that have been mapped. Otherwise, these roles are replaced by their mapped value. This option defaults to "true". This option replaces the deprecated replaceRole option. If keepMappedRoles or keepUnmappedRoles is set, then replaceRole is ignored.keepUnmappedRoles: Set to true to preserve in the user roles list the original roles that have not been mapped. Otherwise, these roles are removed from the list. This option defaults to "true".rolesMappingPathName: Location of the role mapping file. By default this file is located in $TOMCAT_HOME/conf/roles-mapping.properties<Realm className="com.semarchy.tool.jee.tomcat.RoleMappingRealm"
keepMappedRoles="false"
keepUnmappedRoles="false"
regexEnabled="true"
rolesMappingPathName="/home/user/map.properties">To simplify the configuration of user authentication and authorizations in Apache Tomcat, Semarchy xDM comes with a Wrapper realm that supports two nested realms:
username = password, since this realm is only used for authorizations. Note that this realm, in the example below, uses a specific credential handler to automatically handle the possible case-sensitivity differences between the authentication provider and the authorization provider.<Realm className="com.semarchy.tool.jee.tomcat.AuthAndRolesRealm">
<!-- First realm is for authentication -->
<Realm className="org.apache.catalina.realm.JNDIRealm"
connectionURL="ldap://ldaphost.mydomain.com:389"
userPattern="uid={0},ou=users,ou=people,dc=myCompany,dc=com"
/>
<!-- Second realm is for authorizations -->
<Realm className="org.apache.catalina.realm.JDBCRealm"
driverName="oracle.jdbc.driver.OracleDriver"
connectionURL="jdbc:oracle:thin:@dbserver:1521:ora11"
userTable="users"
userNameCol="user_name"
userCredCol="user_name"
userRoleTable="user_roles"
roleNameCol="role_name"
<!-- Credential handler for case-sensitivity differences -->
<CredentialHandler className="com.semarchy.tool.jee.tomcat.CaseInsensitiveCredentialHandler"/>
/>
</Realm>Semarchy xDM can use a JMS (Java Message Service) provider as a notification server, in order to send job completion notifications to other applications in the form of JMS messages.
In most cases, the resource definition is generic and follows the Tomcat generic guidelines.
Certain JMS servers do not precisely follow the JMS Standards and require specific mechanisms and configuration to connect and access their JMS destinations. For these cases, Semarchy xDM includes a generic JNDI lookup factory to request a JNDI Connections and Resources (Queue or Topic).
This component is available as a jar named com.semarchy.tool.jee.tomcat-<tomcat_version>.jar in your Semarchy xDM installation package.
To configure the JNDI Lookup Factory:
temp/mdm-server/additional-libraries/com.semarchy.tool.jee.tomcat-<tomcat_version>.jar file to the $TOMCAT_HOME/lib directory.$TOMCAT_HOME/lib directory.semarchy.xml file and add the following resource declarations:<!-- The Connection Factory encapsulates a set of connection configuration parameters.
It is used to create a connection with the JMS provider. -->
<Resource name="jms/<connection_factory_name>" (1)
auth="Container"
type="javax.jms.ConnectionFactory"
factory="com.semarchy.tool.jee.tomcat.jndi.JndiLookupFactory"
jndiKey="<connection_factory_jndi_location_in_provider>"(2)
initialCtxFactory="<initial_context_factory>" (3)
providerUrl="<provider_url>" (4)
username = "<jms_server_login>" (5)
password = "<jms_server_password>" (5)
/>
<!-- Depending on the JMS provider, you must provide additional parameters.
For example:
java.naming.security.protocol = "ssl"
-->The Connection Factory resource definition uses the following parameters:
| 1 | The Tomcat resource name for your JMS connection factory. |
| 2 | The location of the connection factory JNDI resource in the remote JNDI provider. |
| 3 | The initial context factory class, specific to the JNDI provider. |
| 4 | The URL of the JNDI provider. |
| 5 | The login and password required to access the JNDI resource, if required. |
<!-- A destination is a JMS Queue or Topic to send notifications to. -->

<Resource name="jms/<destination_name>" 			(1)
	auth="Container"
	type="javax.jms.Queue"					(2)
	factory="com.semarchy.tool.jee.tomcat.jndi.JndiLookupFactory"
	jndiKey="<destination_jndi_location_in_provider>" 	(3)
	initialCtxFactory="<initial_context_factory>" 		(4)
	providerUrl="<provider_url>" 				(5)
	username = "<jms_server_login>"				(6)
	password = "<jms_server_password>"			(6)
/>
<!-- Depending on the JMS provider, you must provide additional parameters.
     For example:
     java.naming.security.protocol = "ssl"
-->
The JMS destination resource definition uses the following parameters:
| 1 | The resource name of your JMS destination in Tomcat. |
| 2 | Type of the JMS destination. Can be a Queue or Topic. |
| 3 | The location of the JMS destination JNDI resource in the remote JNDI provider. |
| 4 | The initial context factory class, specific to the JNDI provider. |
| 5 | The URL of the JNDI provider. |
| 6 | The login and password required to access the JNDI resource, if required. |
When configuring the Notification Server and Job Notification Policy, or order to use the JMS destination defined:
jms/<connection_factory_name> value in the notification server Connection Factory URL property.jms/<destination_name> value in the job notification JMS Destination property.Both those values must be prefixed with java:comp/env/ when used.
You can configure the look and feel of the Semarchy xDM login, logout and error pages.
The following parameters can be passed in the semarchy.xml` file to configure this page:
<!-- Enable SSO with Google along with the login form -->
<Parameter name="SingleSignOn" value="openid_identifier=https://www.google.com/accounts/o8/id" override="true"/>

<!-- Google Login button branding -->
<Parameter name="SingleSignOnButtonLabel" value="Google" />
<Parameter name="SingleSignOnButtonIcon" value="google.png" />
<Parameter name="SingleSignOnButtonColor" value="#4885ed" />

<!-- Login/Logout/Error pages image banner and footer text -->
<Parameter name="SignOnImageURL" value="http://localhost:80/staticAssets/banner.png" />
<Parameter name="SignOnBottomMessage" value="Please use this application <b>wisely</b>" />This section explains how to configure and deploy the Semarchy xDM Server with WildFly Application Server (formerly JBoss AS).
In this section, <wildfly_home> refers to the Wildfly server installation
folder.
Install the JDBC drivers to connect the repository and data location databases, as well as the additional drivers required for the the datasources accessed by xDM Dashboards or xDM Discovery.
To install the JDBC drivers:
temp/mdm-server/additional-libraries/ to the <wildfly_home>/standalone/deployments directory.The following example explains how to configure the semadmin user for Wildfly in the default configuration.
To configure the security realm:
<wildfly_home>/bin folder and start the add-user.sh or
add_user.bat scriptsemadmin for the Username and then press Enter.semarchyConnect,semarchyAdmin
and then press Enter.To configure the repository datasource:
SEMARCHY_REPOSITORYjdbc/SEMARCHY_REPOSITORY<repository_user_name><repository_user_password>jdbc:oracle:thin:@<oracle_instance_hostname>:<oracle_listener_port>:<oracle_SID_name>jdbc:postgresql://<postgresql_hostname>:<postgresql_port>/<postgresql_database_name>jdbc:sqlserver://<sqlserver_hostname>:<sqlserver_port>;databaseName=<repository_database_name>;jdbc:sqlserver://<sqlserver_hostname>;instanceName=<sqlserver_instancename>;databaseName=<repository_database_name>;To configure a data location datasource:
<data_location_datasource_name>jdbc/<data_location_datasource_name><data_location_user_name><data_location_user_password>jdbc:oracle:thin:@<oracle_instance_hostname>:<oracle_listener_port>:<oracle_SID_name>jdbc:postgresql://<postgresql_hostname>:<postgresql_port>/<postgresql_database_name>jdbc:sqlserver://<sqlserver_hostname>:<sqlserver_port>;databaseName=<repository_database_name>;jdbc:sqlserver://<sqlserver_hostname>;instanceName=<sqlserver_instancename>;databaseName=<rdata_location_database_name>;The repository and data location datasources are now configured, pointing to the storage previously created.
To configure datasources for xDM Dashboards or xDM Discovery, use the same configuration steps that you used to configure the data location datasources.
To deploy the application:
temp/mdm-server/semarchy.war file to the <wildfly_home>/standalone/deployments/ folder.The Semarchy xDM application is deployed in the server.
This configuration is required for mail notifications using JEE Mail Session.
To configure JavaMail Session:
domain.xml or standalone-full.xml configuration file and create the mail subsystem to match your configuration. See
https://docs.jboss.org/author/display/AS71/Mail+Subsystem for more information.To test the application:
http:/<wildfly_host>:<wildfly_port>/semarchy/.This section explains how to configure and deploy the Semarchy xDM Server with Glassfish Application Server.
In this section, <glassfish_home> refers to the Glassfish server
installation folder.
Install the JDBC drivers to connect the repository and data location databases, as well as the additional drivers required for the databases accessed by the xDM Dashboards charts and dashboards, or profiled by xDM Discovery.
To install the JDBC drivers:
temp/mdm-server/additional-libraries/ to the <glassfish_home>/glassfish/lib directory.To configure the security realm:
http://<glassfish_host>:4848).semarchyRealmcom.sun.entreprise.security.auth.realm.file.FileRealmfileRealm${com.sun.aas.instanceRoot}/config/keyfileTo configure the semadmin user:
semadminsemarchyAdminGroup,semarchyConnectGroup<semadmin_password>The configured realm uses the default Java Authorization Contract for Containers (JACC) provider included in Glassfish. This JACC provider does not support dynamic roles, and mandates that the mappings between Groups and Roles are defined in the deployed application descriptor file.
To define the groups/roles mappings:
/temp/mdm-server/semarchy.war file into the temp/semarchy_war/ folder.temp/semarchy_war/semarchy/WEB-INF/glassfish-web.xml file.<glassfish-web-app> element and then save the file.<security-role-mapping>
<role-name>semarchyConnect</role-name>
<group-name>semarchyConnectGroup</group-name>
</security-role-mapping>
<security-role-mapping>
<role-name>semarchyAdmin</role-name>
<group-name>semarchyAdminGroup</group-name>
</security-role-mapping>To configure the repository datasource:
http://<glassfish_host>:4848).SEMARCHY_REPOSITORYjava.sql.ConnectionPoolDataSource<repository_user_name><repository_user_password>jdbc:oracle:thin:@<oracle_instance_hostname>:<oracle_listener_port>:<oracle_SID_name>jdbc:postgresql://<postgresql_hostname>:<postgresql_port>/<postgresql_database_name>jdbc:sqlserver://<sqlserver_hostname>:<sqlserver_port>;databaseName=<repository_database_name>;jdbc:sqlserver://<sqlserver_hostname>;instanceName=<sqlserver_instancename>;databaseName=<repository_database_name>;50jdbc/SEMARCHY_REPOSITORYSEMARCHY_REPOSITORYEnabledTo configure a data location datasource:
http://<glassfish_host>:4848).<data_location_datasource_name>java.sql.ConnectionPoolDataSource<data_location_user_name><data_location_user_password>jdbc:oracle:thin:@<oracle_instance_hostname>:<oracle_listener_port>:<oracle_SID_name>jdbc:postgresql://<postgresql_hostname>:<postgresql_port>/<postgresql_database_name>jdbc:sqlserver://<sqlserver_hostname>:<sqlserver_port>;databaseName=<repository_database_name>;jdbc:sqlserver://<sqlserver_hostname>;instanceName=<sqlserver_instancename>;databaseName=<rdata_location_database_name>;50jdbc/<data_location_datasource_name><data_location_datasource_name>EnabledRepeat this operation for each data location’s datasource.
The repository and data location datasources are now configured, pointing to the storage previously created.
To configure datasources for xDM Dashboards or xDM Discovery, use the same configuration steps that you used to configure the data location datasources.
This configuration is required for mail notifications using JEE Mail Session.
To configure JavaMail Session:
http://<glassfish_host>:4848).mail/Session<mail_server_host><mail_user_name>smtptrue<mail_user_password>To deploy the application:
http://<glassfish_host>:4848).temp/semarchy_war/semarchy/ folder in the folder
browser and click Choose Folder.Web Application for the Type and make sure the Status
is Enabled.The Semarchy xDM application is deployed in the server.
To test the application:
http:/<glassfish_host>:<glassfish_port>/semarchy/.This section explains how to configure and deploy the Semarchy xDM Server with the Eclipse Jetty Application Server.
In this section, <jetty_home> refers to the Jetty server installation folder.
Install the JDBC drivers to connect the repository and data location databases, as well as the additional drivers required for the databases accessed by the xDM Dashboards charts and dashboards, or profiled by xDM Discovery.
To install the JDBC drivers:
temp/mdm-server/additional-libraries/ to the <jetty>/lib/ext directory.This configuration uses connection pooling available in DBCP.
To install the Connection Pooling Libraries:
commons-dbcp-1.4.jar and commons-pool-1.6.jar files to the <jetty>/lib/ext directory.To create the Semarchy xDM Realm:
<jetty>/etc/jetty.xml file and add the realm definition as described in the example below.<Call name="addBean">
<Arg>
<New class="org.eclipse.jetty.security.HashLoginService">
<Set name="name">semarchyRealm</Set>
<Set name="config"><SystemProperty name="jetty.home" default="."/>/etc/realm.properties</Set>
<Set name="refreshInterval">0</Set>
</New>
</Arg>
</Call>This realm uses file storage for the users and roles.
To add the semadmin user to the realm:
<jetty>/etc/realm.properties file and add the users in the following format:<user_name>: <password>[,<role_1>, <role_2>]
An example is given below:
semadmin: <semadmin_password>, semarchyAdmin,semarchyConnect
myuser: <my_password>,semarchyConnect, dataStewardTo configure the datasources using DBCP connection pooling:
<jetty>/etc/jetty.xml file and add the new JNDI resources shown in the template below.<!-- Repository Datasource -->
<New id="SEMARCHY_REPOSITORY" class="org.eclipse.jetty.plus.jndi.Resource">
<Arg></Arg>
<Arg>jdbc/SEMARCHY_REPOSITORY</Arg>
<Arg>
<New class="org.apache.commons.dbcp.BasicDataSource">
<!-- Configuraton for Oracle -->
<Set name="driverClassName">oracle.jdbc.OracleDriver</Set>
<Set name="url">jdbc:oracle:thin:@<oracle_instance_hostname>:<oracle_listener_port>:<oracle_SID_name></Set>
<!-- Configuration for PostgreSQL -->
<!-- <Set name="driverClassName">org.postgresql.Driver</Set> -->
<!-- <Set name="url">jdbc:postgresql://<postgresql_hostname>:<postgresql_port>/<postgresql_database_name></Set> -->
<!-- Configuration for SQL Server -->
<!-- <Set name="driverClassName">com.microsoft.sqlserver.jdbc.SQLServerDriver</Set> -->
<!-- <Set name="url">jdbc:sqlserver://<sqlserver_hostname>:<sqlserver_port>;databaseName=<repository_database_name></Set> -->
<Set name="username"><repository_user_name></Set>
<Set name="password"><repository_user_password></Set>
</New>
</Arg>
</New>
<!-- Repeat the following element for each data location -->
<New id="<data_location_datasource_name>" class="org.eclipse.jetty.plus.jndi.Resource">
<Arg></Arg>
<Arg>jdbc/<data_location_datasource_name></Arg>
<Arg>
<New class="org.apache.commons.dbcp.BasicDataSource">
<!-- Configuraton for Oracle -->
<Set name="driverClassName">oracle.jdbc.OracleDriver</Set>
<Set name="url">jdbc:oracle:thin:@<oracle_instance_hostname>:<oracle_listener_port>:<oracle_SID_name></Set>
<!-- Configuration for PostgreSQL -->
<!-- <Set name="driverClassName">org.postgresql.Driver</Set> -->
<!-- <Set name="url">jdbc:postgresql://<postgresql_hostname>:<postgresql_port>/<postgresql_database_name>`</Set> -->
<!-- Configuration for SQL Server -->
<!-- <Set name="driverClassName">com.microsoft.sqlserver.jdbc.SQLServerDriver</Set> -->
<!-- <Set name="url">jdbc:sqlserver://<sqlserver_hostname>:<sqlserver_port>;databaseName=<data_location_database_name></Set> -->
<Set name="username"><data_location_user_name></Set>
<Set name="password"><data_location_user_password></Set>
</New>
</Arg>
</New><jetty>/etc/jetty.xml file and add the new JavaMail resource as described in the template below.<New id="mail" class="org.eclipse.jetty.plus.jndi.Resource">
<Arg><Ref refid="wac"/></Arg>
<Arg>mail/Session</Arg>
<Arg>
<New class="org.eclipse.jetty.jndi.factories.MailSessionReference">
<Set name="user"><mail_user_name></Set>
<Set name="password"><mail_user_password></Set>
<Set name="properties">
<New class="java.util.Properties">
<Put name="mail.transport.protocol">smtp</Put>
<Put name="mail.smtp.host"><mail_server_host></Put>
<Put name="mail.smtp.port"><mail_server_port></Put>
<Put name="mail.from"><mail_from_user_name></Put>
<Put name="mail.debug">true</Put>
</New>
</Set>
</New>
</Arg>
</New>To deploy the application:
temp/mdm-server/semarchy.war file to the <jetty>/webapp/ folder.<jetty> folder and then run java -jar start.jar to start the Jetty Server.The Semarchy xDM application is deployed and the server started.
To test the application:
http:/<jetty_host>:<jetty_port>/semarchy/.This section explains how to configure and deploy the Semarchy xDM Server with Oracle WebLogic Application Server.
Oracle WebLogic comes with a JDBC Driver for the Oracle database. For PostgreSQL, SQL Server and the databases accessed from xDM Dashboards or xDM Discovery, you must add the driver file to the classpath variable of the WebLogic Server.
To create the groups:
semarchyConnectGroupDefaultAuthenticatorsemarchyAdminGroupDefaultAuthenticatorTo create the semadmin user:
semadminDefaultAuthenticator<semadmin_password>semadmin user from the Users table, then select the
Groups tab.semarchyAdminGroup and semarchyConnectGroup groups in
the Available group list, then click the Add button to add them to the
Chosen list.To configure the roles mappings:
semarchyConnectXACMLRoleMappersemarchyConnect role in the Roles table.Group for the Predicate List and then click Next.semarchyConnectGroup and
then click Add.semarchyAdminXACMLRoleMappersemarchyAdmin role in the Roles table.Group for the Predicate List and then click Next.semarchyAdminGroup and then
click Add.To configure the repository datasource:
SEMARCHY_REPOSITORYjdbc/SEMARCHY_REPOSITORY<oracle_SID_name><oracle_instance_hostname><oracle_listener_port><repository_user_name><repository_user_password><postgresql_database_name><postgresql_hostname><postgresql_port><repository_user_name><repository_user_password><repository_database_name><sqlserver_hostname><sqlserver_port><repository_user_name><repository_user_password>defaultAutoCommit=falseAdmin Server) and then
click Finish.To configure the data location datasource:
<data_location_datasource_name>jdbc/<data_location_datasource_name><oracle_SID_name><oracle_instance_hostname><oracle_listener_port><data_location_user_name><data_location_user_password><postgresql_database_name><postgresql_hostname><postgresql_port><data_location_user_name><data_location_user_password><data_location_database_name><sqlserver_hostname><sqlserver_port><repository_user_name><repository_user_password>defaultAutoCommit=falseAdmin Server) and then
click Finish.Repeat this operation for each data location’s datasource.
The repository and data location datasources are now configured, pointing to the storage previously created.
To configure datasources for xDM Dashboards or xDM Discovery, use the same configuration steps that you used to configure the data location datasources.
To deploy the application:
Upload your file(s) link.temp/mdm-server/semarchy.war file on
your local disk.The Semarchy xDM application is deployed in the server.
This configuration is required for mail notifications using JEE Mail Session.
To configure JavaMail Session:
MailSessionmail/Sessionmail.transport.protocol=smtpmail.smtp.host=<mail_server_host>mail.port=<mail_server_port>mail.smtp.auth=truemail.smtp.user=<mail_user_name>password=<mail_user_password>To test the application:
http:/<weblogic_host>:<weblogic_port>/semarchy/.Semarchy xDM holds all its information in a repository stored in a database/schema. The first task when connecting to Semarchy xDM is to create this repository structure in the storage previously created.
Repository installation is done the first time an administrator connects to Semarchy xDM.
http://<application_server_host>:<application_server_port>/semarchy/.semadmin<semadmin_password>The repository is created and Semarchy xDM is now up and running.
Semarchy xDM is now up and running.
This section describes the next recommended tasks for the Administrators and Project Managers.
Administrators should proceed with the following tasks:
Project Managers should proceed to the following tasks: