Semarchy xDM Integration Guide
version 5.1 Rev 1, 2020-07-30
Welcome to Semarchy xDM.
This guide contains information about publishing and consuming data in an MDM hub generated by Semarchy xDM.
Using this guide, you will:
This document uses the following formatting conventions:
| Convention | Meaning |
|---|---|
boldface | Boldface type indicates graphical user interface elements associated with an action, or a product specific term or concept. |
italic | Italic type indicates special emphasis or placeholder variable that you need to provide. |
| Monospace type indicates code example, text or commands that you enter. |
In addition to the product manuals, Semarchy provides other resources available on its web site: http://www.semarchy.com.
There are many ways to access the Semarchy Technical Support. You can call or email our global Technical Support Center (support@semarchy.com). For more information, see http://www.semarchy.com.
We welcome your comments and suggestions on the quality and usefulness
of this documentation.
If you find any error or have any suggestion for improvement, please
mail support@semarchy.com and indicate the title of the documentation
along with the chapter, section, and page number, if available. Please
let us know if you want a reply.
Semarchy xDM is the Intelligent Data Hub platform for Master Data
Management (MDM), Reference Data Management (RDM), Application Data Management
(ADM), Data Quality, and Data Governance.
It provides all the features for data
quality, data validation, data matching, de-duplication, data authoring,
workflows, and more.
Semarchy xDM brings extreme agility for defining and implementing data management applications and releasing them to production. The platform can be used as the target deployment point for all the data in the enterprise or in conjunction with existing data hubs to contribute to data transparency and quality.
Its powerful and intuitive environment covers all use cases for setting up a successful data governance strategy.
Semarchy xDM certifies golden data from source applications’ data and allows applications to consume this golden data.
Integration with Semarchy xDM is performed in several ways:
Semarchy xDM provides several integration services, including:
Using these components, applications and middleware products can consume and publish data in the hub.
In the context of integration, we refer to applications publishing source data into the hub as Publishers.
We also refer to application consuming golden data from the hub as Consumers.
These roles are not exclusive. An application can publish data into the MDM hub and consume certified golden data from the hub to update its records.
For example, a business intelligence application is typically a consumer-only as it consumes only golden records for reporting purposes. An operational application may publish its contact information to the MDM hub for certification and update its contact information with the certified golden records.
This term refers to the original application from which the data originates, and not necessarily to the middleware tool or user-designed program actually doing the data movement. The publisher is typically an operational application such as a Customer Relationship Management (CRM), a Product Lifecycle Management (PLM) or an Enterprise Resource Planner (ERP).
A middleware tool may be an Extract-Transform-Load (ETL), Enterprise Service Bus (ESB) or any other data integration product. It may also be a user-designed program or script implemented in SQL, Java, etc. The middleware tool or user-designed program communicates with the publisher to extract data and communicates with the MDM Hub using the publishing methods described in this guide to load this data.
Similarly to the publisher, this term refers to the applications consuming data from the hub. This consumption usually takes place via a middleware tool or a user-designed program, and uses the consumption methods described in this guide.
Data consumption is available via the REST API or SQL through the tables stored in the Data Location Schema.
Various views on the data can be used for consumption, including:
Data Consumption is always done on a specific Data Location.
Publishing source data for certification into golden data is performed as a transaction. Such publisher transaction is called an External Load. It is a Semarchy xDM transaction identified by a sequential Load ID.
An External Load represents a source data load transaction.
When an External Load is submitted with an Integration Job Name, a Batch - identified by a Batch ID - is created, and the Job starts processing the data published in this load.
A Batch represents a transaction certifying loaded data and writing in the hub the resulting golden data.
An external load lifecycle is described below:
The middleware can also Cancel the External Load to abort the external load instead of submitting it.
Continuous loads enable integration developers to push data into the MDM hub in a continuous way without having to take care of Load Initialization or Load Submission.
With continuous loads:
Continuous loads are configured and managed by the administrator in a data location. Unlike external loads, they cannot be created, submitted or canceled via integration points.
The SQL Interface or the REST API can use continuous loads via their Load ID or Name to push data into the hub without having to perform the load ID management operation.
B_LOADID column to load the Load ID of the continuous load.GET_CONTINUOUS_LOAD, stored in the repository (and in the INTEGRATION_LOAD package for Oracle), to returns the Load ID for a given continuous load name.vLoad_id := <repository_schema>.INTEGRATION_LOAD.GET_CONTINUOUS_LOADID(
'<continuous_load_name>' /* Name of the continuous load. */
);vLoad_id := <repository_schema>.get_continuous_loadid(
'<continuous_load_name>' /* Name of the continuous load. */
);EXEC <repository_schema>.dbo.GET_CONTINUOUS_LOADID
@LOAD_ID OUTPUT,
@P_CONTINUOUS_LOAD_NAME = '<continuous_load_name>' /* Name of the continuous load. */When an external load is submitted, the following operations take place:
Even when multiple loads take place simultaneously, the sequence into which the external loads are submitted defines the order into which the data is processed by the integration jobs and golden data certified from this source data.
This section describes the interfaces available for integration.
This interface is available for application to consume or publish data from the hub in a programmatic way.
This interface is available for data integration and ETL products to publish or consume data. It is composed of the Integration Load Functions and the Data Location Database Schema.
The Integration Load Functions are stored in the repository schema, contains function to manage the External Load Lifecycle, for the purpose of publishing data in batch mode.
The Data Location Database Schema stores a set of tables that contain the hub data.
This schema contains the landing (or staging) tables used to publish data into the hub. It contains also the golden records tables and the intermediate tables handled by the integration job that create golden
records from the source records. There is a single data structure for the entire hub, and a single set of tables for each entity regardless of the model edition.
The data location schema is accessed for integration purposes to:
The structure of the tables stored in the data location schema is detailed in the Table Structures section.
This section explains the artifacts involved when certify data published into the hub.
The integration job processes the data submitted in an external load and runs this data through the Certification Process, which is a series of steps to create and certify golden data out of this source data.
This job is generated from the certification rules defined at design time, and it uses the data structures automatically created in the MDM hub when deploying the model edition.
An integration job is a sequence of tasks used to certify golden data for a group of entities. The model edition deployed in the data location brings several integration jobs definitions with it. Each of these job definitions is designed to certify data for a group of entities.
Integration jobs definitions as well as integration job logs are stored in the repository
For example, a multi-domain hub contains entities for the PARTY domain and for the PRODUCTS domain, and has two integration jobs definition:
Integration jobs are started when source data has been loaded in the landing tables and is submitted for golden data certification.
Each integration job is the implementation of the overall certification process template. It may contain all or some of the steps of this process. The following section details the structure of the certification process.
The Certification Process creates consolidated and certified Golden Records from various sources:
The certification process takes these various sources, applies the rules and constraints defined in the model in order to create, update or delete the golden data that business users browse using the MDM applications and that downstream application consume from the hub.
This process is automated and involves several phases, automatically generated from the rules and constraints, which are defined in the model based on the functional knowledge of the entities and the publishers involved.
The following sections describe the details of the certification process for ID, fuzzy matched and basic entities, and the delete process for all entities.
The following figure describes the certification process and the various Table Structures involved in this process.
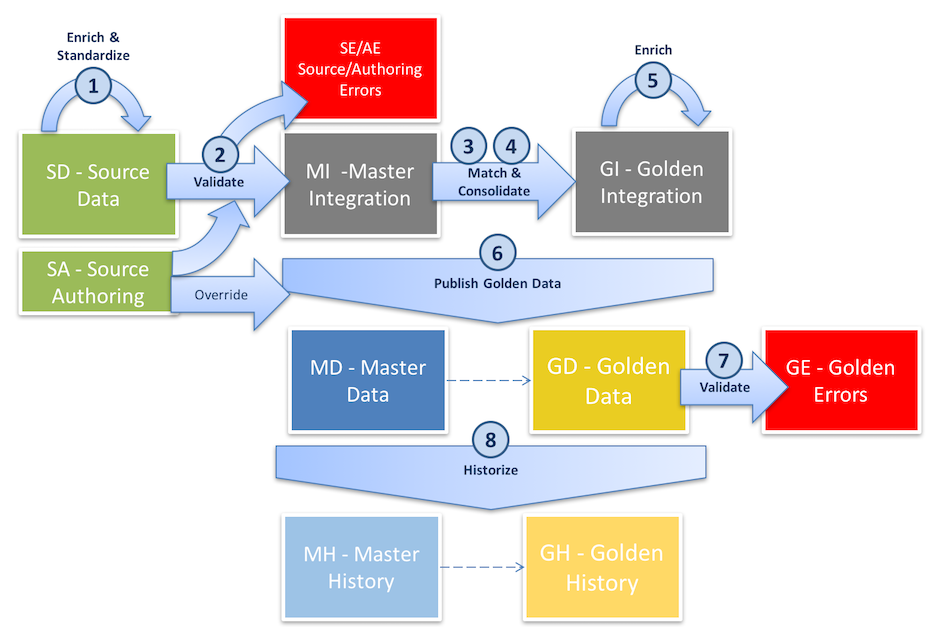
The certification process involves the following steps:
Note that source authoring records are enriched and validated only for basic entities. For ID and fuzzy matched, source authoring records are not enriched and validated.
Source Authoring Records are not enriched or validated for ID and fuzzy matched entities as part of the certification process. These records should be enriched and validated as part of the steppers into which users author the data.
The following figure describes the certification process and the various Table Structures involved in this process.
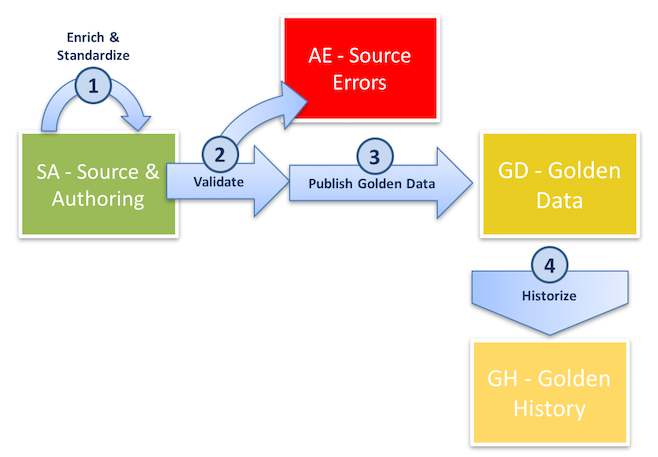
The certification process involves the following steps:
Note that:
A Delete Operation (for basic, ID or fuzzy matched entities) involves the following steps:
For more information about these various phases and how the certification process is designed, refer to the Certification Process Design chapter in the Semarchy xDM Developer’s Guide.
This section describes the general structure of the tables involved in the certification process.
For each entity, a pre-defined set of tables is created. These tables are named with the following convention: <Prefix>_<Physical Table Name>
The prefix is automatically generated depending on the table nature (Source Data, Source Error, etc.), and the Physical Table Name is set in the entity definition.
The following list describes the tables created for a given entity.
| Table | Name | Applicable Entity Type | Access | Description |
|---|---|---|---|---|
| Source Data | Fuzzy and ID Matched | Read/Write | This table contains source data loaded by publishers, using the middleware. |
| Source Authoring | All | Read (Write for Basic Entities) | For matching entities, this table contains both the records created in the hub by the user as well as possible overrides performed on consolidated records. In that case, it is associated to a |
| Source Errors | All | Read | This table contains the errors detected during the pre-consolidation validation phase. It is named |
| Duplicates | Fuzzy Matched | Read | This table stores references to pairs of records detected as duplicates in the matching phase, with the match rule and match score. |
| Matching Groups | Fuzzy Matched | Read | Table containing the master records being re-grouped by a user during a duplicates management operation. |
| Master Integration | Fuzzy and ID Matched | Internal | This table contains the records that have passed the pre-consolidation validation phase and that have been grouped by the matching phase. |
| Master Data | Fuzzy and ID Matched | Read | This table contains the master records, which are the enriched and validated source records that have participated in the creation of golden records. This table can be accessed to review groups/duplicates or to refer to the source data. |
| Deleted Master | Fuzzy and ID Matched | Read | Table containing deleted master records logs, plus the deleted data for soft deletes. |
| Master History | Fuzzy and ID Matched | Read | Master records history. |
| Golden Integration | Fuzzy and ID Matched | Internal | This table contains the records that have been consolidated but not yet passed through the post-consolidation validation phase. |
| Golden Authoring | Fuzzy and ID Matched | Internal | This table contains data overrides performed on golden records . It is associated to a |
| Deleted Golden | All | Read | Table containing deleted golden records logs, plus the deleted data for soft deletes. |
| Golden History | All | Read | Golden records history. |
| Golden Data | All | Read | This table contains the golden records, including those flagged as erroneous by post-consolidation validations. |
| Golden Errors | Fuzzy and ID Matched | Read | This table contains the errors detected during the post-consolidation validation phase on golden records. |
For publishing and consuming data, internal tables are not needed. The structure of these tables is not explained in this document.
Attributes appear in the tables’ structure as follows:
<Complex Attribute Physical Prefix><Definition Attribute Physical Column Name>For example: The Country (COUNTRY) and City (CITY) definition
attributes of the Geocoded Address complex attribute (Prefix: GEO)
will be mapped to columns named GEOCOUNTRY and GEOCITY.
In addition to the attribute columns, built-in columns are added to the tables’ structure, and are used in the certification process.
They track for example:
B_BATCHIDB_CONSTRAINTNAME, B_CONSTRAINTTYPEB_CLASSNAMEB_MATCHGRP, B_CONFSCORE, B_HASSUGGMERGE, B_SUGGMERGEID, B_SUGGMERGECONFSCORE, B_SUGGMERGEMASTERSCOUNT, B_CONFIRMATIONSTATUS, B_MASTERSCOUNT, B_ISCONFIRMEDB_DELETETYPE, B_DELETEDATE, B_DELETEAUTHOR, B_DELETEOPERATION,The following list describes these columns.
| Column Name | Exists in Tables | Datatype | Description |
|---|---|---|---|
| GA, SA |
| For matched entities, type of authoring operation:
|
| AE, GA, GD, GE, GF, GI, GP, GX, MD, MI, MX, SE |
| ID of the batch into which the new data, data changes, overrides or duplicate decisions were applied, or during which errors were detected. |
| UM |
| Cause that made the record part of the duplicate management transaction. Possible causes are:
|
| AE, GA, GD, GE, GF, GH, GI, GP, GX, MD, MH, MI, MX, SA, SD, SE, SF, UM |
| Unique name of class / entity to which this record belongs. See Class Name for more information. |
| GD, GH, GI, GX, MD, MH, MI, MX, UM |
| Confirmation status for duplicate management:
|
| MD, MI, UM | Varies | ID of the confirmed golden record this master record is attached to. |
| GD, GH, GI, GX, UM |
| Confidence Score of the golden record. It is the average of the match scores in the match group. |
| AE, GE, SE |
| For error records, name of the constraint causing this error. |
| AE, GE, SE |
| For error records, type of the constraint causing this error. |
| SA |
| ID of the original record copied into this record. |
| DU, GA, GD, GH, GI, GX, MD, MH, MI, MX, SA, SD, UM |
| For golden data (GD, GI, GX, GH), the submitter of the batch into which for record was created. For source and master data, the user who has created the record in a workflow, stepper, duplicate manager or a user name loaded by the data integration process. |
| DU, GA, GD, GH, GI, GX, MD, MH, MI, MX, SA, SD, UM |
| For golden and master data, the submit timestamp of the batch into which the record was created. For source data (SD, SA, UM), the timestamp at which the source record was created. |
| GX, MX, SA, SD |
| Author of the delete operation. |
| GX, MX, SA, SD |
| Deletion timestamp of a record |
| GX, MX, SA, SD |
| Delete operation ID. |
| GX, MX, SA, SD |
| Cascade path through which the record was reached during a delete. Null for record directly selected for deletion. |
| GX, MX, SA, SD |
| Delete Type ( |
| GD, GH, GX, SA, SD |
| Error Status of a record. This value indicates whether the source or golden record has passed successfully or not validations. Possible values are:
|
| GH, MH |
| Batch at which the history record was created. |
| GD, GH, GX |
| For fuzzy matching and ID matching entities, indicates whether the golden record was created and authored only in the MDM ( |
| GD, GH, GX |
| For fuzzy matching and ID matching entities, this flag ( |
| GD, GH, GI, GX, MD, MH, MI, MX, UM |
| Flag ( |
| GD, GH, GI, GX |
| Flag ( |
| AE, SA, SD, SE, SF, UM |
| Load Identifier used as the unique transaction ID for external application pushing data to the platform |
| GD, GH, GI, GX, UM |
| Number of master records contributing to the golden record. |
| MD, MH, MI, MX |
| ID of the match group for the master record. This column is set when matching takes place. |
| DU |
| Match rule having cause the pair of records to match. |
| DU |
| Score of the matched pair. |
| MI |
| Previous identifier of the match group for the master record. |
| MD, MH, MI, MX | Varies | ID of the previous golden record the master record was attached to. |
| SA, SD, UM |
| Batch identifier of the record when it was originally edited out in a stepper or a duplicate manager. |
| UM |
| Original Confirmation Status in a duplicate management operation. |
| UM | Varies | ID of the original confirmed golden record to which the master record was attached to. |
| UM |
| Confidence Score of the original golden in a duplicate management operation. |
| UM |
| Number of master records in the original golden in a duplicate management operation. |
| UM | Varies | ID of the original golden record to which the master record was attached to. |
| UM |
| Original exclusion group to which the master record belonged to. |
| DU, GD, GH, GI, GX, MD, MH, MI, MX, SD, SE, UM |
| For matching entities, code of the publisher that published the record. |
| DU |
| For duplicate pairs, code of the publisher that published the second record. |
| DU, GD, GH, GI, GX, MD, MH, MI, MX, SD, SE, UM |
| ID of the source record in the source publisher system (Fuzzy Matched entities only). See below for a detailed explanation of the primary key options. |
| DU |
| For duplicate pairs, ID of the second source record in the source publisher system (Fuzzy Matched entities only). |
| GD, GH, GI, GX, MD, MH, MI, MX, UM |
| Confidence Score for the suggested match group. |
| GD, GH, GI, GX, MD, MH, MI, MX, UM |
| ID of the merge suggested by the automated matching. |
| GD, GH, GI, GX, MD, MH, MI, MX, UM |
| Number of master records in the suggested merge. |
| GH, MH |
| Batch at which history record stopped being current or null if the records is still current. |
| DU, GA, GD, GH, GI, GX, MD, MH, MI, MX, SA, SD, UM |
| For golden data (GD, GI, GX, GH), the submitter of the batch into which the record was updated. For source and master data, the latest user who has updated the record in a workflow, stepper, duplicate manager or the user name loaded by the data integration process. |
| DU, GA, GD, GH, GI, GX, MD, MH, MI, MX, SA, SD, UM |
| For golden and master data, the submit timestamp of the batch into which the record was updated. For source data (SD, SA, UM), the timestamp at which the source record was created or updated. |
| MD, MH, MI, MX, UM |
| Exclusion group ID. An exclusion group represents a group of records for which a user has taken split decisions. |
The primary key to load depends on the Entity Type:
For basic entities, Semarchy xDM uses a single identifier, stored in a column named after the Physical Column Name specified in the primary key attribute definition. This column will exist in all tables. This identifier is simply propagated into the hub from the source records.
When using ID Matching, Semarchy xDM assumes a common identifier across all systems. In this case, this common identifier is stored in a column named after the Physical Column Name specified in the primary key attribute definition.
This column will exist in all tables. When publishing data into the hub, the middleware loads this column with the primary key from the publishing system. This identifier is simply propagated into the hub, and matching is done using this primary key.
When using Fuzzy Matching, Semarchy xDM assumes no common identifier across publishers. There may be two different records with the same ID in different systems. There is a need to match the records and consolidate them under a golden record having a primary key generated by the system.
In this case, the source identifier is stored in the column named
B_SOURCEID, along with the publisher code stored in the B_PUBID.
This is the case for the SD, SE and MD tables.
When publishing data into the hub, the middleware loads this
B_SOURCEID column with a primary key value from the publishing system.
If this primary key is a composite key in the source system, all the
columns of this composite key must be concatenated into B_SOURCEID.
When the records are consolidated in a golden record (GD and GE tables), a System Defined Primary Key is generated and stored in a column named after the Physical Column Name specified in the primary key attribute definition. This key is referred to as the Golden Record ID.
The MD table makes the bridge between the Source ID and the Golden ID as it contains both these values.
When a reference exists in the source publisher and need to be expressed in the landing table, this reference mapping in the table structure depends on the Entity Type of the referenced entity.
For a reference to a Basic entity, the referenced key stored is simply the primary key of the basic entity.
As a consequence, the referenced value is stored in a single column. This column is named after the Physical Name
provided in the reference definition and is prefixed with F_. For example, F_COUNTRIES.
For a reference to an ID Matched entity, the referenced key is the
same for all systems. As a consequence, the referenced value is stored
in a single column. This column is named after the Physical Name
provided in the reference definition and is prefixed with F_. For
example, F_EMPLOYEE.
For example: if Customer references Employee and this entity uses ID
Matching, SD_CUSTOMER will contain the following information.
| CUSTOMER_NAME | F_EMPLOYEE |
|---|---|
Gadgetron | 11 |
Roxxon | 56 |
This information means that the customer Gadgetron references the
employee number 11, and Roxxon references employee number 56. This
employee number is the same in all systems.
For a reference to a Fuzzy Matched entity, the referenced may point to a master record from a publisher, or directly to a golden record in the hub:
FS_ (for Foreign Source ID). For example, FS_CUSTOMER.FP_ (for Foreign Publisher). For example, FP_CUSTOMER.
For a reference to a golden record:F_ (for Foreign ID).Contact references Customer and this entity uses
Fuzzy Matching, SD_CONTACT contains the following information.
| FIRST_NAME | LAST_NAME | FP_CUSTOMER | FS_CUSTOMER |
|---|---|---|---|
John | Doe | CRM | 1235 |
Jane | Smith | MKT | A3251 |
This information means that the contact John Doe references the
customer with the primary key 1235 in the CRM publisher, and
that Jane Smith references the customer with the primary key
A3251 in the MKT publisher.
Contact references Customer and this entity uses
Fuzzy Matching, SD_CONTACT contains the following information.
| FIRST_NAME | LAST_NAME | F_CUSTOMER |
|---|---|---|
John | Doe | 6598 |
Jane | Smith | 6556 |
This information means that the contact John Doe references the
golden customer record with the golden ID 6598, and
that Jane Smith references the golden customer with the golden ID
6556.
FS_, FP_ and F_ columns.Several entities involved in an inheritance relation have their data
stored in the same set of tables. These tables store the superset of the
attributes of the parent and all its child entities. The B_CLASSNAME
column is used to identify the class (entity) of a record in a table.
For example, when Person and Company inherit from the Party
entity, the resulting table is named after the parent entity
(Party), and will contain all the attributes of Person and
Company as well. In the GD_PARTY table for example, records
representing persons will have B_CLASSNAME='Person'. When publishing
person or company information in the SD_PARTY table, the middleware
must set B_CLASSNAME='Person' or B_CLASSNAME='Company' accordingly.
The only constraints physically enforced in the tables are the primary keys and the not null columns. These constraints apply to system columns only.
For example, on an SD_ table, the following constraints are enforced:
B_LOADID, B_PUBID, B_SOURCEID (or the primary key
column for ID Matched entities)B_LOADID, B_CLASSNAME, B_PUBID and B_SOURCEID
(or the primary key column for ID Matched entities) are not nullOther constraints defined in the model (mandatory attributes, references, etc.) are not enforced in the physical model but checked during the validation phase.
Publishing data is done using function calls to initialize/submit the external load and DML statements to load the data into the landing (SD for matching entities, SA for basic entities) tables.
In this approach, external loads are handled using the and SQL interface. It works as follows:
GET_NEW_LOADID function on the repository schema. This function call returns a Load ID.SUBMIT_LOAD to submit a load identified by its Load ID. This function call returns a Batch ID.CANCEL_LOAD to cancel a load identified by its Load ID.Alternately, you can use Continuous Loads to load data into the SD tables with the Load ID of the Continuous Load, without having to explicitly initialize and submit individual external loads.
Initializing an external load uses the following parameters:
data_location_name: name of the data location. This data location is the one hosting the MDM hub into which the external load is performed.program_name: This variable is for information only. It is used to identify the middleware performing the external load. For example ’ETL Custom Script’.load_description: This variable is for information only. It is used to describe the nature of this load. For example: ’Daily updates for Customers and Contacts’.user_name: name of the user initializing the external load. This user may or may not be a user defined in the security realm of the application server.This function call to GET_NEW_LOADID initializes an external load and returns a Load ID. It is performed on the repository database schema.
INTEGRATION_LOAD package. You must prefix the function name with the name of this package.vLoad_id := <repository_schema>.INTEGRATION_LOAD.GET_NEW_LOADID(
'<data_location_name>' /* Data Location Name (As in the UI) */
'<program_name>' /* Informational. Identifies the Middleware*/
'<load_description>' /* Informational. Describes the load. */
'<user_name>' /* User initializing the load. */
);vLoad_id := <repository_schema>.get_new_loadid(
'<data_location_name>' /* Data Location Name (As in the UI) */
'<program_name>' /* Informational. Identifies the Middleware*/
'<load_description>' /* Informational. Describes the load. */
'<user_name>' /* User initializing the load. */
);EXEC <repository_database>.dbo.GET_NEW_LOADID
@LOAD_ID OUTPUT,
@P_DATA_LOCATION_NAME varchar(max),
@P_PROGRAM_NAME = '<program_name>', /* Informational. Identifies the Middleware */
@P_LOAD_DESCRIPTION = N'<load_description>',/* Informational. Describes the load. */
/* Note the N to allow accented characters */
@P_USERNAME = '<user_name>' /* User initializing the load. */The following example performs a function call initializing an external load on the CustomerMDMHub data location. The repository schema is REPO. The returned Load ID is stored in the vLoad_id variable.
vLoad_id := REPO.INTEGRATION_LOAD.GET_NEW_LOADID(
	'CustomerMDMHub',
	'Custom ETL',
	'Initial Load for the Hub',
	'John Doe' );
Loading data consists in inserting new source records in the SD (and SA for Basic Entities) tables for the set of entities taken into account in the integration job.
When loading data in the SD or SA tables:
Make sure to load all the SD and SA tables for the entities that will be taken into account in the integration job. For example, if the integration job processes the Customer and Contact entities, then you should load the
SD_CUSTOMER and SD_CONTACT tables.
If you insert data into the SD table of an entity that is not taken into account by the integration job, this data will be ignored. For example, if the integration job processes the Customer and Contact entities, data loaded the SD_EMPLOYEE table will not be taken into account by the integration job to certify golden records for the Employee entity.
There is no required order to load the SD and SA tables, as no foreign keys
are implemented on these tables.
Reference validation is performed by the integration job, as a
consequence references between entities must be loaded as indicated in
the Columns to Load section.
It is recommended to use a database transaction when writing to the SD and SA tables.
This section provides some guidance for loading the columns of the SD and SA tables.
The following system columns must be loaded as indicated:
B_LOADID: This column must be loaded with the Load ID provided by GET_NEW_LOADID function call, of with the ID of the Continuous Load. Note that you can use the GET_CONTINUOUS_LOADID function to retrieve a continuous load ID from the continuous load name.B_CLASSNAME: Name of the entity (or class) being loaded. When inheritance is used, the same table stores data for all parent and child classes. Set explicitly B_CLASSNAME to the name of the entity
for which data is being published. For example: Person, Party, Company. See the Class Name section for more details.B_PUBID: This column must be loaded with a Publisher Code for ID Matched and Fuzzy Matched entities. For example: CRM, MKT, etc. This publisher code identifies the publisher (application that publishes the data) and should be declared in the model edition. The list of publisher codes is available by double-clicking the Publishers node in the Model Design view in the Model Design perspective. If the publisher code is unknown to the model, data from this publisher is processed, but this publisher will
have the lowest ranking in a Preferred Publisher consolidation strategy.B_PUBID column.B_PUBID with the publisher code as defined in the model. Publisher codes may contain uppercase letters, digits and underscores.B_PUBID column to identify each publisherFor matching entities, the primary key that you load into the SD table allows identifying the
source record from the publisher (identified by Publisher Code B_PUDIB). This primary key will allow taking into account the creation or update of a source record and report through the consolidation process the corresponding data changes to the golden record.
For basic entities, the primary key that you provide in the SA table is the one of the golden record and will allow updating this record.
The primary key column to load depends on the Entity Type of the entity.
If the entity is basic, then this ID must be loaded in the column representing the attribute defined as the primary key attribute for the entity.
If the entity uses ID Matching, then this ID must be loaded in the column representing the attribute defined as the primary key attribute for the entity.
If the entity uses Fuzzy Matching, then you must load into the
B_SOURCEID column the value of the primary key from the source system.
If this primary key is a composite key, then you must concatenate the
values of the composite primary key and load them in the B_SOURCEID
column.
B_SOURCEID column is a VARCHAR(128) column. Make sure
to perform the appropriate conversions for loading this column.When loading data for entities that are related by a reference relationship, you must load the referencing entity with the value of the referenced primary key. The columns to load differ depending on the Entity Type of the referenced entity.
If the referenced entity is an Basic entity, then you need to load
the column representing the referencing attribute. This column is
F_<Physical Name of the Reference To Role Name>.
If the referenced entity is an ID Matched entity, then you need to load
the column representing the referencing attribute. This column is
F_<Physical Name of the Reference To Role Name>.
For example, if Customer references Employee and this entity uses ID
Matching, then you must load into SD_CUSTOMER the F_EMPLOYEE column
with the primary key of the source employee record referenced by each
customer record.
If the referenced entity is a Fuzzy Matched entity, then you need to load two columns:
FS_<Physical Name of the Referenced To Role Name>: Load this column
with the Source ID of the referenced record.FP_<Physical Name of the Referenced To Role Name>: Code of the
publisher of the referenced record.FP_ column with a publisher code and leave FS_
to a null value, and vice versa.For example, if Contact references Customer and this entity use
Fuzzy Matching, you must load the following columns into the SD_CONTACT table:
FP_CUSTOMER: Code of the publisher providing the customer referenced
by the given contact, e.g., MKT.FS_CUSTOMER: Source ID of the customer referenced by the given
contact, e.g., 81239.You should load the attribute columns relevant for the entity you are loading.
Make sure to load:
B_CLASSNAME) you are loading.Loading Date and Timestamp Columns
Date attributes convert to Date columns in the database. The behavior of these date columns differ depending on the database:
TRUNC(date) function. Integration specialists should be aware of this automated transformation when loading a date and may consider performing this truncation in their integration flows.Timestamp attributes convert to Timestamp columns that contain a timezone portion. Semarchy xDM stores and expects in the database timestamps in the timezone of the application server hosting the Semarchy xDM application. When loading timestamps, integration specialists should take into account the timezone differences and possible timezone conversion between their integration component and the data location’s database server.
The following columns do not need to be loaded or can be optionally loaded:
B_ORIGINALBATCHID: This column is not used for external loads and should not be loaded.B_CREATOR, B_UPDATOR: These columns can be optionally loaded to store the users who have created or updated the records in the source systems. If left null, these columns are automatically set to the name of the user who submits the batch.B_CREDATE, B_UPDDATE: These columns can be optionally loaded to store the creation and update date (timestamp) of the records in the source systems. If left null, these columns are set to the submit date (timestamp) of the batch.
Note that values loaded here are not propagated beyond the SD table.Submitting an external load uses the following parameters:
load_id: Load ID returned by the load initialization.integration_job: Name of the integration job to process this load.user_name: name of the user who has initialized the external load. This user may or may not be a user defined in the security realm of the application server.The SUBMIT_LOAD function call submits an external load identified by its Load ID and returns a Batch ID. It is performed on the repository database schema.
vBatch_id := <repository_schema>.INTEGRATION_LOAD.SUBMIT_LOAD(
	<load_id>		/* Load ID returned by INTEGRATION_LOAD.GET_NEW_LOADID */
	'<integration_job>'	/* Name of the Integration Job to trigger. */
	'<user_name>'		/* User who has initialized the load. */
);vBatch_id := <repository_schema>.submit_load(
<load_id> /* Load ID returned by get_new_loadid */
'<integration_job>' /* Name of the Integration Job to trigger. */
'<user_name>' /* User who has initialized the load. */
);EXEC <repository_database>.dbo.SUBMIT_LOAD
@BATCH_ID OUTPUT,
@P_LOAD_ID = @LOAD_ID,
@P_INTEGRATION_JOB_NAME = '<integration_job>',/* Name of the Integration Job to trigger. */
@P_USERNAME '<user_name>' /* User who has initialized the load. */The following example performs a function call to submit an external load identified by the Load ID 22. It submits it with the job name INTEGRATE_DATA. The repository schema is REPO. The returned Batch ID is stored in the vBatch_id variable.
vBatch_id := REPO.INTEGRATION_LOAD.SUBMIT_LOAD(
	22,
	'INTEGRATE_DATA',
	'John Doe' );
Canceling a load is performed using the CANCEL_LOAD function with the following parameters:
load_id: Load ID returned by the load initialization.user_name: name of the user who has initialized the external load. This user may or may not be a user defined in the security realm of the application server.The CANCEL_LOAD procedure cancels an external load identified by its Load ID. It is performed on the repository database schema.
SD_% tables loaded during the external load. This must be taken care of separately.<repository_schema>.INTEGRATION_LOAD.CANCEL_LOAD(
<load_id> /* Load ID returned by INTEGRATION_LOAD.GET_NEW_LOADID */
'<user_name>' /* User who has initialized the load. */
);<repository_schema>.cancel_load(
<load_id> /* Load ID returned by get_new_loadid */
'<user_name>' /* User who has initialized the load. */
);<repository_database>.dbo.CANCEL_LOAD(
@P_LOAD_ID = @LOAD_ID,
@P_USERNAME '<user_name>' /* User who has initialized the load. */
);INTEGRATION_LOAD.CANCEL_LOAD to cancel an external load identified by the Load ID 22. (Oracle)REPO.INTEGRATION_LOAD.CANCEL_LOAD(
22,
'John Doe' );Semarchy xDM supports publishing golden records deletion using SQL for all entities using the same method.
To publish a golden record deletion, you must load the following columns into the SA table (even for ID and fuzzy matched entities):
B_LOADID: This column must be loaded with the Load ID provided by the GET_NEW_LOADID function call, of with the ID of the Continuous Load. Note that you can use the GET_CONTINUOUS_LOADID function to retrieve a continuous load ID from the continuous load name.B_DELETETYPE: load this column with the SOFT_DELETE or HARD_DELETE value depending on the type of delete that you want to trigger.B_DELETEOPERATION Delete operation ID. This ID must be a unique value for each deleted record. For example, use a UUID that you convert to a string (e.g.: Using the functions RAWTOHEX(SYS_GUID())).B_CLASSNAME: This column must be loaded with the name of the entity of the records to delete.<GoldenID>: This column must be loaded with the ID of the golden record to delete.You can optionally load the B_DELETEAUTHOR and B_DELETEDATE columns to provide an author and date for the delete operation.
It is possible to manage duplicates using SQL, and perform programmatically actions typically available to users in applications' duplicate managers. The following sections provide the methods to perform various duplicates management operations using SQL with the UM table.
All these methods use a Load ID (in a vLoadID variable), which is initialized and submitted using a process similar to the one used when Publishing Data Using SQL.
This method automatically confirms programmatically certain matches. It reproduces the behavior of the user interface.
Columns to load into the UM table:
B_LOADID: This column must be loaded with the Load ID provided by the GET_NEW_LOADID function call, of with the ID of the Continuous Load. Note that you can use the GET_CONTINUOUS_LOADID function to retrieve a continuous load ID from the continuous load name.B_SOURCEID, B_PUBID: These columns must be loaded with the ID and the publisher of the master records to confirm.B_CLASSNAME: This column must be loaded with the name of the entity of these records.<GoldenID>: This column must be loaded with the ID of the golden record to which the master record is attached to.B_CONFIRMEDSDPK: This column must be loaded with the same value as <GoldenID>.INSERT INTO UM_CUSTOMER (
B_LOADID,
B_SOURCEID,
B_PUBID,
B_CLASSNAME,
CUSTOMER_ID,
B_CONFIRMEDSDPK
)
SELECT
vLoad_id,
B_SOURCEID,
B_PUBID,
'Customer',
CUSTOMER_ID,
CUSTOMER_ID
FROM MD_CUSTOMER
WHERE
B_CONFIRMATIONSTATUS = 'NOT_CONFIRMED';When loading a source record, use this method to load at the same time a user decision forcing this record to:
To perform such an operation, combine data loading with the previous technique.
/* Load source record */

INSERT into SD_CUSTOMER (
  B_LOADID,
  B_SOURCEID,
  B_PUBID,
  B_CLASSNAME,
  -- Data fields are below
  CUSTOMER_NAME,
  ...

) values (
  vLoad_id,
  123456,
  'CRM',
  'Customer',
  -- Values are below
  'GADGETRON',
  ...

)

/* Force a merge of this source record with a known golden ID */

INSERT INTO UM_CUSTOMER (
  B_LOADID,
  B_SOURCEID,
  B_PUBID,
  B_CLASSNAME,
  CUSTOMER_ID,
  B_CONFIRMEDSDPK
)
SELECT
  vLoad_id,
  123456,
  'CRM',
  'Customer',
  2,   -- Target Golden ID
  2    -- Confirm the golden ID
FROM MD_CUSTOMER;

COMMIT;This method automatically moves master records to golden records. It reproduces the behavior of the user interface for moving masters into golden records, or for merging golden records into golden records
Columns to load into the UM table:
B_LOADID: This column must be loaded with the Load ID provided by the GET_NEW_LOADID function call, of with the ID of the Continuous Load.B_SOURCEID, B_PUBID: These columns must be loaded with the ID and the publisher of the master records to move.B_CLASSNAME: This column must be loaded with the name of the entity of these records.<GoldenID>: This column must be loaded with the ID of the golden record to which the master record should be moved to.B_CONFIRMEDSDPK: This column must be set to `<GoldenID> if you want to flag the match as confirmedB_XGRP: This column must be loaded with a UUID value, representing the exclusion group. This UUID value should be same for all the records that belong to the same exclusion group, that is records that previously matched and that should no longer match. The value to load in this column depends on the exclusion groups of the master and golden records:INSERT INTO UM_CUSTOMER (
B_LOADID,
B_SOURCEID,
B_PUBID,
B_CLASSNAME,
CUSTOMER_ID,
B_CONFIRMEDSDPK,
B_XGRP
)
SELECT
vLoad_id,
B_SOURCEID,
B_PUBID,
'Customer',
2, -- Target golden ID
2, -- Confirm the golden ID
NULL -- Neither master nor golden are in an exclusion group
FROM MD_CUSTOMER
WHERE
CUSTOMER_ID = 1;Similarly, to split a golden record by moving its master records to new golden records, you do not provide an existing golden ID but seed a new golden ID using the golden ID generation method for the entity.
INSERT INTO UM_CUSTOMER (
	B_LOADID,
	B_SOURCEID,
	B_PUBID,
	B_CLASSNAME,
	CUSTOMER_ID,
	B_CONFIRMEDSDPK,
	B_XGRP
)
SELECT
	vLoad_id,
	B_SOURCEID,
	B_PUBID,
	'Customer',
	SEQ_CUSTOMER.NEXTVAL, -- New golden ID generated by a sequence.
	SEQ_CUSTOMER.CURRVAL, -- The same golden ID is used to confirm.
	SYS_GUID()            -- New exclusion group ID.
FROM MD_CUSTOMER
WHERE
CUSTOMER_ID = 5;This methods gets rid of user decisions previously taken with duplicate managers, forcing the master records to merge according to the matcher’s decisions.
Columns to load into the UM table:
B_LOADID: This column must be loaded with the Load ID provided by the GET_NEW_LOADID function call, of with the ID of the Continuous Load.B_SOURCEID, B_PUBID: These columns must be loaded with the ID and the publisher of the master records to reconsider for the matching.B_CLASSNAME: This column must be loaded with the name of the entity of these records.INSERT INTO UM_CUSTOMER (
B_LOADID,
B_SOURCEID,
B_PUBID,
B_CLASSNAME
)
SELECT
vLoad_id,
B_SOURCEID,
B_PUBID,
'Customer'
FROM MD_CUSTOMER;The previous method does not force the match rules to run again. It only removes user decisions. To force the entire matching process to replay, you must reset of the user decisions, as described in the previous method, and reload the data to re-match into the SD table.
-- Remove User Decisions

INSERT INTO UM_CUSTOMER (
	B_LOADID,
	B_SOURCEID,
	B_PUBID,
	B_CLASSNAME
)
SELECT
	vLoad_id,
	B_SOURCEID,
	B_PUBID,
	'Customer'
FROM MI_CUSTOMER
-- add below a clause to filter the records to re-process.
-- WHERE MI_CUSTOMER.CUSTOMER_ID = ??
;

-- Re-load the data from the latest master values.
INSERT into SD_CUSTOMER (
    B_LOADID,
    B_PUBID,
    B_SOURCEID,
    B_CLASSNAME,
	-- Data fields are below
    CUSTOMER_NAME,
    TOTAL_REVENUE
	...
)
SELECT
	vLoad_id,
	B_PUBID,
	B_SOURCEID
	-- Data fields are below
    CUSTOMER_NAME,
    TOTAL_REVENUE
	...
FROM MI_CUSTOMER
-- add below a clause to filter the records to re-process.
-- WHERE MI_CUSTOMER.CUSTOMER_ID = ??
;

COMMIT;
Consuming Data from Semarchy xDM is done in SQL using the tables of the hubs. This chapter covers this type of consumption.
Consuming the data mainly involves:
Using the golden data in conjunction with the master data allows cross referencing to source data and re-integrating golden data into source systems.
The complete list of system columns available is provided in the Table Structures section of this guide. The following table lists the system columns used when consuming information from the hub:
| Column Name | Datatype | Description |
|---|---|---|
|
| ID of the batch that created this record. |
|
| Class name of this record. |
|
| Submit date (timestamp) of the batch into which the record was created. |
|
| Submit date (timestamp) of the batch into which the record was updated. |
|
| Submitter of the batch into which the record was created. |
|
| Submitter of the batch into which the record was updated. |
B_CREDATE, B_UPDDATE: These timestamps do not necessarily correspond to the moment when the records were created or updated in a source system or in the hub using a stepper, duplicate manager, etc. They give the moment when the record was submitted to the hub. Note that a record, even unmodified, it considered updated as soon as it is submitted to the hub.B_CREDATOR, B_UPDATOR: For records created or modified using direct authoring or duplicate managers, this corresponds to the user who has performed the changes. For records created or modified in workflows, this corresponds to the user who has submitted the workflow.To access golden data using SQL, you query on the GD table. The queries are filtered to access data for one or more entity classes,
The following code sample gives a query to access golden records in the GD table.
select G.* (1)
from GD_<Physical_Table_Name> G (2)
where G.B_CLASSNAME in ( <classname_list> ) (3)
Explanation of the query:
| 1 | We select all columns from the golden record. You can select specific columns from the GD record. |
| 2 | The GD table accessed is named after the entity. Replace <Physical Table Name> with the physical table name defined for the entity. |
| 3 | Provide the list of entity classes stored in this table you want to access. For example, Person,Company. Note that if you are no using inheritance, only one class is stored in the table and this clause is not required. |
CONTACT_ID, FIRST_NAME and LAST_NAME golden data for the Contact entity.select CONTACT_ID, FIRST_NAME, LAST_NAME
from GD_CONTACT G
where G.B_CLASSNAME = 'Contact'The primary key for a golden data table depends on the Entity Type and the ID Generation for the entity. A column named after the Physical Column Name of the primary key attribute stores the golden record primary key for the GD table and has the following datatype:
NUMBER(38,0)RAWAccessing master data from fuzzy and ID matched entities uses queries similar to those used to access the
golden data.
Starting from the golden data, we can refer to the master data using the
golden record primary key. The master data table (MD) includes a column
that references this primary key. As the master data also stores the
primary key of the publisher, it is possible to refer back to the source
data from the golden data via the master data.
Depending on the Entity Type (ID Matched, Fuzzy Matched), access to the master data differs:
With ID Matched Entity, the master data table has a structure similar to the
golden data table, and contains in addition the publisher code. The same
primary key is stored in the golden and master data in a column named
after the physical column name of the primary key attribute
(<primary_key_column> in the sample below)
select M.B_SOURCEID, G.*
from MD_<Physical_Table_Name> M
inner join GD_<Physical_Table_Name> G on (
 	G.<primary_key_column> = M.<primary_key_column>
  and	G.B_CLASSNAME in ( <classname_list> )
)
where
      	M.B_CLASSNAME in ( <classname_list> )
  and 	M.B_PUBID = '<publisher_code>'
  and 	M.<primary_key_column> = '<searched_source_id>'
In this code, access is filtered with the class name for both the golden data and the master data (lines #5 and #8). The two tables are joined on their common primary key (line #4). In addition, the master data is filtered by source publisher (line #9) and ID of the source record (line #10).
EMPLOYEE_NUMBER=100 in the HR system (ID Matched Entity).select M.EMPLOYEE_NUMBER, G.FIRST_NAME, G.LAST_NAME
from MD_EMPLOYEE M
inner join GD_EMPLOYEE G on (
G.EMPLOYEE_NUMBER = M.EMPLOYEE_NUMBER
and G.B_CLASSNAME = 'Employee'
)
where
M.B_CLASSNAME = 'Employee'
and M.B_PUBID = 'HR'
and M.EMPLOYEE_NUMBER = '100'The resulting information can be used to update the source record with golden data.
With Fuzzy Matched Entity, the master data table has a structure similar to the golden data table. It contains a reference to the golden data primary key, but the master data primary key consists of two columns:
B_PUBID (VARCHAR2(30 CHAR)) contains the code of the publisher
that published this record.B_SOURCEID (VARCHAR2(128 CHAR)) contains the ID of the source
record in that publisherAs a consequence, the link between golden and master records is done
using the primary key column as in an ID Matched Entity, but the link to the
source is done using the B_SOURCEID column.
select M.B_SOURCEID, G.*
from MD_<entity> M
inner join GD_<entity> G on (
 	G. <primary_key_column> = M. <primary_key_column>
  and	G.B_CLASSNAME in ( <classname_list> )
)
where
      	M.B_CLASSNAME in ( <classname_list> )
  and 	M.B_PUBID = '<publisher_code>'
  and 	M.B_SOURCEID = '<searched_source_id>'
In this code, the golden and master data tables are joined on their
golden record primary key (line #4), but the master data is restricted
by source publisher (line #9) and ID of the source record (line #10),
using the B_SOURCEID column.
27030 in the CRM system (Fuzzy Matched Entity).select M.B_SOURCEID, G.FIRST_NAME, G.LAST_NAME
from MD_CONTACT M
inner join GD_CONTACT G on (
G.CONTACT_ID = M.CONTACT_ID
and G.B_CLASSNAME = 'Contact'
)
where
M.B_CLASSNAME = 'Contact'
and M.B_PUBID = 'CRM'
and M.B_SOURCEID = '27030'Example: Select side by side the duplicates detected for a given source
Contact record with the ID 27030 in the CRM system (Fuzzy
Matched Entity). In this example, the master data table is used twice (aliased
as M and MM) to retrieve the two sides of a duplicate pair.
select
  M.B_PUBID DUP1_PUBLISHER, M.B_SOURCEID DUP1_ID, M.FIRST_NAME DUP1_FIRST_NAME, M.LAST_NAME DUP1_LAST_NAME,
  MM.B_PUBID DUP2_PUBLISHER, MM.B_SOURCEID DUP2_ID, MM.FIRST_NAME DUP2_FIRST_NAME, MM.LAST_NAME DUP2_LAST_NAME,
  G.CONTACT_ID GOLD_ID, G.FIRST_NAME GOLD_FIST_NAME, G.LAST_NAME GOLD_LAST_NAME
from 	MD_CONTACT M
inner join GD_CONTACT G on
 (
 	G.CONTACT_ID = M.CONTACT_ID
  and	G.B_CLASSNAME = 'Contact'
 )
inner join MD_CONTACT MM on
 (
 	MM.CONTACT_ID = M.CONTACT_ID
  and	MM.B_CLASSNAME = 'Contact'
 )
where
      	M.B_CLASSNAME = 'Contact'
  and 	M.B_PUBID = 'CRM'       /* Publisher ID */
  and 	M.B_SOURCEID = '27030'  /* Source ID */
  /* and M.B_PUBID = MM.B_PUBID */
  /* Uncomment the previous line to restrict the duplicates
to those within the CRM application */Pre-consolidation errors can be accessed via the Source Errors (SE, or AE for basic entities)
tables.
These tables store the error information, that is the
information about the constraints that caused the records to fail the
validation. The latter is stored in the B_CONSTRAINTNAME (name of the
constraint) and B_CONSTRAINTTYPE (type of the constraint) columns.
SE tables do not store the erroneous data itself, but they contain the identifiers to the source (SD or SA for basic entities) records in error.
Note that the B_ERROR_STATUS column on the SD table provides a simple way to detect the records with errors.
Example: Select the source errors for the Contact entity.
In this example, incorrect foreign references would appear. To identify
them, we retrieve the incorrect referenced IDs from FP_CUSTOMER and
FS_CUSTOMER.
select * from SD_CONTACT where B_ERROR_STATUS = 'ERROR';select SE.B_BATCHID, SD.B_LOADID,
SE.B_CONSTRAINTNAME, SE.B_CONSTRAINTTYPE,
SE.B_PUBID, SE.B_SOURCEID,
SD.FIRST_NAME, SD.LAST_NAME,
SD.FP_CUSTOMER, SD.FS_CUSTOMER
from SE_CONTACT SE, SD_CONTACT SD
where
SE.B_CLASSNAME = 'Contact'
and SD.B_CLASSNAME = 'Contact'
and SD.B_PUBID = SE.B_PUBID
and SD.B_SOURCEID = SE.B_SOURCEID
and SD.B_LOADID = SE.B_LOADID
and SD.B_ERROR_STATUS = 'ERROR';Post-consolidation errors can also be accessed via the Golden Errors (GE) tables.
These tables store the error information, that is the
information about the constraints that caused the records to fail the
validation. The latter is stored in the B_CONSTRAINTNAME (name of the
constraint) and B_CONSTRAINTTYPE (type of the constraint) columns.
GE tables do not store the erroneous data itself, but they contain the identifier to the golden (GD) records in error.
Note that the B_ERROR_STATUS column on the GD table provides a simple way to detect the records with errors.
Example: Select the errors and data for the golden contacts in error.
select * from GD_CONTACT where B_ERROR_STATUS = 'ERROR';select GE.B_BATCHID,
GE.B_CONSTRAINTNAME, GE.B_CONSTRAINTTYPE,
GE.CONTACT_ID,
GD.FIRST_NAME, GD.LAST_NAME, GD.F_CUSTOMER
from GE_CONTACT GE, GD_CONTACT GD
where
GE.B_CLASSNAME = 'Contact'
and GD.B_CLASSNAME = 'Contact'
and GD.CONTACT_ID = GE.CONTACT_ID
and GD.B_BATCHID = GE.B_BATCHID
and GD.B_ERROR_STATUS = 'ERROR';The REST API provides programmatic access to read data in Semarchy xDM.
The REST API is available at the following base URL (referred to as [base_url] in this section):
http://<host>:<port>/{wars-base-name}/api/rest/Each operation in the REST API is available with a parameterized URL under this base URL. The URL may also take additional parameters.
$baseExprs is a valid parameter, but $baseexprs or $BASEXPRS are invalid and will be ignored.The REST API exposes its built-in documentation as a link in the Welcome page. In addition, this documentation is available for tools as an OpenAPI specification.
To Access the REST API Documentation:
The documentation exposes the endpoint description and provides request and response samples.
The main operations available in the REST API are also described in the following sections.
This section describes the authentication mechanisms for the REST API and provides simple recommendations to secure the use of this API.
Applications accessing Semarchy xDM using the REST API must be authenticated.
The REST API supports two authentication methods:
Authorization HTTP header containing username:password encoded in base64. With this authentication method, REST API calls use the identity, roles, and privileges of the user specified with the username.API-Key HTTP header containing an API key created in Semarchy Configuration. With this authentication method, REST API calls use the identity (Default User Name) and roles defined for the API Key.Operations in the REST API need privileges similar to those required to perform the same operations via a user interface:
See the Semarchy xDM Administration Guide for more information about defining roles and API keys, and the Semarchy xDM Developer’s Guide for more information about securing data, models and privilege grants with those roles.
The following simple recommendations will help you secure your code and data when using the REST API.
Unless specified otherwise, all @mdm-full-product-name@ APIs will return the information that you request in the JSON format.
Certain API calls require you to send data in a particular format as part of the API call. By default, all API calls expect input in JSON format
Every API call that requires data to sent by POST or PUT has a different data structure that it expects in the payload. Refer to the documentation for the specific call you are making to see the exact payload formats to complete your request.
The API endpoints report in the response payload possible errors with an appropriate HTTP code. Refer to the documentation for each endpoint for the possible responses.
When calling an endpoint, note that:
Method | GET |
|---|---|
Base URL | |
URL |
|
URL Structure | The URL is configured using the following values:
|
Supported Parameters | |
Response Format | The response contains the list of records with the query expressions. Multiple records query: sample response.
|
Method | GET |
|---|---|
Base URL | |
URL |
|
URL Structure | The URL is configured using the following values:
Record ID Structure The
For example, to query a source data record ( |
Supported Parameters | |
Response Format | The response contains the list of query expressions. Single record query: sample response.
|
Method | GET |
|---|---|
Base URL | |
URL |
|
URL Structure | The URL is configured using the following values:
|
Supported Parameters | |
Response Format | The response contains the count of records. Record count query: sample response.
|
Named queries provide customized REST endpoints to consume data with a predefined structure and query parameters.
Method | GET |
|---|---|
Base URL | |
URL |
|
URL Structure | The URL is configured using the following values:
|
Supported Parameters | Pagination, Filtering, Sorting. In addition, query parameters are passed to the query using their name. For example: Sorting applies before the sort expression defined in the name query itself. Pagination and Filtering only apply to the root object of the named query. |
Response Format | The response contains a hierarchy of objects corresponding to the named query definition. |
Certain URLs support a view type parameter. This view parameter uses the alias of the view.
The most common view types are listed below:
GD: Golden consolidated and certified records.GE: Errors detected after master data consolidation (post-consolidation), for matching entities.GDWE: Golden consolidated and certified records, filtered to only show those with errors (matching entities only)GH: Golden History.GH4B: Golden data history as of batch or golden data if not historized. This view type requires a batch_id or as_of_date value in the URL.GX: Deleted golden records logs (and data for soft delete).MD: Enriched, validated and cleansed master records.MH: Master records history.MH4B: Master data history as of batch or master data if not historized. This view type requires a batch_id or as_of_date value in the URL.MX: Deleted master records logs (and data for soft delete).SD: Source records from finished loads,SE: Errors on source records, returned with the data from the erroneous record,SDWE: Source records from finished loads, filtered to only show those with errors,SD4L Source data loaded by the publishers for a given load. This view type requires a load_id value in the URL.SA: Source data authored by users.AE: Errors detected on source authoring data.SAWE: Source data authored by users with errors.SA4L for source data authored by users for a given load. This view type requires a load_id value in the URL.When calls return a large number of records, it is recommended to page the record set. By requesting smaller subsets of data, you will get a response much faster than when requesting the entire, potentially large, record set.
| Parameter | Default Value | Description |
|---|---|---|
| 0 | Defines the record offset for pagination. |
| 100 | Defines the maximum number of returned records. |
/query/CustomerAndFinancialMDM/Customer/GD?$offset=20&$limit=10Query expressions define which values are returned by the query for each record.
| Parameter | Default Value | Description |
|---|---|---|
| USER_ATTRS | Defines the set of base attributes to include in the records, in addition to those specified using the
|
| N/A | Expression to include to the record in addition to, or to remove from, the base attributes (
|
/query/CustomerAndFinancialMDM/Customer/GD?$baseExprs=USER_ATTRS&$expr=Creator&$expr=CreationDate/query/CustomerAndFinancialMDM/Customer/GD?$baseExprs=NONE&$expr=Name:Upper(CustomerName)&$expr=Revenue:TotalRevenue/query/CustomerAndFinancialMDM/Customer/GD?$baseExprs=USER_ATTRS&$expr=$exclude:TotalRevenueSort expressions define the order of the records in the response.
| Parameter | Default Value | Description |
|---|---|---|
| None | SemQL Order By Clause defining the order of the records in the response. |
/query/CustomerAndFinancialMDM/Customer/GD?$orderBy=TotalRevenue%20DESC,CustomerName%20ASCUse filters to request only specific records, that match the criteria you choose.
| Parameter | Default Value | Description |
|---|---|---|
| SemQL filter. It is a SemQL condition applied to filter records. Only records matching this condition are returned. You can combine several several SemQL filters in the same query. |
/query/CustomerAndFinancialMDM/Contact/GD?$f=FirstName%20LIKE%20%27Joe%25%27The REST API provides also programmatic management of data loads in Semarchy xDM, using requests as well as responses in JSON format.
The REST API provides the capabilities to manage loads, which includes querying, creating, submitting and canceling loads. It also supports persisting records in existing loads. Finally, it provides a shortcut to Load and Submit data in a single request.
Method | GET |
|---|---|
Base URL | |
URL |
|
Supported Parameters |
|
Response Format | The response contains a count of loads, or the list of loads meeting the criteria. The information returned for each load depends on the status of the load. Query Existing Loads: sample response.
|
The loadType indicates the nature of the load:
EXTERNAL_LOAD) which can be submitted (submittable=true).CONTINUOUS_LOAD) which cannot be manually submitted but is automatically submitted every submitInterval seconds.WORKFLOW, DIRECT_AUTHORING, DIRECT_DELETE, DIRECT_DUPS_CONFIRM, DIRECT_DUPS_MANAGEMENT, ACTIVITY.The possible values for the Load Status are listed in the table below.
| Load Status | Description |
|---|---|
RUNNING | The load is currently running. |
CANCELED | The load was canceled (CancelLoad) |
PENDING | The load was submitted. A batch was created and is waiting for the batch poller to pick it. |
SCHEDULED | The batch was taken into account by the batch poller. The job is queued by the engine. |
PROCESSING | The batch’s job is currently being processed by the engine. |
SUSPENDED | The job is suspended, either by an administrator or due to an error. It awaits for administrator intervention. |
WARNING | The job completed successfully, but some records have caused validation errors. |
DONE | The job completed successfully with no validation errors. |
ERROR | The job did not complete successfully, it was canceled by an administrator. |
If a job is attached to the load (the load was submitted), then the integrationJob object provides details about this job, including its start date, current task, duration and any error that may occur in this job.
It also includes the notificationStatus, which indicates whether the notifications were successfully sent.
currentTask correspond to the running task for RUNNING jobs and the last executed task for KILLED or SUSPENDED jobsSUSPENDED or in ERROR to report possible issues with the integration. Combine this endpoint with the capability to manage loads to automate job restart.Method | GET |
|---|---|
Base URL | |
URL |
|
Response Format | The response contains the load identified by Query one Load: sample response.
|
Method | POST |
|---|---|
Base URL | |
URL |
|
Request Payload | The request contains the Load creation: sample request.
|
Response Format | The response contains the load information, including the load ID, load type, and an indication of the status. Load creation: sample response.
|
To load data in a given load, the URL must contain the Load ID that was returned at load creation time, or the Load ID/Name of a continuous load.
Method | POST | ||||
|---|---|---|---|---|---|
Base URL | |||||
URL |
| ||||
Request Payload | The request contains the
Load data: sample request.
| ||||
Response Format | The response contains, in the Load submission: sample response.
|
When loading one or more records you can configure the following elements in the persistOptions element:
enrichers: List of enrichers that should be executed before persisting the records.validations: List of validations that should be executed after the enrichers.queryPotentialMatches: Detect and report potential master records matching the incoming record, using the matcher defined for the entity.missingIdBehavior: Option to define whether to generate IDs when they are not provided in the payload. Possible values are GENERATE to generate the ID or FAIL to fail loading if the ID is missing.persistMode: Flag to define whether the records should be persisted or not.You update an existing record by providing its ID when loading the data:
If you persist a record in a load with an existing record ID, a copy of the record is checked out and changes are applied only the field provided in the request JSON. Other attributes still keep their value.
By default, the auditing fields, Creator, Updator, CreateDate, UpdateDate are automatically set to the current user name and the current date when the user publishes the data. These values cannot be set by the user.
However, a user may be configured to push values in these auditing fields to publish data, for example, in the past, or on behalf of other users.
A user with a role having the Allow Publishing as user in API option selected in a model privilege grant is able to set the audit fields (Creator, Updator, CreateDate, UpdateDate) while publishing data via the REST API.
When loading data, you can choose to execute enrichers, validations, and matchers for each entity.
You may define, for each entity you want to configure, under the optionsPerEntity element, one element named after the entity.
For each entity, you can:
enrichers to run, with their enricher names,validations to execute, with their validationType and validationName. Possible validationType values are CHECK, PLUGIN, MANDATORY, LOV, FOREIGN or UNIQUE,When loading data, indicate with the queryPotentialMatches boolean element whether the platform should check for duplicates according to the matching rules defined for the entity.
When queryPotentialMatches is set to true, master records potentially matching an incoming record are returned in the response, with all their used-defined attributes, to help identify the reason for the matches.
You can define the attributes returned to only include those required for a specific use case, with two additional properties:
queryPotentialMatchesBaseExpressions defines the set of base attributes to include in the master records detected as potential matches:NONE: no attributes.USER_ATTRS: all attributes, except built-in attributes and references.VIEW_ATTRS: all attributes, except references. This includes built-in attributes.queryPotentialMatchesExpressions defines a list of expressions to return in addition to the set of base attributes. These expressions are in the following format: <alias>:<semql_expression>.For example, the following request looks for potential matches.
{
  "action":"PERSIST_DATA",
  "persistOptions": {
    "defaultPublisherId": "CRM",
    "optionsPerEntity": {
      "Person": {
        "queryPotentialMatches": true,  (1)
        "enrichers":["CleanseEmail"],
        "validations":[],
        "queryPotentialMatchesBaseExpressions": "NONE", (2)
        "queryPotentialMatchesExpressions": { (2)
          "Name": "Concat(FirstName, ' ', LastName)",
          "Email": "CleansedEmail",
          "Golden ID": "Gold_ID",
          "Master ID": "ID"
        }
      }
    },
    "missingIdBehavior": "FAIL",
    "persistMode": "NEVER"   (3)
  },
  "persistRecords": {
    "Person": [
    {
      "SourceID": "99998",
      "FirstName": "John",
      "LastName": "Doe",
      "DateOfBirth": "1974-01-25",
      "SourceEmail": "jass@ellerbusch.com"
    }
    ]
  }
}| 1 | Trigger potential matches detection for the records. Note that since the matcher uses enriched values, the CleanseEmail enricher is also triggered. |
| 2 | Select the information returned for the potential matches. Since queryPotentialMatchesBaseExpressions is set to NONE, only the expressions defined in the queryPotentialMatchesExpressions are returned. |
| 3 | This value for PersistMode never persists the records. This call only finds potential matches. |
The response to this request is as follows:
{
  "status": "PERSIST_CANCELLED",
  "load": {
    ...
  },
  "records": {
    "Person": [
      {
        "entityName": "Person",
        "recordValues": {
          "CleansedEmail": "jass@ellerbusch.com",
          "SourceEmail": "jass@ellerbusch.com",
          "DateOfBirth": "1974-01-25",
          "FirstName": "John",
          "SourceID": "99998",
          "PublisherID": "CRM",
          "LastName": "Doe",
          ...
        },
        "failedValidations": [],
        "potentialMatches": [
          {
            "matchRuleName": "ExactEmailMatch",
            "matchScore": 74,
            "matchedRecordLocation": "MD",
            "matchedRecordId": {
              "SourceID": "1320830",
              "PublisherID": "CRM"
            },
            "matchedRecordData": {
              "Master ID": "CRM.1320830",
              "Email": "jass@ellerbusch.com",
              "Golden ID": 10002,
              "Name": "Jass Ellerbusch"
            }
          }
        ]
      }
    ]
  }
}When invoked with a payload, the REST operation will run the enrichers, validations and matchers for each record, depending on the entity configuration.
It will then return:
The record may be persisted or not at that stage, depending on the persistMode option:
ALWAYS, then the records are persisted even if they have errors and potential matches.NEVER, then the records are not persisted. Use this option to perform a dry-run to test your records.IF_NO_ERROR_OR_MATCH (default value), then the records are persisted if no validation error was raised and no potential match was found.You can use the endpoint to load data, with the DELETE_DATA action, in order to publish golden record deletions.
Method | POST | ||||||
|---|---|---|---|---|---|---|---|
Base URL | |||||||
URL |
| ||||||
Request Payload | The request contains the
Delete data: sample request.
| ||||||
Response Format | The response contains the status of the request, the load information as well as a list of all the records deleted as part of this request (including child records deleted by a cascade). Delete data: sample response.
The record deletion
|
To submit a load, the URL must contain the Load ID that was returned at load creation time.
Method | POST |
|---|---|
Base URL | |
URL |
|
Request Payload | The request contains the Load submission: sample request.
|
Response Format | The response contains the load information, including the load ID, batch ID, and an indication of the status. Load submission: sample response.
|
To cancel a load, the URL must contain the Load ID that was returned at load creation time.
Method | POST |
|---|---|
Base URL | |
URL |
|
Request Payload | The request contains only the Load cancellation: sample request.
|
Response Format | The response contains load ID as well as an indication of the status. Load cancellation: sample response.
|
Using the REST API, it is possible to create a load, load data (or request deletions) and submit the load in a single request.
Method | POST | ||||||
|---|---|---|---|---|---|---|---|
Base URL | |||||||
URL |
| ||||||
Request Payload | The request contains the Load and Submit: sample request.
| ||||||
Response Format | The response contains load ID as well as an indication of the status. Load and Submit: sample response.
|
When a load was submitted, it is still possible to manage it using the REST API.
Method | POST |
|---|---|
Base URL | |
URL |
|
Request Payload | The request contains the Load submission: sample request.
|
Response Format | The response contains the load information and its new state. If the requested operation is not possible, an error is returned. |