Welcome to Semarchy.
This tutorial shows you how to set up Semarchy xDI on Docker to run the tutorials available on the Semarchy website.
What you'll learn
- Download and edit the Docker Compose samples.
- Run Semarchy xDI Runtime with Docker Compose.
- Connect to the Semarchy xDI Runtime container from a local Semarchy xDI Designer.
- Run Semarchy xDI Analytics with Docker Compose.
- Log in to Semarchy xDI Analytics.
What you'll need
- Access to the Internet.
- A Web browser, such as Chrome or Firefox.
- Docker installed.
- Semarchy xDI Designer installed with PostgreSQL module.
Before you start
If you have not already done so, click the button below to download resources such as the sample files that you will use to set up xDI in this tutorial.
Before starting, download the Docker Compose samples with the link below. The archive contains sample files that are used in this tutorial.
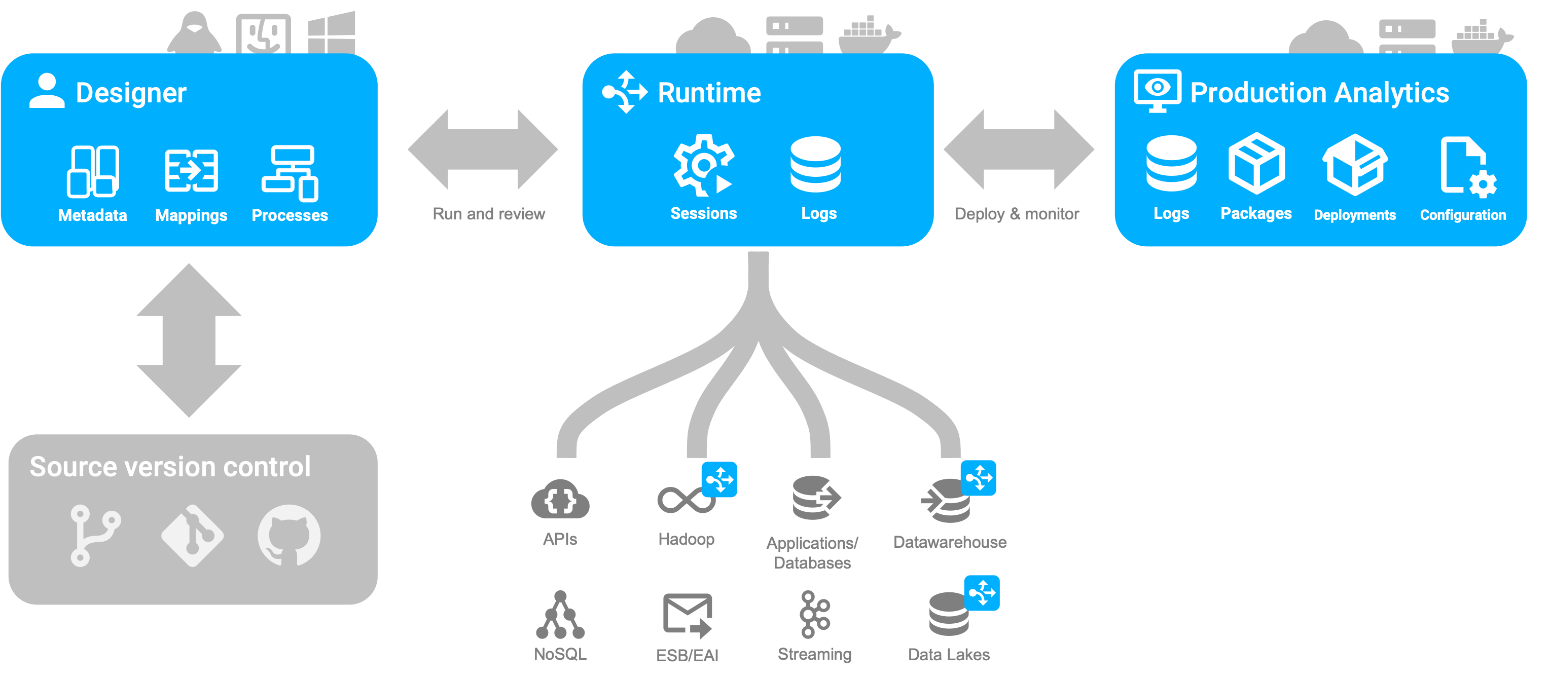
The Semarchy xDI architecture includes the following components:
- The Designer is a thick client based on the Eclipse platform, used by integration designers to design their integration flows.
- The Runtime is a lightweight Java process that runs the integration flows. It connects to the systems and applications containing the data to integrate.
- Semarchy xDI Production Analytics is a Java EE application that provides a web-based interface used in production to deploy, manage, and monitor the integration flows.

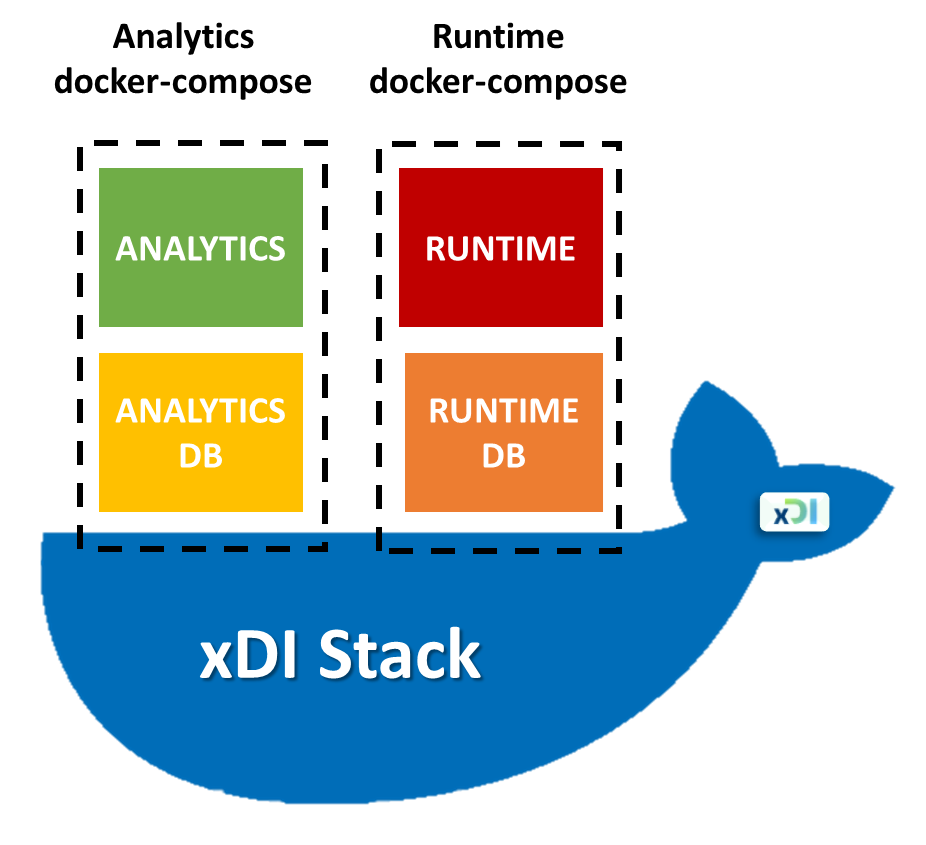
In this tutorial, you will use two Docker Compose files:
- The first one runs Semarchy xDI Runtime and its PostgreSQL database.
- The second one runs Semarchy xDI Analytics and its PostgreSQL database.

The Semarchy xDI Runtime Docker image uses an official Tomcat base image composed of the latest:
- Debian image
- OpenJDK version supported by SemarchyxDIRuntime
The Semarchy xDI Analytics Docker image uses an official Tomcat base image composed of the latest:
- Tomcat version supported by SemarchyxDIAnalytics
- Debian image
- OpenJDK version supported by SemarchyxDIAnalytics
The PostgreSQL images are using the official PostgreSQL Docker image.
In the next step, you will start by installing Docker if you have not done so already.
Follow the instructions provided on the Docker website to download and install Docker Desktop for your operating system:
In the next step, you will use Docker Compose to configure and run a Docker container.
A module is generated for each driver in Semarchy xDI Designer. We will add the PostgreSQL module for each xDI component in the quick-install folder.
The quick-install folder is located in the xdi-tutorials-main folder that you downloaded and unzipped at the Introduction stage.
In this tutorial, we will use the following syntax conventions at the command line:
- <xdi-designer-folder>: replace with your xdi-designer path
- <docker-quick-install>: replace with your docker quick-install path
- Copy the two files named "module_descriptor.properties" and "postgresql-xx.x.x.jar" contained in the PostgreSQL module from the xDI Designer folder, and paste them in the Docker quick-install subfolders as described below:
Source folder | Target folder |
<xdi-designer-folder>\runtime\modules\PostgreSQL | <docker-quick-install>\docker\xdi-runtime\docker-compose\shared-resources\modules\BACKEND-DATABASE * * If this folder does not exist, you will need to create it. |
<docker-quick-install>\docker\xdi-analytics\docker-compose\shared-resources\tomcat-additional-libraries | |
<docker-quick-install>\docker\xdi-analytics\docker-compose\shared-resources\analytics-webapp-home\jdbc |
You will now configure your xDI Runtime Docker container and run it using Docker Compose.
- Open the sample
docker-compose.ymlfile in thexdi-runtime\docker-composefolder of the tutorial resources you have downloaded at the beginning of this tutorial. This YAML file defines the services, networks, and volumes to run and use in your Docker container. - Edit this file if you wish to modify parameters such as:
services/ports:Runtime HTTP portservices/environment/XDI_RUNTIME_SESSIONLOG_DB_JDBC_USERandXDI_RUNTIME_SESSIONLOG_DB_JDBC_PASSWORD:credentials used by xDI Runtime to access the runtime database.
- Open a terminal and access the folder that contains the
docker-compose.ymlfile.
- Run the following command:
docker compose -f docker-compose.yml up -d- Wait until the console shows the line below (this process may take a few minutes the first time because the images have to be downloaded from the Docker hub).
- Network docker-compose_semarchy-net                               Created                                           0.0s
 - Container docker-compose-semarchy-xdi-runtime-backend-database-1  Healthy                                           6.1s
- Container semarchy-xdi-runtime Started 6.4s16.9s- Copy the local modules folder (in the xDI Designer folder) on your Docker modules folder in order to have all the necessary drivers to run your local projects through the Docker runtime. To do so:
- Open a terminal.
- Copy the local modules folder to the Docker modules folder using the following command:
docker cp <xdi-designer-folder>/runtime/modules <docker container id>:/opt/semarchy/xdi-runtime/modules- Open Docker Desktop to check that Semarchy xDI Runtime and its local database are now running in a Docker container.

You can test the connection to this runtime from Semarchy xDI Designer. In xDI Designer, you should set the parameters of the runtime with the HTTP port, user, and password defined in the configuration file: docker-compose.yml and engineParameters.xml.
xDI Runtime is now up and running.
You can stop the docker-compose using the command below (or through the GUI of Docker Desktop):
docker compose -f docker-compose.yml stopIn the next step, you will configure and run your xDI Runtime Docker container.
You will now configure your xDI Analytics Docker container and run it using Docker Compose.
- You can modify the
docker-compose.ymlfile according to your configuration.
- Open the sample
docker-compose.ymlfile in thexdi-analytics\docker-compose\docker-composefolder of the tutorial resources you have downloaded at the beginning of this tutorial. This YAML file defines the services, networks, and volumes to run and use in your Docker container.
- Edit this file if you wish to modify parameters such as:
services/ports:xDI Analytics portservices/environment/XDI_ANALYTICS_DEFAULT_ADMIN_USERNAMEandXDI_ANALYTICS_DEFAULT_ADMIN_PASSWORD:default administrator login to connect to xDI Analytics.
- Open a terminal and access the folder that contains the
docker-compose.ymlfile.
- Run the following command:
docker compose -f docker-compose.yml up -d- Wait until the console shows the following line (the whole process may take a few minutes the first time because we download the images from Docker hub):
- Container docker-compose-semarchy-xdi-analytics-backend-database-1  Healthy                                         6.0s
 - Container semarchy-xdi-analytics                                    Started                                         6.4s 6.4s16.9s
Semarchy xDI Analytics and its local database are now running in a Docker container.
You can check it in Docker Desktop:

- To test the connection to xDI Analytics, open a browser tab and connect to http://localhost:8098/semarchy-xdi-analytics/.
- Enter the login and password. For this tutorial, you can find the login in the analytics docker-compose file.
xDI Analytics is now up and running.
Great job! The xDI Stack is now ready to be used. You can try to deploy and monitor the metadata, mappings, and processes you develop through xDI Designer.
For example, you can link the previously installed runtime to Docker.
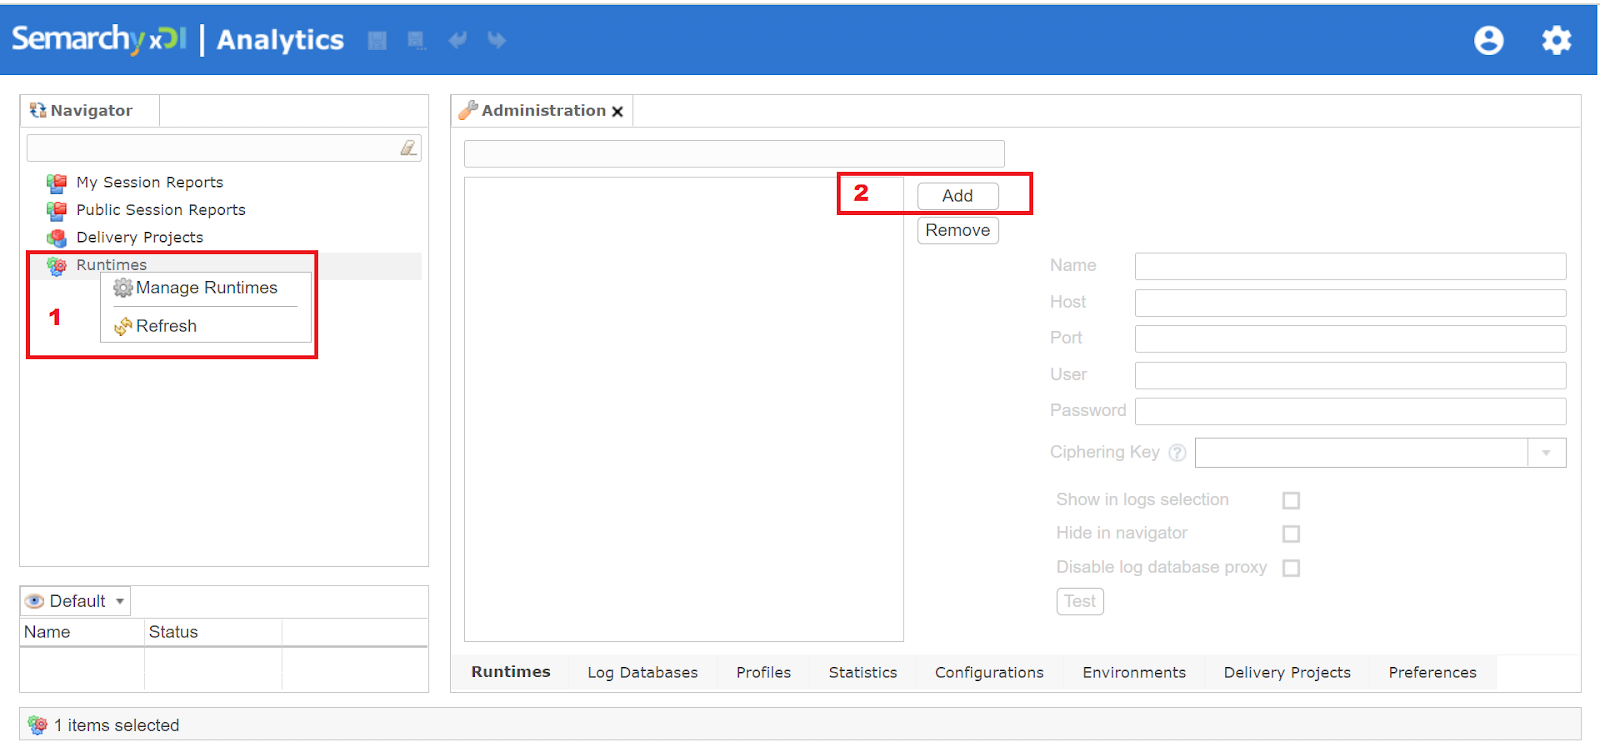
To do this, right-click on "Runtime" menu, select "Manage Runtimes" and click on the "Add" button:

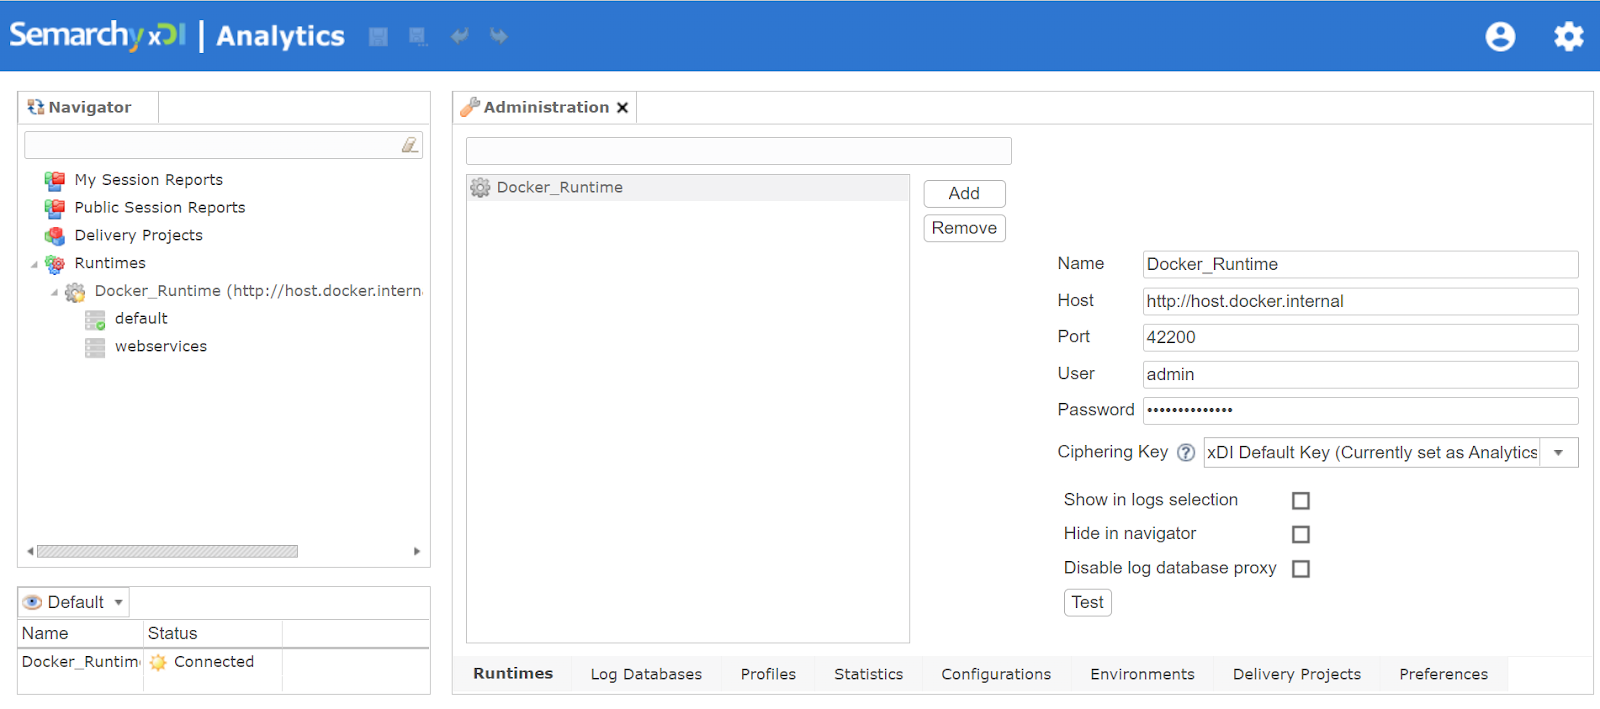
Enter the following parameters:
- Name: the name you want to give your Docker runtime (e.g., "Local_Runtime_Docker"°
- Host: Indicates which machine is hosting your runtime. In our case, we have to indicate that it is on our local docker. Entered
http://host.docker.internal - Port: 42200
- User/Password: The default values can be found in the
engineParameters.xmlfile located in thexdi-tutorials-main\quick-install\docker\xdi-runtime\docker-compose\shared-resources\propertiesfolder

Save by clicking on the floppy disk icon at the top of the screen.
Then, click on the "Test" button under the configuration. If the parameters are right, you will have the following message "Connection to provided data source was successful!".
Great job going through this tutorial! You have successfully installed an xDI Stack on Docker. Let's summarize:
- You installed Docker Desktop.
- You learned how to run Docker Compose and customize parameters for xDI Runtime.
- You are connected to a docked runtime through xDI Designer.
- You learned how to run Docker Compose and customize parameters for xDI Analytics.
- You are connected to a docked xDI Analytics.
Next steps
Now that you have set up an xDI stack, you can manage your production.
The next step is to proceed to five different tutorial tracks:
- Configure Analytics
- Manage Runtimes
- Configure Metadata
- Manage sessions
- Manage Deployments
Go back to the main menu to find these tutorials.