Table of Contents

Welcome to Semarchy xDM.
This guide contains information about installing Semarchy xDM in Microsoft Azure.

Preface

Overview

Using this guide, you will learn how to:

  • Plan the configuration of Semarchy xDM for development and production environments in Azure.
  • Start and connect to Semarchy xDM installed in Azure.

Audience

This document is intended for administrators and project managers interested in installing Semarchy xDM for their data management initiatives.

To discover Semarchy xDM, you can watch our tutorials.
The Semarchy xDM Documentation Library, including the development, administration and installation guides is available on-line.

Document Conventions

This document uses the following formatting conventions:

ConventionMeaning

boldface

Boldface type indicates graphical user interface elements associated with an action, or a product specific term or concept.

italic

Italic type indicates special emphasis or placeholder variable that you need to provide.

monospace

Monospace type indicates code example, text or commands that you enter.

Other Semarchy Resources

In addition to the product manuals, Semarchy provides other resources available on its web site: https://www.semarchy.com.

Obtaining Help

There are many ways to access the Semarchy Technical Support. You can call or email our global Technical Support Center (support@semarchy.com). For more information, see https://www.semarchy.com.

Feedback

We welcome your comments and suggestions on the quality and usefulness of this documentation.
If you find any error or have any suggestion for improvement, please mail support@semarchy.com and indicate the title of the documentation along with the chapter, section, and page number, if available. Please let us know if you want a reply.

Introduction to Semarchy xDM

Semarchy xDM is the Intelligent Data Hub platform for Master Data Management (MDM), Reference Data Management (RDM), Application Data Management (ADM), Data Quality, and Data Governance.
It provides all the features for data quality, data validation, data matching, de-duplication, data authoring, workflows, and more.

Semarchy xDM brings extreme agility for defining and implementing data management applications and releasing them to production. The platform can be used as the target deployment point for all the data in the enterprise or in conjunction with existing data hubs to contribute to data transparency and quality.
Its powerful and intuitive environment covers all use cases for setting up a successful data governance strategy.

Semarchy xDM and Azure

This section is an introduction to using Semarchy xDM with Azure, detailing the core Azure features relevant to Semarchy xDM users.

Host Semarchy xDM in Azure to move your data hub to the cloud and scale your deployment as the needs of your data management initiative grow. You can deploy Semarchy xDM in Azure using one of the following offers available in the Azure Marketplace:

  • The Semarchy xDM Azure Virtual Machines Offer deploys a single virtual machine containing all the components to run Semarchy xDM for an evaluation or development purposes.
    Creating a virtual machine from the over is explained in the Semarchy xDM tutorials.
  • The Semarchy xDM Solution Template Offer deploys a production-ready infrastructure, with a choice of database technologies, the possibility to enable high-availability, etc. Such a deployment is suitable for development, test or production purposes.
    The current document describes the solution template offer and explains how to use it to set up and manage a Semarchy instance in Azure.

Semarchy xDM Solution Template

Prerequisites

Review the information in this section before you begin your installation.

You will need the following to install Semarchy xDM on Azure:

  • An Azure subscription. If you don’t have an Azure subscription, create a free account before you begin.
  • Access to SSH on your computer’s command line (such as the Bash shell or PuTTY)

Semarchy xDM supports an installation model suitable for large scale and high-available configurations. The steps in this section guide you through installing and configuring a Semarchy xDM instance on Azure in this model.

Overview

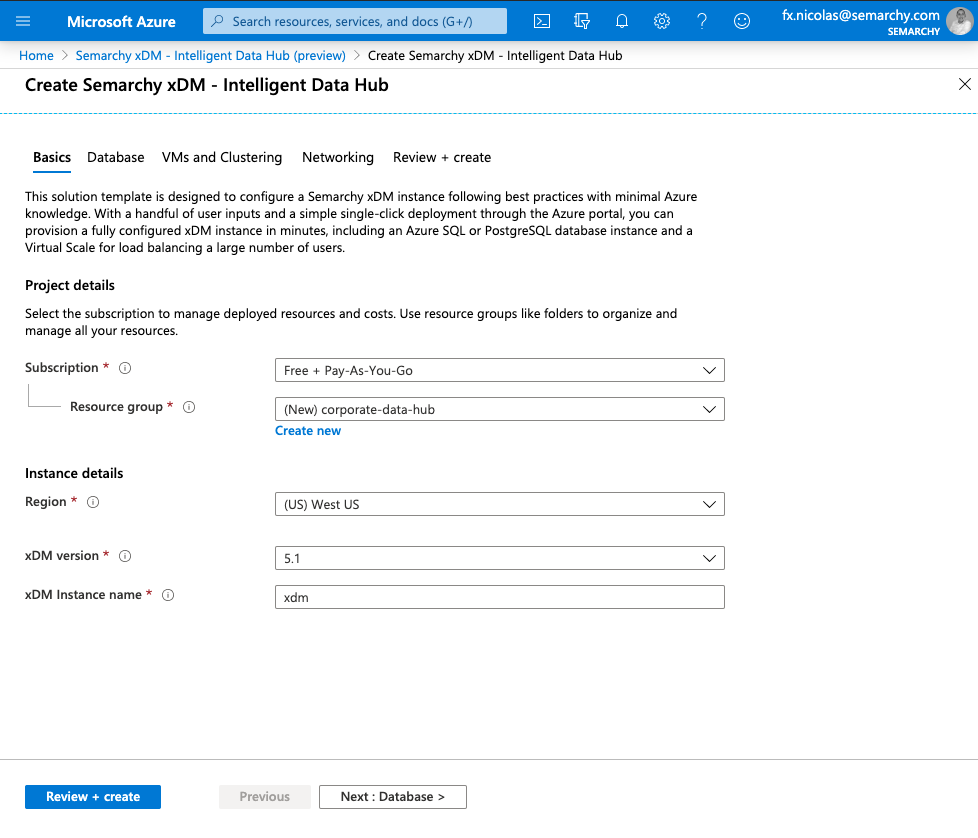
The solution template creates a set of resources for the instance in a single resource group.

A single Semarchy instance is composed of the following resources:

  • A database server, using one of the following database technologies:
    • Azure Database for PostgreSQL (PostgreSQL). When using this server technology, a single database server is created in the instance with multiple schemas and dedicated users.
    • Azure SQL Database (Microsoft SQL Server). When using this server technology, a database managed instance is created with multiple database resources and dedicated users.

      When creating and configuring databases with the solution template, and later with the instance management scripts, all components of the deployment are automatically configured to use these databases. For example, the datasources are automatically created for the active and passive to connect the databases.

  • A virtual machine running an active node, which is an Semarchy active web application in a Tomcat server running on an Ubuntu Linux machine. This node is an active version of Semarchy, which runs the certification jobs, and can be used to access the application builder. It can also be used for all the other components of the Semarchy platform.
  • A virtual scale set running one or more Semarchy passive nodes (the semarchy passive web application in a Tomcat server running on an Ubuntu Linux machine). These nodes run a passive version of Semarchy and are used primarily for users accessing data management applications, dashboard applications, dashboard builder and discovery. This scale set can be scaled up and down depending on the number of business users and data stewards accessing the Semarchy instance.

    You can define the minimum and the maximum number of machines running in the scale set when deploying the Semarchy instance and change them later. By setting these two values to zero, you disable the scale set.

  • An application gateway, to manage and load balance the incoming web traffic.
    • The gateway exposes two ports: one for the active node and one for the virtual scale set. It manages the load balancing of incoming requests on the nodes in the scale set.
    • The gateway also secures the connectivity to the Semarchy instance. To configure HTTPS, you must provide a certificate in the form of a Personal Information Exchange (PFX) file.
  • A network security group is configured for the gateway to filter inbound and outbound access to the resources.
  • A storage account, containing a Azure file share. This file share stores the configuration and files shared by all the Semarchy active and passive nodes.

Create an Semarchy instance from the solution template

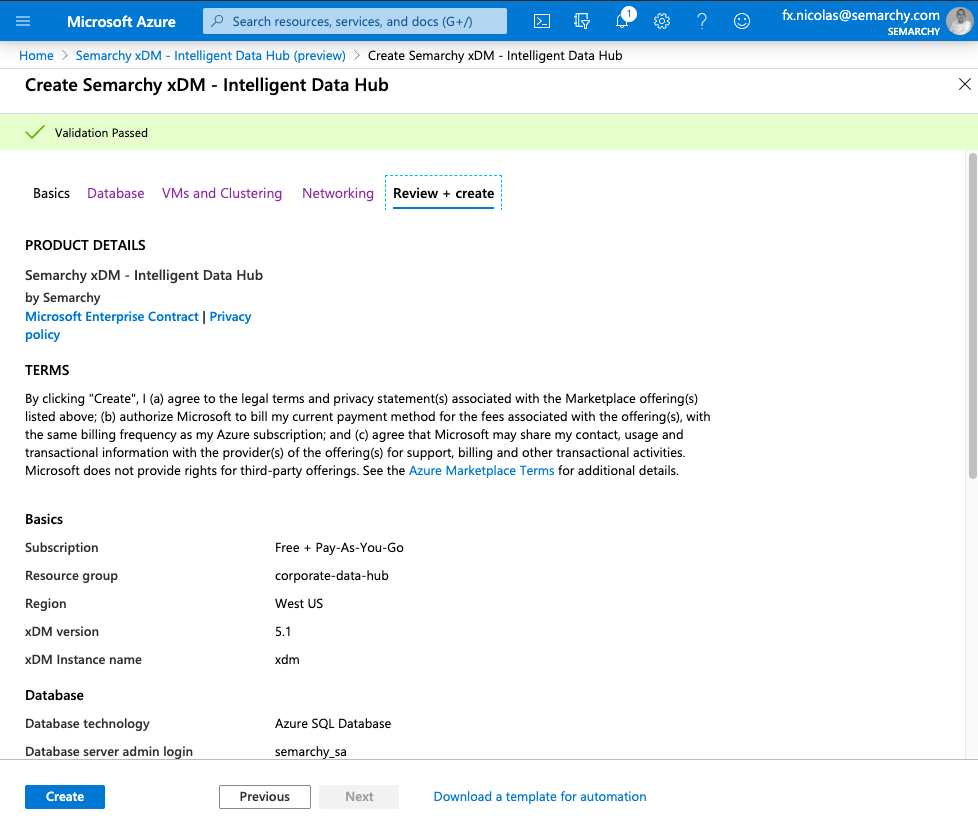
To create an Semarchy instance from the solution template:

  1. In your browser, open the Semarchy xDM Azure Marketplace Solution.
  2. Select GET IT NOW
  3. Review the software plan details and then click Continue.
  4. Select Create to configure the Semarchy instance in the Azure portal.

    Selecting the template

  5. In the Basics tab, specify the following values:
    • Subscription: Select the Azure subscription into which you want to install Semarchy xDM.
    • Resource group: Select Create new and then enter a name for the resource group that serves as a logical container for the collection of resources that make up your instance.
    • Location: Select the location for your instance.
    • Semarchy version: Select the version of Semarchy xDM that you want to install. Note that only the minor versions are indicated. The latest patch for this minor version is automatically installed.
    • Semarchy instance name: Enter a name for your instance. This name is used as a prefix in the names of the resources created for the instance. For example xdm.

      Step 1: Project details

  6. Click Next: Database > to proceed to the database settings.
  7. In the Database tab, specify the following values in the Database details section:
    • Database technology: Select the database technology used for the repository and data locations.
    • Database server admin login: Enter the login of the administrator of the database server.
    • Database server password: Enter the password for the database server administrator.

      Semarchy xDM requires a default database for the repository. A database, with the associated login, is automatically created in the database server for the repository. A datasource is also automatically configured in the application server to connect this database.
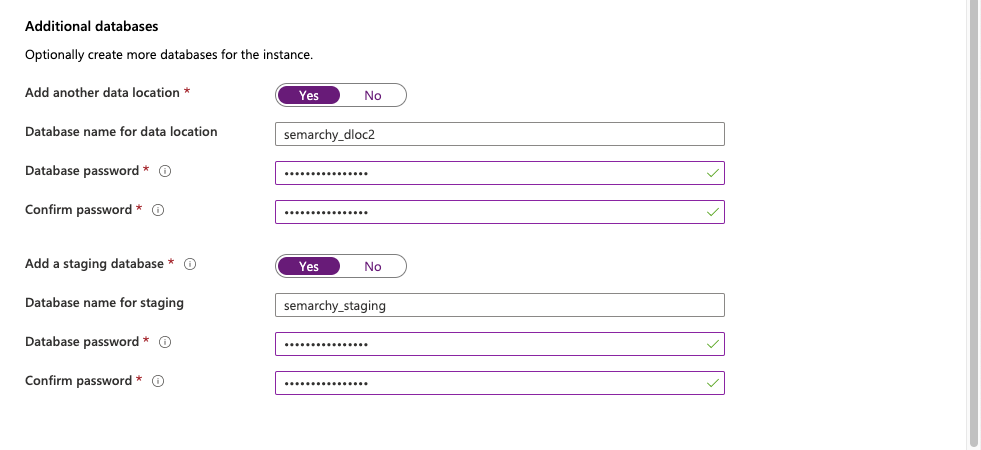
      Another database is similarly created to host the first data location, and you can optionally create additional databases.

    • Repository database password: The template automatically creates the repository database/schema, with a user named SEMARCHY_REPOSITORY. Enter the password for the repository user.
    • Database name for data location: Enter the name of the first data location. This value is used for the name of the database created to host the data location, for the user created for this database, as well as for the name of the datasource configured in the application server to connect this database.
    • Database password: Enter the password for the data location database user.

      Step 2: Database server - PostgreSQL

  8. To optionally create additional databases, in the Additional databases section:
    • Select Add a staging database if you want to add a staging database and configure a datasource for this database. Enter the Database name for staging as well as the password for the database user.
    • Select Add another data location if you want to add another database for another data location and configure a datasource for this database. Enter the Database name for data location as well as the password for the database user.

      Step 2: Additional databases

  9. Click Next: VMs and Clustering > to proceed to the settings of the virtual machine and scale set.
  10. In the VMs and Clustering tab, configure the active node in the Virtual machine details:
    • Size: Select the appropriate sizing option for the Semarchy active node virtual machines.
    • Admin account: Enter the user name of the administrator of the active node’s virtual machine. The same account is configured for the virtual machines in the scale set.
    • Password: Password for the virtual machine administrator.

      Step 3: Virtual machine

  11. Configure the scale set for high availability in the Scale set configuration section:
    • Size: Select the appropriate sizing option for your Semarchy passive nodes virtual machines.
    • Min VMs: Define the minimum scale set capacity allowed as the cluster size.
    • Max VMs: Define the maximum scale set capacity allowed as the cluster size.

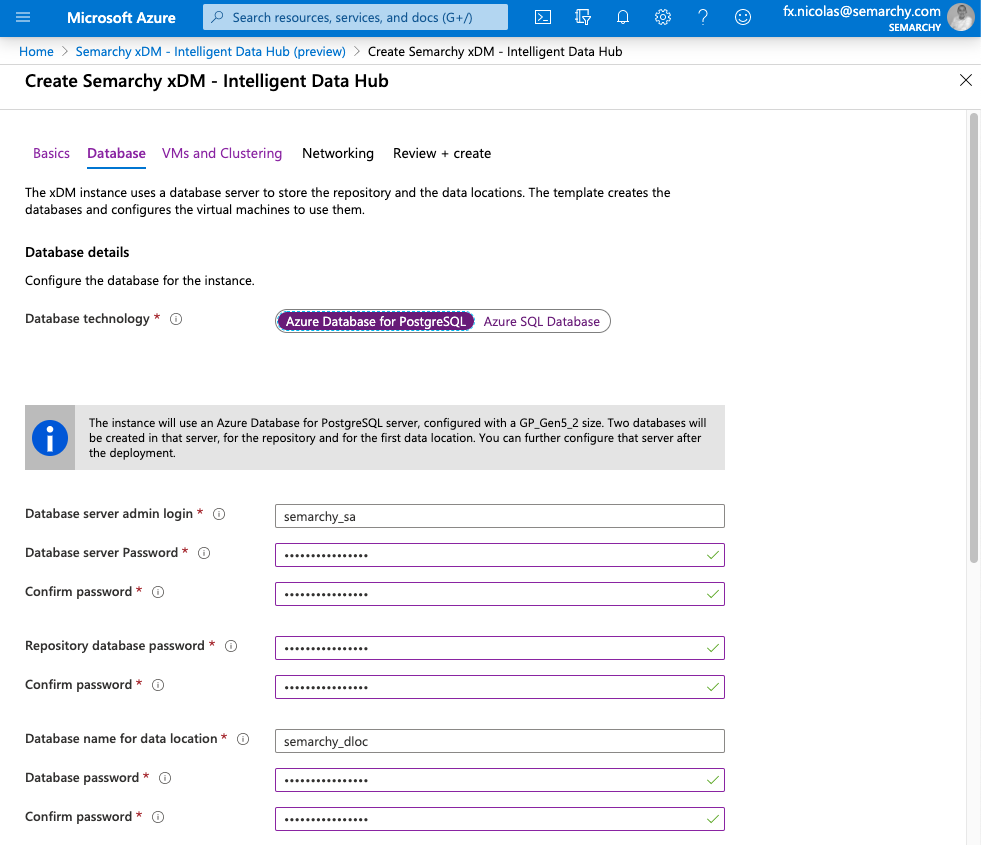
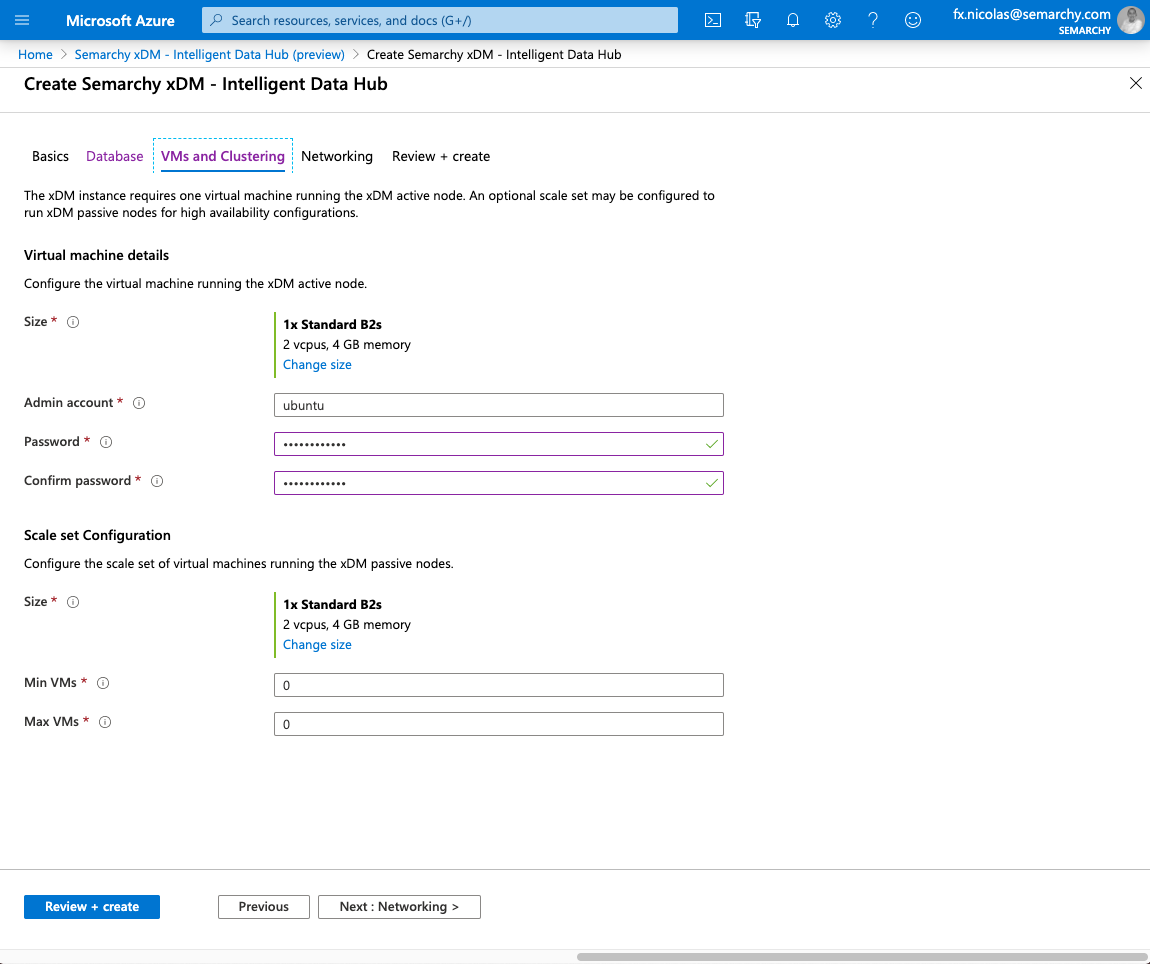
      Leave the Min/Max VMs value to zero to disable the scale set. You will be able to configure these values later.

  12. Click Next: Networking > to proceed to the network settings.
  13. In the Networking tab, if you want to enable HTTP, select Yes for Enable HTTPs, and then specify the following values:
    • Upload the SSL certificate for the application gateway. This certificate is in the Personal Information Exchange (PFX) file format.
    • Enter the Certificate password for the application gateway certificate you uploaded.
  14. Optionally modify the Active node port. You can connect your instance on this HTTP port to access the Semarchy active node.
  15. Optionally modify the Passive nodes port. You can connect your instance on this HTTP port to access the Semarchy passive nodes in the scale set.

    Step 4: Networking configuration

  16. Select Review + Create to proceed to the configuration validation.
  17. When the Review + create displays, the information entered is validated. Once you see the Validation passed message (at the top of the tab), select Create.

    Step 5: Review and create

  18. The deployment starts. When the deployment is ready, a notification appears in the Azure portal.

The template outputs contain useful information. For example:

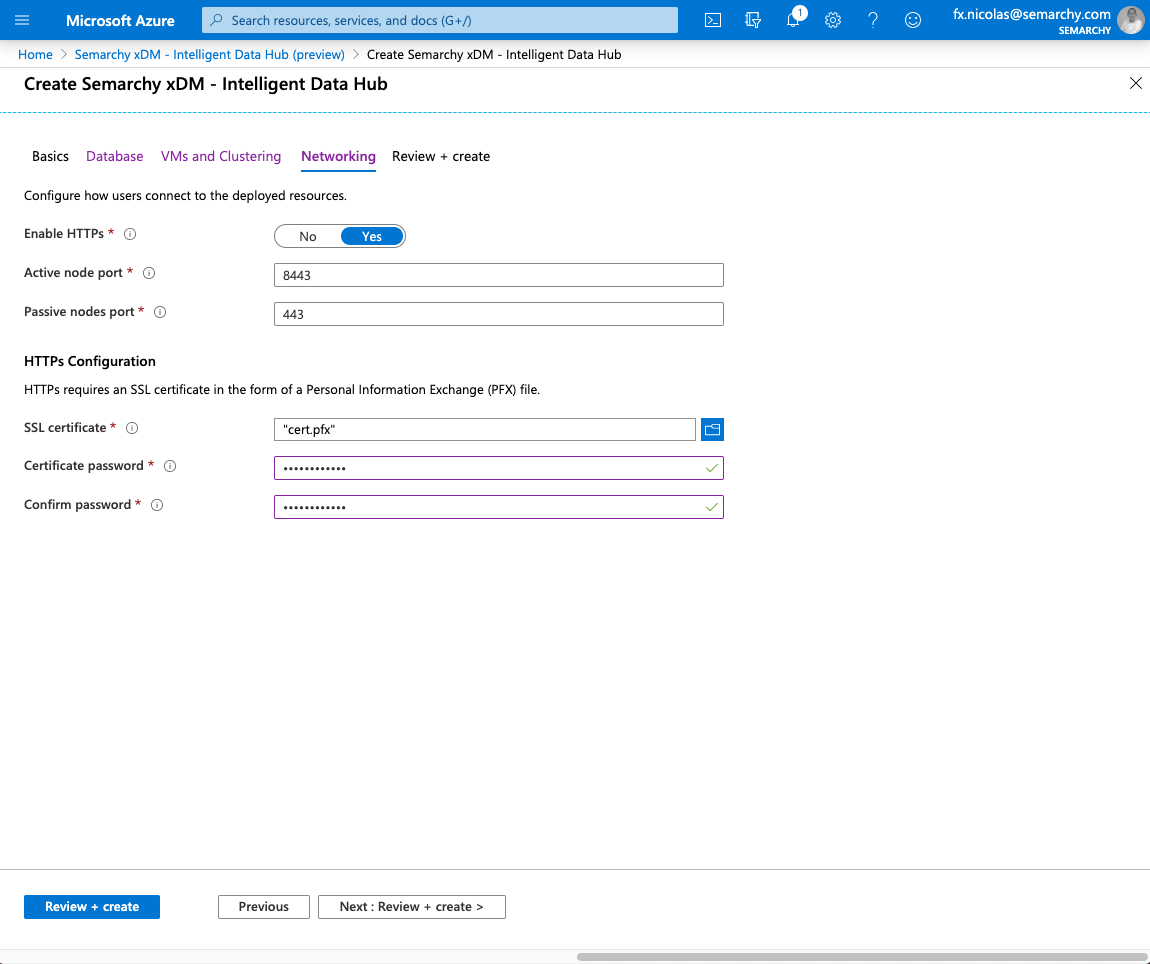
  • xdmInstanceActiveUrl: the URL to connect the active node virtual machine.
  • xdmInstancePassiveUrl: the URL to connect the passive nodes scale set.

Connect the Semarchy xDM instance

There multiple ways to access the instance:

The active node virtual machine allows connecting to the SSH port (22) by default, using the Admin account and Password that you have configured. This might be required to troubleshoot support issues.

Connect to the Semarchy Platform

You can connect now to the virtual machine running the active node, or to the virtual scale set, using your web browser. The URL of the instance and the ports to access both the active node and virtual scale set are displayed in the outputs of your deployment.

If the scale set is configured with zero for the Min and Max VM values, then no virtual machine is started for the scale set, and the passive instance URL will return a network error.

Connect to the file share

The storage account in the resource group contains the configuration and files used by all the Semarchy active and passive nodes. You may need to download and upload files to this storage. To do so, you must configure access to this storage account from your location, by allowing your client IP address.

To allow access to the storage account:

  • In the Azure Portal, open the resource group and select the storage account within this resource group.
  • Select Firewall and virtual networks.
  • In the Firewall section, select the Add your client IP address checkbox.
  • Save the configuration.

    Configuring access to the storage account

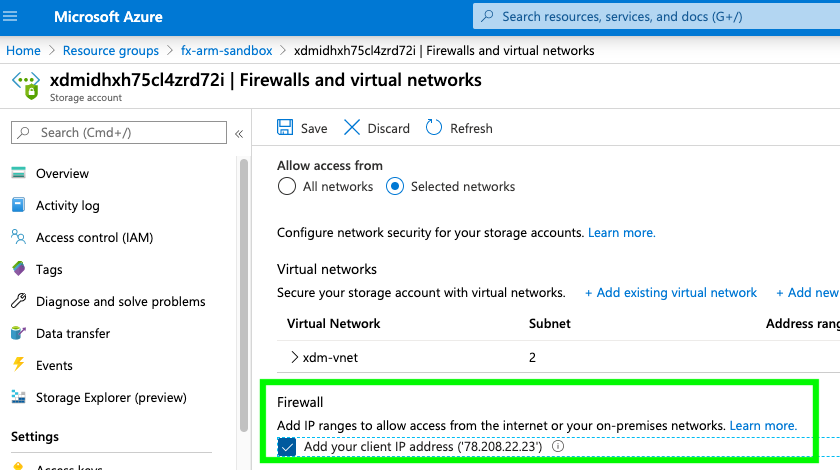
    You can now access the file share from the Storage Explorer, in FILE SHARES > xdm_assets, upload additional libraries in the lib folder, download and upload updated configuration files in the bin and conf folders.

Connect to the databases

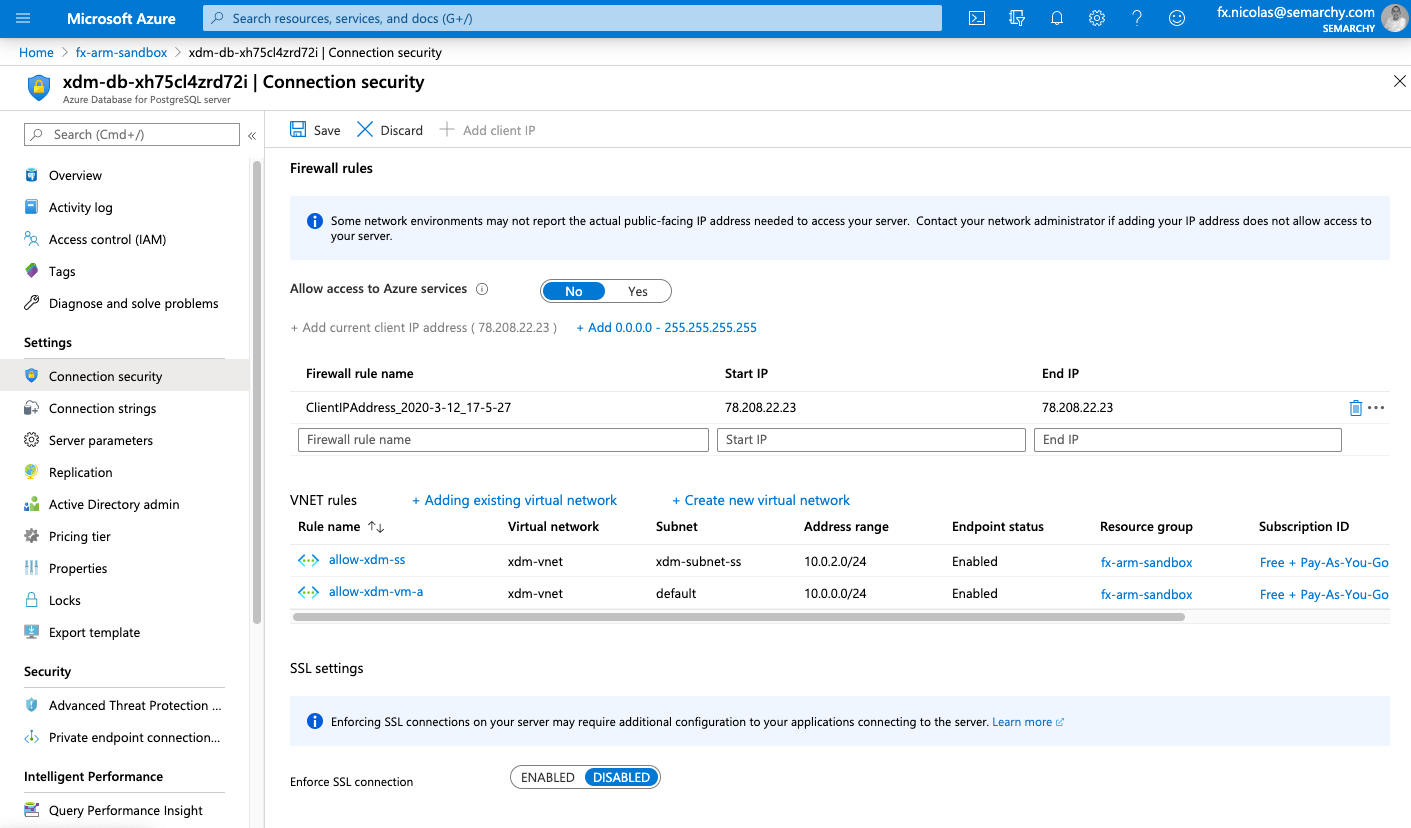
To connect to the database, configure the network firewall rules to enable access from your machine or from the machine running the integration flow. An example is provided below for PostgreSQL.

Configure access to the database

Manage the Semarchy xDM instance

After the deployment, you can configure all aspects of the instance.

The Semarchy instance comes with scripts to perform certain administrative tasks, listed below. These scripts can be downloaded from the Semarchy Azure Templates Github repository.

Other tasks, such as resising the instances or databases or configuring the firewall rules, are performed as regular Azure tasks.

Configure the Azure Resources

You can configure the resources deployed in the instance, for example:

  • To scale the instance, you can change the size of the virtual machine, of the scale set virtual machines or of the databases. You can also modify the scale set configuration to add more VMs.
  • To configure network rules or reinforce security, you can modify the application gateway configuration.

Refer to the Azure documentation for more information about these tasks and the configuration options of the deployed resources.

Add a new database

The az-xdm-instance-add-database script creates a new database/schema - for example, for a new data location - and then automatically configures and restarts the Semarchy instance to take into account this new database.

az-xdm-instance-add-database.sh
    [--resource-group resource-group-name]
    [--admin-password admin-password]
    [--db-server-password database-server-password]
    --db-name <database-name>
    [--db-password database-password]

Parameters:

--db-name

The name of the new database. This value is used for the name of the database created, for the user created for this database, as well as for the name of the datasource configured in the application server to connect this database.

Optional Parameters:

--resource-group

The resource group into which the instance is deployed. The resource group specified in the $XDM_RESOURCE_GROUP environment variable is used by default.

--admin-password

The password of the virtual machine administrator. The password specified in the $XDM_ADMIN_PASSWORD environment variable is used by default.

--db-admin-password

The password of the database server administrator. The password specified in the $XDM_DB_SERVER_PASSWORD environment variable is used by default.

--db-password

The password of the new database user to create. The password specified in the $XDM_DB_PASSWORD environment variable is used by default.

Configure the application server

The virtual machine and the scale set run Semarchy xDM in a Tomcat application server. This server reads its configuration from the file share in the storage account.

The file share, hosting the configuration and files used by all the Semarchy active and passive nodes, is organized as shown below:

  • /xdm-assets
    • /conf
      This folder contains the Semarchy configuration files, including:
      • semarchy.xml: This file contains the datasources configured for all the Semarchy nodes to connect the databases.
      • tomcat-users.xml: This file contains the user configured for all the Semarchy nodes. See Default authentication configuration for more information.
    • /lib
      This folder contains all user-libraries. These libraries will be copied in the active and passive VM’s Tomcat
    • /bin
      This folder contains the startup configuration for the tomcat server running on the active and passive nodes.
      • setenv.sh: tomcat startup options for all nodes node, including java system properties.
      • setenv-active.sh: specific options for the active node. This file does not exist by default. If it exists, it is used instead of setenv.sh for the active node.

You can use the content of the the file share to configure the active and passive nodes. For example:

  • To connect an existing database, by adding a JDBC datasource definition in the conf/semarchy.xml file.
  • To modify the configuration of existing datasources in the conf/semarchy.xml file
  • To configure authentication to use an SSO provider, or to connect your Azure Active Directory, by modifying the conf/semarchy.xml file
  • To add new users in the conf/tomcat-users.xml file.
  • To add new startup parameters to the application in the bin/setenv.sh file.
  • To add new libraries in the /lib/ folder.

When you change the content of the file share, you must Restart the instance to refresh the instance with these changes.

To configure the application server:

  1. Download the configuration file that you want to modify, update it and re-upload it at the same location.
  2. Upload additional libraries to the /lib/ folder.
  3. Restart the instance.

Restart the instance

The az-xdm-instance-upgrade script restarts the Semarchy instance, for example after modifying its configuration.

az-xdm-instance-restart.sh
    [--resource-group resource-group-name]
    [--admin-password admin-password]

Example

Restart the instance in the xdm-production resource group.
az-xdm-instance-restart.sh --resource-group xdm-production

Optional Parameters:

--resource-group

The resource group into which the instance is deployed. The resource group specified in the $XDM_RESOURCE_GROUP environment variable is used by default.

--admin-password

The password of the virtual machine administrator. The password specified in the $XDM_ADMIN_PASSWORD environment variable is used by default.

Upgrade the instance

The az-xdm-instance-upgrade script upgrades the Semarchy instance to a given version.

az-xdm-instance-upgrade.sh
    [--resource-group resource-group-name]
    [--admin-password admin-password]
    [--xdm-version version]

Example

Upgrade the instance in the xdm-production resource group to version 5.2.3.
    az-xdm-instance-upgrade.sh --resource-group xdm-production --xdm-version 5.2.3

Optional Parameters:

--resource-group

The resource group into which the instance is deployed. The resource group specified in the $XDM_RESOURCE_GROUP environment variable is used by default.

--admin-password

The password of the virtual machine administrator. The password specified in the $XDM_ADMIN_PASSWORD environment variable is used by default.

--xdm-version

The Semarchy version to which you want to upgrade. This version may be provided in the following format:

  • A 2 digits minor version of Semarchy (e.g.: 5.2): In that case, the template upgrades the latest patch of the minor version specified.
  • A 3 digits patch version of Semarchy (e.g.: 5.2.1). In that case, the template upgrades to that product version.

    If you do not specify the version, then the latest patch of the currently deployed minor version is installed.

Configure Authentication

Default authentication configuration

The application server is configured by default to look for its users in the cont/tomcat-users.xml file. In this file:

  • A single user - semadmin - is created with the password specified for the virtual machine administrator to connect to Semarchy.
  • A user named after the administrator of the active node’s virtual machine (by default ubuntu), and the same password, is also created. This user is used by the scripts, and should not be removed.

You can add new users into this file and use it to quickly get started, or as a backup configuration. You can also use in Azure all the authentication methods available for Semarchy xDM. Refer to the Semarchy xDM Installation Guide for more information.

Passwords are hashed in the file. When adding new users, you must specify their password in hashed form.

Configure Azure Active Directory

Register the application in AAD

  1. In the Azure Portal, select your Azure Active Directory

    Opening Azure Active Directory

  2. Select App Registration, and then click New Registration

    AAD App Registration

  3. In the Register an Application page enter the following information:
    • Name: Name of the registered application. For example, the name of your instance.
    • Supported accounts type: Select who can use this application.
    • Redirect URI: Enter a Web URI for the Semarchy active instance, with the port and the 
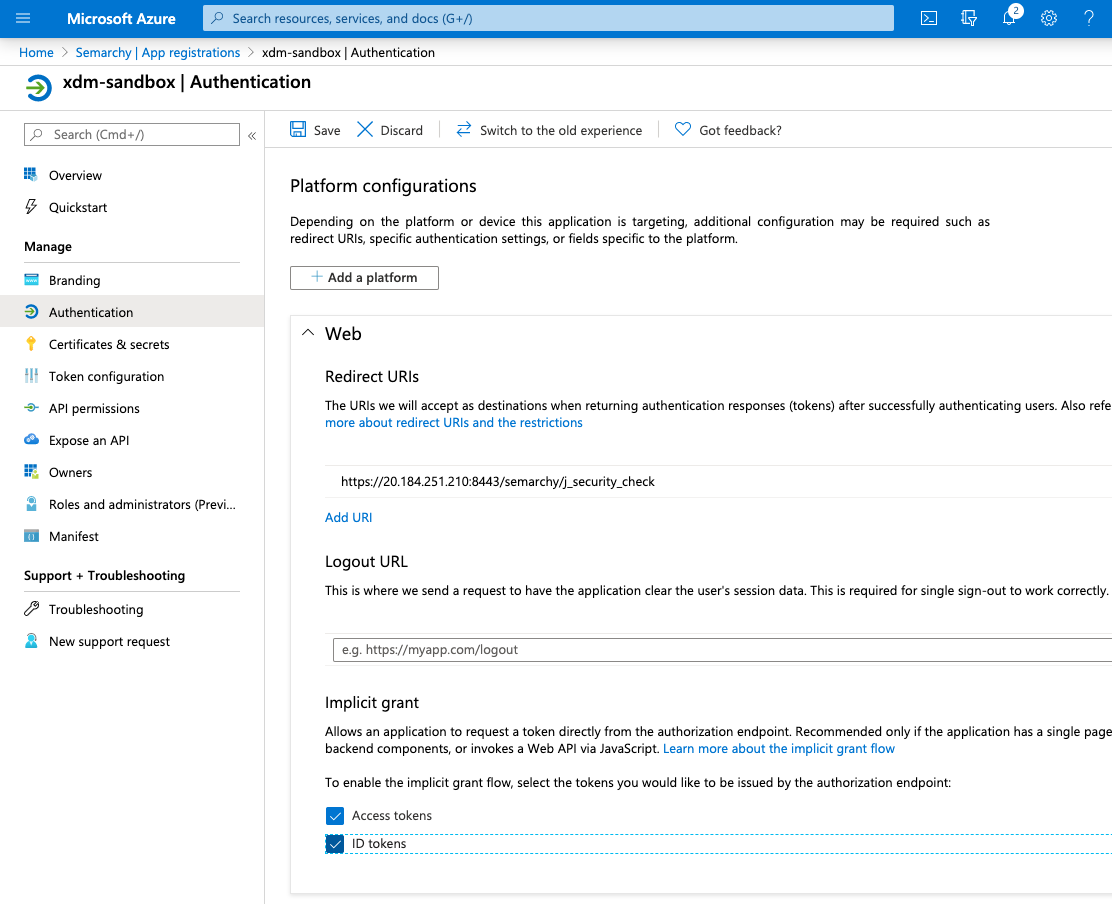
/semarchy/j_security_check prefix.
  4. Click Register. The application registration is created and opens.

    AAD App Registration

  5. In the App Registration, select Certificates and Secrets, and then click New client Secret.
  6. Enter a Description for the client secret, and then click Add.

    Create client secret

  7. The secret is created. Note the Value of the Client Secret. This value will be used as Client Secret later in the configuration.

    Client secret value

  8. Select Authentication.
  9. In the Authentication page, select Access Tokens and ID Tokens in the Implicit grant section.

    Authentication

  10. Click Save to apply your changes.
  11. Select API Permissions, and then click Add a permission.
  12. Select Microsoft Graph

    Configuring API Permissions

  13. Select Delegated Permissions and then enter directory to filter the permissions.
  14. Select the Directory.Read.All permission, and then click the Add permissions button.

    Selecting API Permissions

  15. Click the Grant admin consent for …​ button and then click OK to confirm.

    Grant Consent

  16. Select Manifest.
  17. In the editor, search for the 
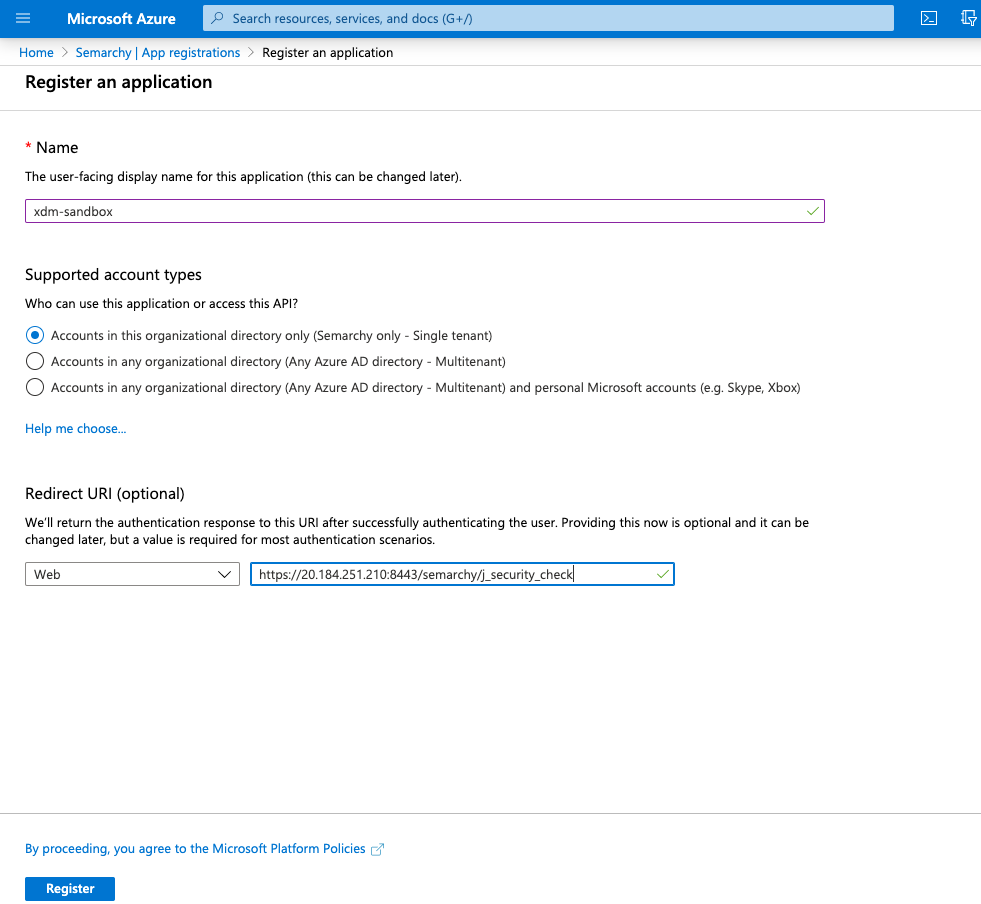
groupMembershipClaims property, currently set to null. Change its value to SecurityGroup

    Configure Group Membership Claims

  18. Click Save.
  19. Select Overview. Note the Application (Client ID) value. This value will be used as the Client ID later in the configuration.

    Viewing the Client ID

  20. Click Endpoints. Copy the URL of the OpenID Connect metadata document. This value will be used as the Issuer URL later in the configuration.
    You should only copy the part of the URL until 
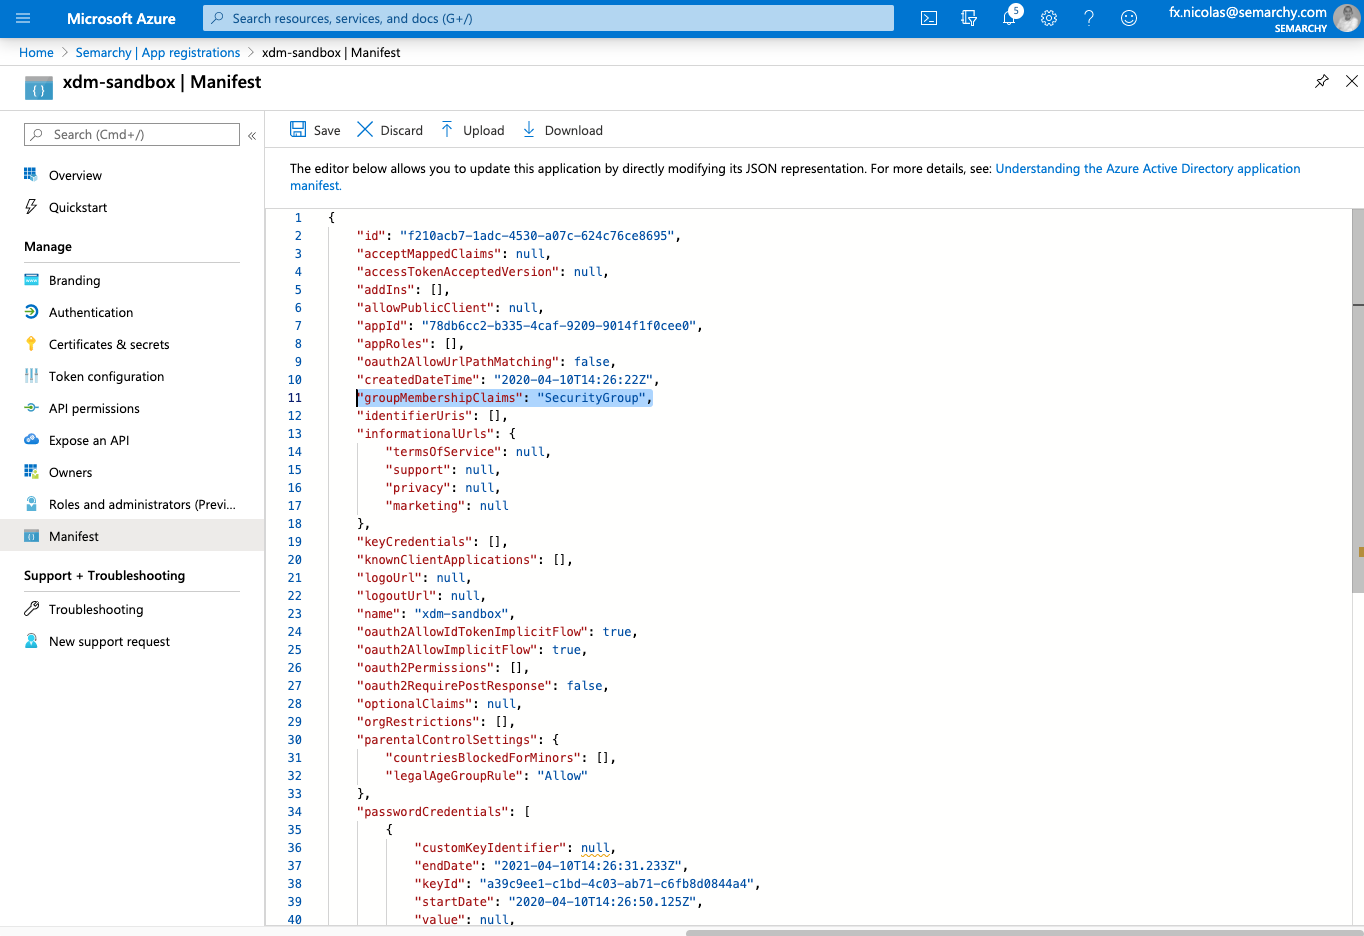
2.0, as shown below.

    Open ID Connect Metadata Document

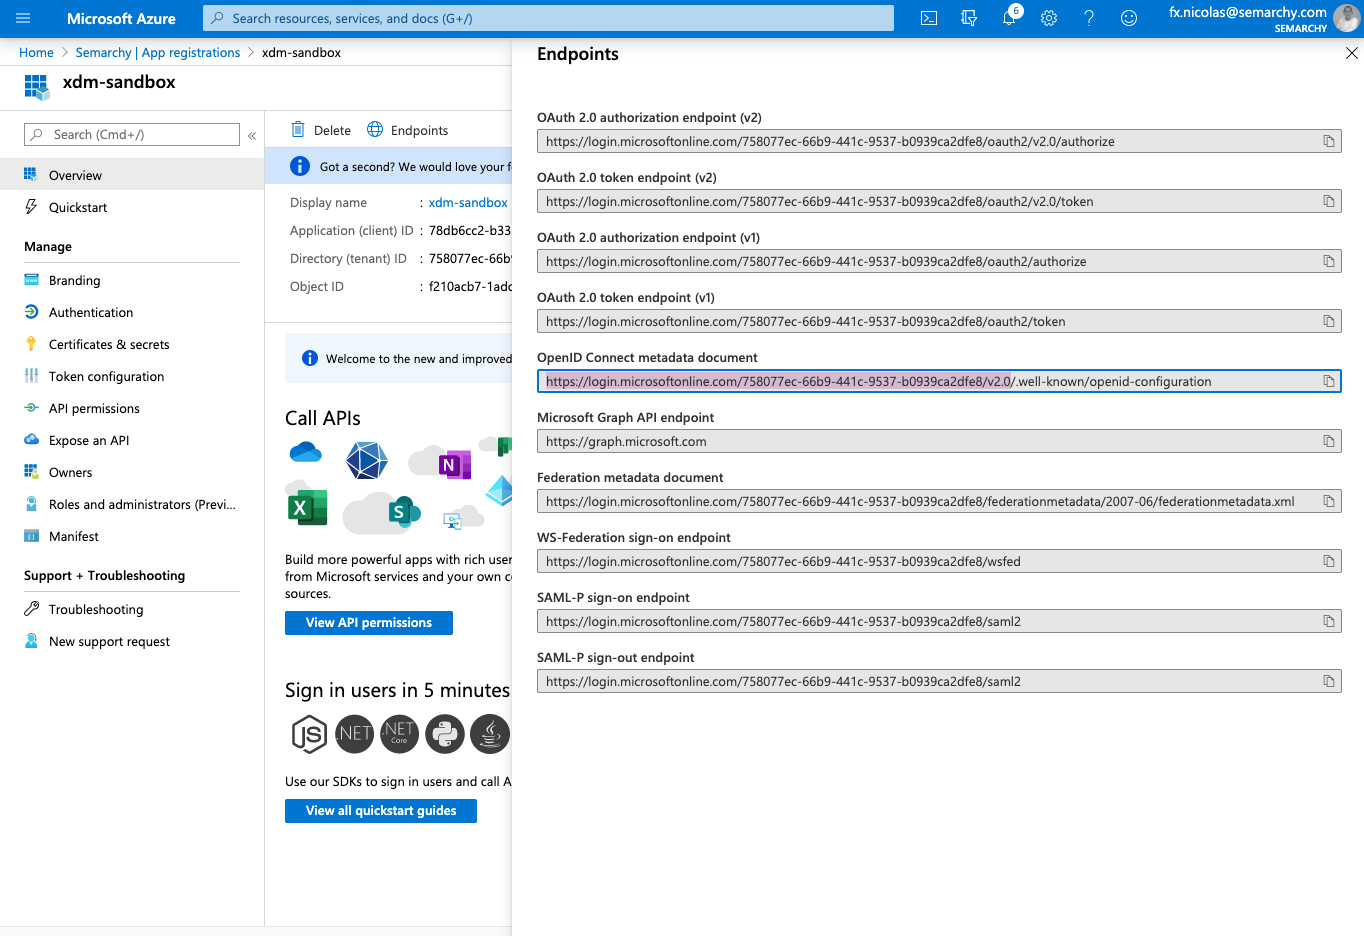
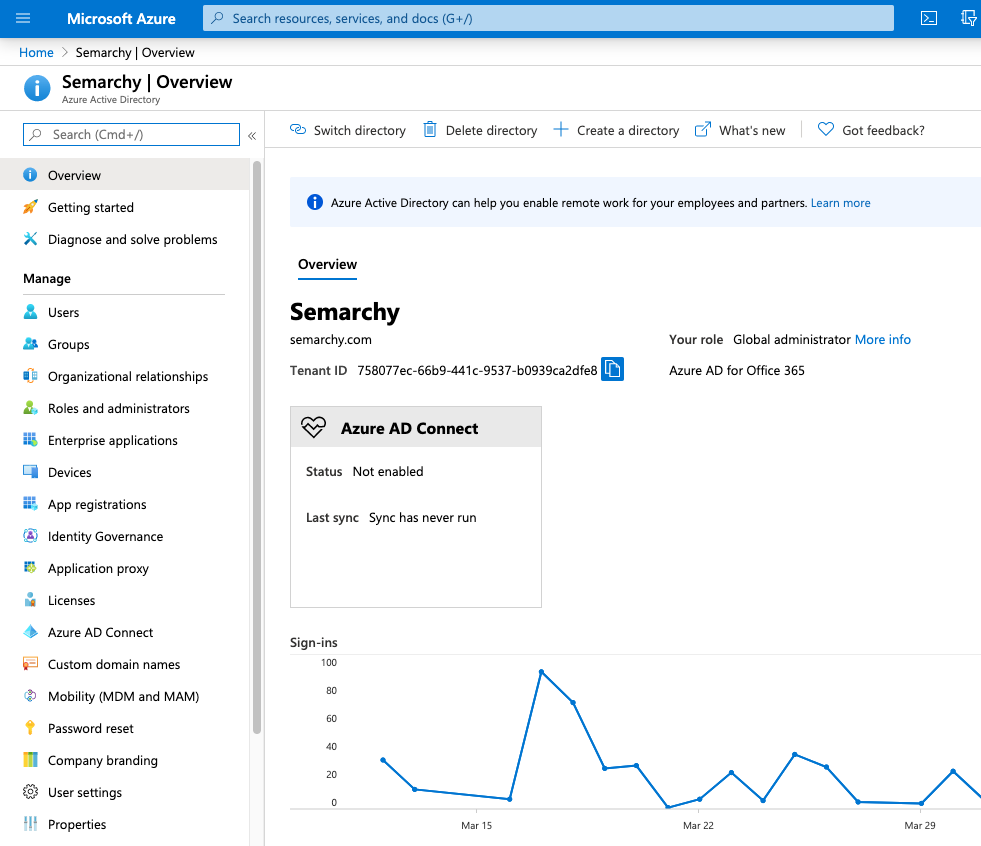
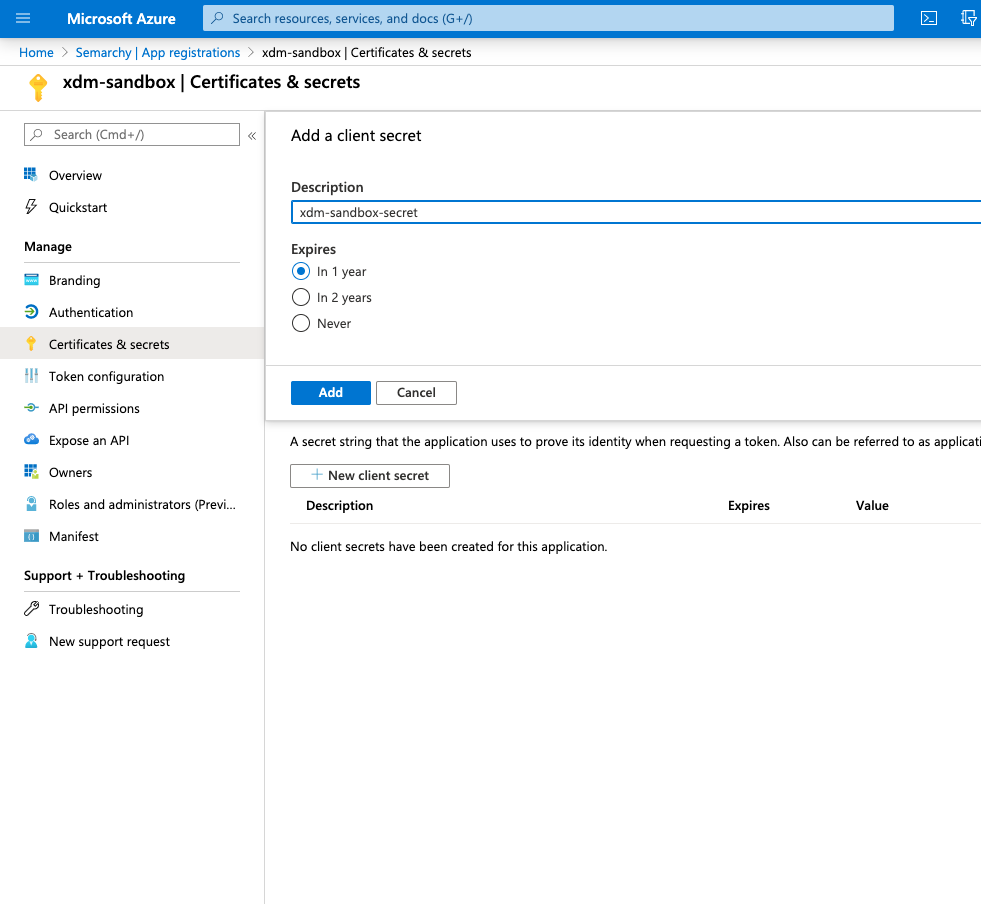
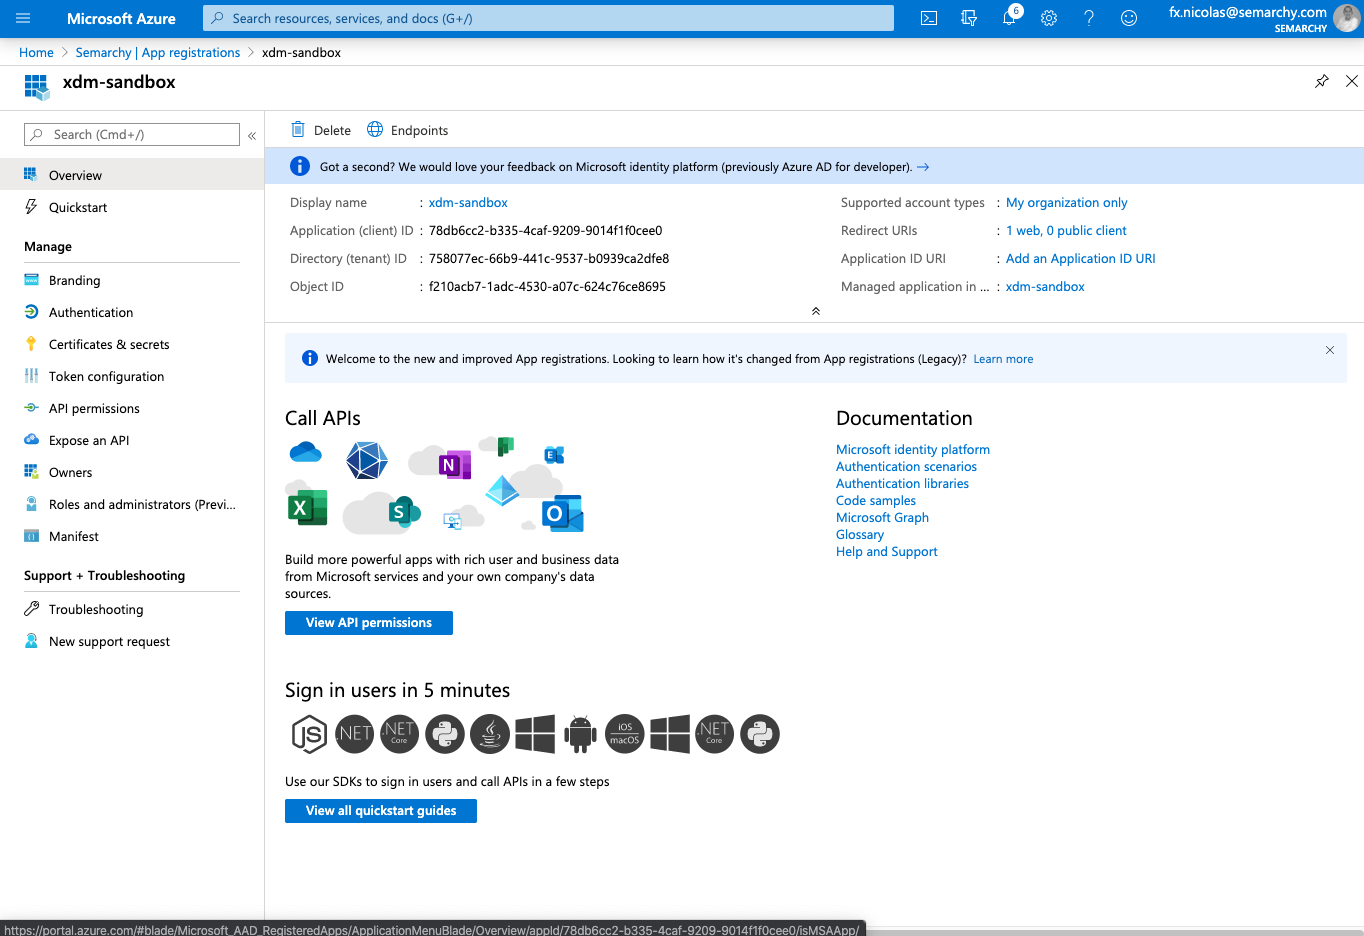
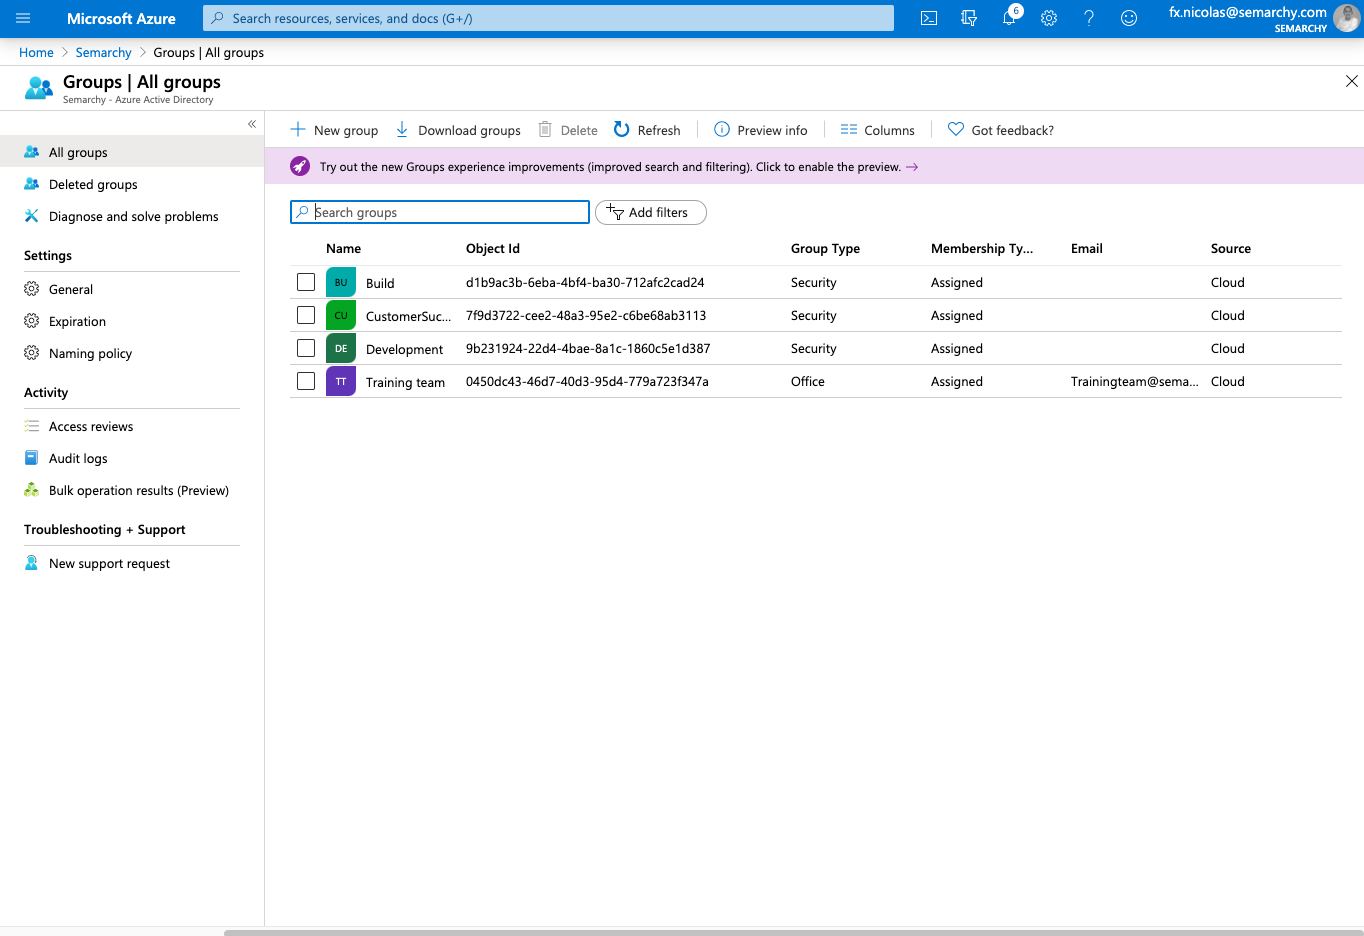
At that stage, you should have the three following values:

  • Client ID: The Application (Client ID) in the App Registration Overview.
  • Client Secret: The value of the secret created in the App Registration Certificate and secrets.
  • Issuer URL: The OpenID Connect metadata document in the App Registration Overview > Endpoints.

Identify AAD groups to use in Semarchy

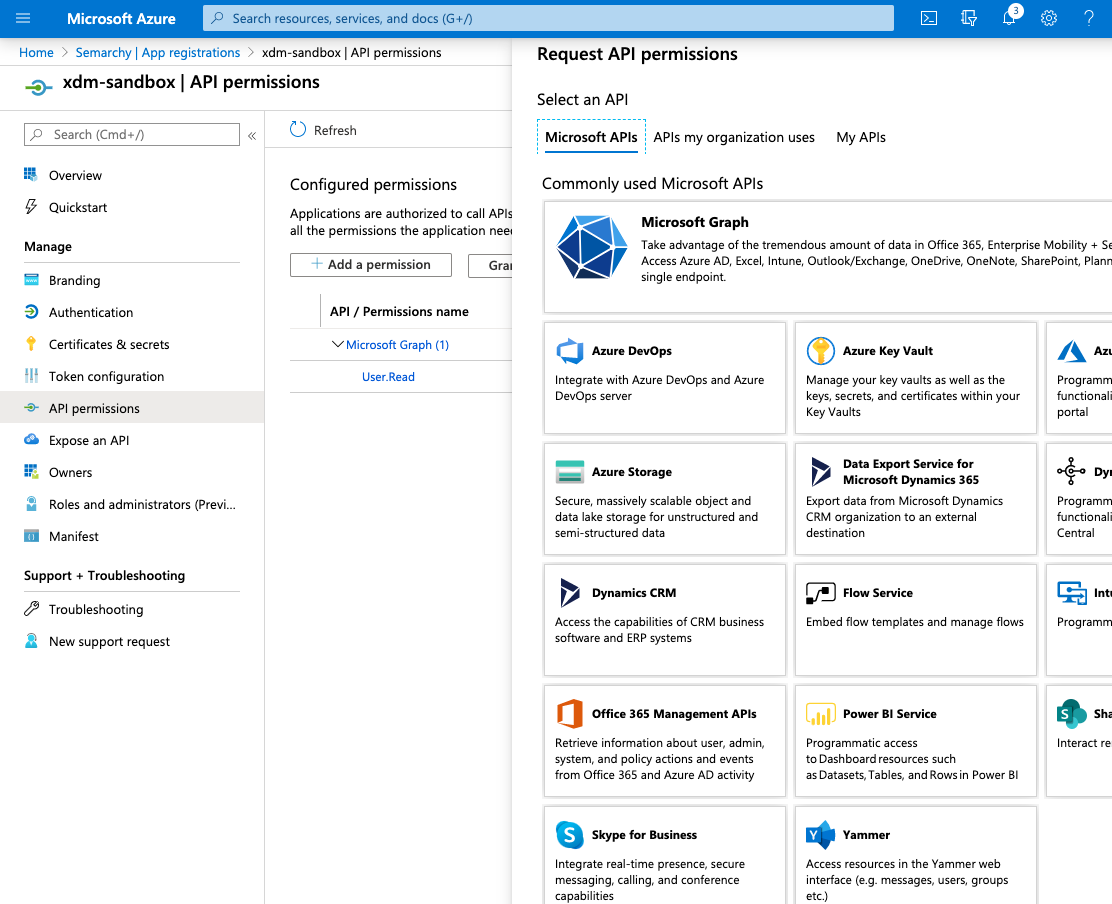
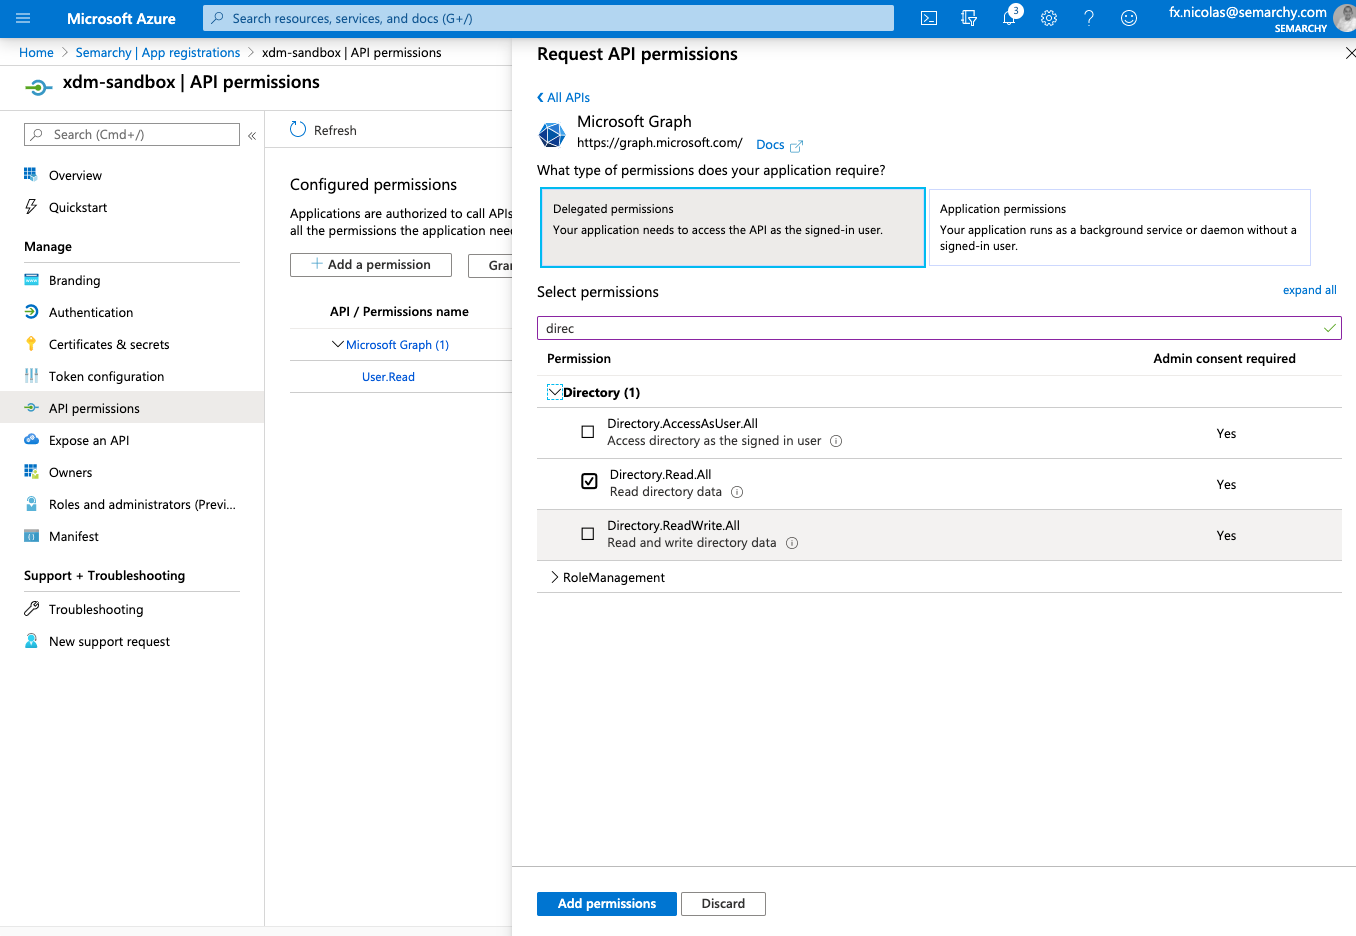
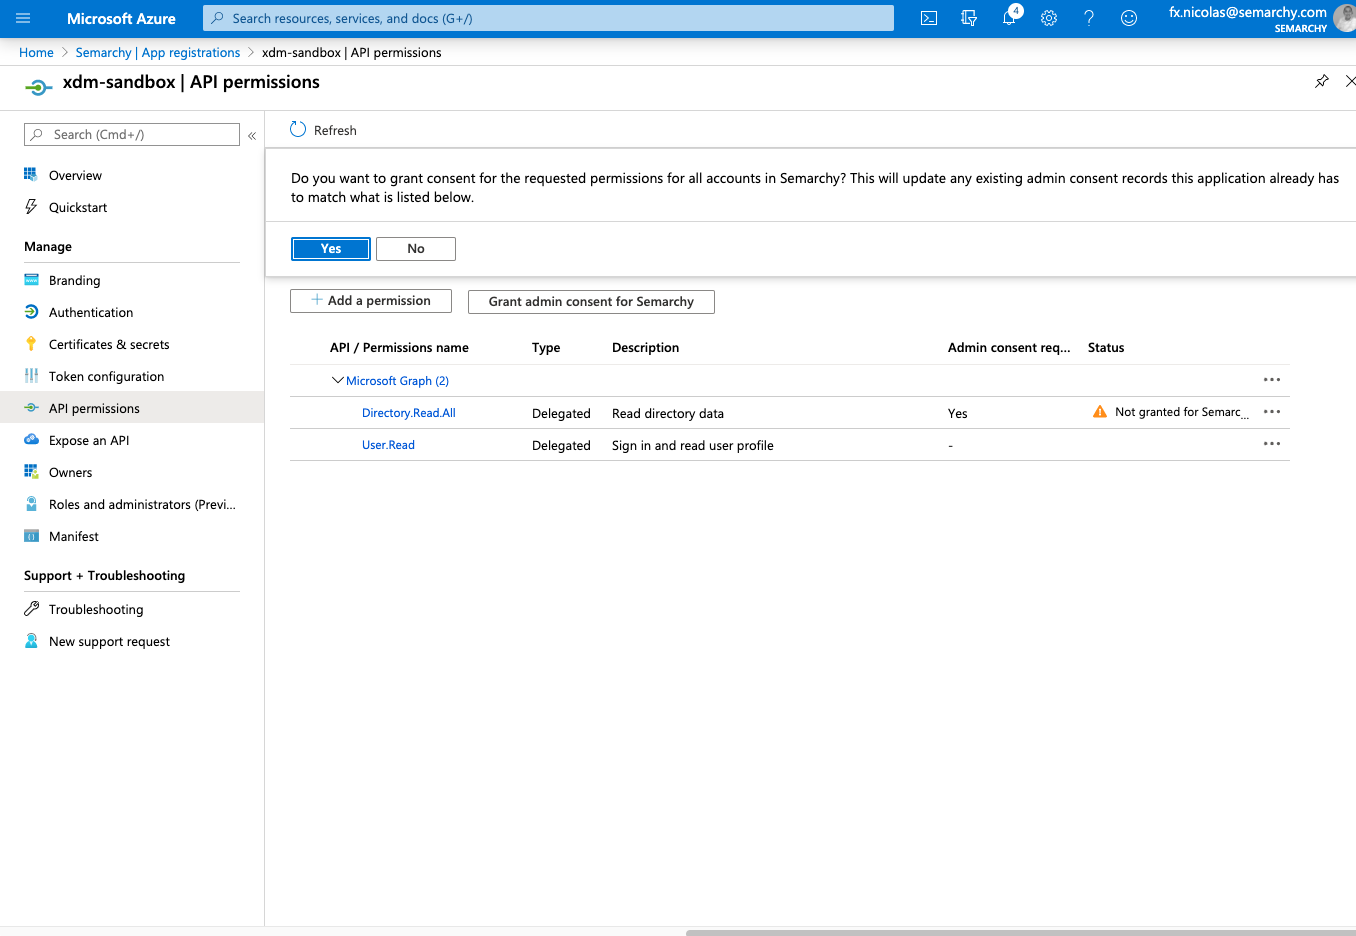
Semarchy xDM uses roles that need to be mapped on groups in the Azure Active Directory. You must identify the user groups and their corresponding roles in Semarchy

  1. In the Azure Portal, select your Azure Active Directory

    Opening Azure Active Directory

  2. Select Groups. Identify those of the groups that you want to map on specific roles and note their Object Id value.

    Selecting Groups

Configure Semarchy xDM to use AAD

  1. Edit the semarchy.xml file of your instance as explained in the Configure the application server section.
  2. Search the following line, which configure the authentication with a login form.
    <Valve className="org.apache.catalina.authenticator.FormAuthenticator" landingPage="/" />
  3. Replace it with the following element, making sure to replace the issuer, clientId and clientSecret values in the providers element with those that you captured while Register the application in AAD
    <Valve className="com.semarchy.tool.jee.tomcat.OpenIdConnectAuthenticator"
           providers="[{
                name: 'Microsoft Azure AD',
                issuer: https://login.microsoftonline.com/758077ec-66b9-441c-9537-b0939ca2dfe8/v2.0,
                clientId: 5978c2a3-107b-43ff-9187-bbeee30d2863,
                clientSecret: 0h__Fi=:5gyqK6g4r6=eAPII[I1h/]_V
            }]"
           usernameClaim="preferred_username"
           additionalScopes="email profile"
           noForm="true"
           groupClaim="groups"
           groupSeparator=","
           roleMappingEnabled = "true”
           keepMappedRoles="false"
           keepUnmappedRoles="false"
           landingPage="/"
           />
    
    <Realm className="com.semarchy.tool.jee.tomcat.OpenIdConnectRealm" />
  4. Restart the instance

Map AAD groups to Semarchy roles

  1. Create a text file named roles-mapping.properties.
  2. In this file, add one line for each group that you identified in AAD, and map the Semarchy roles that you want to associate to this group, as shown in the example below:
    Examples of a role mapping
    0450dc43-46d7-40d3-95d4-779a723f347a=semarchyConnect,semarchyAdmin
    9b231924-22d4-4bae-8a1c-1860c5e1d387=semarchyConnect, dataSteward
    7f9d3722-cee2-48a3-95e2-c6be68ab3113=semarchyConnect, businessUser
  3. Save this file and upload it to the instance File Share, in the xdm-assets/conf folder.
  4. Restart the instance.
You must restart the instance every time you modify the role mapping file.