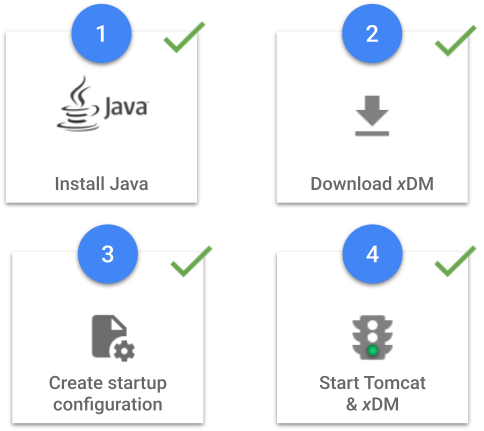
Welcome! This tutorial will show you how to set up Semarchy xDM using Semarchy's preconfigured Tomcat xDM installation so you can run the tutorials available on the Semarchy website.
Learning outcomes
- Installing the database.
- Installing Java.
- Defining the xDM startup configuration.
- Starting and installing xDM.

Prerequisites
- Ensure you have Internet access.
- Use a web browser like Chrome or Firefox.
- Have a text editor handy, such as Notepad++.
- Use a file archiver like 7-Zip.
Learning track
If you have not already done so, click the button below to download resources such as the sample files that you will use to set up xDM in this tutorial.
The Semarchy xDM architecture includes the following components:
- A web browser, such as Google Chrome, Firefox, Safari, or Microsoft Edge, where the Application Builder and MDM applications run.
- A Java EE application server (Tomcat, WildFly, etc.) running the Semarchy xDM application.
- A database instance (Oracle, PostgreSQL, or SQL Server) containing the repository (where xDM stores its metadata) and one or more data locations (where xDM stores your organization's data).
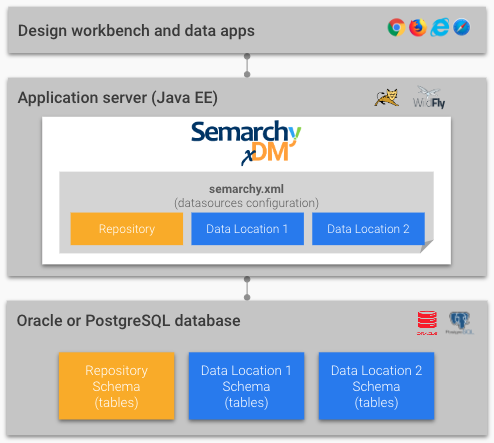
Next, you will set up the database and application server to prepare your environment for Semarchy xDM setup.
To operate xDM, a database is necessary. This section covers setting up a database if you do not already have one available for use.
Database architecture
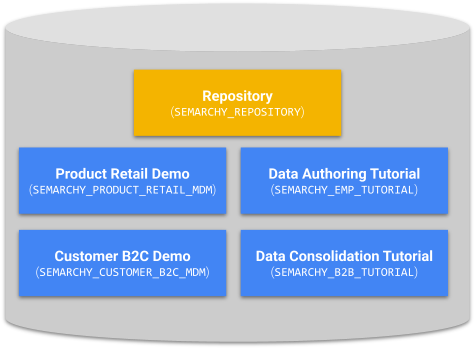
Before installing Semarchy xDM, it is essential to create a database schema for the repository.
Next, additional schemas for the data locations are required. The quantity and nomenclature of schemas vary based on your data location requirements.
In this section, you will create one repository and four data location schemas that will allow you to complete all the xDM tutorials.
Choose a database
Semarchy xDM supports Oracle Database (Oracle), PostgreSQL (Postgres), and SQL Server. For the supported version of each database, see the Semarchy xDM documentation.
Pick one database to proceed.
☆ For advanced users
If you have an existing database that meets the system requirements, you may proceed to skip the upcoming sections for downloading and installing a database and proceed directly to ⑦ Set up Java.
Set up a PostgreSQL database
- From the PostgreSQL website, download PostgreSQL.
- Run the PostgreSQL setup wizard to install PostgreSQL.
- Set a password during the PostgreSQL installation.
- Note your password, you will need it later.
Create schemas using pgAdmin 4
Now that you have installed PostgreSQL, you also have access to pgAdmin 4. You will use pgAdmin 4 to create the repository and data location schemas.
- Connect as the postgres user.
- Provide the password created during PostgreSQL installation.
- Open the Query Tool.
- Execute the user creation, schema creation, and privilege grant scripts below.
install-on-premises/postgresql/4-setup-1-create-schemas.sql
/*******************************************************************************
** PostgreSQL database create schema scripts
** Semarchy xDM Tutorials
** Copy and paste the SQL DDL scripts and use them in the tutorial.
** Copyright (c) 2021 Semarchy
*******************************************************************************/

/******************************
Configure Database Schemas
******************************/
CREATE SCHEMA extensions;
GRANT USAGE ON SCHEMA extensions TO PUBLIC;
ALTER DEFAULT PRIVILEGES IN SCHEMA extensions GRANT EXECUTE ON FUNCTIONS TO PUBLIC;
ALTER DATABASE postgres SET SEARCH_PATH TO "$user",public,extensions;

CREATE EXTENSION IF NOT EXISTS "uuid-ossp"     with schema extensions;
CREATE EXTENSION IF NOT EXISTS "fuzzystrmatch" with schema extensions;

CREATE USER   semarchy_repository WITH PASSWORD 'semarchy_repository';
CREATE SCHEMA semarchy_repository AUTHORIZATION semarchy_repository;
GRANT USAGE ON SCHEMA semarchy_repository TO public;

/* Create the repository read-only user */
CREATE USER semarchy_repository_ro WITH PASSWORD 'semarchy_repository_ro';
GRANT CONNECT ON DATABASE postgres to semarchy_repository_ro;

CREATE USER   semarchy_product_retail_mdm WITH PASSWORD 'semarchy_product_retail_mdm';
CREATE SCHEMA semarchy_product_retail_mdm AUTHORIZATION semarchy_product_retail_mdm;
GRANT USAGE ON SCHEMA semarchy_product_retail_mdm TO public;

CREATE USER   semarchy_customer_b2c_mdm WITH PASSWORD 'semarchy_customer_b2c_mdm';
CREATE SCHEMA semarchy_customer_b2c_mdm AUTHORIZATION semarchy_customer_b2c_mdm;
GRANT USAGE ON SCHEMA semarchy_customer_b2c_mdm TO public;

CREATE USER   semarchy_emp_tutorial WITH PASSWORD 'semarchy_emp_tutorial';
CREATE SCHEMA semarchy_emp_tutorial AUTHORIZATION semarchy_emp_tutorial;
GRANT USAGE ON SCHEMA semarchy_emp_tutorial TO public;

CREATE USER   semarchy_b2b_tutorial WITH PASSWORD 'semarchy_b2b_tutorial';
CREATE SCHEMA semarchy_b2b_tutorial AUTHORIZATION semarchy_b2b_tutorial;
GRANT USAGE ON SCHEMA semarchy_b2b_tutorial TO public;

/* Give all users read access to all the tables (and views) in semarchy_repository - NOT SUITABLE FOR A PRODUCTION ENVIRONMENT */
ALTER DEFAULT PRIVILEGES FOR USER semarchy_repository IN SCHEMA semarchy_repository GRANT SELECT ON TABLES TO public;

/* Setting the search path to include the repository */
ALTER ROLE semarchy_repository_ro SET SEARCH_PATH TO "$user", semarchy_repository,public,extensions;

/* Cleanup scripts to start fresh */
/*
  DROP SCHEMA semarchy_repository CASCADE;
  DROP USER   semarchy_repository;
  DROP owned by semarchy_repository_ro;
  DROP user semarchy_repository_ro;

  DROP SCHEMA semarchy_product_retail_mdm CASCADE;
  DROP USER   semarchy_product_retail_mdm;

  DROP SCHEMA semarchy_customer_b2c_mdm CASCADE;
  DROP USER   semarchy_customer_b2c_mdm;

  DROP SCHEMA semarchy_emp_tutorial CASCADE;
  DROP USER   semarchy_emp_tutorial;

  DROP SCHEMA semarchy_b2b_tutorial CASCADE;
  DROP USER   semarchy_b2b_tutorial;

*/
/******************************************************************************/
Congratulations!
You have successfully installed a PostgreSQL database necessary for running xDM.
To summarize:
- You have completed the database installation process.
- You have established a connection to the database.
- You have created the necessary users and schemas for the Semarchy xDM tutorials.
- You have provided all the necessary permissions within the database.
You can now proceed to ⑦ Set up Java.
Set up an Oracle database
- Create an account on the Oracle website.
- Download the Oracle database.
- Extract the Oracle installation zip files.
- Install Oracle Database using the Oracle Database Installer.
- Set a password during the Oracle installation.
- Note your database administrator (DBA) username, password, and system identifier (SID). You will need this information later.
SQL Developer
Download and install SQL Developer. It is a free tool from Oracle that allows you to create your repository and data location schemas in an Oracle database.
- Download SQL Developer from the Oracle website.
- Extract the SQL Developer zip files.
- Open the SQL Developer application.
- Connect using the SYSTEM credentials within SQL Developer.
Create schemas
Now that you have installed Oracle and SQL Developer, you will create the repository and data location schemas in SQL Developer.
- Connect as the SYSTEM user.
- Execute the schema creation and privilege grant scripts below.
install-on-premises/oracle/5-setup-1-create-schemas.sql
/*******************************************************************************
** Oracle database create schema scripts
** Semarchy xDM Tutorials
** Copy and paste the SQL DDL scripts and use them in the tutorial.
** Copyright (c) 2021 Semarchy
*******************************************************************************/

/******************************
Configure Database Schemas
******************************/
CREATE USER       SEMARCHY_REPOSITORY
IDENTIFIED BY     SEMARCHY_REPOSITORY
DEFAULT TABLESPACE USERS
TEMPORARY TABLESPACE TEMP;

CREATE USER       SEMARCHY_PRODUCT_RETAIL_MDM
IDENTIFIED BY     SEMARCHY_PRODUCT_RETAIL_MDM
DEFAULT TABLESPACE USERS
TEMPORARY TABLESPACE TEMP;

CREATE USER       SEMARCHY_CUSTOMER_B2C_MDM
IDENTIFIED BY     SEMARCHY_CUSTOMER_B2C_MDM
DEFAULT TABLESPACE USERS
TEMPORARY TABLESPACE TEMP;

CREATE USER       SEMARCHY_EMP_TUTORIAL
IDENTIFIED BY     SEMARCHY_EMP_TUTORIAL
DEFAULT TABLESPACE USERS
TEMPORARY TABLESPACE TEMP;

CREATE USER       SEMARCHY_B2B_TUTORIAL
IDENTIFIED BY     SEMARCHY_B2B_TUTORIAL
DEFAULT TABLESPACE USERS
TEMPORARY TABLESPACE TEMP;

GRANT CONNECT, RESOURCE TO SEMARCHY_REPOSITORY
, SEMARCHY_PRODUCT_RETAIL_MDM
, SEMARCHY_CUSTOMER_B2C_MDM
, SEMARCHY_EMP_TUTORIAL
, SEMARCHY_B2B_TUTORIAL;


-- The following command should be used for Oracle 12c and above
GRANT UNLIMITED TABLESPACE TO SEMARCHY_REPOSITORY
, SEMARCHY_PRODUCT_RETAIL_MDM
, SEMARCHY_CUSTOMER_B2C_MDM
, SEMARCHY_EMP_TUTORIAL
, SEMARCHY_B2B_TUTORIAL;

-- Create the repository read-only user
CREATE USER SEMARCHY_REPOSITORY_RO
 IDENTIFIED BY SEMARCHY_REPOSITORY_RO
 DEFAULT TABLESPACE USERS TEMPORARY TABLESPACE TEMP;

-- Grant minimum access to the user
GRANT CONNECT TO SEMARCHY_REPOSITORY_RO;

/* Cleanup scripts to start fresh */
/*
  DROP USER SEMARCHY_REPOSITORY CASCADE;
  DROP USER SEMARCHY_REPOSITORY_RO CASCADE;
  DROP USER SEMARCHY_PRODUCT_RETAIL_MDM CASCADE;
  DROP USER SEMARCHY_CUSTOMER_B2C_MDM CASCADE;
  DROP USER SEMARCHY_EMP_TUTORIAL CASCADE;
  DROP USER SEMARCHY_B2B_TUTORIAL CASCADE;
*/

/******************************************************************************/
Congratulations!
You have successfully installed an Oracle database necessary for running xDM.
To summarize:
- You have completed the database installation process.
- You have established a connection to the database.
- You have created the necessary users and schemas for the Semarchy xDM tutorials.
- You have provided all the necessary permissions within the database.
You can now proceed to ⑦ Set up Java.
Set up a Microsoft SQL Server database
- From the Microsoft website, download SQL Server.
- Run the SQL Server setup wizard to install SQL Server.
- Set a password during the SQL Server installation.
- Note your password, you will need it later.
SQL Server Management Studio
Download and install SQL Server Management Studio (SSMS). It is a free tool from Microsoft that allows you to create your repository and data location schemas in an SQL Server database.
- Click the button below to download SSMS.
- Extract the SSMS zip files.
- Open the SSMS application.
- Connect using the sa credentials within SSMS.
Create schemas
Now that you have installed SQL Server and SSMS, you will create the repository and data location schemas in SSMS.
- Connect as the sa user.
- Execute the schema creation and privilege grant scripts below.
install-on-premises/sqlserver/6-setup-1-create-schemas.sql
/*******************************************************************************
** SQL Server database create schema scripts
** Semarchy xDM Tutorials
** Copy and paste the SQL DDL scripts and use them in the tutorial.
** Copyright (c) 2021 Semarchy
*******************************************************************************/

/******************************
Configure Database Schemas
******************************/

-- Repository
CREATE DATABASE SEMARCHY_REPOSITORY
GO
CREATE LOGIN SEMARCHY_REPOSITORY WITH  PASSWORD='13BC5881-632b-12ef-cd34-1256bd302470'
GO
USE SEMARCHY_REPOSITORY
GO
CREATE USER SEMARCHY_REPOSITORY FOR LOGIN SEMARCHY_REPOSITORY
GO
ALTER ROLE db_owner ADD MEMBER SEMARCHY_REPOSITORY
GO

-- Create the repository read-only user
CREATE LOGIN SEMARCHY_REPOSITORY_RO WITH PASSWORD='13BC5881-632b-12ef-cd34-1256bd302471', DEFAULT_DATABASE=SEMARCHY_REPOSITORY
GO
USE SEMARCHY_REPOSITORY
GO
CREATE USER SEMARCHY_REPOSITORY_RO FOR LOGIN SEMARCHY_REPOSITORY_RO
GO

-- Grant minimum access to the user
GRANT CONNECT TO SEMARCHY_REPOSITORY_RO;


-- Retail MDM Data Location
CREATE DATABASE SEMARCHY_PRODUCT_RETAIL_MDM
GO
CREATE LOGIN SEMARCHY_PRODUCT_RETAIL_MDM WITH PASSWORD='13BC5881-632b-12ef-cd34-1256bd302472'
GO
USE SEMARCHY_PRODUCT_RETAIL_MDM
GO
CREATE USER SEMARCHY_PRODUCT_RETAIL_MDM FOR LOGIN SEMARCHY_PRODUCT_RETAIL_MDM
GO
ALTER ROLE db_owner ADD MEMBER SEMARCHY_PRODUCT_RETAIL_MDM
GO

-- Customer B2C Data Location
CREATE DATABASE SEMARCHY_CUSTOMER_B2C_MDM
GO
CREATE LOGIN SEMARCHY_CUSTOMER_B2C_MDM WITH PASSWORD='13BC5881-632b-12ef-cd34-1256bd302473'
GO
USE SEMARCHY_CUSTOMER_B2C_MDM
GO
CREATE USER SEMARCHY_CUSTOMER_B2C_MDM FOR LOGIN SEMARCHY_CUSTOMER_B2C_MDM
GO
ALTER ROLE db_owner ADD MEMBER SEMARCHY_CUSTOMER_B2C_MDM
GO

-- Employee HR Tutorial - Track 1 - Data Location
CREATE DATABASE SEMARCHY_EMP_TUTORIAL
GO
CREATE LOGIN SEMARCHY_EMP_TUTORIAL WITH PASSWORD='13BC5881-632b-12ef-cd34-1256bd302474'
GO
USE SEMARCHY_EMP_TUTORIAL
GO
CREATE USER SEMARCHY_EMP_TUTORIAL FOR LOGIN SEMARCHY_EMP_TUTORIAL
GO
ALTER ROLE db_owner ADD MEMBER SEMARCHY_EMP_TUTORIAL
GO

-- Customer B2B - Track 2 - Data Location
CREATE DATABASE SEMARCHY_B2B_TUTORIAL
GO
CREATE LOGIN SEMARCHY_B2B_TUTORIAL WITH PASSWORD='13BC5881-632b-12ef-cd34-1256bd302475'
GO
USE SEMARCHY_B2B_TUTORIAL
GO
CREATE USER SEMARCHY_B2B_TUTORIAL FOR LOGIN SEMARCHY_B2B_TUTORIAL
GO
ALTER ROLE db_owner ADD MEMBER SEMARCHY_B2B_TUTORIAL
GO

-- Additional Data Location1
CREATE DATABASE SEMARCHY_DLOC1
GO
CREATE LOGIN SEMARCHY_DLOC1 WITH PASSWORD='13BC5881-632b-12ef-cd34-1256bd302476'
GO
USE SEMARCHY_DLOC1
GO
CREATE USER SEMARCHY_DLOC1 FOR LOGIN SEMARCHY_DLOC1
GO
ALTER ROLE db_owner ADD MEMBER SEMARCHY_DLOC1
GO

-- Additional Data Location2
CREATE DATABASE SEMARCHY_DLOC2
GO
CREATE LOGIN SEMARCHY_DLOC2 WITH PASSWORD='13BC5881-632b-12ef-cd34-1256bd302477'
GO
USE SEMARCHY_DLOC2
GO
CREATE USER SEMARCHY_DLOC2 FOR LOGIN SEMARCHY_DLOC2
GO
ALTER ROLE db_owner ADD MEMBER SEMARCHY_DLOC2
GO

/* Cleanup scripts to start fresh */
/*
  DROP DATABASE SEMARCHY_REPOSITORY
  GO
  DROP LOGIN    SEMARCHY_REPOSITORY
  GO
  DROP LOGIN    SEMARCHY_REPOSITORY_RO
  GO
  DROP DATABASE SEMARCHY_PRODUCT_RETAIL_MDM
  GO
  DROP LOGIN    SEMARCHY_PRODUCT_RETAIL_MDM
  GO
  DROP DATABASE SEMARCHY_CUSTOMER_B2C_MDM
  GO
  DROP LOGIN    SEMARCHY_CUSTOMER_B2C_MDM
  GO
  DROP DATABASE SEMARCHY_EMP_TUTORIAL
  GO
  DROP LOGIN    SEMARCHY_EMP_TUTORIAL
  GO
  DROP DATABASE SEMARCHY_B2B_TUTORIAL
  GO
  DROP LOGIN    SEMARCHY_B2B_TUTORIAL
  GO
  DROP DATABASE SEMARCHY_DLOC1
  GO
  DROP LOGIN    SEMARCHY_DLOC1
  GO
  DROP DATABASE SEMARCHY_DLOC2
  GO
  DROP LOGIN    SEMARCHY_DLOC2
  GO
*/

/******************************************************************************/
Congratulations!
You have successfully installed the SQL Server database necessary for running xDM.
To summarize:
- You have completed the database installation process.
- You have established a connection to the database.
- You have created the necessary users and schemas for the Semarchy xDM tutorials.
- You have provided all the necessary permissions within the database.
You can now proceed to ⑦ Set up Java.
Semarchy xDM requires a Java Development Kit (JDK) to run. It also requires an application server that you will configure in the next section.

☆ For advanced users
If you already have a JDK version which follows the Semarchy system requirements and you have configured your JAVA_HOME environment variable, you can skip this section and move on to ⑧ Download and configure Semarchy xDM.
Install a JDK
- Download and install Java JDK which is needed for your version of xDM, an example is available from the Adoptium website.
- Run the Java setup application to install Java.
- In Programs and Features application in the control panel, check that Java was successfully installed.
Congratulations!
You have successfully installed Java. Next, you will install and configure xDM.
In this section, you will download and configure xDM for startup.
Download Semarchy xDM
- Access the "All Downloads" page on the Semarchy website.
- Download the xDM with Tomcat package for the most recent version of xDM. This package includes a Tomcat application server.
- Extract the xDM zip files in a suitable location (e.g., the Downloads or Documents folder in a Windows environment).
Prepare the configuration file
You will now create a configuration file that stores all the connection parameters to the xDM repository. The repository includes information like your license key, as well as your data model and the business rules and logic that you will apply to your organization's data.
- Create a file named
config.propertiesunder themdm-server\conffolder. - Copy and paste the content provided below depending on your database.
For PostgreSQL
install-on-premises/postgresql/config.properties
# Repository datasource
xdm.repository.driver=org.postgresql.Driver
xdm.repository.url=jdbc:postgresql://localhost:5432/postgres
xdm.repository.username=semarchy_repository
xdm.repository.password=semarchy_repository
# Repository read-only datasource credentials
xdm.repository.readonly.username=semarchy_repository_ro
xdm.repository.readonly.password=semarchy_repository_ro
For Oracle
install-on-premises/oracle/config.properties
# Repository datasource
xdm.repository.driver=oracle.jdbc.OracleDriver
xdm.repository.url=jdbc:oracle:thin:@localhost:1521:XE
xdm.repository.username=SEMARCHY_REPOSITORY
xdm.repository.password=SEMARCHY_REPOSITORY
# Repository read-only datasource credentials
xdm.repository.readonly.username=SEMARCHY_REPOSITORY_RO
xdm.repository.readonly.password=SEMARCHY_REPOSITORY_RO
# Set the current schema of the read-only user to the repository
xdm.repository.readonly.connectioninitsql=ALTER SESSION SET CURRENT_SCHEMA = SEMARCHY_REPOSITORY
For SQL Server
install-on-premises/sqlserver/config.properties
# Repository datasource
xdm.repository.driver=com.microsoft.sqlserver.jdbc.SQLServerDriver
xdm.repository.url=jdbc:sqlserver://localhost:1433;databaseName=SEMARCHY_REPOSITORY
xdm.repository.username=semarchy_repository
xdm.repository.password=13BC5881-632b-12ef-cd34-1256bd302470
# Repository read-only datasource credentials
xdm.repository.readonly.username=semarchy_repository_ro
xdm.repository.readonly.password=13BC5881-632b-12ef-cd34-1256bd302471
Create the startup configuration (Windows)
Now that your configuration file is ready, you will modify the setenv.bat file to reference this configuration file and set all the environment variables that are required for startup. Edit the setenv.bat in the mdm-server\bin folder.
- To reference the configuration file you created earlier, add the following line to the
setenv.batfile:
set "CATALINA_OPTS=%CATALINA_OPTS% -Dxdm.config.file=..\conf\config.properties"
- Copy the path to your Java installation (e.g.,
C:\Program Files\Java\jdk-11.0.5) - Add the following line to define the
JAVA_HOMEvariable and set it to the path of your Java installation.
set "JAVA_HOME=C:\Program Files\Java\jdk-11.0.5"
- Set the setup token: add the following line to your
setenv.batfile:
set SEMARCHY_SETUP_TOKEN=mySetupToken
- Double check and save the content of your
setenv.batfile, which should now look as follows:
quick-install/install-on-premises/setenv.bat
set "CATALINA_OPTS=%CATALINA_OPTS% -Xmx512M -server -XX:+UseG1GC"
set "CATALINA_OPTS=%CATALINA_OPTS% -Dorg.apache.cxf.Logger=org.apache.cxf.common.logging.Slf4jLogger -Dorg.ops4j.pax.logging.DefaultServiceLog.level=WARN -Duser.language=en -Duser.country=US -Djava.awt.headless=true"

rem Configuration file
set "CATALINA_OPTS=%CATALINA_OPTS% -Dxdm.config.file=..\conf\config.properties"

rem JAVA_HOME
set "JAVA_HOME=C:\Program Files\Java\jdk-11.0.5"

rem Setup Token (initial setup only)
set SEMARCHY_SETUP_TOKEN=mySetupToken
Create the startup configuration (macOS or Linux)
Now that your configuration file is ready, you will modify the setenv.sh file to reference this configuration file and set all the environment variables that are required for startup. Edit the setenv.sh in the mdm-server/bin folder.
- To reference the configuration file, add the following line to your
setenv.shfile:
CATALINA_OPTS="$CATALINA_OPTS -Dxdm.config.file=../conf/config.properties"
- Copy the path to your Java installation (e.g.,
/Library/Java/JavaVirtualMachines/jdk-11.0.5) - Add the following line to define the
JAVA_HOMEvariable and set it to the path of your Java installation.
export JAVA_HOME=/Library/Java/JavaVirtualMachines/jdk-11.0.5
- Set the setup token: add the following line to your
setenv.shfile:
export SEMARCHY_SETUP_TOKEN=mySetupToken
- Double check and save the content of your
setenv.shfile, which should now look as follows:
quick-install/install-on-premises/setenv.sh
CATALINA_OPTS="$CATALINA_OPTS -Dxdm.show.stacktrace.jsp.error=true -server -XX:+UseG1GC -Dorg.apache.cxf.Logger=org.apache.cxf.common.logging.Slf4jLogger -Duser.language=en -Duser.country=US -Djava.awt.headless=true"

#Configuration file
CATALINA_OPTS="$CATALINA_OPTS -Dxdm.config.file=../conf/config.properties"

#JAVA_HOME
export JAVA_HOME=/Library/Java/JavaVirtualMachines/jdk-11.0.11.jdk/Contents/Home

#Setup Token (initial setup only)
export SEMARCHY_SETUP_TOKEN=mySetupToken
Run xDM
On Windows
- Go to the
mdm-server\binfolder. - Open the
startup.batfile. You will see a Terminal window pop up. You should have started Tomcat successfully.
On macOS or Linux
- Go to the
mdm-server/binfolder. - Execute the
startup.shfile:./startup.sh
You should have started Tomcat successfully.
Congratulations!
You successfully installed Java and xDM.
To summarize:
- You have downloaded and installed xDM.
- You have created the startup configuration with the
JAVA_HOMEenvironment variable, setup token, and connection parameters for the Semarchy xDM repository. - You have started the Tomcat application server.
Next, you will navigate to http://localhost:8088/semarchy and request a license key.
In this section, you will install your xDM instance.
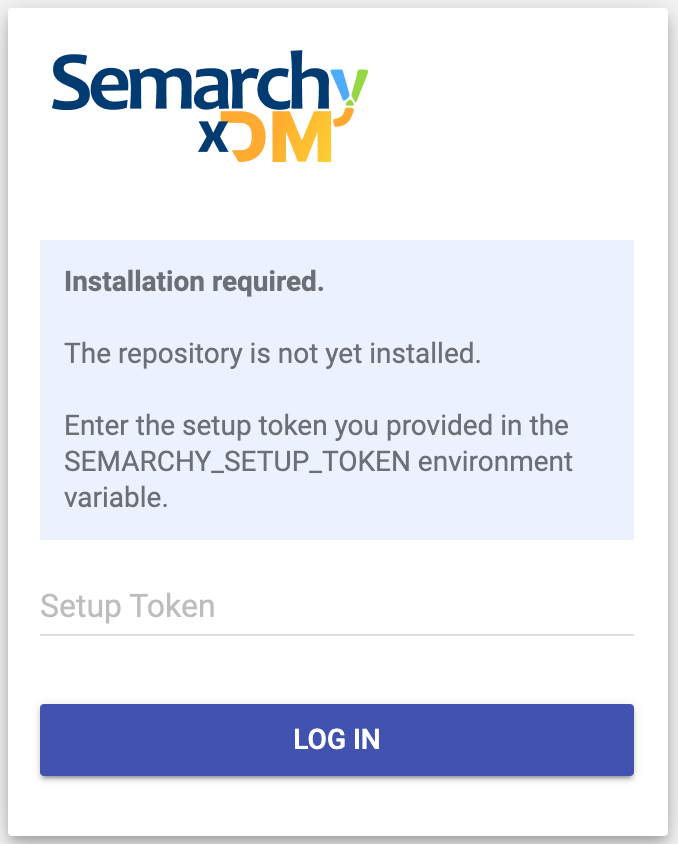
- In your browser, connect to http://localhost:8088/semarchy.
- Enter the setup token you have set in your
setenvfile and click Log in.
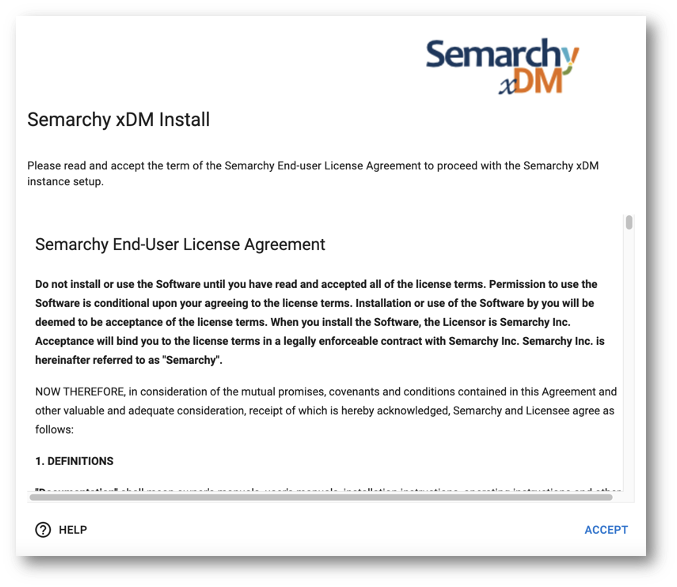
- Review the end-user license agreement (EULA) and select Accept.
- Configure the repository and the administrator account as follows:
- Keep the default Repository Name.
- Ensure the Repository Type is set to Design.
- Keep the Administrator Username set to semadmin.
- Enter and confirm the password for the administrator (use semadmin or another value).
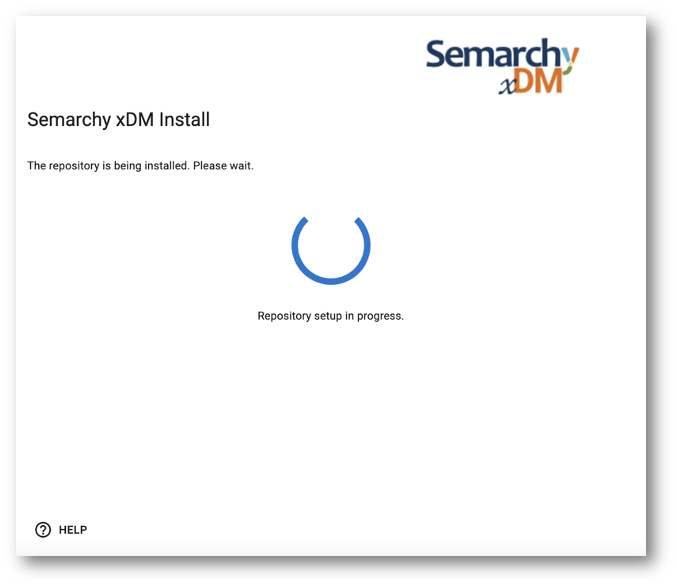
- Click Install.

- Wait until the repository is installed.
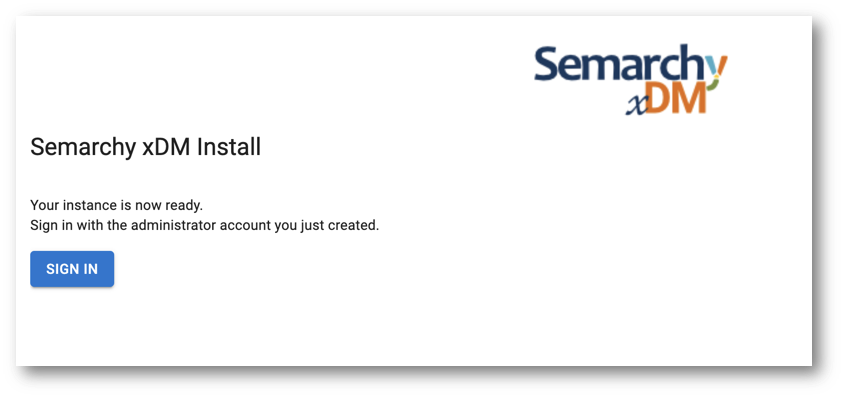
- When the instance is ready, click Sign in.
- Enter the semadmin credentials you defined during the installation, and then click Log in.
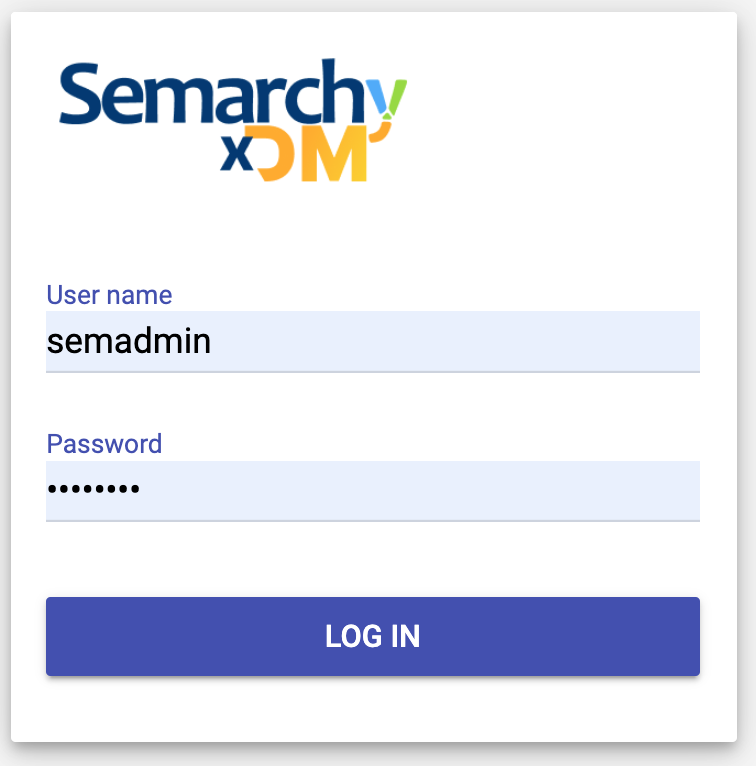
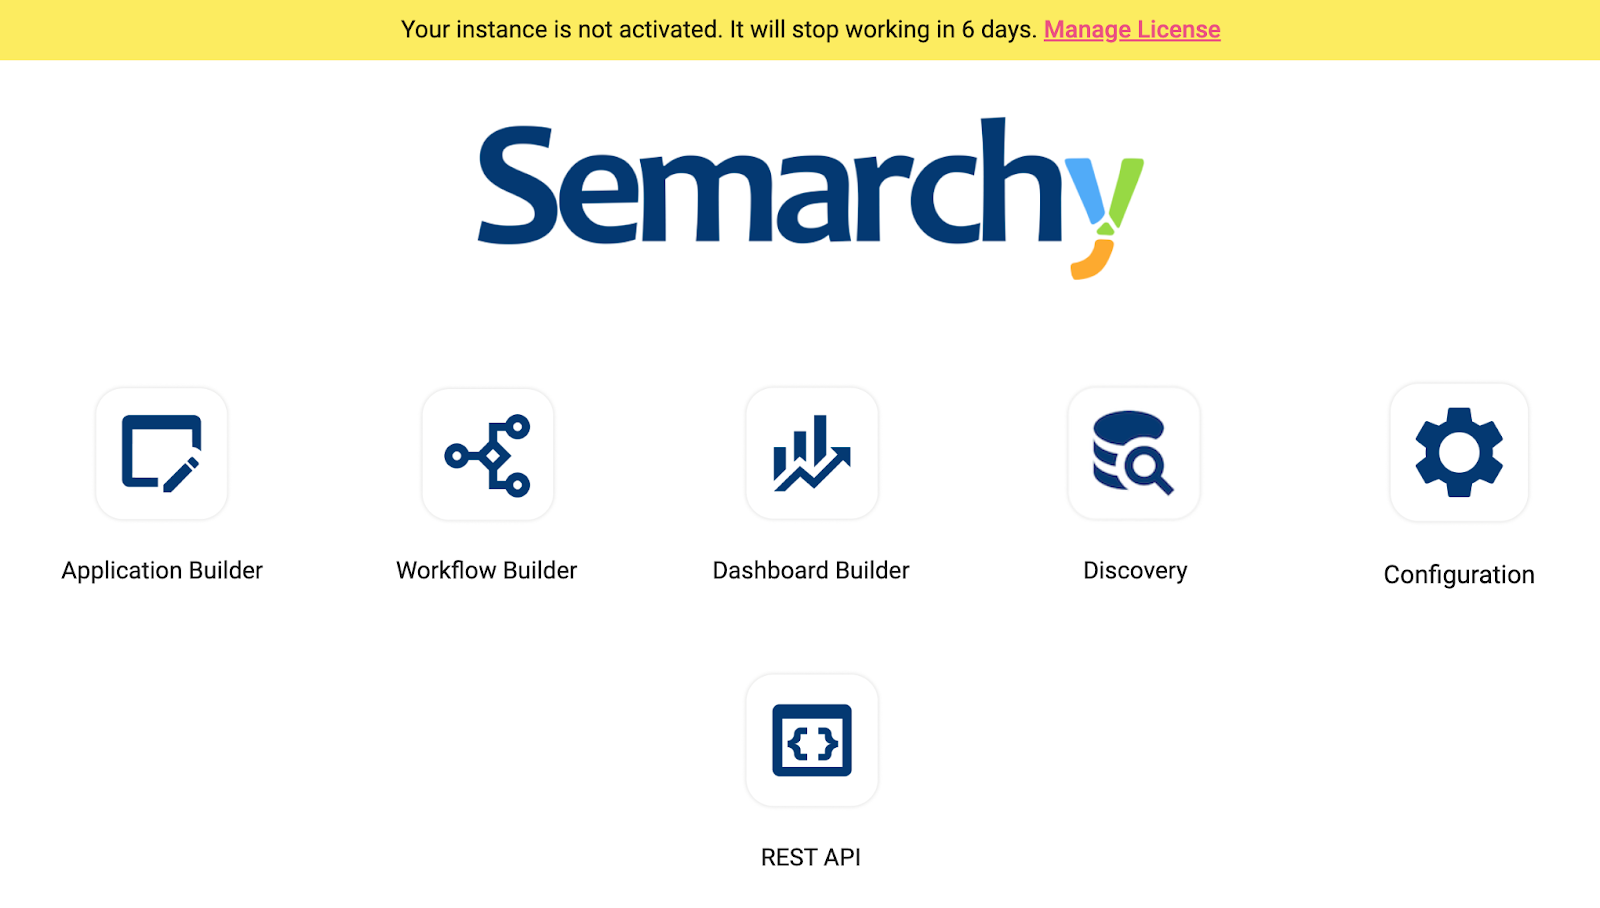
- If you see this page, then you have successfully installed the repository.
Congratulations!
Semarchy xDM is now up and running. For more details about system requirements and installing xDM, see our Semarchy xDM documentation.
Next, you will finalize the installation by granting access rights for some of the tables of the Semarchy repository you have just created.
Now that the repository has been initialized, you must grant access to some of the tables that have just been created. The repository read-only user needs SELECT privileges on the profiling tables to render the xDM Discovery profiles.
- Connect to the database with the same client and credentials as previously.
- Depending on your database, run the following script to grant to the repository read-only user select privileges on the profiling tables:
For PostgreSQL
common/postgresql/post-installation-grant-access.sql
/*******************************************************************************
** PostgreSQL database post-installation scripts
** Semarchy xDM Tutorials
** Copy and paste the SQL DDL scripts and use them in the tutorial.
** Copyright (c) 2021 Semarchy
*******************************************************************************/

/************************************************
Grant select privileges on the profiling tables
************************************************/
GRANT USAGE ON SCHEMA semarchy_repository TO semarchy_repository_ro;
GRANT SELECT ON TABLE
    semarchy_repository.PRF_PROFILING,
    semarchy_repository.PRF_TABLE,
    semarchy_repository.PRF_COLUMN,
    semarchy_repository.PRF_DIST_VALS,
    semarchy_repository.PRF_DIST_PATTERNS
TO semarchy_repository_ro;
For Oracle
common/oracle/post-installation-grant-access.sql
/*******************************************************************************
** Oracle database post-installation scripts
** Semarchy xDM Tutorials
** Copy and paste the SQL DDL scripts and use them in the tutorial.
** Copyright (c) 2021 Semarchy
*******************************************************************************/

/************************************************
Grant select privileges on the profiling tables
************************************************/
GRANT SELECT ON SEMARCHY_REPOSITORY.PRF_PROFILING TO SEMARCHY_REPOSITORY_RO;
GRANT SELECT ON SEMARCHY_REPOSITORY.PRF_TABLE TO SEMARCHY_REPOSITORY_RO;
GRANT SELECT ON SEMARCHY_REPOSITORY.PRF_COLUMN TO SEMARCHY_REPOSITORY_RO;
GRANT SELECT ON SEMARCHY_REPOSITORY.PRF_DIST_VALS TO SEMARCHY_REPOSITORY_RO;
GRANT SELECT ON SEMARCHY_REPOSITORY.PRF_DIST_PATTERNS TO SEMARCHY_REPOSITORY_RO;
For SQL Server
common/sqlserver/post-installation-grant-access.sql
/*******************************************************************************
** SQL Server database post-installation scripts
** Semarchy xDM Tutorials
** Copy and paste the SQL DDL scripts and use them in the tutorial.
** Copyright (c) 2021 Semarchy
*******************************************************************************/

/************************************************
Grant select privileges on the profiling tables
************************************************/
USE SEMARCHY_REPOSITORY
GO
GRANT SELECT ON PRF_PROFILING TO SEMARCHY_REPOSITORY_RO;
GRANT SELECT ON PRF_TABLE TO SEMARCHY_REPOSITORY_RO;
GRANT SELECT ON PRF_COLUMN TO SEMARCHY_REPOSITORY_RO;
GRANT SELECT ON PRF_DIST_VALS TO SEMARCHY_REPOSITORY_RO;
GRANT SELECT ON PRF_DIST_PATTERNS TO SEMARCHY_REPOSITORY_RO;
Congratulations!
xDM Discovery is now ready to be used on your xDM instance.
Well done! You have learned how to install xDM on your local computer.
To summarize:
- You have installed a database and created the schemas for storing xDM data.
- You have installed Java.
- You have defined the startup configuration and started Tomcat.
- You have accepted the license agreement and installed your xDM instance.
- You have executed the post-installation scripts.
Now that you have set up xDM, you can request a license key.
Next steps
xDM is designed to handle various data types, including customer data, location data, reference data, organizational data, supplier data, and other domains.
To learn how to harness the capabilities of xDM, you could now pursue two distinct paths:
- Learning how to use xDM applications as a business user by following the Demo Applications track.
- Understanding how to design applications as a developer through the Data Authoring and Data Consolidation tracks.
Go back to the main menu to find these resources.
Thank you for completing this tutorial.