Today, organizations invest significant time in processes related to customer data, such as standardization, programmatic and manual cleansing, matching, deduplication, and organization-wide tracking. This tutorial will assist data stewards in using xDM to consolidate and standardize customer data. |
|

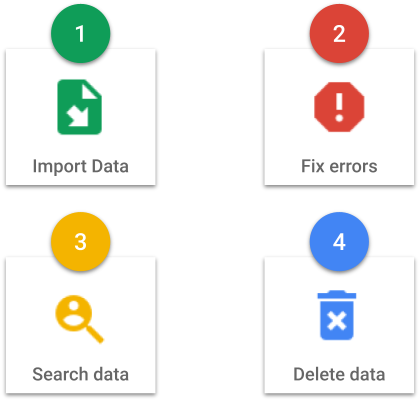
Learning outcomes
- Browsing data.
- Browsing the error queue.
- Deleting data as per customer request.
- Searching and filtering data.
- Confirming matches and deduplications performed by xDM.
- Correcting errors in the data.
- Reviewing suggested matches identified by xDM.
- Exploring audit trails and data history.
Background
If you have not already done so, click the button below to download resources such as images, helper files, and datasets used in this tutorial.
The sample data provided mirrors that of an enterprise specializing in high-end bicycles and cycling accessories, using customer data as an illustration.
By the end of this tutorial, you will gain insight into xDM's user-friendly interface, data management functionalities, and how its intelligent design streamlines everyday tasks, saving you time and effort.
Learning track
Before following this tutorial, you must set up Semarchy xDM. If you have not yet, follow one of the "Quick Install" tutorials available in the Tutorials menu.
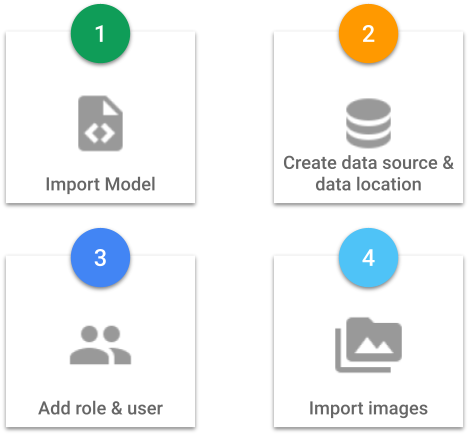
This section will provide step-by-step instructions to help you efficiently set up and configure your environment. By the end of this section, you will possess the necessary skills to navigate the Application Builder with confidence, import data models, and ensure your environment is properly configured to facilitate efficient execution of various data management tasks.
Learning outcomes
- Importing the demo model.
- Creating a data source.
- Creating a data location.
- Adding a role.
- Adding a user.
- Adding an image library.
Import model
Before you begin exploring data, you first need to provide xDM with a data model. We have provided you with a demo data model that is ready to be imported.
The model is preconfigured and accessible in the tutorial resources within the demo-applications/customer-b2c/model directory. Alternatively, you can find it on GitHub (select the appropriate version of the model and download the XML file for later import).
Importing a data model is typically handled by a member of your IT team. Therefore, you will log in as SemAdmin, as this user has full administrative privileges in the xDM platform, including the ability to import the data model.
In this section, you will connect to xDM and configure the application and data location within the Application Builder.
- Open your web browser and connect to the URL where xDM is installed.
- Log in using the SemAdmin user credentials.
- If you have completed the Install Semarchy xDM on AWS or Install Semarchy xDM on Azure tutorial, you will be prompted to change your password. Enter the default password for datasteward in Current password, provide and confirm the New password, and then click Change.

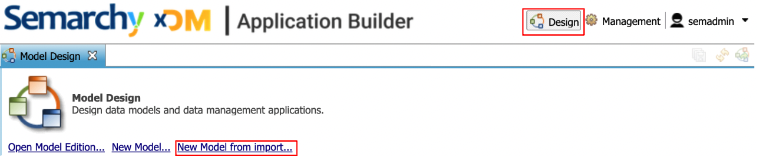
- Open the Application Builder.
This is where you will develop and manage your xDM models and applications.
- In the Design tab, click on New Model from import.
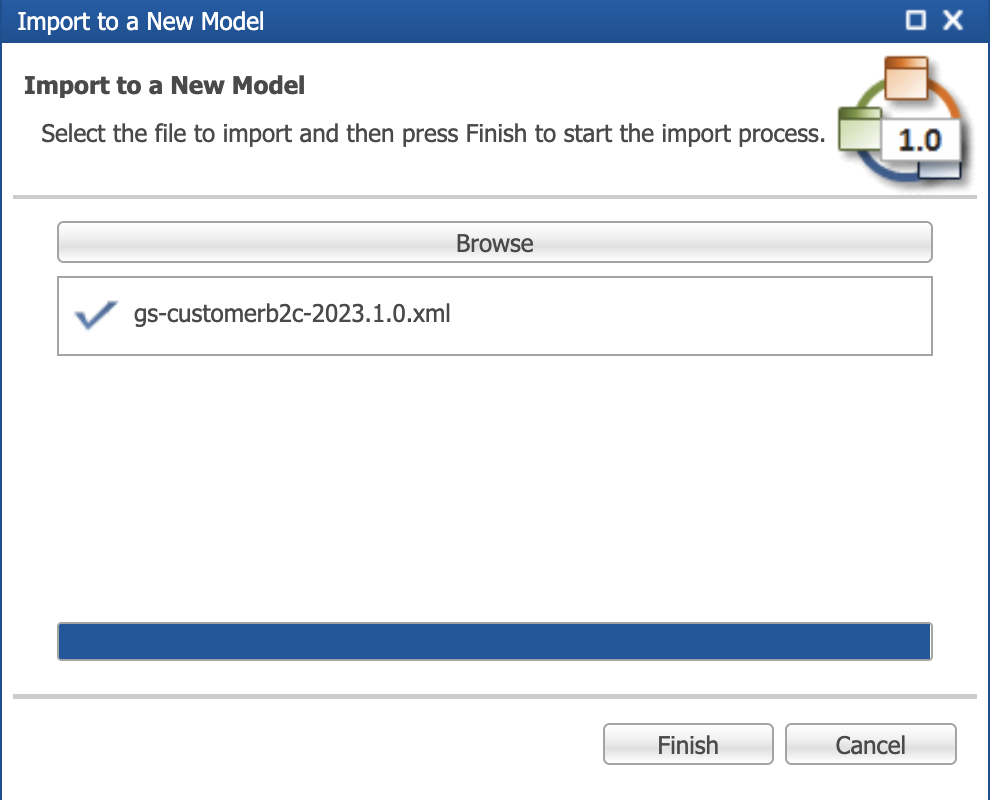
- Import the model that corresponds to your xDM version. Follow the instructions in the pop-up to upload the model.
- Once the import process is complete, click Finish.
Your model should open.
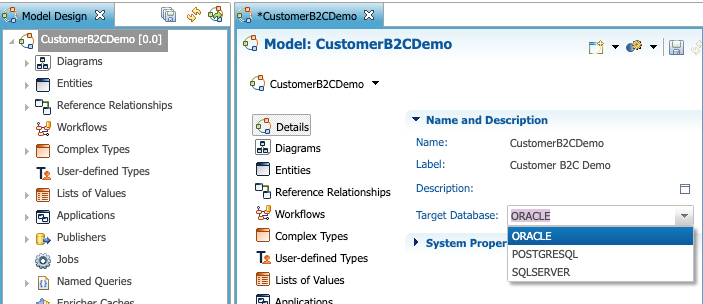
For Oracle and SQL Server users
The model is set to use PostgreSQL by default. If you are using Oracle or SQL Server, you need to modify the model to use a different target database.
To do so:
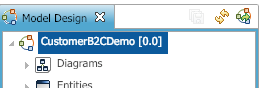
- Double-click the root level of the model at CustomerB2CDemo [0.0].
- Change the Target Database from PostgreSQL to your intended target database.
For SQL Server users
Because SQL Server does not support the regexp_replace function, you will need to update a NormalizeAddress SemQL enricher for this model to work on SQL Server.
If this is beyond your technical ability, reach out to our Semarchy Technical support team for help or ask the person who installed Semarchy xDM to assist you.
For the NormalizedStreet expression, replace the existing SemQL expression with the following:
2-setup-1-sqlserver-normalize-address-enricher.txt
REPLACE(
  REPLACE(
    REPLACE(
      REPLACE(
        REPLACE(
          REPLACE(
            REPLACE(
              UPPER(
                REPLACE(Address.Street,
                  SUBSTRING(Address.Street, PATINDEX('%[,\.\*]', Address.Street), 1), '')),
              'SUITE', 'STE'),
            'PARKWAY', 'PKWY'),
          'DRIVE', 'DR'), '
        STREET', 'ST'),
      'BOULEVARD', 'BLVD'),
    'AVENUE', 'AVE'),
  'ROAD', 'RD')
Now that your model has been imported, you will create a datasource and deploy the model in a data location.
Next, you will add a role for your application.
Add the DataSteward role
Data security is critical to any organization. xDM offers robust controls for managing access to data and platform functions. To restrict access within xDM, you will create the DataSteward role, which is specifically designated for importing data into the application.
To configure this role in xDM:
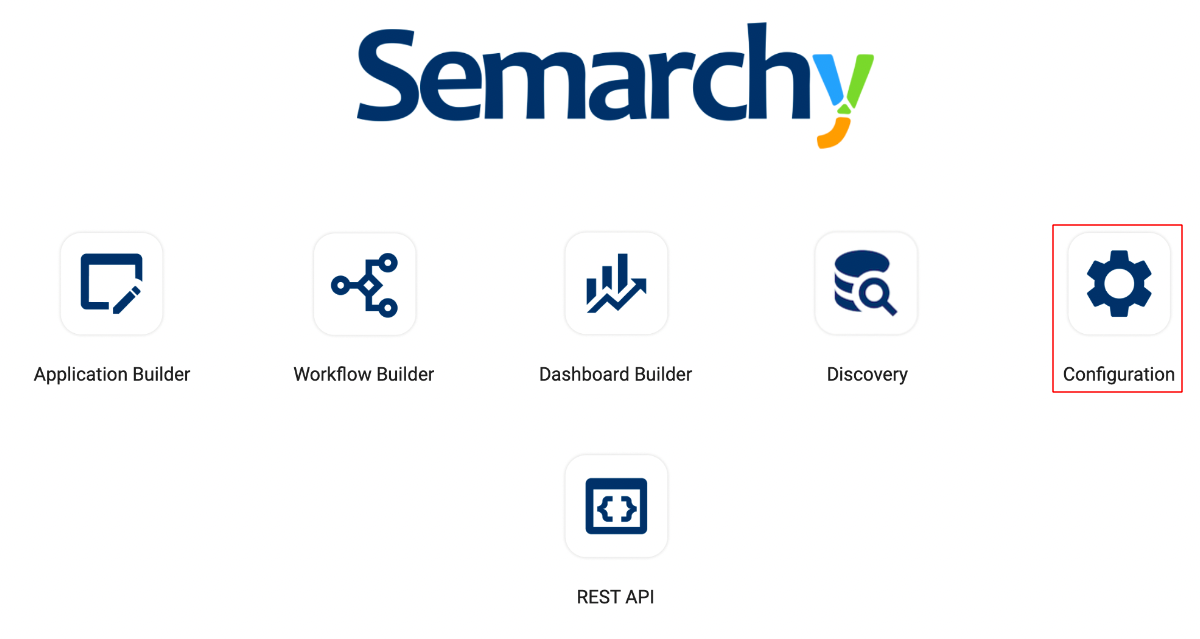
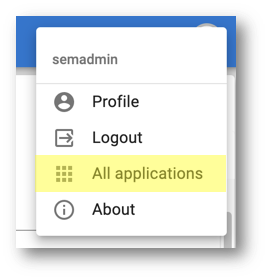
- In the upper-right corner of the Application Builder, click on the arrow in the xDM toolbar to expand the user menu.
- Select Welcome page.
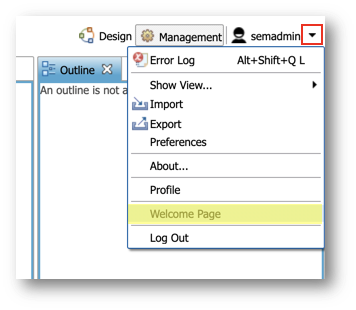
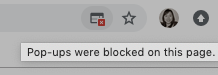
- A new tab will likely open to take you to the Welcome page. If you do not see the new tab open, adjust your browser settings to allow pop-ups.
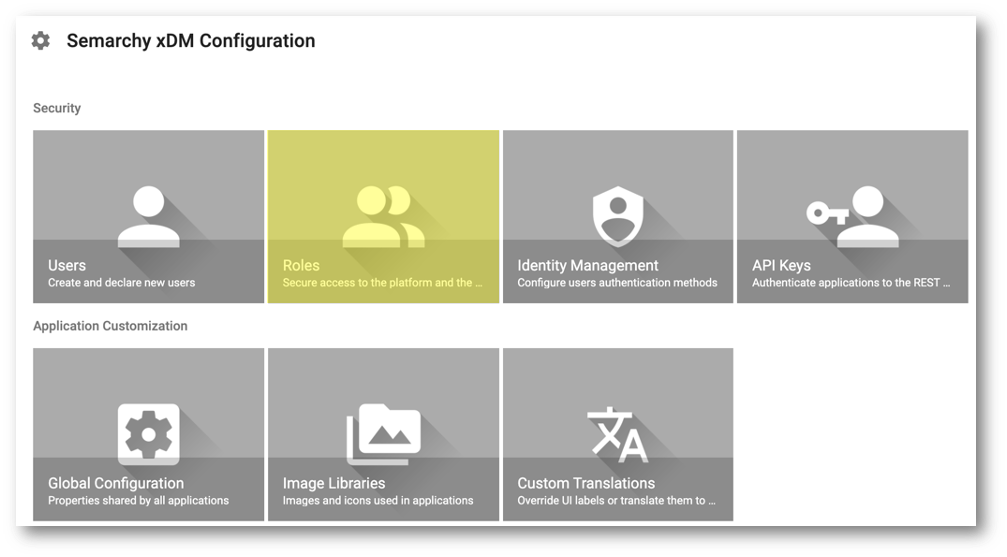
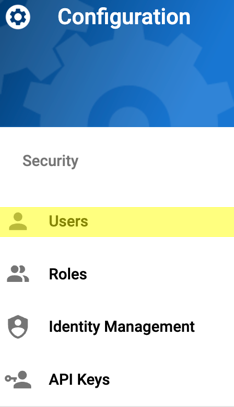
- Click on Configuration on the Welcome page.
- Click Roles.
- Click the Add Role button.
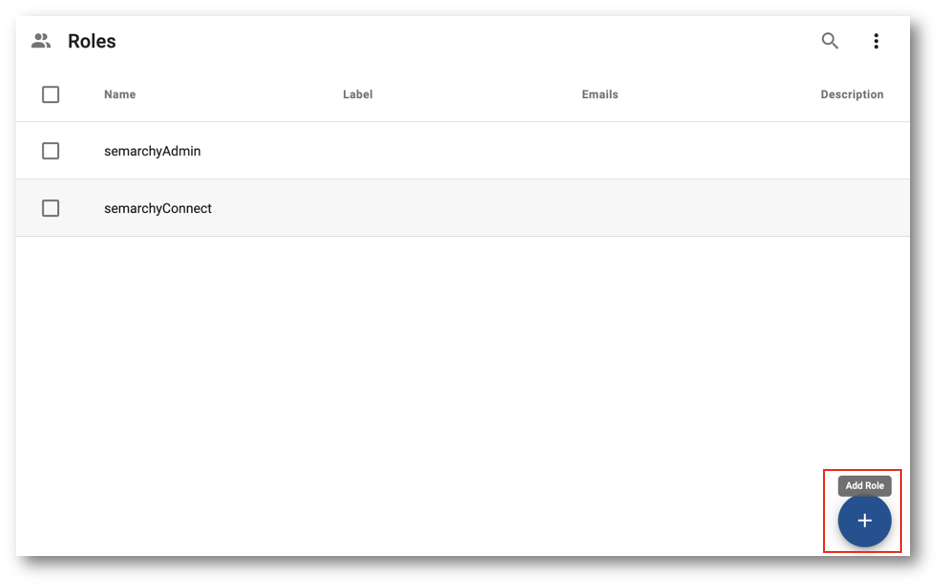
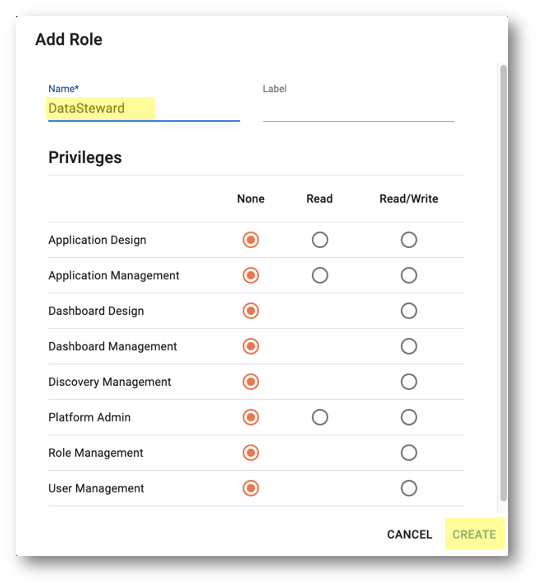
- The Add Role dialog opens. Set the Name to DataSteward, leave all other fields unmodified, and then click Create.
Next, you will create a new user.
Add the Data Steward user
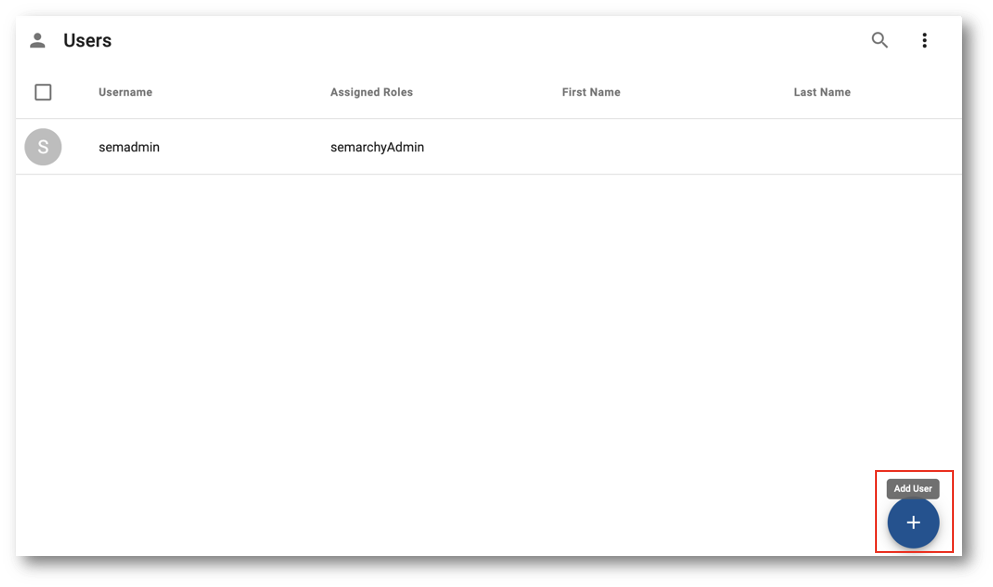
You will now create one user having the DataSteward role you have just created.
- Select Users in the navigation drawer of the Configuration module.
- Click the Add User button.
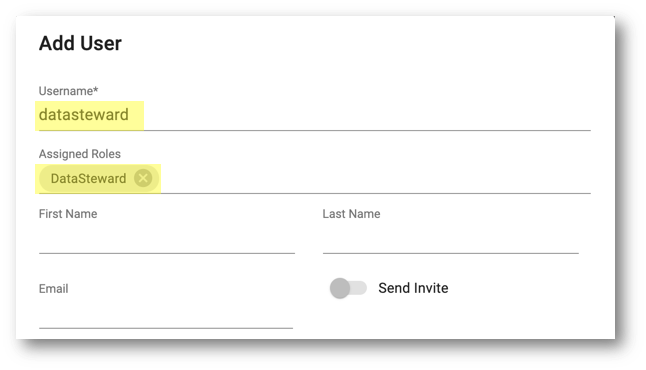
- Enter the following values:
- Username:
datasteward - Assigned Roles: select DataSteward
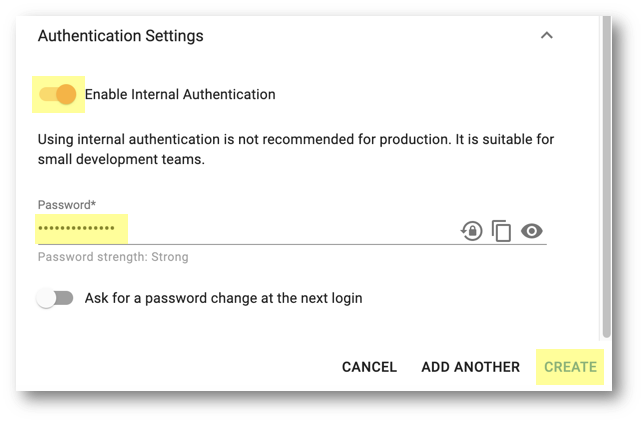
- Click the chevron next to Authentication Settings to unfold the section.

- Select Enable Internal Authentication, set the Password to
datasteward123or any password of your choice, and then click Create.
Next, you will create a datasource that you will use to deploy your model.
Create the datasource
Before creating a data location and deploying your model, you must create a platform datasource to connect to the SEMARCHY_CUSTOMER_B2C_MDM database schema that was created in the Quick Install tutorials.
- On the Welcome page, select Configuration.
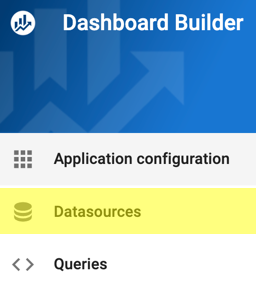
- Scroll down to the Connections section and click Datasources.
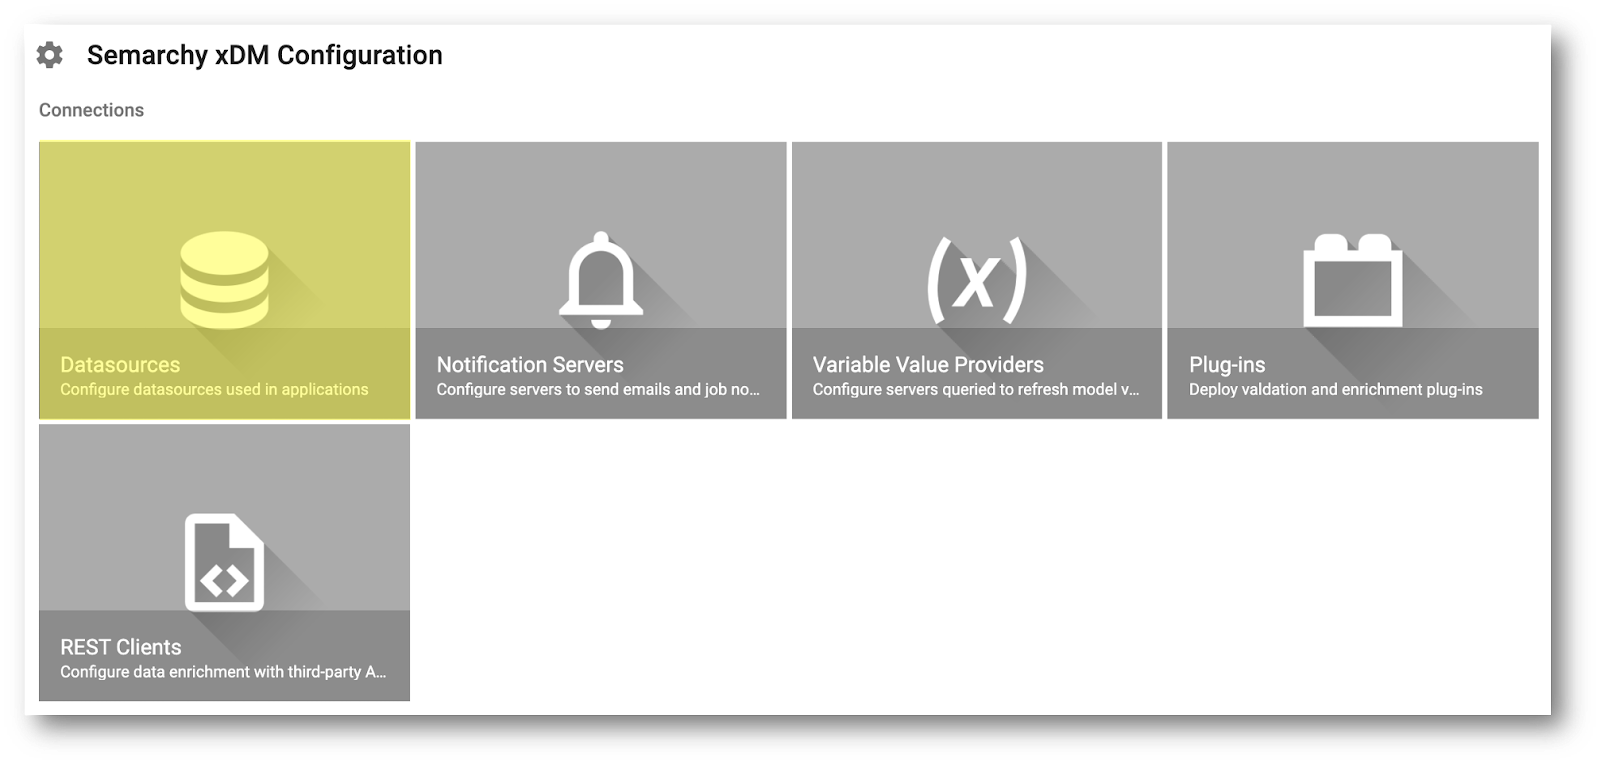
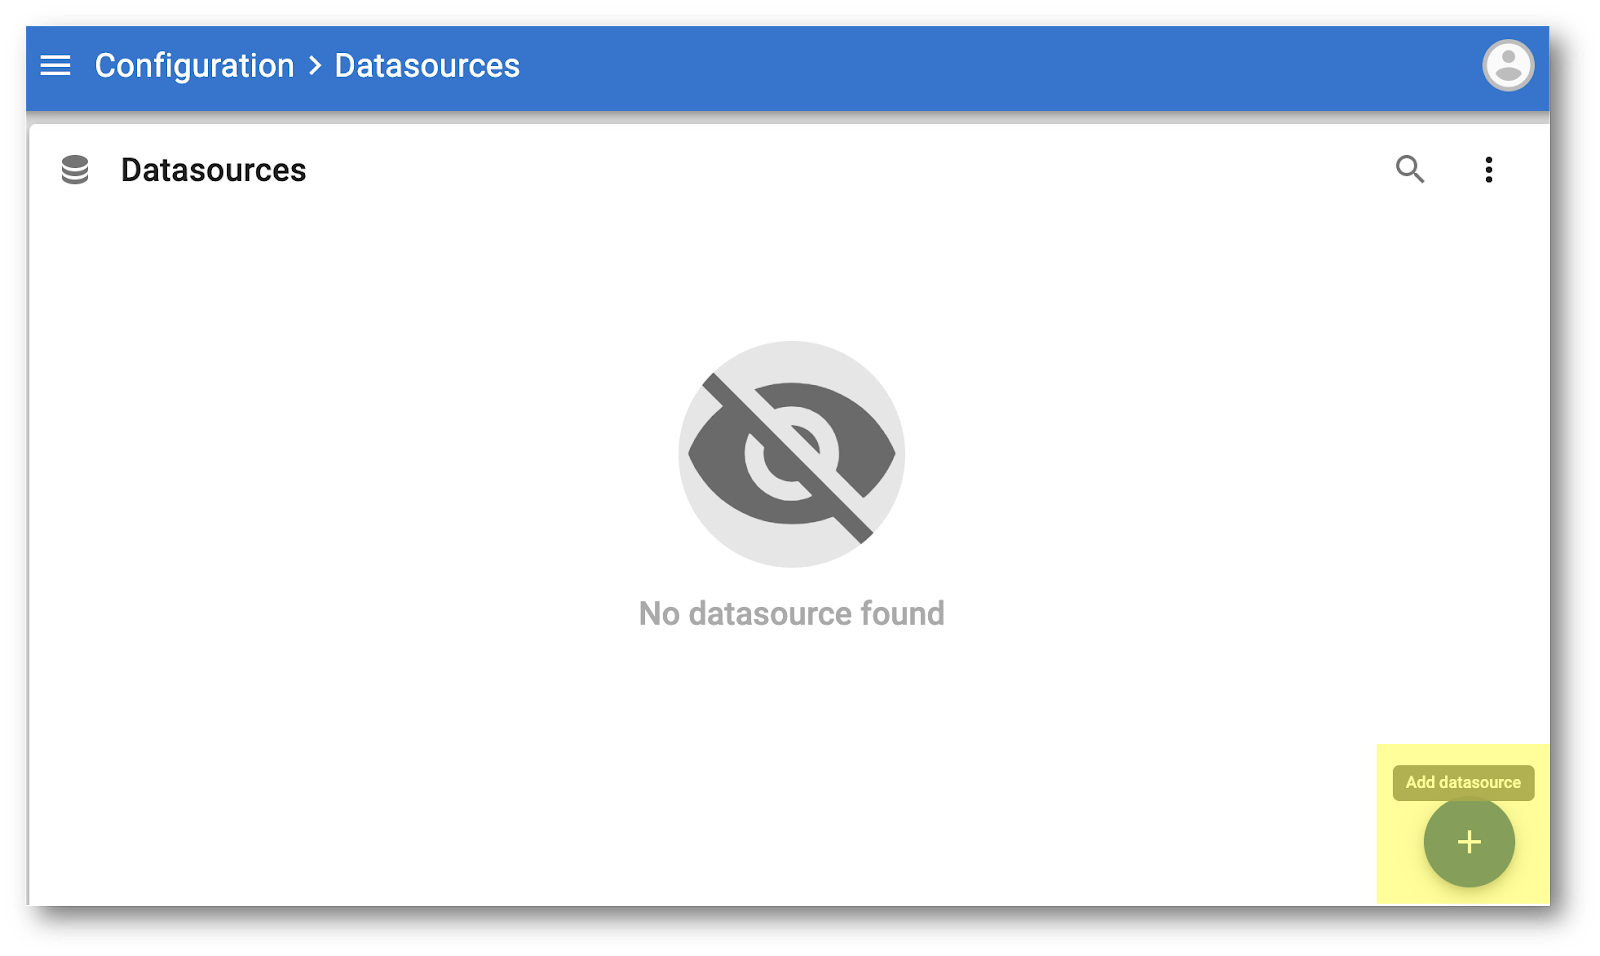
- Click the Add datasource floating action button.
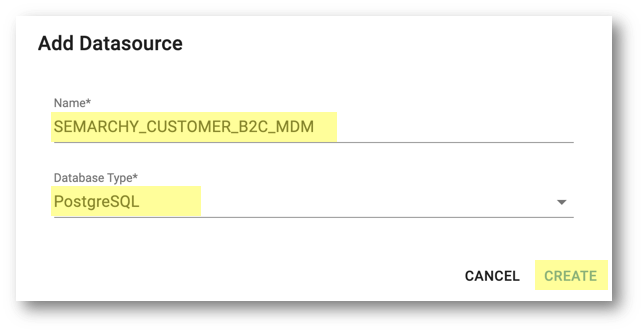
- Enter the following values and then click Create:
- Name:
SEMARCHY_CUSTOMER_B2C_MDM - Database Type: select the value that corresponds to your database.
- Enter the following connection parameters in the editor:
- URL: this field is populated with a default value. Check that the default host, port, and database name in the connection URL are correct.
- Driver: keep the default value unless you are using a database that requires a specific driver.
- Username:
semarchy_customer_b2c_mdm

- Enter the password of the database schema:
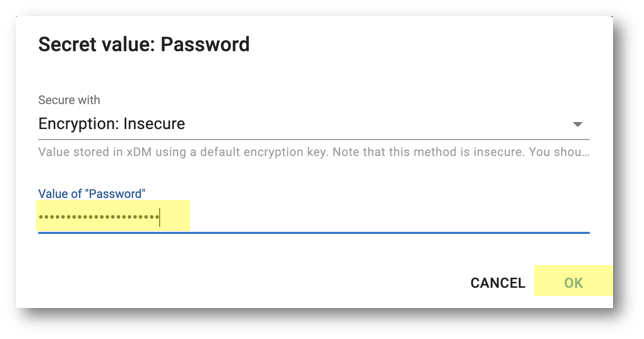
- Click the Edit Secret button next to the Password field.
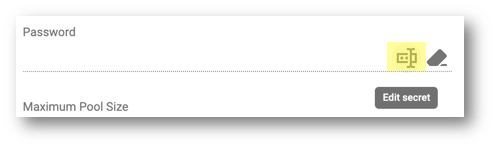
- Keep the current value of the Secure with field (or select another encryption method if you have configured any), enter
semarchy_customer_b2c_mdmin the Value of "Password" field, and then click OK.
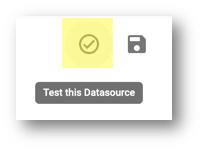
- Click Test this Datasource in the button bar above the editor.
- The "Datasource test successful" message should be displayed. Click OK.
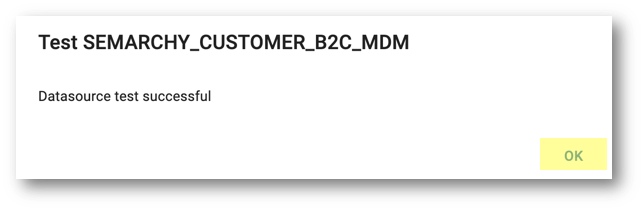
If another message is displayed, identify the error and adjust your connection parameters accordingly.
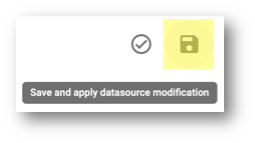
- Click the Save and apply datasource modification button on the datasource editor.
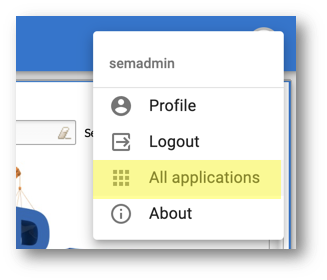
- Open the user menu on the top-right corner and select All applications to go back to the Welcome page.
Create a data location
Now that you have imported the data model and created a datasource, it is time to deploy the model.
In this section, you will create the CustomerB2CDemo data location and deploy your model into this data location. Deploying your model builds your application.
- Click the Management tab.

- Right-click Data Location and select New Data Location.
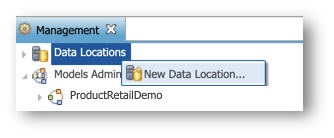
- Create a new data location and name it
CustomerB2CDemo. - Follow the pop-up prompts and enter the following information:
- Name:
CustomerB2CDemo - Data Source Name: SEMARCHY_CUSTOMER_B2C_MDM
- Deployed Model Edition: CustomerB2CDemo [0.0] [Model Edition]
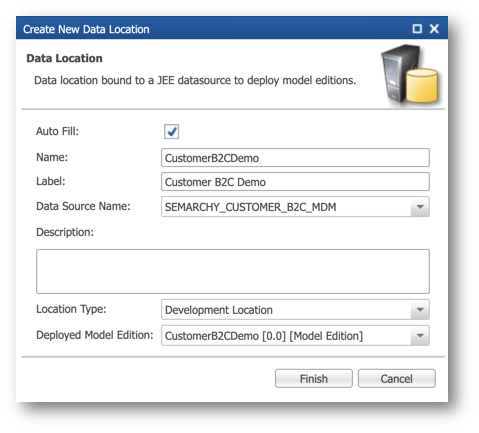
- Click Finish and wait until the database tables and the application are deployed.
Next, you will import images that will be used in the application.
Import images
Images associated with metadata concepts like "Nickname" and "Customer" are commonly stored within an image library. Conversely, images corresponding to user-definable data are typically stored externally or incorporated into the application during data authoring.
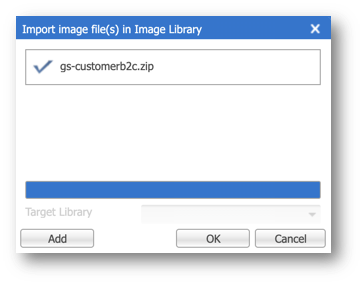
You are now going to upload the gs-customerb2c.zip file to the xDM repository. Find the images library in the demo-applications/customer-b2c/image-library folder.
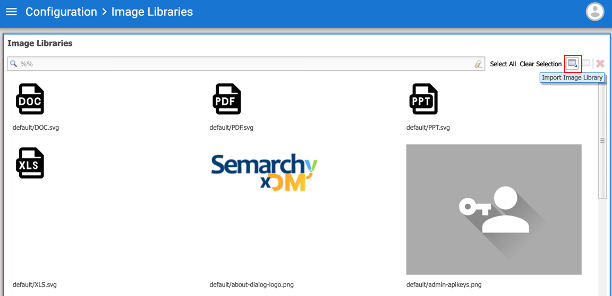
- Select Image Libraries in the navigation drawer of the Configuration module.
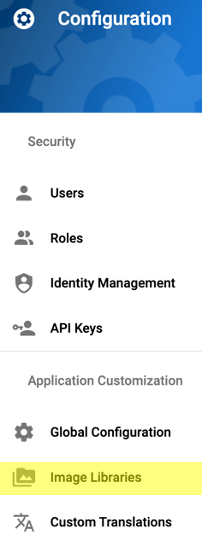
- Click the button Import Image Library in the upper-right corner.
- Select the
gs-customerb2c.zipfile that comes in the folderimage-libraryfrom your resource files, and then click OK.
- If you see new images added such as
gs-customerb2c/Communications.jpgandgs-customerb2c/CommunicationsErrors.jpg, then you have successfully imported the metadata images from thegs-customerb2c.zipfile.
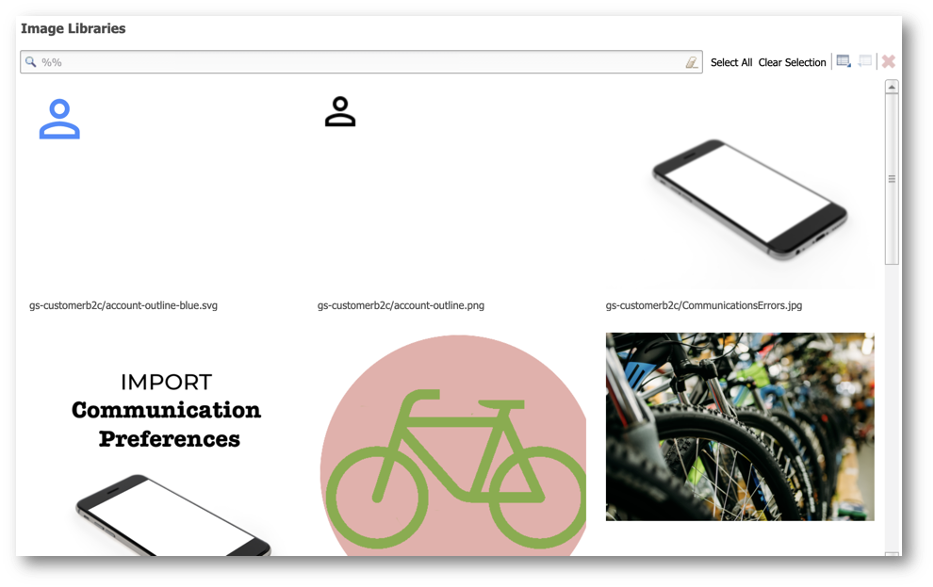
The images are now loaded into xDM.
Import dashboards
Dashboards are useful to any organization for visualizing their data. xDM offers built-in dashboards for profiling data during the data discovery phase. Moreover, xDM enables creating custom dashboards tailored to meet specific organizational needs. For further insights into dashboards and how to write queries and configure charts to render visualizations, see the Semarchy xDM documentation.
You are now going to import the Customer Metrics dashboard into xDM.
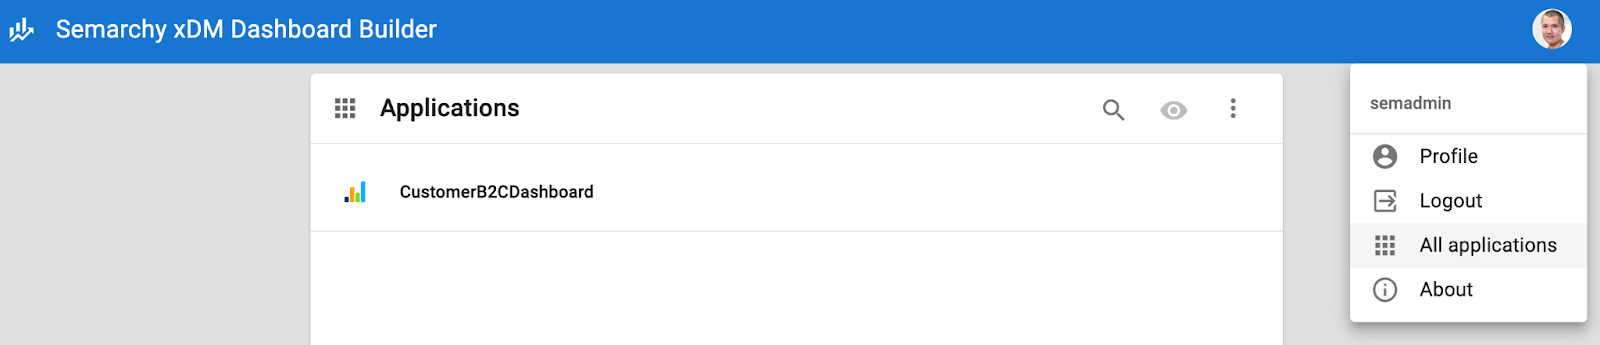
- In the user menu, select All applications.
- Click on Dashboard Builder on the Welcome page.
- Locate the + icon in the lower-right corner of the Dashboard Builder.
- Hover your mouse over the + icon until the Import application icon pops up.
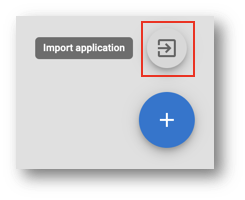
- Click the Import dashboard button.
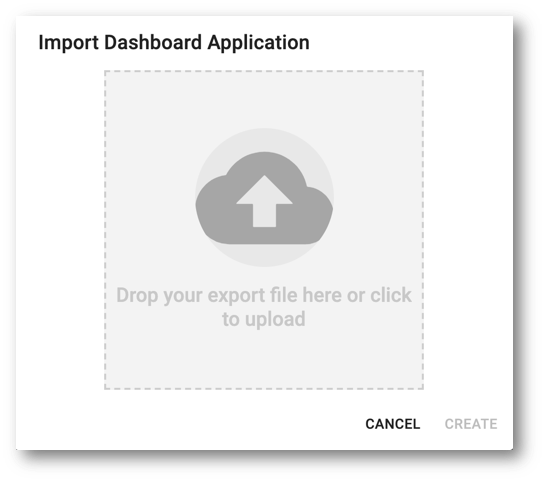
- Follow the instructions on the screen to import the
gs-customerb2c-dashboard-03-2023.1.0.zipfile.
This file can be found in thexdm-tutorials/demo-applications/customer-b2c/dashboardsfolder. - Click Create to finish importing the
gs-customerb2c-dashboard-2023.x.zipfile.
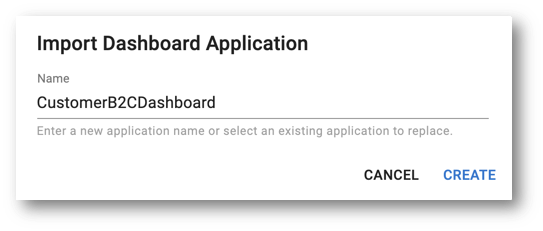
- If you see CustomerB2CDashboard, you have successfully imported the dashboard. You will check whether the dashboard works in the next section after importing data.

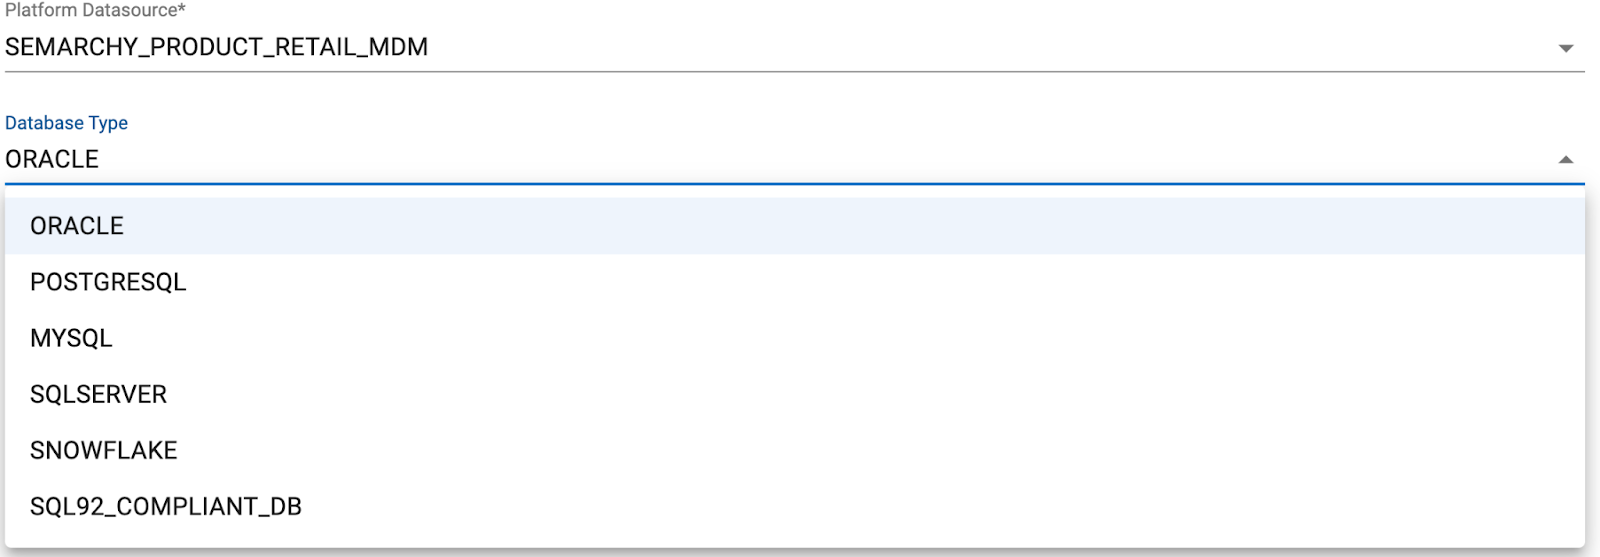
For Oracle and SQL Server users
The dashboard is set to use PostgreSQL connections by default. If you are using Oracle or SQL Server, you need to modify the datasource to use a different connection.
- Click on CustomerB2CDashboard.
- Click on Datasources.
- Click on each data source. If you modified the JNDI resource name in
semarchy.xmlfrom the default tutorial settings, make sure to reflect those changes and update the datasource with the correct Platform Datasource name. Also, verify and adjust the Database Type as necessary.
Congratulations!
You have successfully set up your application.
To summarize:
- You have imported the CustomerB2CDemo sample data model (version [0.0]).
- You have created a datasource.
- You have created a new CustomerB2CDemo data location and deployed the model into this data location.
- You have created a new DataSteward role and assigned this role to a newly created Data Steward user.
- You have imported images corresponding to metadata in the model.
- You have imported the CustomerB2CDashboard file to display the Customer Metrics dashboard.
You are now ready to navigate to the application and start importing data. Access the application to verify that you have properly completed all the steps outlined in ② Set up the application.
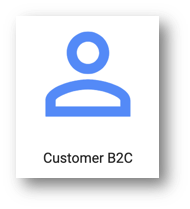
- Click on All Applications from the profile button in the upper-right corner.
- On the Welcome page, you should see an application called Customer B2C.
- Click the Customer B2C icon to enter the Customer B2C application.
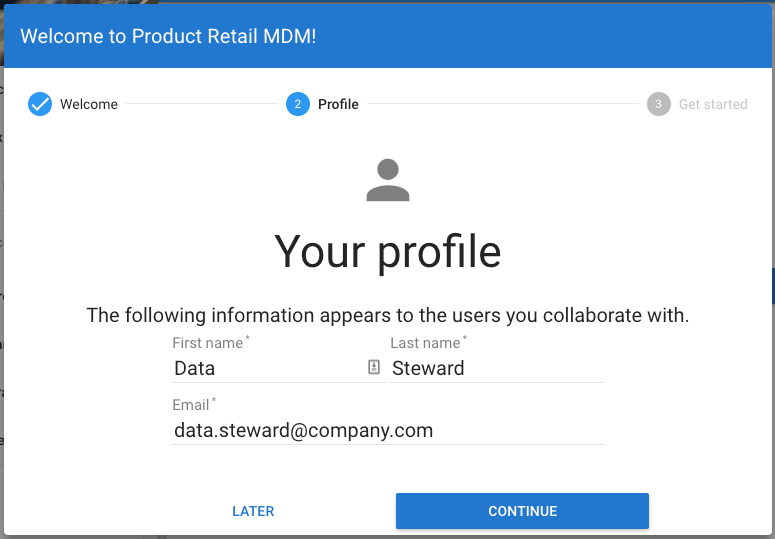
- If you see the Welcome pop-up in the Customer B2C application, you have successfully completed this part of the tutorial.
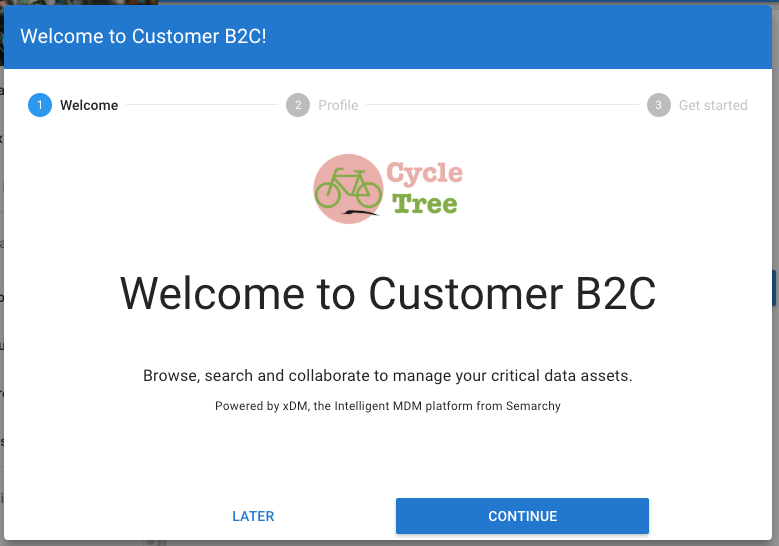
- Click Continue in the wizard.
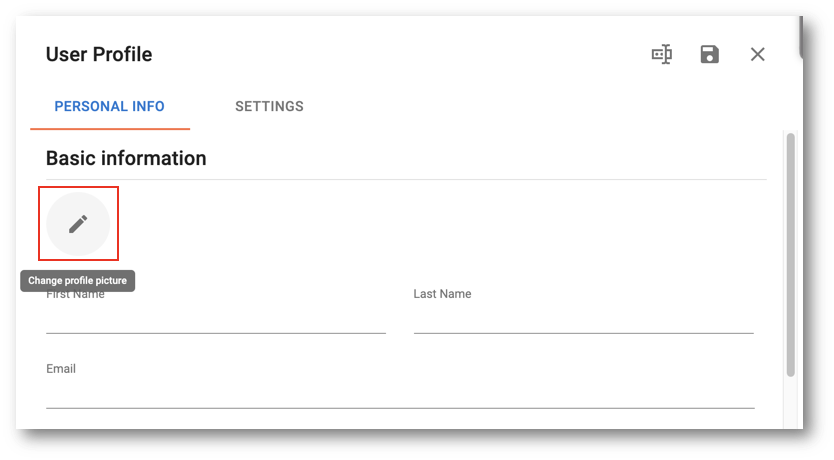
You will now customize your user profile.
- Set up your profile with your name and email address.
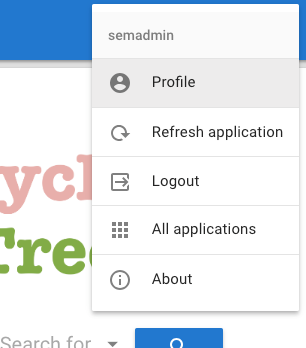
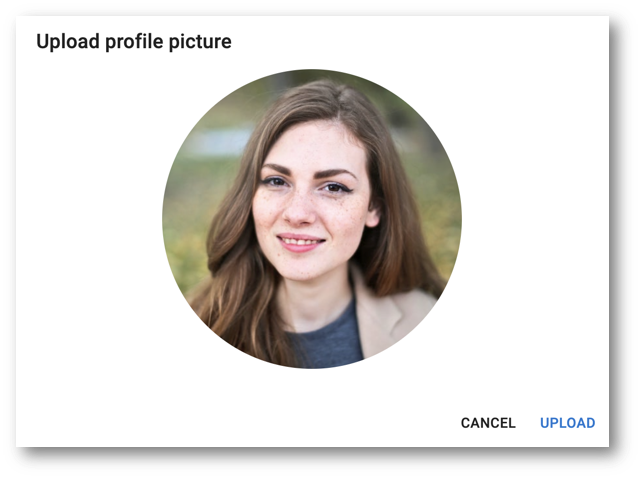
Other basic information has already been provided during the login process. - To upload your profile picture, open the user menu in the upper-right corner.
- Click on your profile picture.
- Click on Profile.
- Click on the placeholder image to change your profile picture.
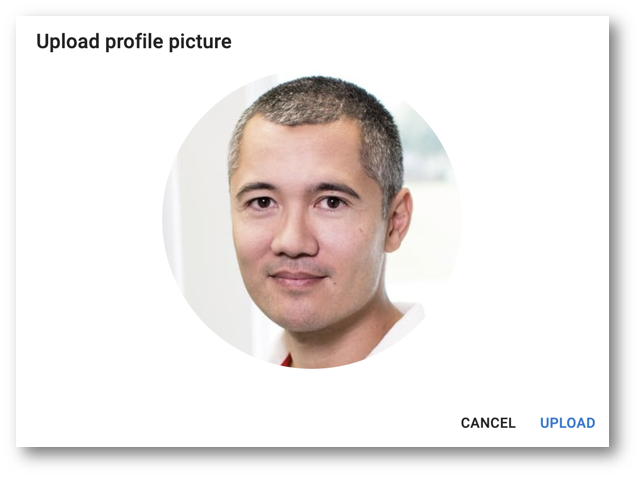
- Select the profile picture for your SemAdmin user (i.e.,
semadmin.jpg) in thecustomer-b2c/picturesfolder of the tutorial resources.
The next section of the tutorial guides you through the process of importing data into the Customer B2C demo application as a data steward. This will facilitate the review of duplicate data and suggested matches.
We will now shift focus to the newly created Data Steward user, as we are now transitioning from development and administrative duties to data stewardship responsibilities.
First, log out the SemAdmin user account:
- In the upper-right corner of the application, click on the profile picture.
- In the user menu, select Logout.
Next, you will connect as Data Steward and import data into your application.
Congratulations!
You have successfully accessed the Customer B2C demo application.
To summarize:
- You have accessed the Customer B2C demo application.
- You have set up the SemAdmin user profile.
- You have updated the user profile picture.
- You have logged in and out of the application.
Next, you will import data into the application.
Before you can start browsing data, you first need to import data into the application.
We have provided you with demo data that is ready to import, including:
- A list of nicknames.
- A list of customers.
- A list of products.
- A list of communication channel preferences and customers' products for each customer.
Importing data is typically performed by a data steward. Therefore, we will connect as the Data Steward user, who has been granted the necessary privileges for data import within the CustomerB2CDemo model.

To prepare for importing sample data, locate the sample data files we provided you in the folder demo-applications/customer-b2c/datasets that came with the tutorial resources. You should find six Excel files:
3-import-data-1-Nicknames.xlsx3-import-data-2-Customers.xlsx3-import-data-3-Products.xlsx3-import-data-4-Communications.xlsx3-import-data-5-CustomerProducts.xlsx3-import-data-6-Customers.xlsx
As a data steward, you will also fix errors and delete some records after importing the datasets.
Connect as Data Steward
- Log in using the Data Steward user credentials.
- If you followed the Install Semarchy xDM on AWS or the Install Semarchy xDM on Azure tutorial, you are prompted to change your password. Enter the default password for datasteward in Current password, provide and confirm the New password, and then click Change.
- On the Welcome page, click the Customer B2C icon to access the application.
- You have now accessed the Customer B2C application where data stewards and business users typically carry out their daily tasks.
- Complete your profile as Data Steward in the Welcome wizard.
- After adding your name and email address, proceed with the same steps as the SemAdmin user to edit your profile.
- Update your profile picture for the Data Steward user with the
datasteward.jpgimage in thecustomer-b2c/picturesfolder.
You are now connected as a Data Steward.
Import data from Excel spreadsheets
You are now going to import the demo data from the resources you downloaded at the beginning of this tutorial.
To import data while logged in as Data Steward:
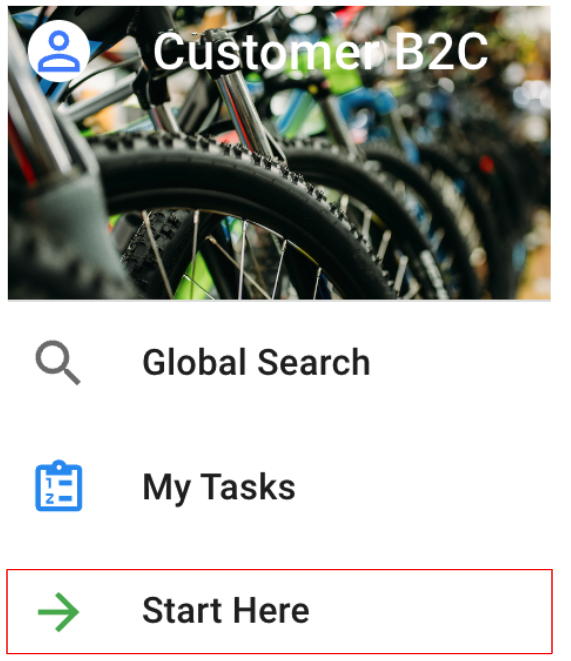
- Take a look at the navigation drawer.
This is where you will find all the links and shortcuts within the application.

- Click on Start Here.
Import Nicknames
To import nickname data, follow these steps:
- Click on Import Nicknames.
- Follow the prompts in the pop-up window.
The data is located in thedemo-applications/customer-b2c/datasetsfolder. - Select the
3-import-data-1-Nicknames.xlsxfile.
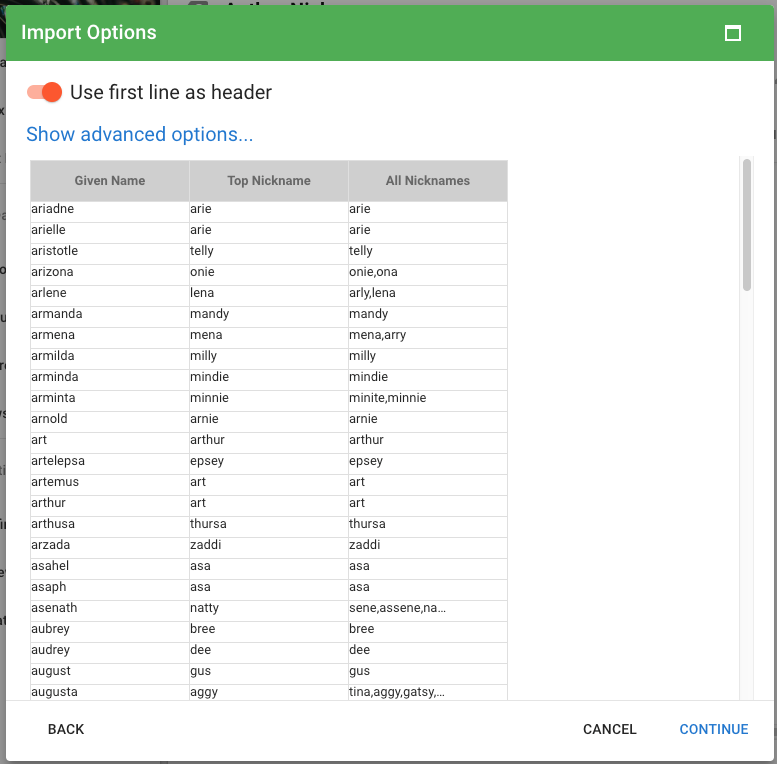
- Click Continue.
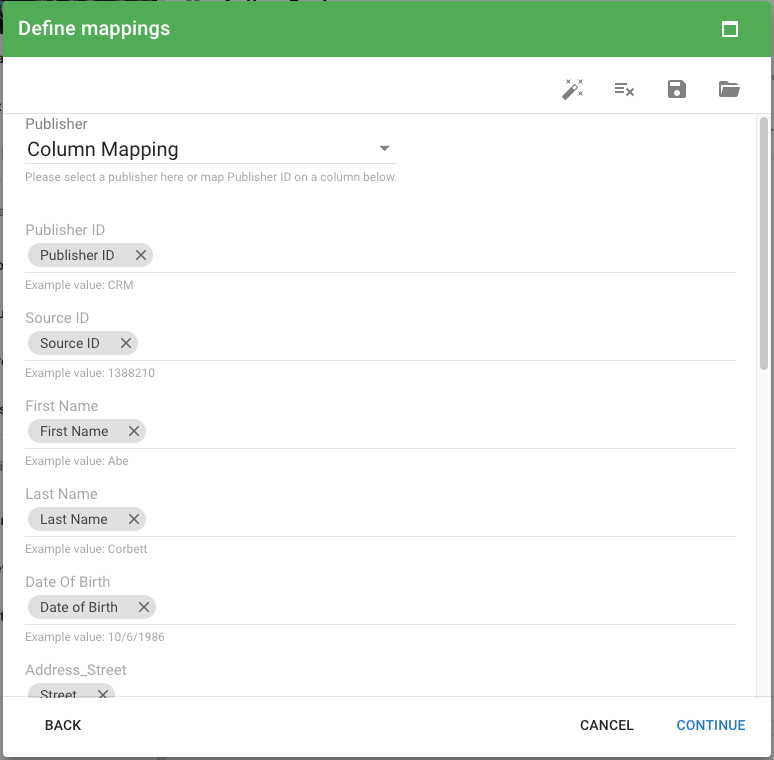
- In the Define mappings step, make sure the columns from the Excel file are correctly mapped to the Nickname columns.
- Click Continue. xDM provides a summary of the data to be imported.
- Click Finish. Your nickname data is now imported into xDM, but it is visible only to you.
The data you imported has not yet transitioned to golden data. - Click Finish in the lower-right corner of the stepper to submit the imported data to the hub.
- Wait until the confirmation messages "New data submitted" and "Changes successfully applied" appear in the pop-up toaster menu located at the lower-left corner of your screen.
Import Customers
To import customer data, repeat the process outlined in the previous Import Nicknames section, except this time:
- Click on Import Customers.
- Select the
3-import-data-2-Customers.xlsxfile. - The Define mappings step should show a different column name, corresponding to the
3-import-data-2-Customers.xlsxExcel file.
- Click Finish in the lower-right corner.
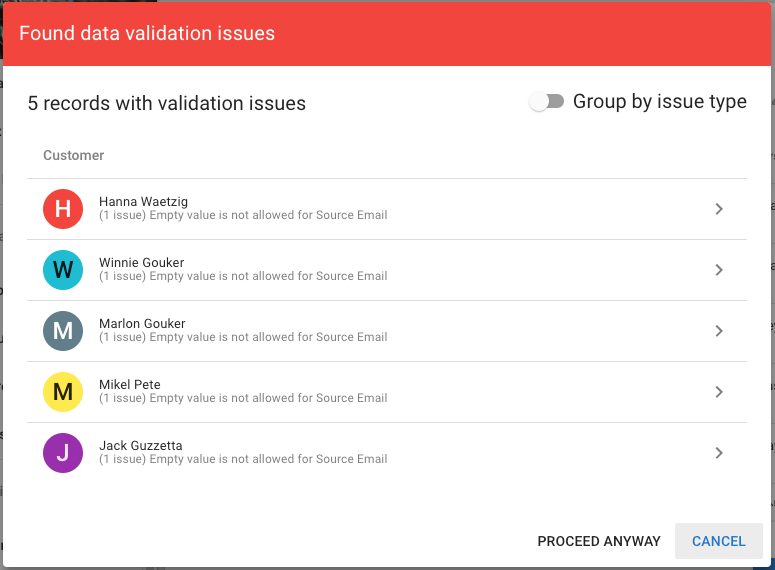
- You will encounter a Found data validation issues pop-up that alerts you to errors in the recently imported spreadsheet. Click Proceed anyway to close the window and save the records.
- Wait until the confirmation messages "New data submitted" and "Changes successfully applied" appear in the pop-up toaster menu located at the lower-left corner of your screen.
Import Products
To import product data, repeat the process outlined in the previous sections, except this time:
- Click on Import Products.
- Select the
3-import-data-3-Products.xlsxfile. - The Define mappings step should show column names corresponding to the
3-import-data-3-Products.xlsxExcel file.
Import Communications
To import communication channel preferences data, repeat the process outlined in the previous sections, except this time:
- Click on Import Communications.
- Select the
3-import-data-4-Communications.xlsxfile. - The Define mappings step should show column names corresponding to the
3-import-data-4-Communications.xlsxExcel file.
Import Customers' Products
To import customers' product data, repeat the process outlined in the previous sections, except this time:
- Click on Import Customer's Products.
- Select the
3-import-data-5-CustomerProduct.xlsxfile. - The Define mappings step should show column names corresponding to the
3-import-data-5-CustomerProduct.xlsxExcel file.
Check data
You are now going to verify that all the Excel files were successfully imported.
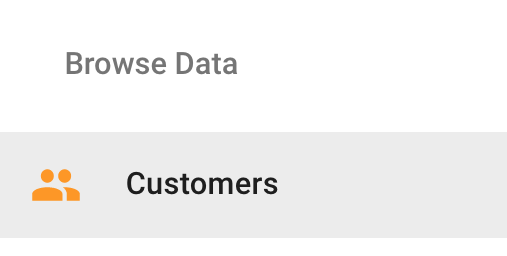
- In the navigation drawer, find the Browse Data section.
- Click on Customer.
- Scroll to the right to view the Person Type column.

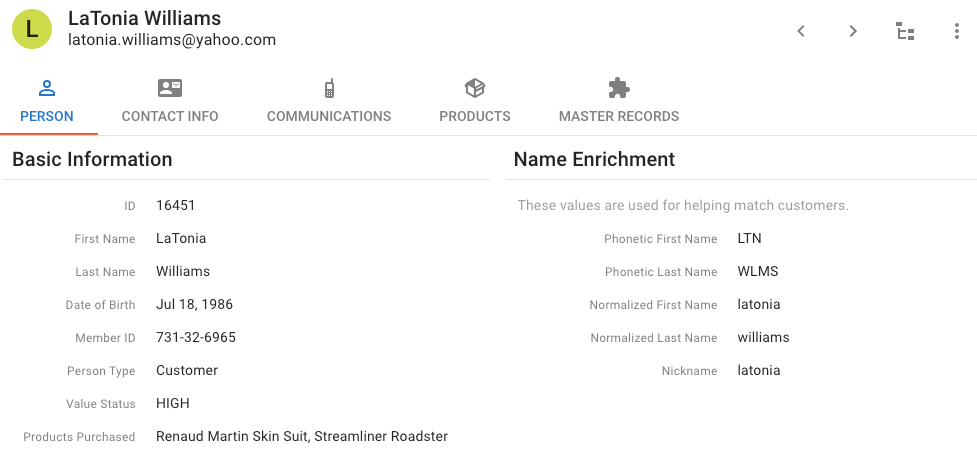
- Click on the first record whose person type is Customer. For example, LaTonia Williams.
- Click on the Communications tab.
- If you see records in Communications, you have successfully imported the customer and communication channel preference data files.

If you do not see any communication preferences data, something went wrong. Review the previous import steps and try again.
- Click on the Products tab.
- If you see records in Products, you have successfully imported the product and customers' products Excel files.
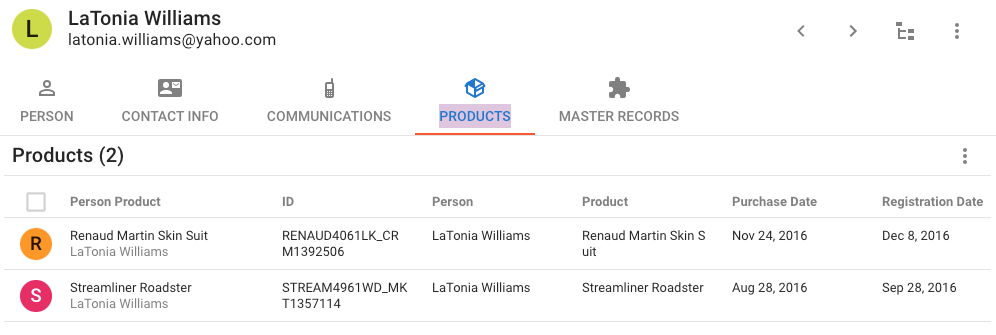
Ensure you have data in the Communications and Products tabs, and explore your customer records.
Explore dashboards
Once your data import is complete, you can review the dashboards you imported into the Dashboard Builder.
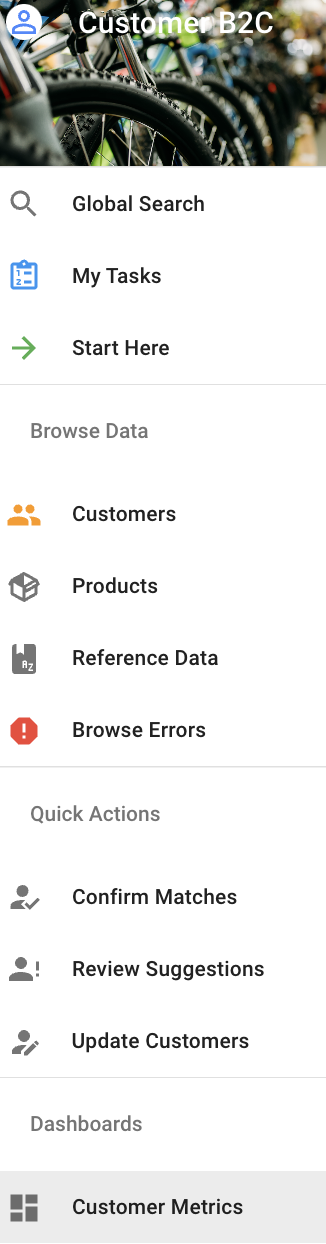
- In the Dashboards section of the navigation drawer, click on Customer Metrics.
- If you see the Customer Metrics dashboard, you have successfully imported the dashboard files and the associated data.
Use the dashboard
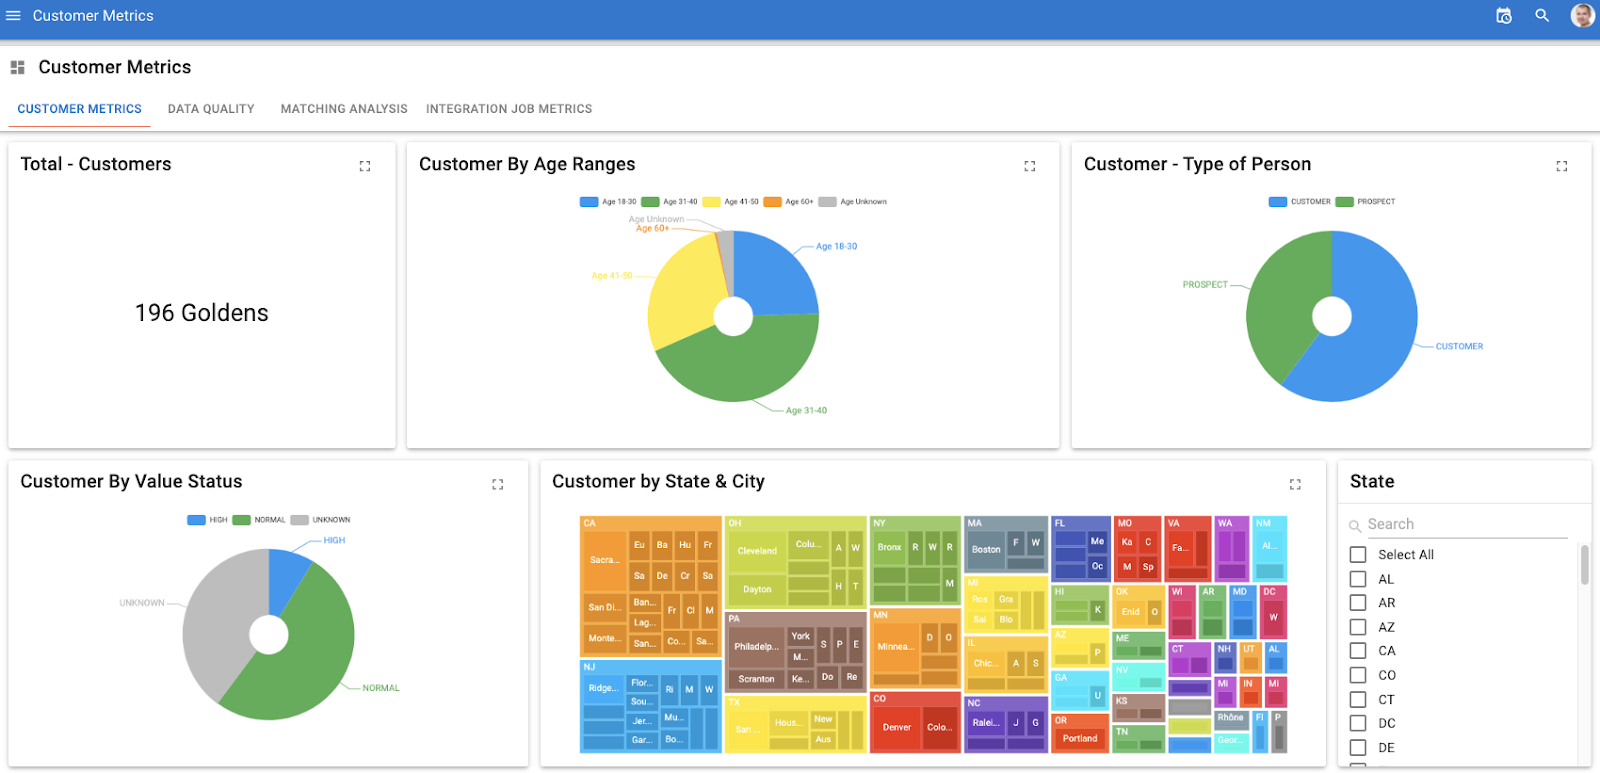
Here is a quick overview of how to use the Customer Metrics dashboard.
- In the Customer Metrics tab, locate the Customer By Age Ranges donut chart.
- Click on the "Age 18–30" segment of the chart.
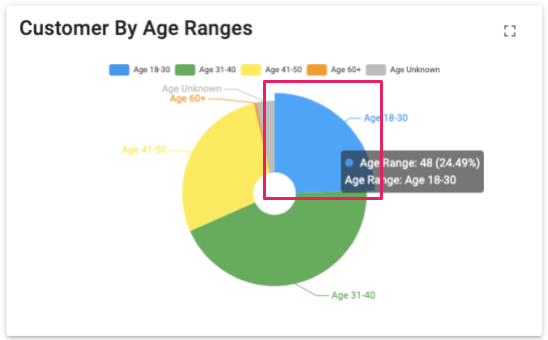
- Observe the drill-down feature in action, which reveals the underlying data that constitute the "Age 18–30" segment of the chart.
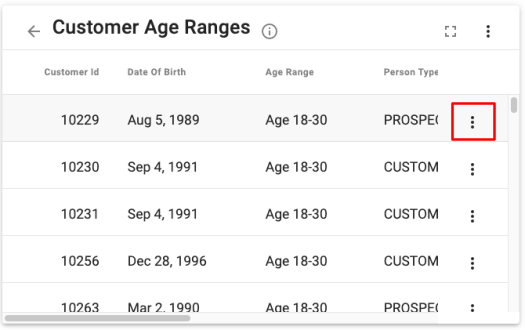
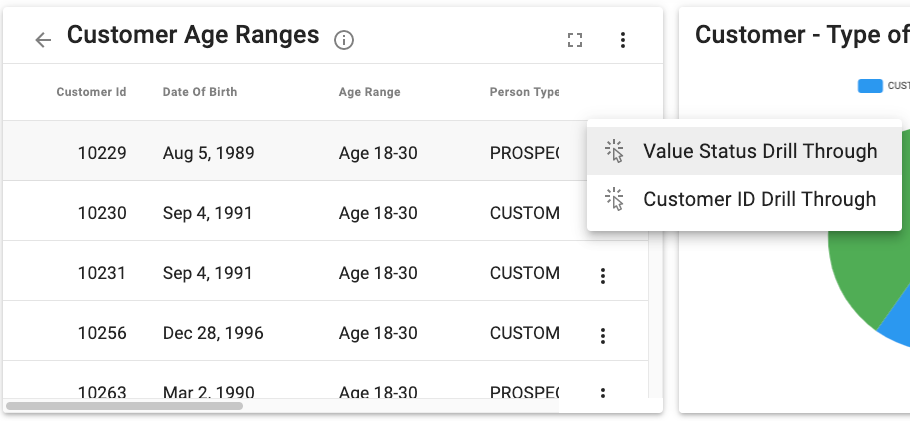
- Open the More menu in any row of the Customer Age Ranges table.
This menu presents the drill-through options, which allow you to examine the data behind the chart. - Select the Value Status Drill Through option to view how xDM presents the underlying data related to the customers within this age range.
- Navigate to the top of the dashboard and select the Data quality tab to access charts related to data quality.
This tab presents various charts designed to analyze key performance indicators (KPIs) concerning the quality of customer data stored within the MDM hub.

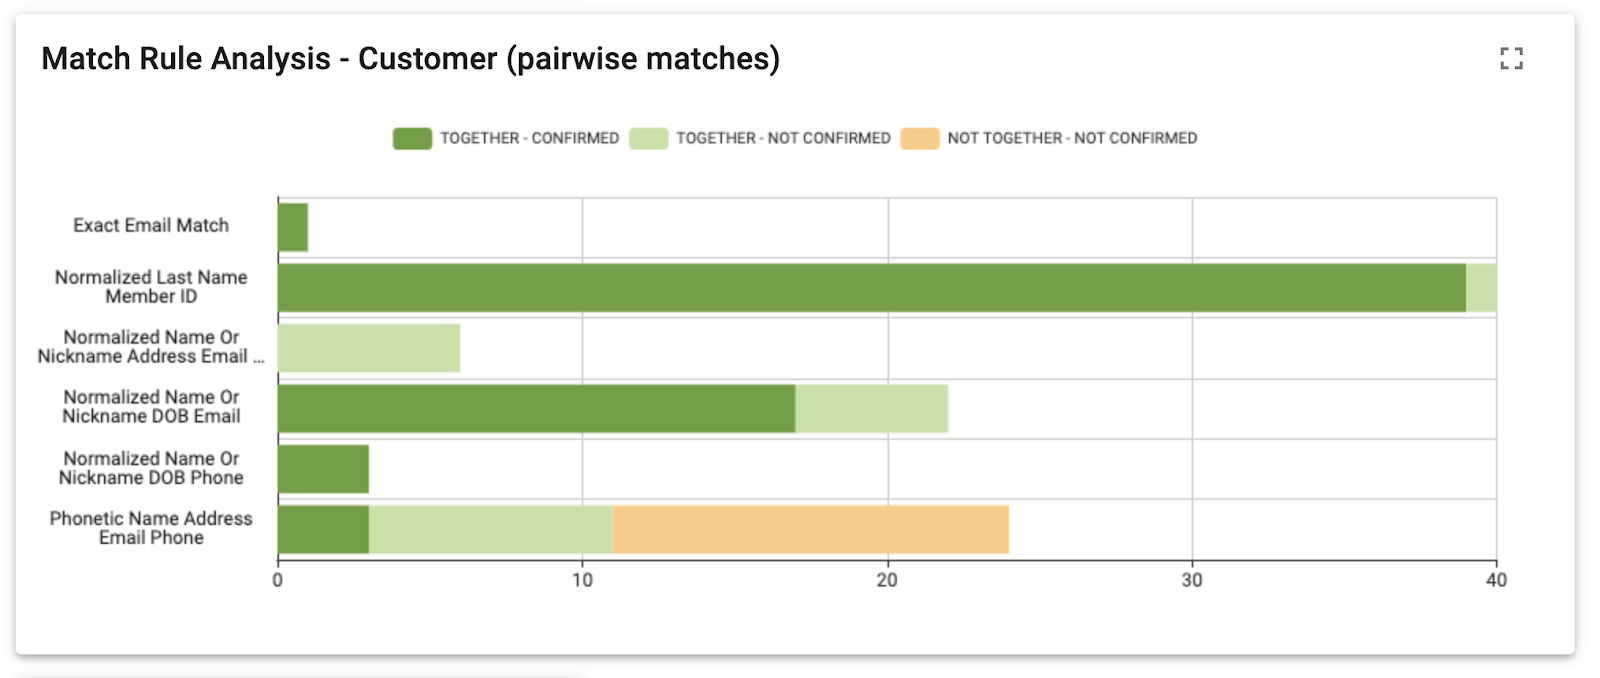
- Return to the top of the dashboard and select the Matching analysis tab to view analytics on matching and merging.
These charts enable business users to monitor the performance of matching and merging rules.
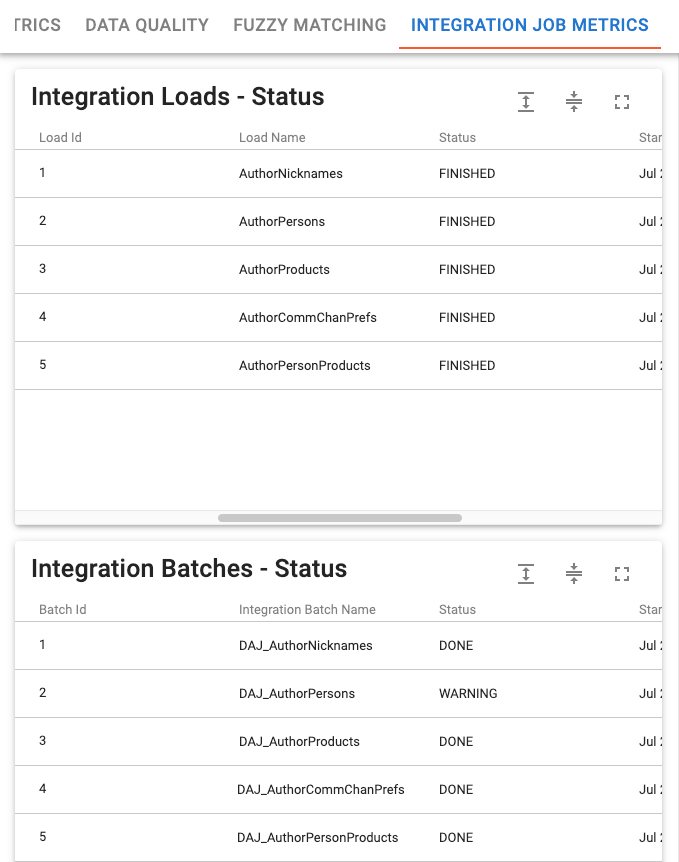
- Return to the top of the dashboard and select the Integration job metrics tab to view the status of integration loads (i.e., data loading into xDM) and integration batches (i.e., xDM processing data to generate golden records). These charts provide valuable insights for business users and data stewards to view the status of jobs within xDM, particularly if they do not have access to the Application Builder.
Execute grants on the repository for dashboards
If you could not view the Fuzzy matching dashboards, it is likely because your Customer B2C data location does not have the necessary privileges to select into the repository schema for fuzzy matching rules. If you can see the Match Rule Analysis - Customer (pairwise matches) chart or if you prefer to skip granting access, proceed to the section Fix errors and delete records.
To enable viewing charts on the Integration job metrics tab, execute grants as the database administrator or another user with privileges to grant SELECT rights to semarchy_repository. If someone installed xDM for you, request a team member with database access to execute the grants. Request them to grant the Customer B2C data location schema access to the MTA_MATCH_RULE table in the SEMARCHY_REPOSITORY schema.
GRANT SELECT ANY TABLE TO SEMARCHY_CUSTOMER_B2C_MDM;
- On PostgreSQL: 3-import-1-postgresql-grant-select-repository.sql
GRANT USAGE ON SCHEMA semarchy_repository TO public ;
GRANT SELECT ON ALL TABLES IN SCHEMA semarchy_repository TO public ;
- On SQL Server: 3-import-1-sqlserver-grant-select-repository.sql
GRANT SELECT ON SCHEMA :: SEMARCHY_REPOSITORY TO SEMARCHY_CUSTOMER_B2C_MDM;
The prebuilt charts and dashboards in this section provide insight into the capabilities of xDM. To dive deeper into dashboards and the Dashboard Builder, see the Semarchy xDM documentation.
Now that you have successfully loaded data in the Customer B2C application, browsed the data, and examined the dashboards, you are ready to address errors and delete customer records.
Congratulations!
As a data steward, you have successfully imported and verified data.
Next, you will perform some typical data stewardship tasks, including searching, rectifying, and deleting data.
You are now ready to browse, search, and filter data in the application. These tasks are usually performed by business users like project managers, product managers, HR managers, and finance managers. Data stewards and business analysts also use xDM to search and filter data for specific purposes, such as reviewing match suggestions, updating information, and exporting data.
Our focus will be on searching data to address errors and delete specific records.
Browse the error queue
Remember the errors we introduced when importing customer records in ④ Import data? While xDM permitted you to bypass these errors during customer data import, validation rules directed these erroneous records into an error queue, often referred to as an exception view. We are now going to explore the error queue and observe how xDM manages errors.
- In the Browse Data section of the navigation drawer, click on Browse Errors.
The3-import-data-2-Customers.xlsxExcel file introduced some errors that have been routed into an error queue to prevent them from impacting downstream processes and polluting your systems. The error queue also identifies the erroneous records so that you can take action, such as rectifying them and resubmitting them to xDM for reprocessing. - Take a look at the error queue that captured the erroneous customer data.
- Click on Customer Errors.
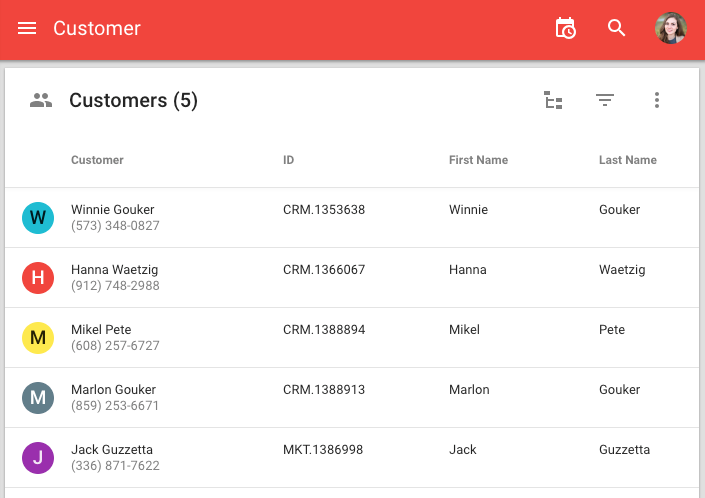
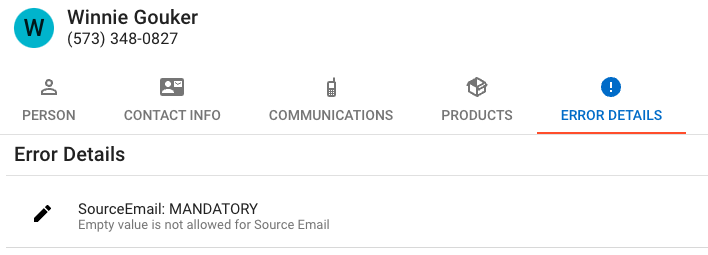
- Click the first customer records in the list, Winnie Gouker.
- Click on the Error details tab to view the reason this customer record was rejected. The error message, "SourceEmail MANDATORY", indicates that this customer record is missing an email address.
Rectify errors
Some organizations choose not to allow edits within xDM and instead require rectification in the source systems, especially when dealing with large data volumes. However, this Customer B2C demo application is configured to allow you, as a data steward, to edit the record and fix the error.
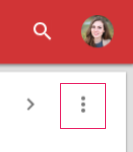
- Open the Options menu in the upper-right corner.
- Select Edit to modify Winnie Gouker's erroneous record.
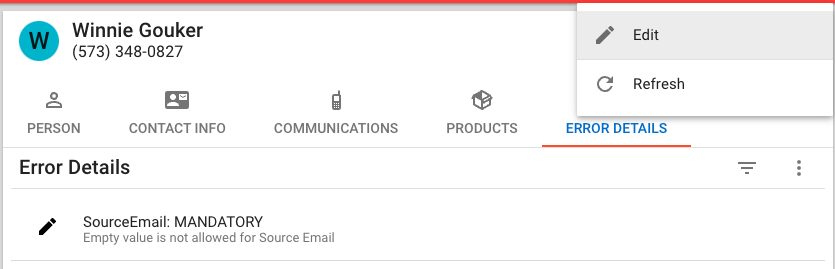
- A stepper interface opens and provides step-by-step guidance for editing the customer record.
- Click Next to proceed to the Contact Info step.
- Add the email address
winnie@gouker.comin the second step.
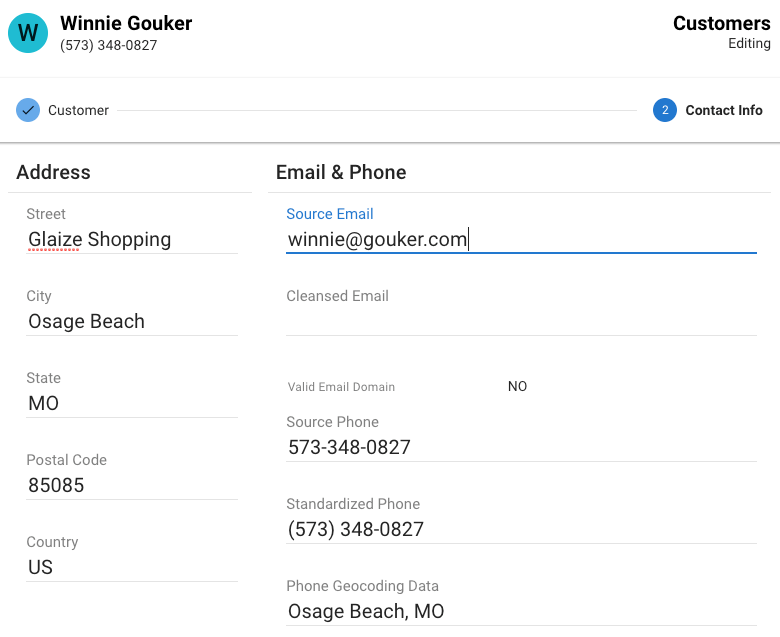
- Click Finish to submit your changes.
- When the toaster message in the lower-left corner pops up with the message "New data submitted" and "Changes successfully applied," click Click to refresh.
- Return to the Errors view to observe the update in effect.
- You should notice fewer errors in the list, as one has been corrected. Winnie Gouker's record has disappeared from the Customer Errors list and should appear in the regular Customers view with the rest of the correct customer records. You have successfully rectified an email error and resubmitted the record to xDM.
- Repeat the process to rectify other erroneous records using the information below:
- Hanna Waetzig:
hanna@waetzig.com - Mikel Pete:
mikel@pete.com - Marlon Gouker:
marlon@gouker.com - Jack Guzzetta:
jack@guzzetta.com
- Navigate back to Browse Errors > Customers Errors.
You should see fewer errors now.
Delete records
In addition to browsing errors and correcting erroneous data, you can also delete records in xDM.
Regulatory compliance
In compliance with the General Data Protection Regulation (GDPR) laws enforced by the European Union (EU), organizations must honor requests from EU citizens to remove their data from systems.
Consider a scenario where one such request has been received from a customer, Marquis Barayuga, to have their data removed from our system. As a data steward, you are authorized to delete their data from your organization by removing it from xDM.
Search Filters
To delete Marquis Barayuga's record from xDM, start by locating their record using search filters.
- In the Browse Data section of the navigation drawer, click on Customers.
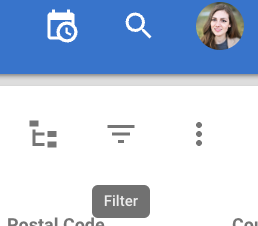
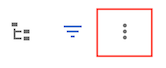
This is a custom business view designed to help you quickly browse all customers in the Customer B2C application. - Click on the Filter icon in the upper-right corner of the application to find Marquis Barayuga.
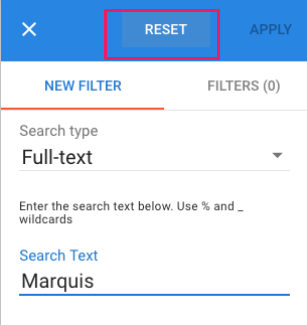
The filter menu appears. By default, a new filter will be created.
- Keep the default Search type on Full-text.
- In the Search Text field, type
Marquis.
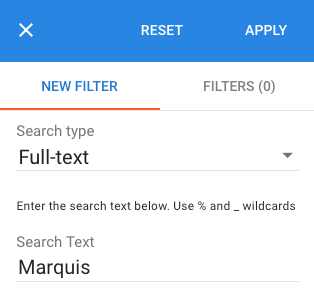
- Click Apply at the top of the filter to execute the search.
The search should return one customer record: Marquis Barayuga.
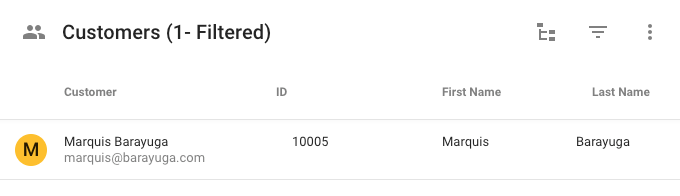
Delete records
To delete Marquis Barayuga's record:
- Select the checkbox next to Marquis Barayuga's record.
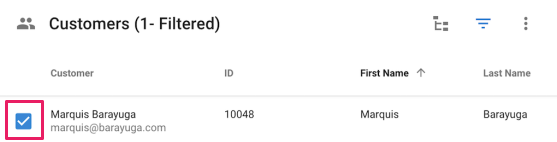
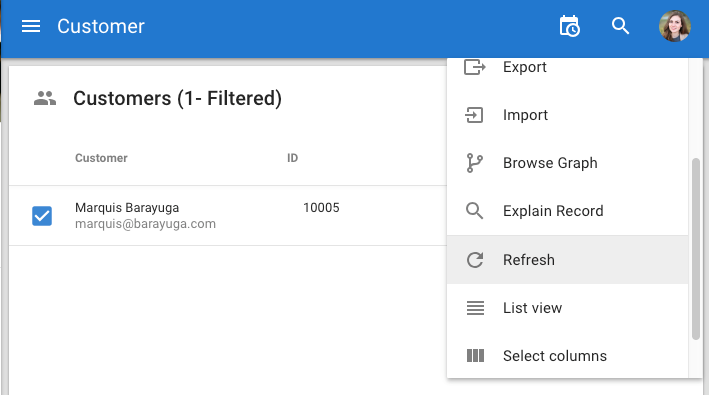
- Click the Options button.
- Select the Delete option.
A confirmation message will appear, reminding you that this action cannot be undone once completed.
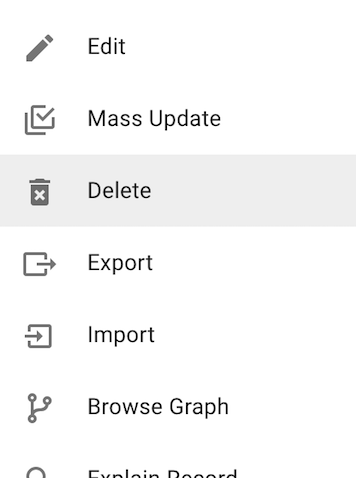
- Click Delete.
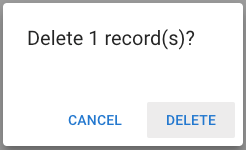
- You will receive a confirmation toaster message in the lower-left corner stating "1 record(s) sent for deletion."
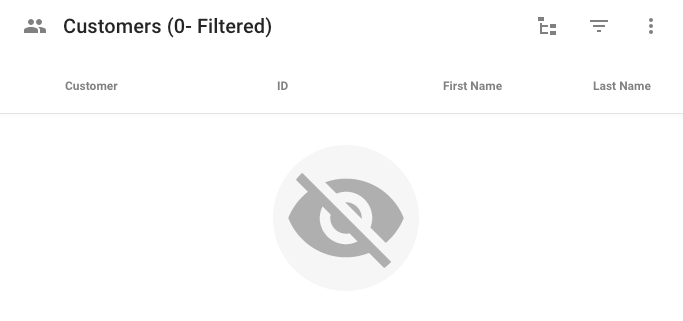
- Open the Options menu and select Refresh to refresh the data.
- You should see no records.
- Click Reset on the filter to return to the Customers view.
You have successfully deleted Marquis Barayuga's information from xDM.
Congratulations!
You have successfully completed common tasks of a data steward, which include:
- Rectifying errors.
- Searching, filtering, and browsing records.
- Deleting data.
Next, you will review duplicate data, which involves tasks like confirming and rejecting deduplicated records, as well as evaluating suggested matches.
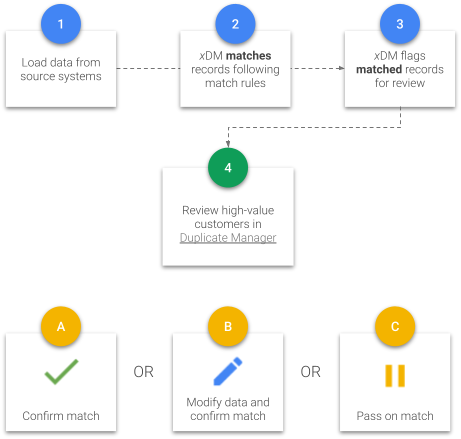
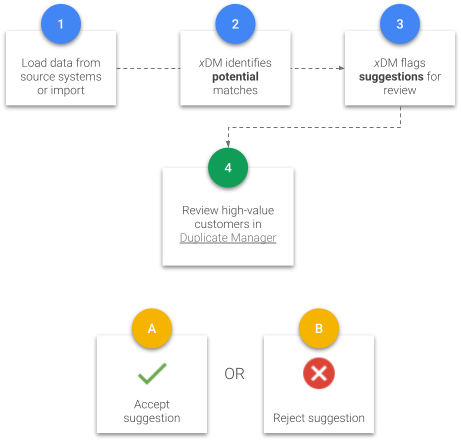
Reviewing matched records and suggestions in xDM is designed to be as simple as possible, as this is a daily task for data stewards. The process is designed to provide step-by-step guidance, making it easy to review matched data accurately.
xDM employs business-driven match rules to de-duplicate data, and it is crucial for data stewards to review these matches to ensure accuracy.
This section of the tutorial will guide you through the process of reviewing matched data, confirming correct matches, and rejecting incorrect suggestions.
Review confirmed matches
As the Data Steward user, your role involves reviewing the matching, merging, and deduplication results produced by xDM, which are based on business rules that identify duplicate customer information.
Golden records, resulting from the merging of multiple master records by xDM, are to be reviewed and either confirmed or modified by you.
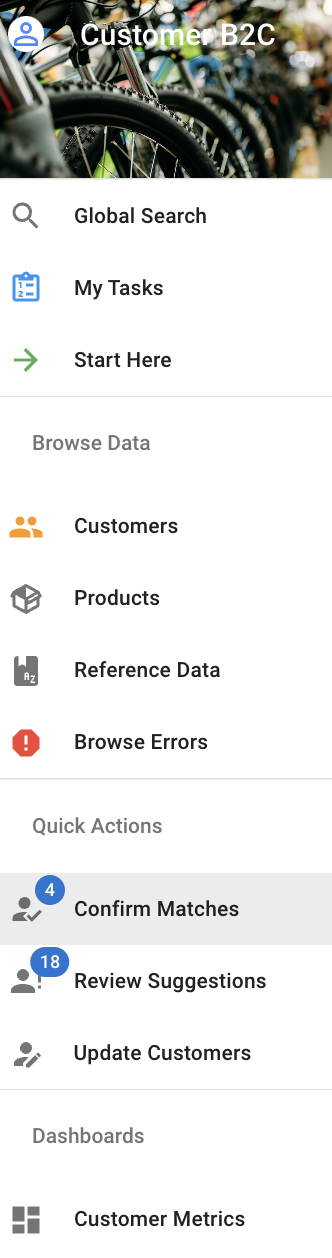
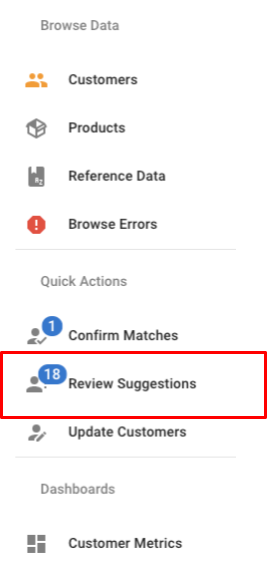
In the Quick Actions section of the navigation drawer, several custom views are available to facilitate swift browsing of the data that require review in the Customer B2C application. These shortcuts enhance productivity for data stewards and business users by presenting the specific data they need to manage.
Find high-value customer records to confirm
To confirm or reject matched records, you first need to find the high-value customers.
- In the Quick Actions section of the navigation drawer, click Confirm Matches.
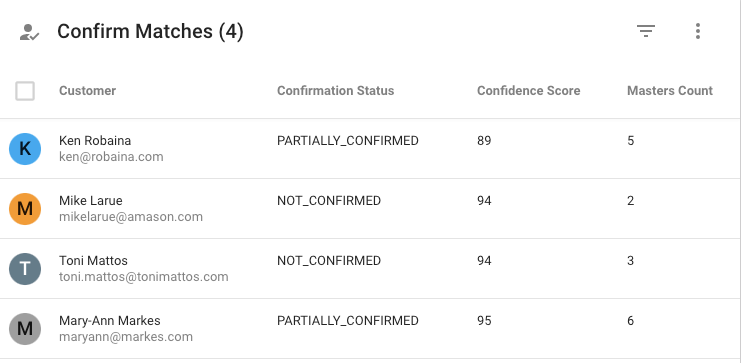
- Take a look at the Confirm Matches view. Here, you can find all the customer and prospect records that xDM merged together based on the defined match rules.
- Examine the Confirmation Status, Confidence Scores, and Masters Count columns.
You can see some records are NOT_CONFIRMED or PARTIALLY_CONFIRMED. These records require manual confirmation because their confidence scores did not meet the Auto-Confirm threshold in the matcher.
Review matches
There are four customer records that have been de-duplicated and merged. Your task now involves reviewing and confirming or modifying these record merges for accuracy. You may also opt to pass if you are unsure.
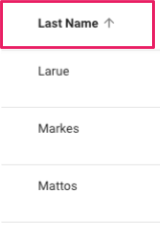
- Click on the Last Name column header until the arrow points upwards to sort all customer records in alphabetical order (from A to Z) based on the Last Name value.
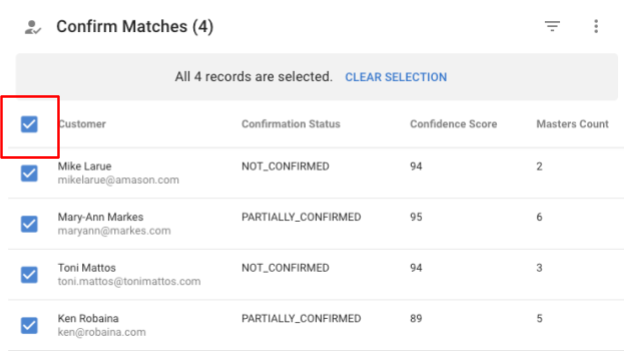
- Select the Select All checkbox to mark all records for review in a duplicate manager.
- Open the Options menu.

- Click Review And Confirm Matches.
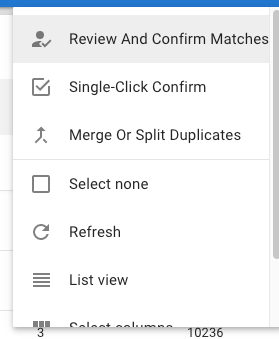
- A duplicate manager opens.
Pass on matches
Deciding whether to approve or modify a golden record requires the judgment of a data steward. If further research is needed, xDM allows you to defer reviewing the golden record for later assessment.
The first golden record in this tutorial is Mike Larue.
- Hover your mouse over the golden-colored display tile to view information about the golden record.
This record has a confidence score of 94 and is associated with two master records.
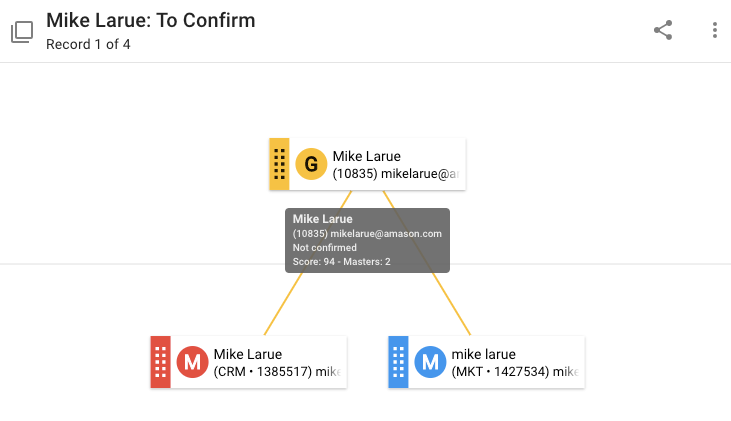
- Click on the golden tile.
The Record details side panel appears on the right side of your screen and provides detailed information on the golden record.
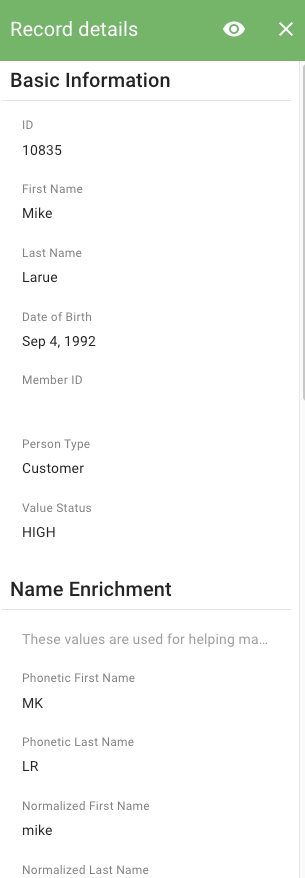
- Click on the eye icon on the upper-right side of the side panel.

- A comparison table explains the golden record, detailing how the underlying master records match and contribute data to the golden record.
Values highlighted in blue indicate those that "survived" to the golden record.
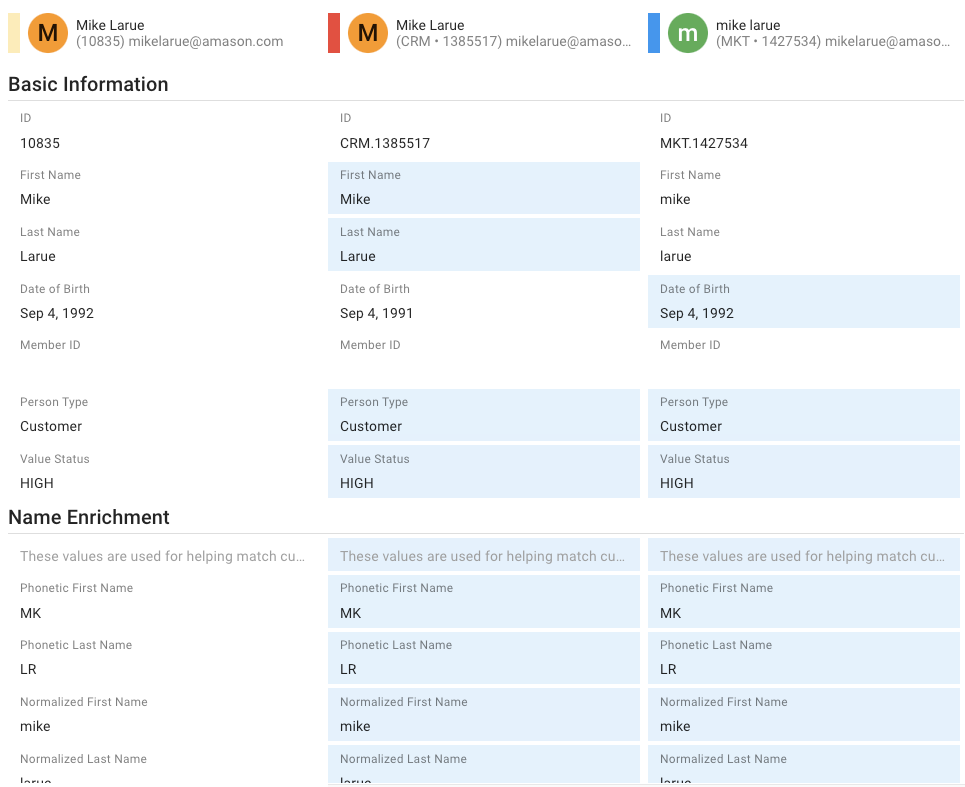
- Notice how the golden record for Mike Larue displays different birth dates, but shares the same standardized address, email, and phone number.
Due to the birth date discrepancy, the record is flagged for review. Whether to approve or modify rests with the data steward. Further research is required to confirm this match, so we will defer this golden record for now. - Click Close in the lower-right corner.
- Once you are back to the duplicate manager again, click Next.
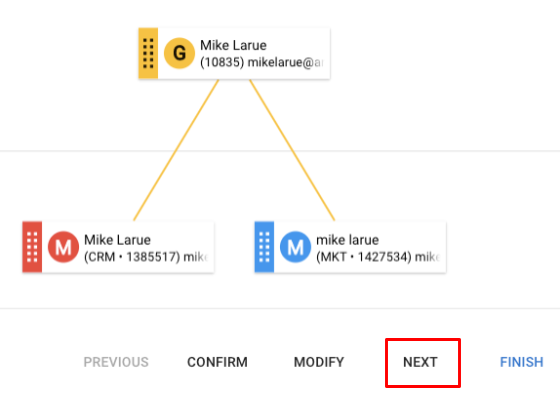
You have passed on this golden record and can revisit it later once you have completed the necessary research. It will remain accessible in the Confirm Matches business view.
Modify and confirm golden records
Proceed to the next golden record in the duplicate manager. It is common for a data steward to rectify data before confirming the golden record, even when it is correctly matched.
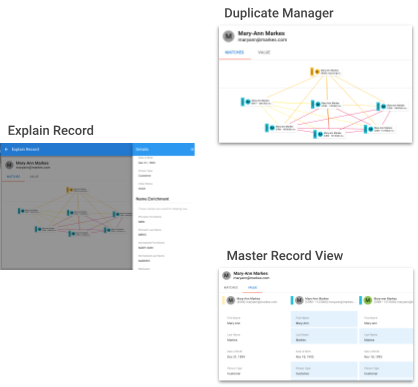
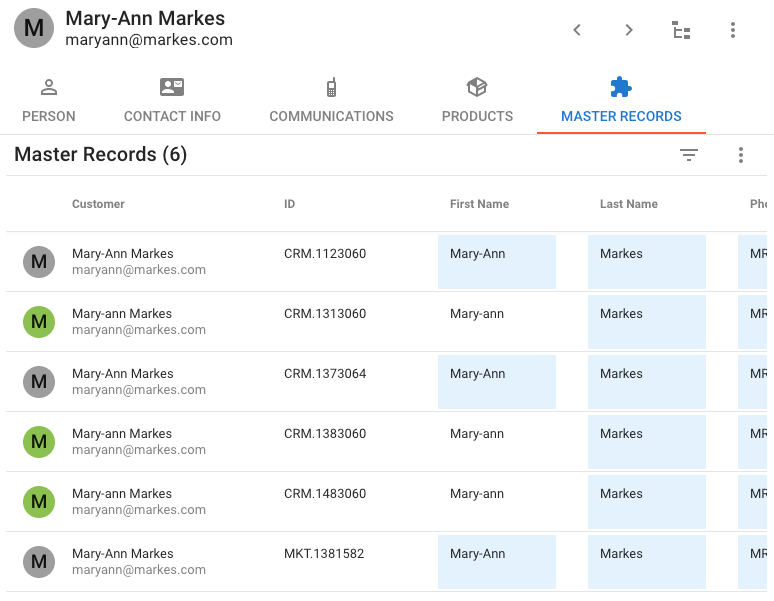
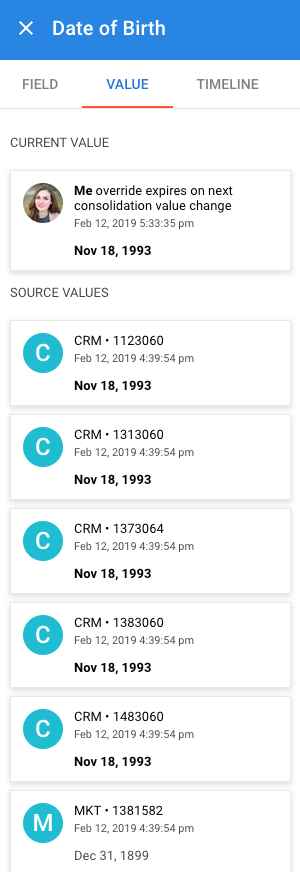
The next golden record to review is Mary-Ann Markes.
- Open the record in a duplicate manager.
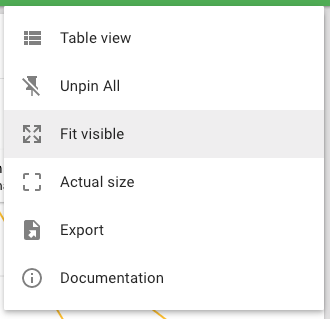
If the tiles overlap, click and drag to reposition them. Alternatively, open the Options menu and select Fit visible to adjust the tile positions.
- Examine the record details for Mary-Ann Markes.
Note discrepancies in birth dates across the six master records, while contact information remains consistent. Consulting with the Marketing team confirms that Dec 31, 1899, is a placeholder birth date used when the field is blank. This indicates erroneous data entry into xDM.
- Go back to the duplicate manager.
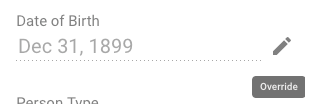
- Select Modify to edit this record and rectify it in xDM.
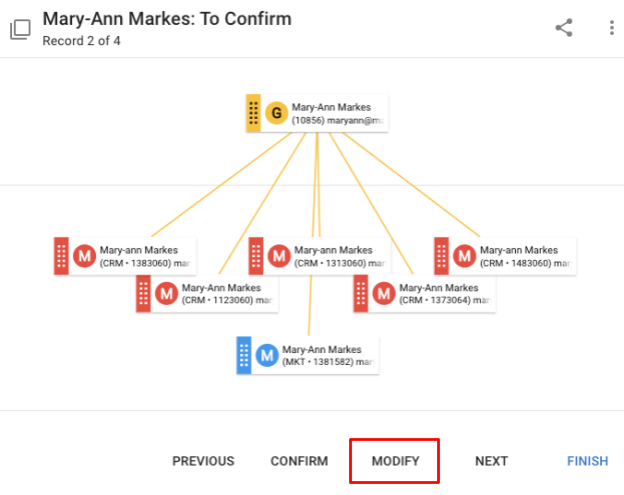
- Click on the pencil icon on the golden record tile.
You now have the ability to edit the golden record for Mary-Ann Markes.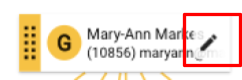
- Click on the pencil icon to override the Date Of Birth value in the golden record.
- Click on the Select value from another Master icon.
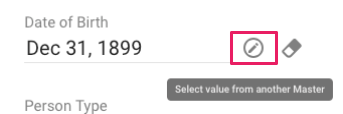
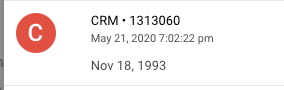
- Select any record with the correct birth date in 1993.
- Click Apply to apply the changes in the duplicate manager.
You successfully modified a golden record and confirmed a match.
Confirm matches
Golden records are generated by matching two or more master records.
In this section, we will confirm two accurately matched golden records to illustrate how data stewards manage this process routinely.
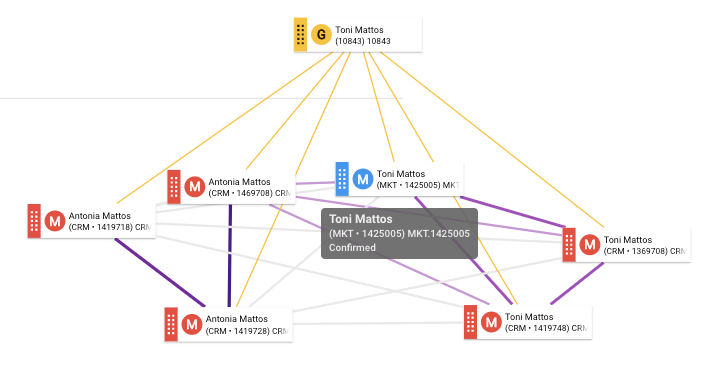
Proceed to the next golden record to be reviewed: Toni Mattos.
- Examine the golden record for Toni Mattos to determine the reason for the master record matches.
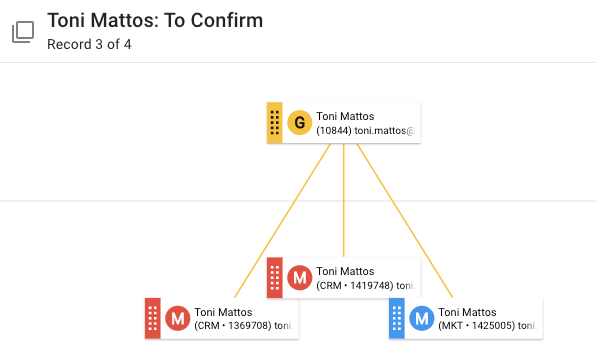
- Review the record details and then click the eye icon to view the master records.
- Analyze this golden record to determine whether you can confirm it as correctly matched.
Notice the following:
- The golden record was flagged for review because the name "Toni," standardized address, phone, and emails are identical.
- However, two out of three master records are missing a date of birth.
- There is no member ID to ascertain if this is the same individual.
- Click Confirm to accept xDM's decision to merge these three master records.
Proceed to the next golden record to be reviewed: Ken Robaina.
- Examine the golden record for Ken Robaina to determine the reason for the master record matches.
Ken Robaina is an interesting golden record because xDM merged several master records to form it. There are three master records under Kenneth Robaina and two under Ken Robaina, which contribute to this golden record. The master record tiles are color-coded: red indicates the CRM system, while blue signifies the Marketing Automation system.
- Click on the Show Matches icon to reveal the relationships between the master records.
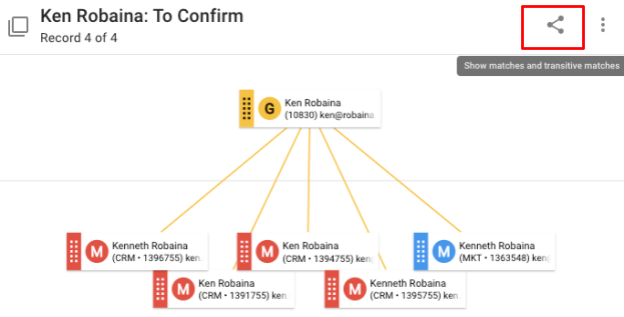
- Examine the match rules that formed this match group.
The match scores are aggregated to generate the confidence score. Since the confidence score exceeds the merge threshold set in the matcher, the Ken Robaina and Kenneth Robaina records matched and merged.
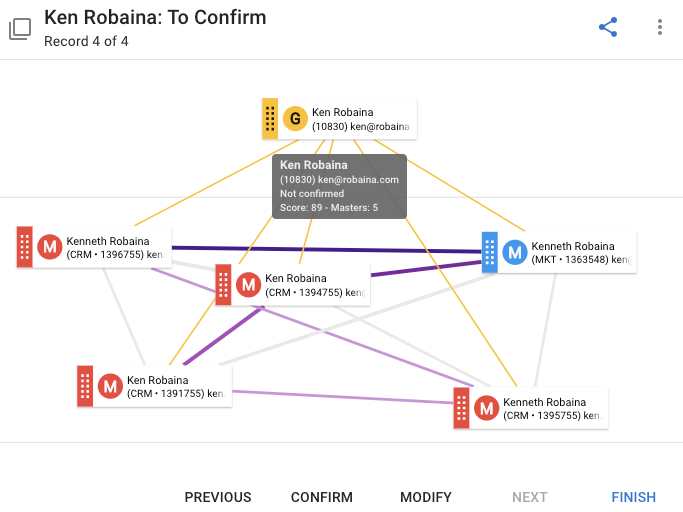
- Look at the Explain Record view of this suggestion and note the following:
- The master records share the same date of birth, member ID, address, email, and phone number, except for null values.
- This is likely the same individual, with a difference in first names due to Kenneth commonly being referred to as Ken as a nickname.
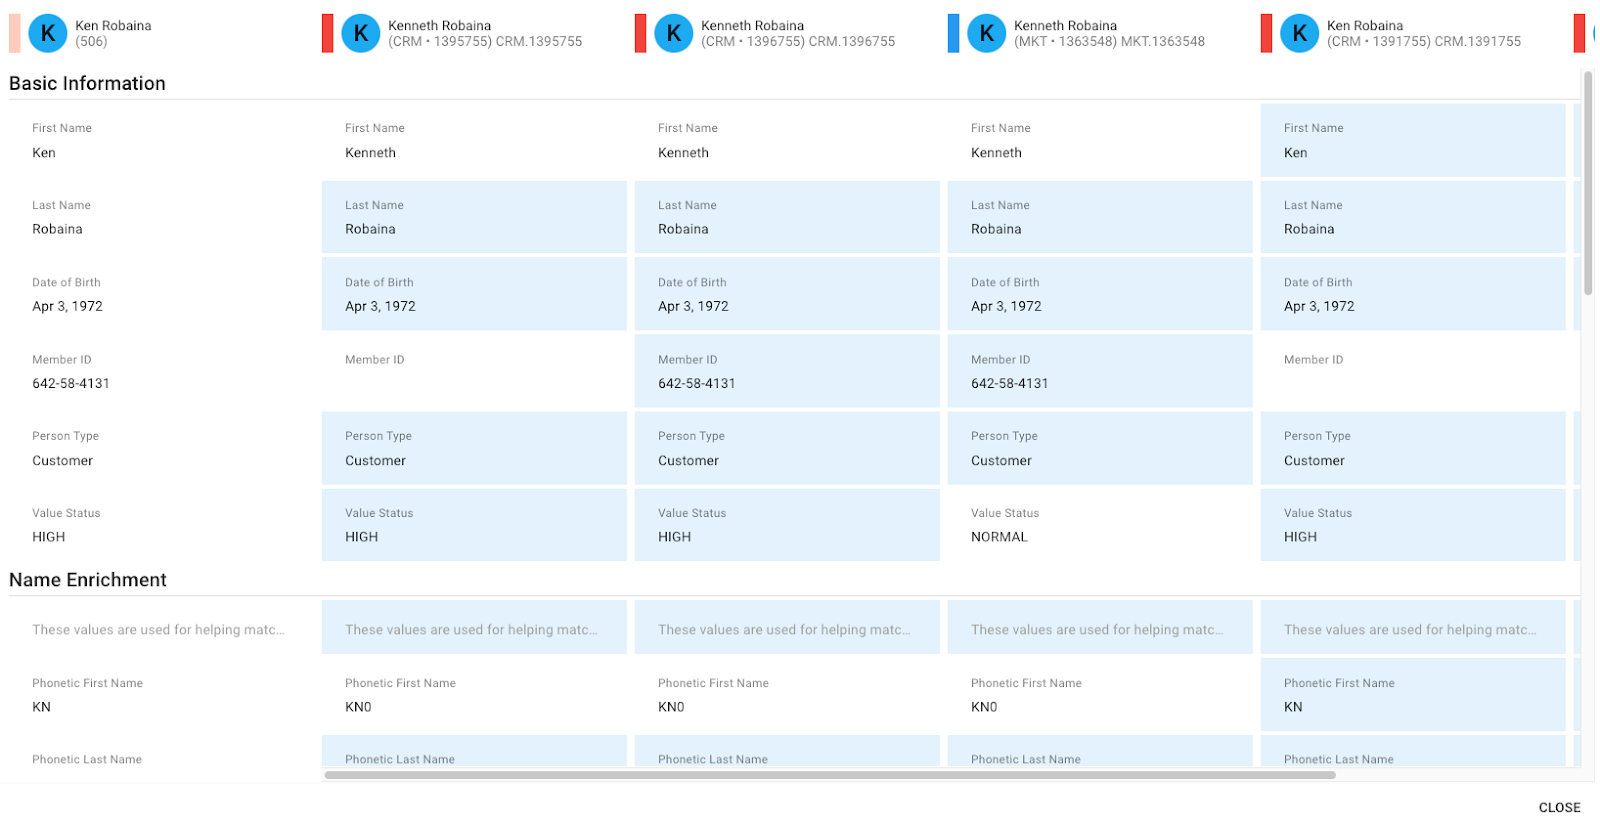
- Confirm this match is correct.
- Click Finish to save your confirmations.
Upon successful confirmation, you will receive a toaster message in the lower-left corner stating "Duplicate changes submitted" to confirm your changes. Then, you will see a toaster message stating "Golden record(s) successfully confirmed" if your changes are saved successfully in xDM.
Congratulations!
You successfully confirmed some matches.
Next, you will review match suggestions.
In addition to merged and deduplicated customer golden records, xDM can suggest matches without automatically merging them, allowing for manual review. Your task is to assess these suggestions and accept them if accurate, or reject them if erroneous.
This section will guide you, as a Data Steward user, through reviewing suggestions, accepting merges if accurate, or rejecting suggestions if they are overmatched.
Review suggested matches
When reviewing suggestions, particularly in a B2C scenario, it is common to have too many records to review, which makes it impractical to examine every suggestion. In such cases, it is recommended to prioritize high-value customers for review. Alternatively, selecting a statistically representative sample of records can provide a practical approach to avoid reviewing all suggestions.
You will start by filtering the records to view the high-value customer records.
- In the Quick Actions section of the navigation drawer, click Review Suggestions.
- You will see a view of all customer and prospect records identified by xDM as potential matches, but not yet merged. These are referred to as suggestions, suggested merges, or suggested matches.
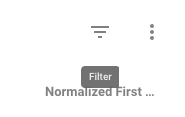
- Click on the Filter icon to start creating a filter that only displays customers with value status HIGH.
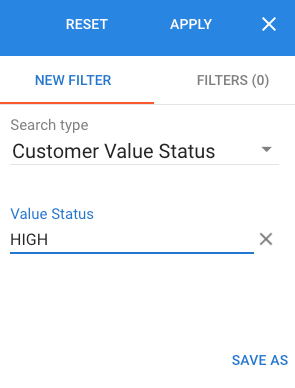
- In the Search type menu, select Customer Value Status.
This is a predefined filter we created to help you search faster. - In the Value Status, select HIGH.
This creates a filter to show customers with a value status HIGH. You can save this search filter for future use or to share it with coworkers.
- Click Save as in the lower-right corner of the filter menu.
- In the Save filter as field, enter
Value Status.
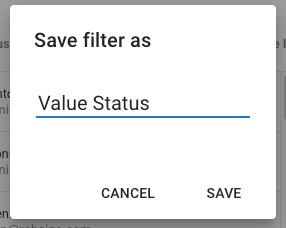
- After clicking Save, xDM takes you to the Filters menu where you can see all the saved filters you or your coworkers created previously and shared with you.
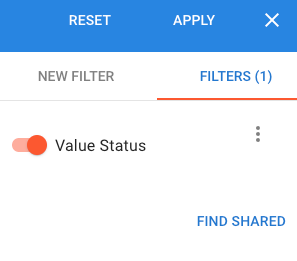
- To share the Value Status filter and make it available to your coworkers, click on the Options button next to the Value Status filter.
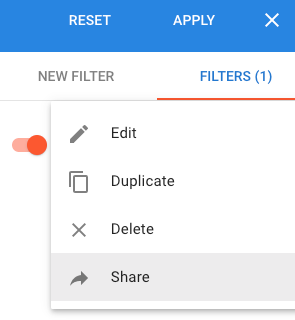
- Select Share.
You should see the confirmation message "Filter 'Value Status' is now shared with all users." Now, your coworkers will be able to access this filter if they need to perform the same search.
- Click Apply.
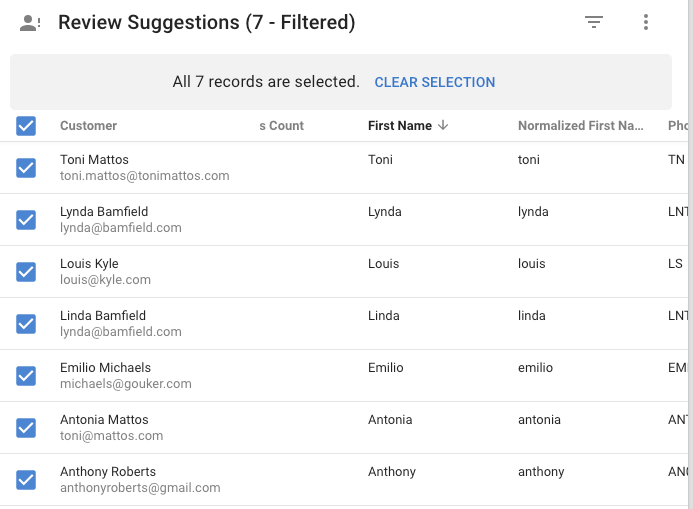
- Notice there are seven customer records that have been merged and deduplicated.
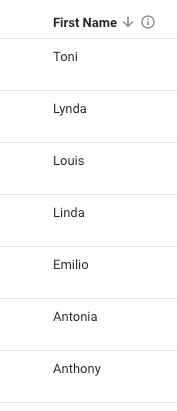
- Click on the First Name column until the arrow is pointing down to sort the records in reverse alphabetical order (from Z to A) based on the First Name value.
- Select the Select All checkbox to mark all the records for review in a duplicate manager.
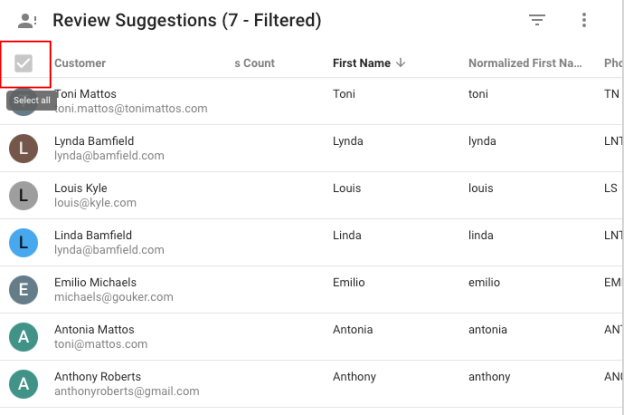
- If you successfully selected all the records, this is what your screen should look like:
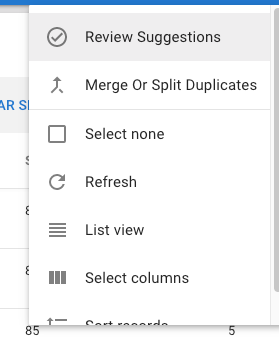
- Open the Options menu.
- Select Review Suggestions.
You enter the duplicate manager with five suggestions to review.
Next, you will review all five suggestions. Your records may not appear in the same order as this tutorial. Look ahead for instructions specific to each suggestion group to follow the steps to accept, and backtrack as necessary.
Accept suggested merges
When xDM matches records but the confidence score of the match group does not meet the merge thresholds, the records are presented as suggestions. In this section, you will examine various suggestions and act to accept them. This task is a common responsibility for a data steward.
The first suggestion is Toni Mattos.
- In the duplicate manager, click on Show matches and transitive matches.
The solid lines indicate match rules that have merged specific master records successfully. Dotted lines represent suggested matches. Gray lines represent transitive matches, which can be solid if merged or dotted if resulting from suggestions.
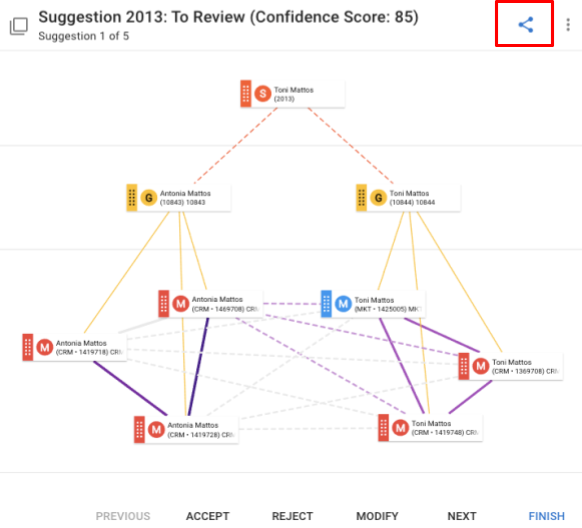
- Click on one of the solid lines.
The side panel shows documentation details about the match rule.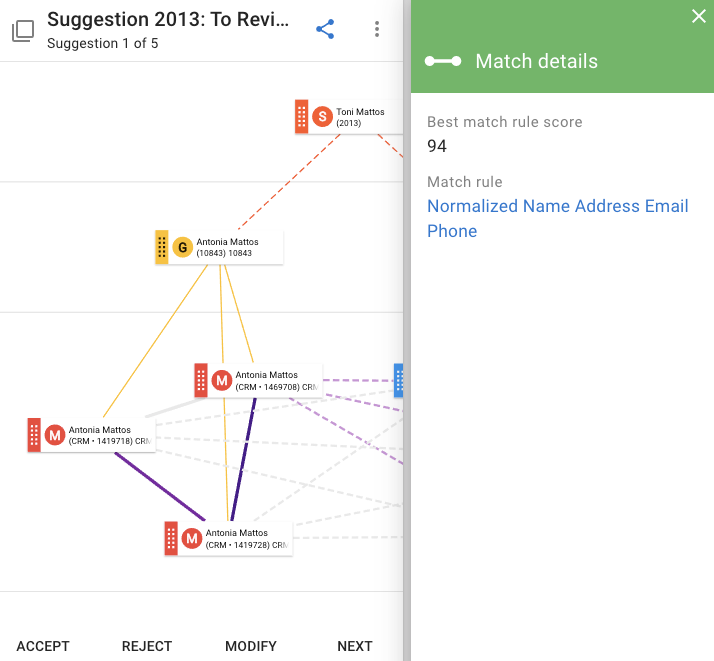
- Review the suggested match for Toni Mattos in the Explain Record view using the eye icon and note the following:
- The master records contain numerous conflicting details and null values, including varying addresses and a potential date of birth discrepancy (07-01-1973 versus 01-07-1973).
- Additionally, there are two different email addresses, but one Antonia master record (CRM.1469708) shares an email address with the other Toni master records.
- This scenario highlights another instance where the legal first name differs from the nickname, leading to conflicts in personal and contact information. It underscores the significance of dealing with messy real-world data and emphasizes the importance of having robust survivorship rules.
- Accept this suggestion to merge the golden records of Toni Mattos and Antonia Mattos to form a new golden record.
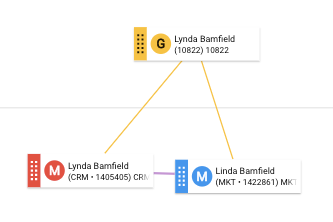
Proceed to review the next golden record suggestion for Lynda Bamfield. This is an instance where the suggestion should be accepted.
- Click to view the Explain Record view for the suggestion tile to investigate further.
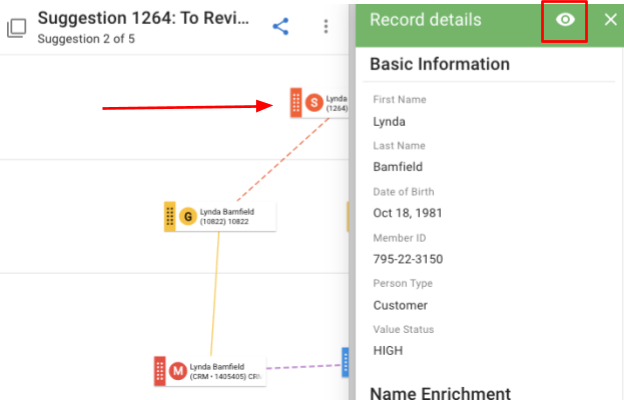
- Upon investigation, you find that golden records for Linda and Lynda share identical birth dates, phone numbers, and addresses. The only discernible distinction is a typographical error in the name (i.e., "Linda" versus "Lynda.")

- Accept this suggestion to merge the Linda Bamfield and Lynda Bamfield master records into the Lynda Bamfield golden record.
Proceed to the next suggested merge where we will look into an overmatch situation.
You successfully accepted several suggestions and saved your changes to xDM.
Next, you will review master records to demonstrate how to trace the cross-reference from source records to golden records. Additionally, you will learn how to reject matches during this process.
Reject suggested match
Continue within the same duplicate manager to accept, reject, or reorganize suggestions. In this section, you will encounter overmatched suggestions that need to be rejected.
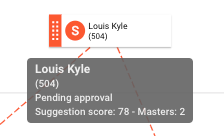
The next suggestion involves the Louis Kyle and Lois Kyle golden records, representing a husband-wife couple that has been overmatched. As a data steward, you can take action on this suggestion in the duplicate manager.
- The Louis Kyle suggested golden record is represented by an orange tile, indicating it is a proposed golden record that does not yet exist. Dotted lines connect the orange tile (suggesting it is not yet established) to the existing golden tiles. These golden tiles are connected to the original master records via solid lines. The master records are color-coded, with the red tile representing CRM and the blue tile representing the Marketing Automation system.
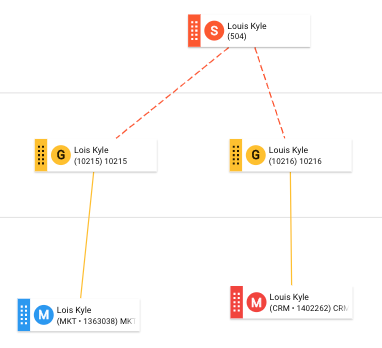
- Hover over the orange suggestion tile to learn more about the suggestion, such as the suggestion score and number of master records in this suggestion group.
- Click on the orange suggestion tile to view the record details about this suggested merge.
- Click on the eye icon to review the record details.
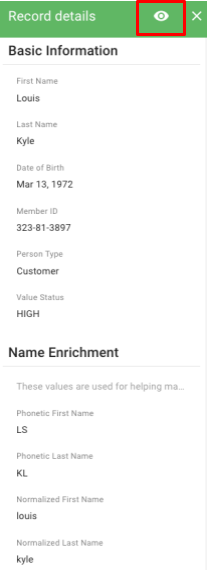
- Analyze this suggested golden record to determine whether you can confirm it as correctly matched. Notice the following:
- The addresses and phone numbers are the same.
- However, the date of birth, member ID number, and email addresses differ.
- The uncertainty surrounding this suggestion is why xDM has flagged it for review. Upon further investigation, it becomes apparent that this is a husband-wife couple with very similar first names, Louis and Lois. However, they are not the same person, even if they reside in the same household.
- Reject the suggestion.
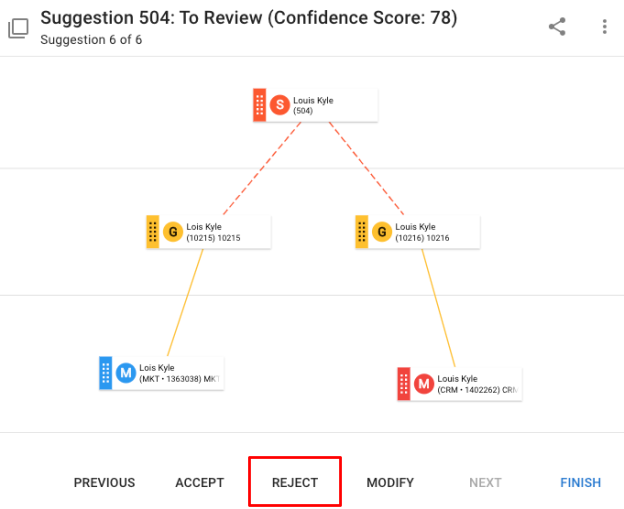
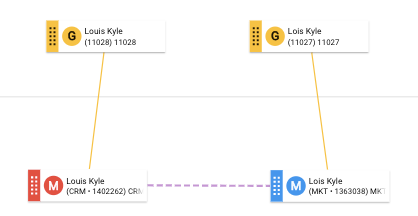
- xDM will remove the suggestion and display the individual golden records along with the associated master records. This decision will be remembered, and xDM will not override the data steward's action to reject the merge (unless the merge policy is set to ignore user splits).
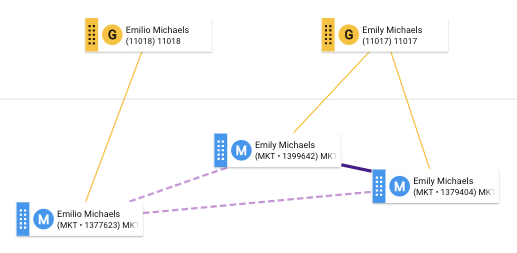
Proceed to the Emilio Michaels suggested merge.
- Investigate this suggestion. You will notice a similar scenario to the Louis Kyle example, where the last name, standardized address, phone number, and even email address are identical. However, there are differences in the date of birth and member ID number. This indicates another husband-wife couple who share the same email address for managing their household affairs.
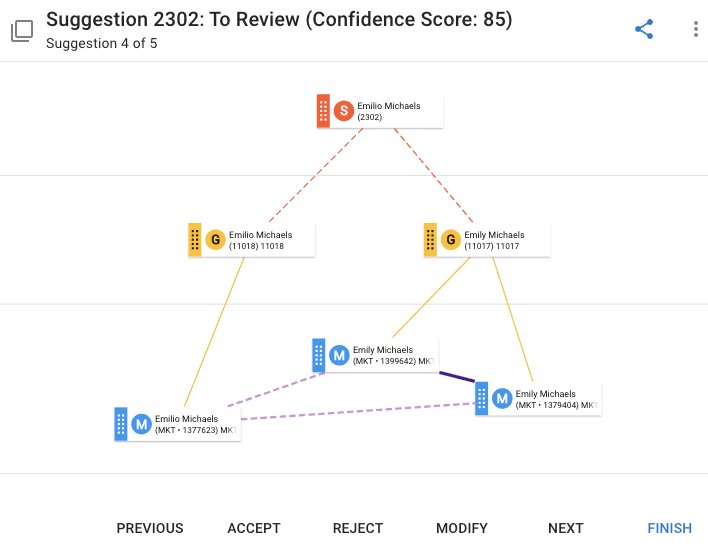
- Reject this suggestion.
The dotted lines indicate that xDM detects a match among these master records due to the match rules. However, since there is no merge, we see two separate golden records for Emilio Michaels and Emily Michaels.
Proceed to review the Anthony Roberts suggestion.
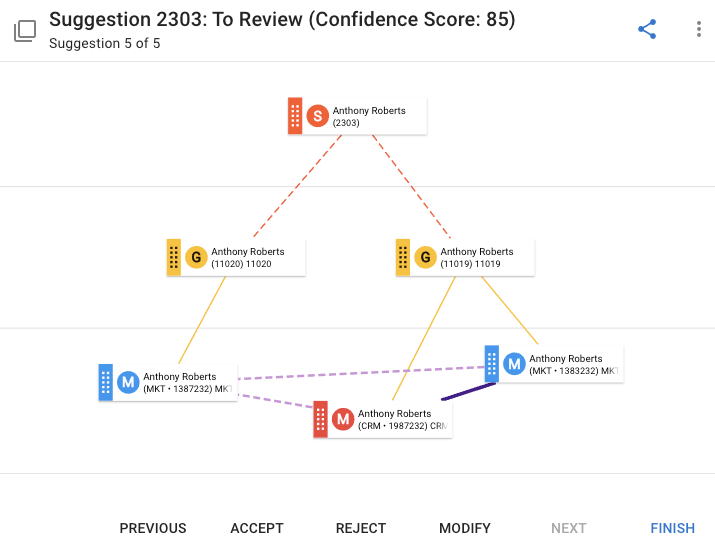
- Analyze the Anthony Roberts suggested golden record to determine whether you can confirm it as correctly matched. Notice the following:
- The first name, last name, addresses, and phone numbers are the same.
- However, the date of birth, member ID number, and email addresses differ. anthonyroberts@gmail.com versus tonyrobertsjr@gmail.com indicates these may be two different persons or that this customer uses more than one email address.
- There is some uncertainty surrounding this suggestion. While some personal information is identical, there are conflicting details in other contact information, prompting xDM to flag the suggestion for review. Upon further investigation, it becomes apparent that this is an overmatched suggestion involving a father and son. They share the same first and last names, leading to the assumption that they are the same person. However, as we lack a Suffix attribute to distinguish between "Senior" and "Junior," it is clear they are not the same individual, even if they reside in the same household.
- Reject this suggestion.
- Click Finish to submit your actions in the duplicates manager.
Congratulations!
You discovered some of the matching, merging, suggestion, and deduplication capabilities of xDM.
To summarize:
- You have filtered data and shared filters to find high-value customers.
- You have confirmed matches.
- You have corrected errors in golden records.
- You have passed on golden records.
- You have reviewed suggestions and accepted or rejected the merge suggestions as appropriate.
Next, you will learn how to browse and search data, and follow the audit trail to look at data history.
You are now ready to browse and search data within the application. The ability to search for customers in xDM is crucial for accomplishing tasks such as updating information and exporting data. Additionally, it serves as the initial step in tracing the history of data and understanding how it evolves over time.
Organizations rely on the ability to trace data back to its original sources, especially when matches and manual changes are made. xDM provides robust recordkeeping capabilities, ensuring it is possible to view how values change over time.
As the Data Steward user, this section of the tutorial will teach you how to:
- Use the Global Search feature.
- Update customer information.
- Browse data history.
- Follow audit trails.
Browse and search data
You can browse and search in xDM using various methods, starting with the Global Search.
Upon logging in as Data Steward, you will typically land on the Global Search homepage. If you are already in the Customer B2C application, you can access the Global Search in two ways:
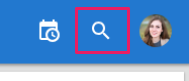
- Click Global Search in the navigation drawer.

- Click on the Search icon in the upper-right corner.
Next, you will use the Global Search to find products.
Global Search
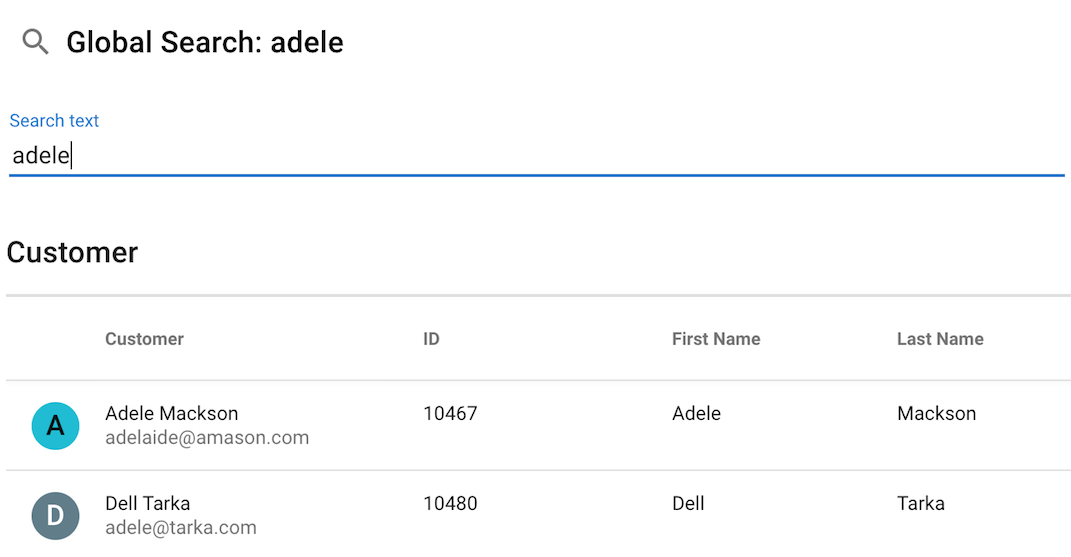
You are now going to search for the record of Mary-Ann Markes to observe how the date of birth changed after the edit made when confirming Mary-Ann Markes' golden record.
- Click Global Search.
- Search for
mary-ann.
You should see one result.
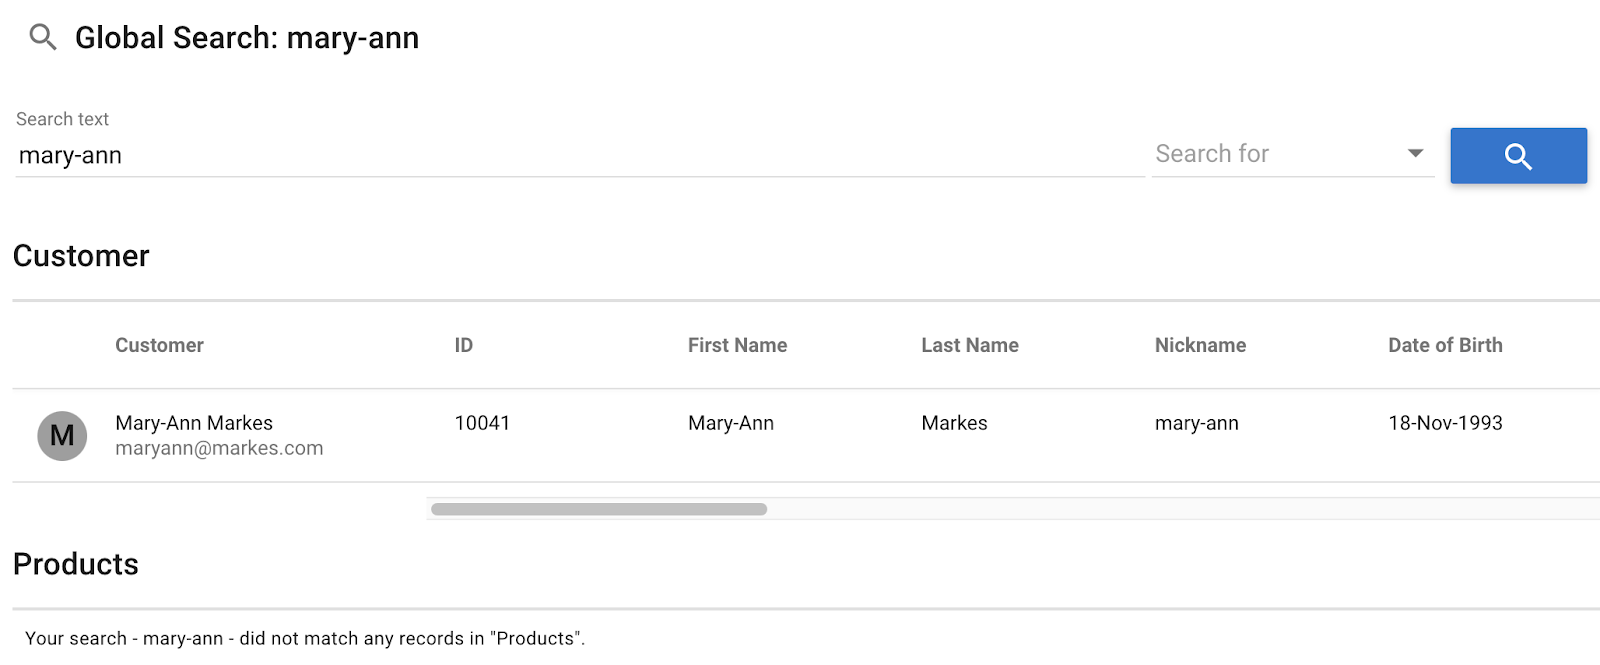
- Select the result, Mary-Ann Markes, to learn more about this customer.
Next, you will review the master records.
Review master records
Organizations need to trace data back to the original sources, especially after matches and manual changes.
xDM preserves the original master data records that contribute to the golden record.
- Click the Master records tab.

- This view displays the various master records that contributed to the golden record. Values highlighted in blue indicate those that "survived" to the golden record.
Next, you will learn to trace data history in xDM.
Data changes
You can observe how values evolve over time as data progresses from source systems to enrichment, matches, manual edits, and merges.
To see data changes using the Timeline feature:
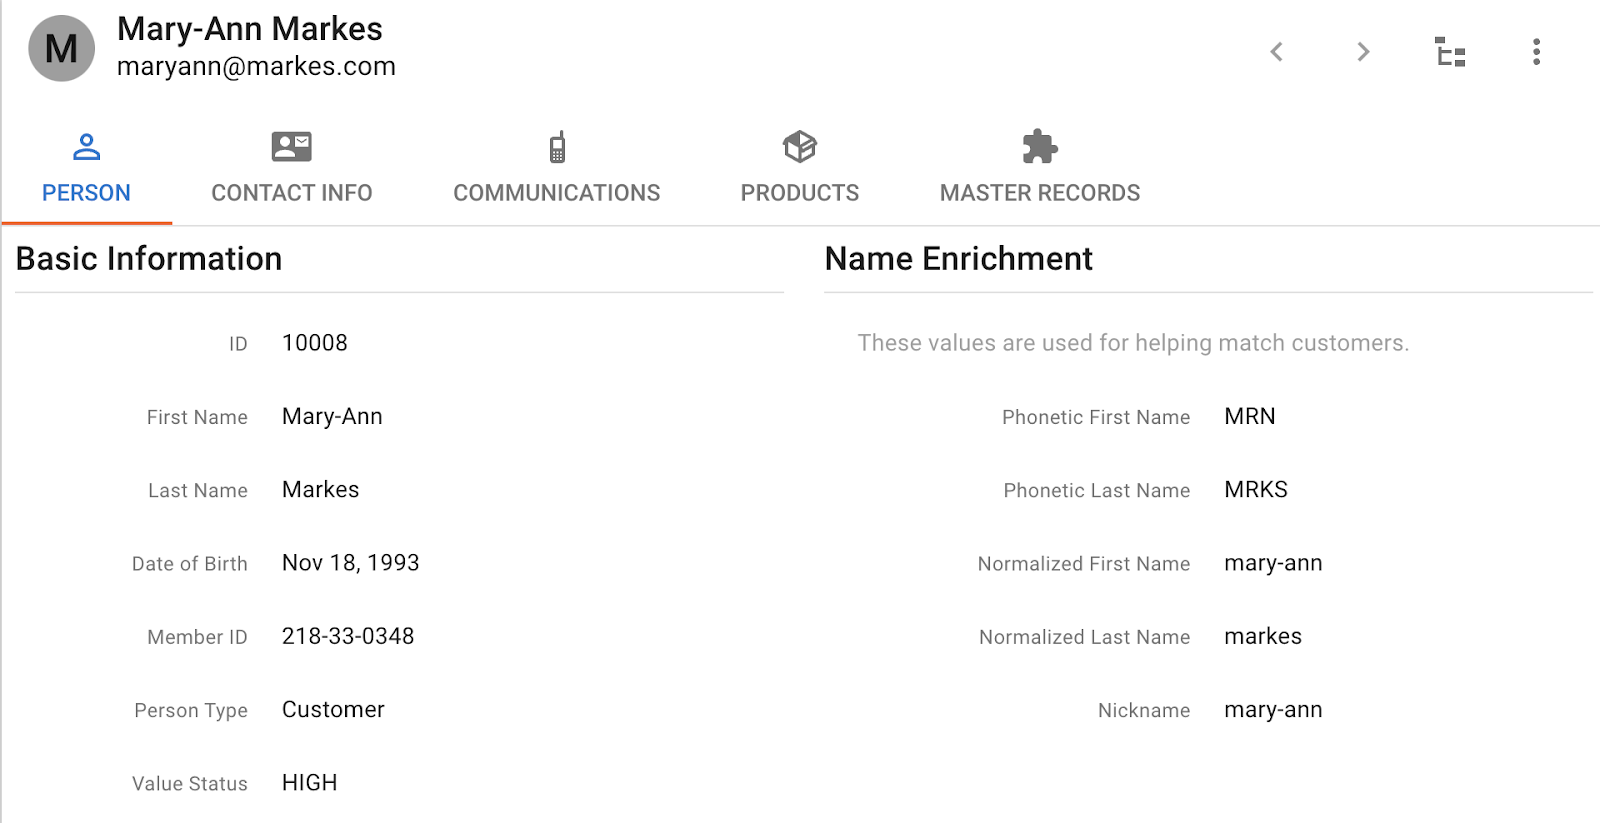
- Click on the Person tab.
- Hover your mouse over the Date Of Birth information.
An information icon appears.
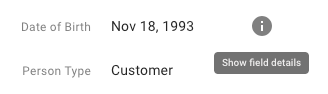
- Click the information icon. The Field tab details appear in the side panel.
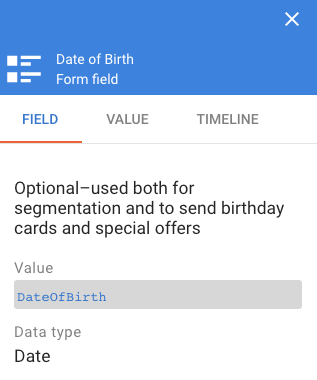
- Click on the Value tab.
You can see the values from source systems as well as see the current value you entered to "override" xDM's chosen value in the duplicate manager.
Next, you will update a customer's master record to see how xDM handles data changes.
Browse updates
Imagine a scenario where a source system updates data, and the newly updated master data is transmitted to xDM. xDM detects these changes and proceeds to update the corresponding master record using the master record's ID. Subsequently, xDM adjusts the associated golden record based on survivorship rules.
For instance, we will consider a few weeks passing after your review of matches. The CRM system updates certain customer information, including married names for a handful of customers. xDM monitors these updates, which are visible in the Timeline.
Typically, data updates are automated and flow into xDM programmatically or via integration tools. However, since ETL is not used in this tutorial, you will manually upload the Excel file to simulate this CRM change by uploading the 3-import-data-6-Customers.xlsx spreadsheet.
Browse original data
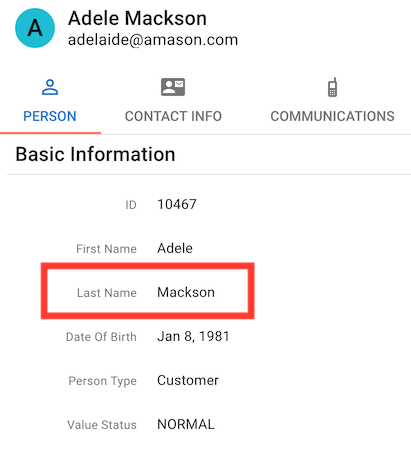
First, take note of the original customer record before the source system changes.
- Search for a customer called Adele Mackson using the Global Search.
- Select Adele Mackson's record.
- Note that this customer's last name is Mackson.
Next, you will see how the data changed.
Update customer data
You are now going to update customer data to simulate an ETL job from a CRM system to xDM. In this step, you will upload customer data changes.
To update customer data:
- In the Quick Actions section of the navigation drawer, select Update Customers.

- Import the
3-import-data-6-Customers.xlsxExcel spreadsheet.
- Click the Click to refresh button when the toaster message appears.
Browse customer updates
After importing the data updates, you are ready to see the data changes.
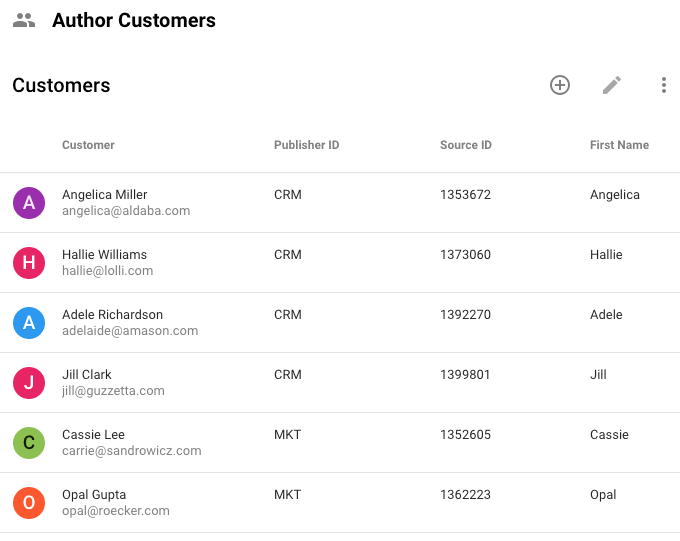
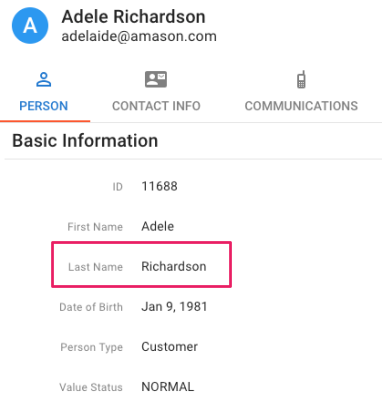
- Once refreshed, note that Adele's last name has changed from Mackson to Richardson.
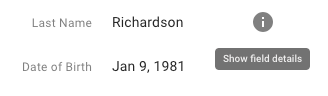
- Click the information icon on the Last Name field to reveal the field details.
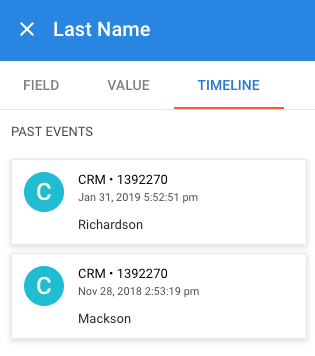
- Click on the Timeline tab. xDM shows that it has recorded the data change from Mackson to Richardson, identifying the source system (CRM) and the time of change.
Congratulations!
You have successfully updated master data and observed how xDM records data history. These are just some of the auditing capabilities of xDM.
To summarize:
- You have used the Global Search feature.
- You have browsed data, including using custom-built business views.
- You have checked the history of data in xDM using the timeline feature.
Well done! You have completed a customer data management project with Semarchy xDM.
Learning recap
- You have performed a quick install of xDM.
- You have imported a data model in the Application Builder.
- You have set up privileges to restrict access to different users within the xDM platform.
- You have imported data from spreadsheets into xDM.
- You have browsed the error queue.
- You have added search filters to find customer data.
- You have deleted records permanently from xDM.
- You have managed duplicate customer data by confirming matches and reviewing suggestions.
- You have accepted correct matches and suggestions.
- You have rejected or modified matches and suggestions when incorrect.
- You have browsed and searched for data using Global Search.
- You have browsed the history of data and followed audit trails.
Next steps
xDM is designed to handle various data types, including customer data, location data, reference data, organizational data, supplier data, and other domains.
To learn how to harness the capabilities of xDM, you could now pursue two distinct paths:
- Exploring the second unit of the Demo Applications track to enhance your proficiency in using xDM applications as a business user.
- Understanding how to design applications as a developer through the Data Authoring and Data Consolidation tracks.
Go back to the Tutorials menu to find these resources.
Thank you for completing this tutorial.