In this tutorial, you will learn how to create robust match rules and enrichers to facilitate these match rules. You will also define some custom survivorship rules. These activities are essential to ensure that data coming from different publishers is matched and optimally consolidated.
Learning outcomes
- Designing enrichers to standardize and augment your data.
- Designing and improving match rules.
- Testing your rules in the user application.
- Defining survivorship rules.
Learning track
This tutorial is the second unit of the Data Consolidation track. If not done yet, follow the first unit, Create your first data consolidation application.
If you have not completed this prerequisite, return to the Tutorials menu.
Otherwise, enjoy this tutorial!
Laying the groundwork
This tutorial provides guidelines for conducting effective matching on business-to-business (B2B) data. You will grasp the mechanics of crafting match rules tailored to your data requirements.
In a real data management project, you will need to conduct some preparatory work. Consider the following questions:
- How much overmatching is acceptable?
- How much undermatching is acceptable?
- Where is your data most reliable?
- Where is your data least reliable?
- What are the sources of errors in the source data?
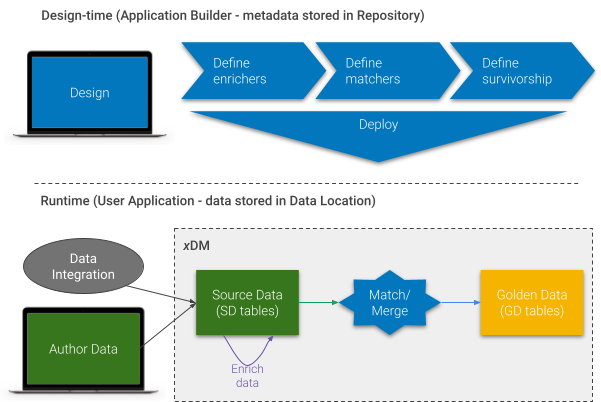
Semarchy xDM enables the creation of enrichers to normalize, standardize, and enrich data loaded into or authored within your xDM application. This is a key success factor for matching as it allows working with cleaner, richer, and more standardized data.
This section will guide you through the process of creating a SemQL enricher to standardize company names.
Learning outcomes
- Creating a SemQL enricher.
- Reloading data to observe the impact of your enricher on matching.
Add the NormalizedName attribute
Before setting up an enricher, you first need to add an attribute to the Company entity to store standardized company names.
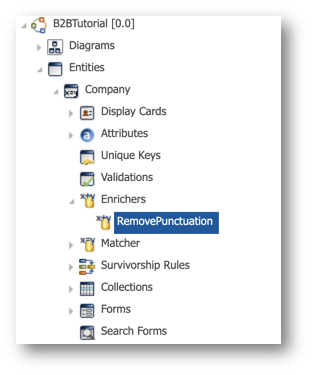
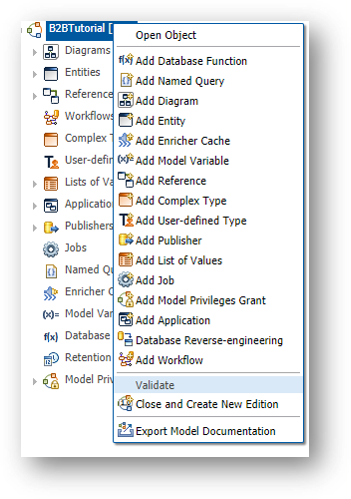
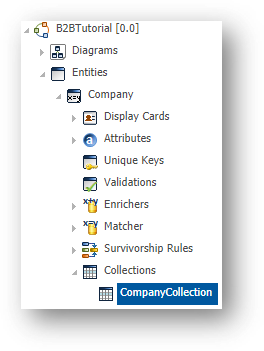
- From the Designer perspective of the Application Builder, expand Entities > Company > Attributes.
- Right-click on Attributes and select Add Simple Attribute.
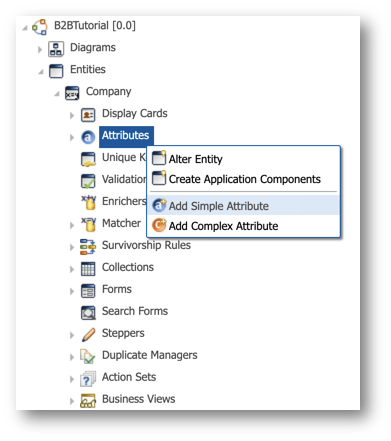
- Enter
NormalizedNamein the Name field. - Keep the other default values, and then click Finish.
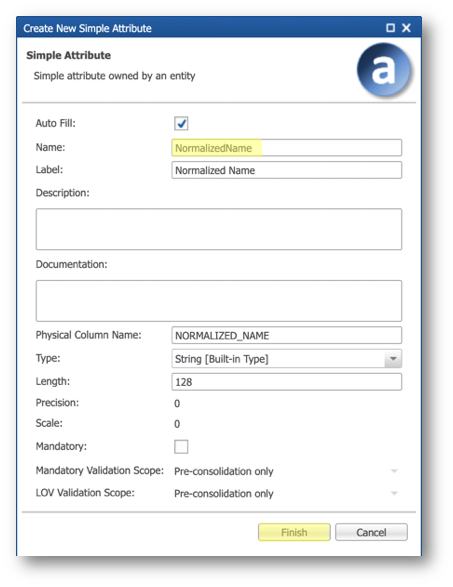
- Repeat the procedure above to create the PhoneticName attribute.
- Save the model.
Create an enricher
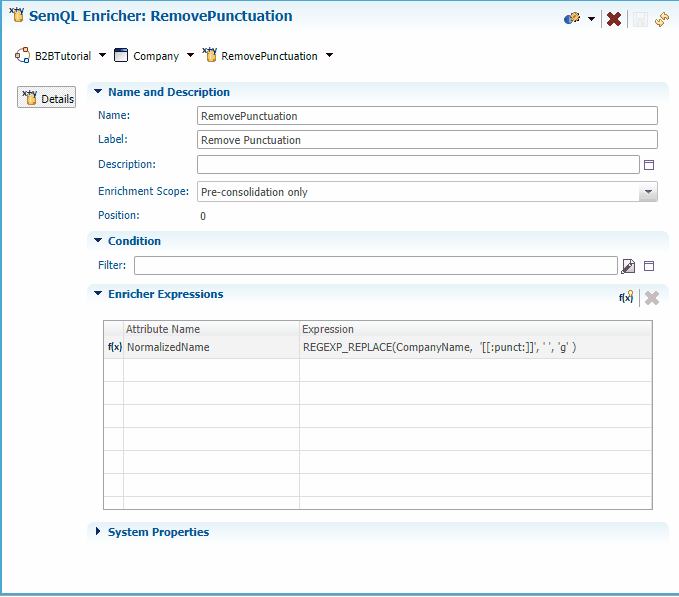
We will now add a SemQL enricher to perform basic data standardization on CompanyName. The goal is to remove punctuation.
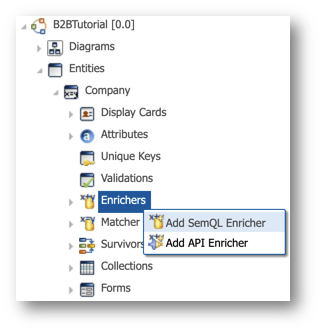
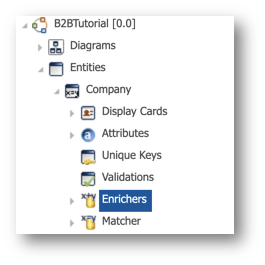
- Under the Company entity, right-click on Enrichers, and select Add SemQL Enricher.
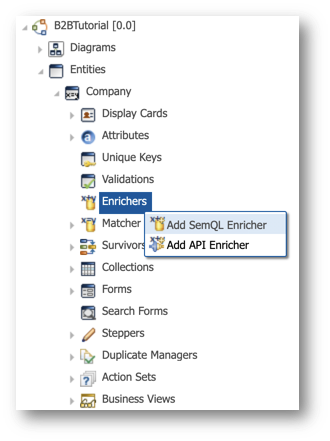
- Enter
RemovePunctuationin the Name field and click Next.

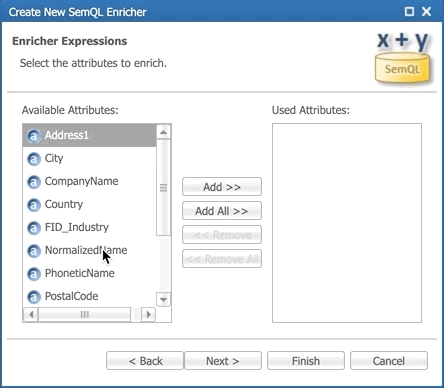
- Define the attribute to enrich: select the NormalizedName attribute, click the Add >> button, and then click Finish.
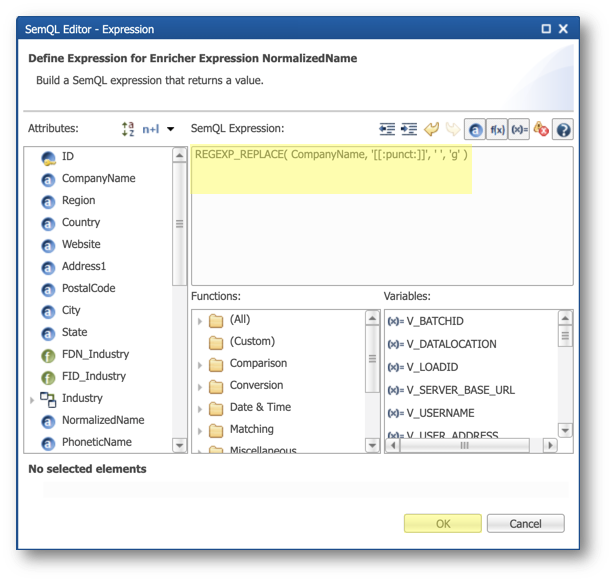
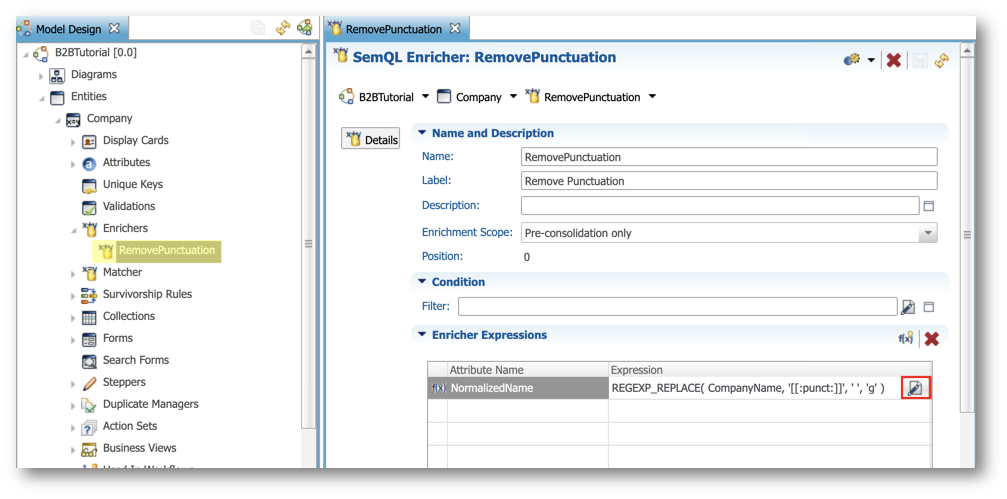
- In the Enricher Expressions section, click the Edit Expression button next to the NormalizedName attribute.
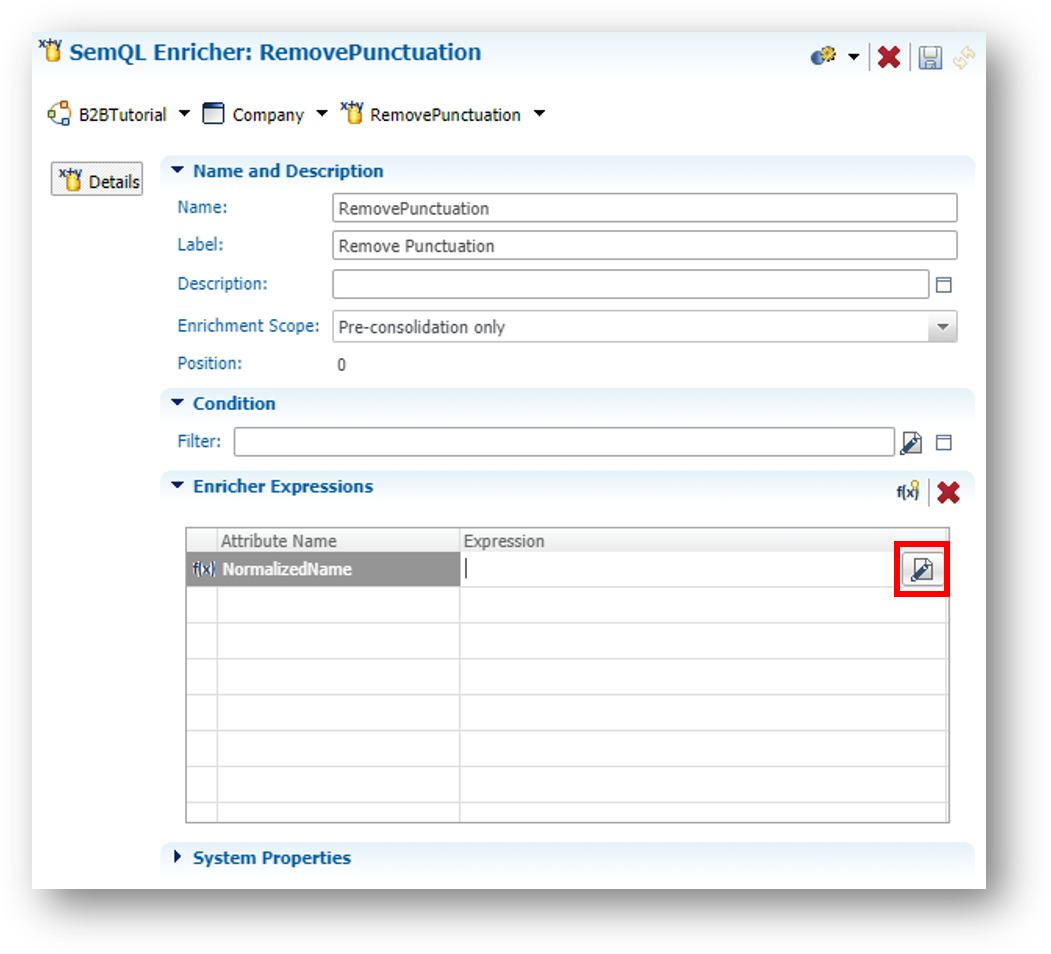
- Copy and paste the SemQL expression for your database (or build it by double-clicking REGEXP_REPLACE in the Functions list and setting the parameters), and then click OK.
- On PostgreSQL, use the following expression:
REGEXP_REPLACE( CompanyName, '[[:punct:]]', ' ', 'g' )
- On Oracle, use the following expression:
REGEXP_REPLACE( CompanyName, '[[:punct:]]', ' ' )
- Click Save to save the enricher.
Add the new attributes to the Company collection
- Expand the Collections node under the Company entity and double-click on CompanyCollection.

- Drag and drop NormalizedName and PhoneticName from the Attributes list to the content of the collection.
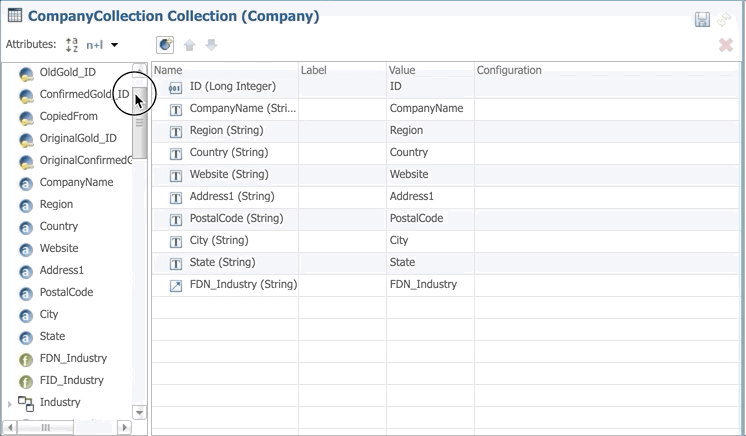
- Save the collection.
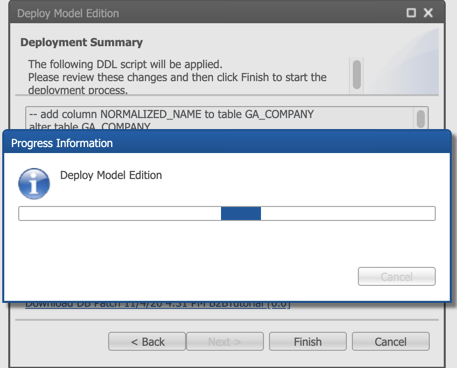
Deploy the model changes
You first need to deploy the changes you just performed on your model.
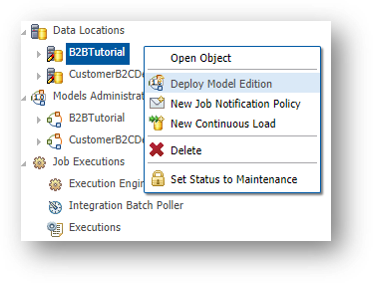
- Go to the Management perspective.
- Right-click on B2BTutorial and select Deploy Model Edition.
- Click Next.
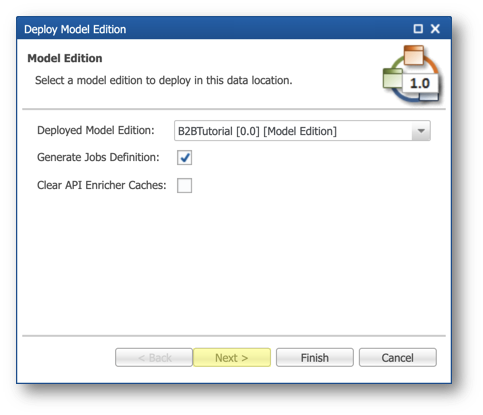
- Click Finish to deploy the listed changes to the data location.

- Wait until all changes are deployed.
Reload data
Executing the enricher on all existing data necessitates reloading the data. In this section, you will use the xDM user interface to delete and reload data. If you are loading from a data integration tool, you may use it to truncate and reload data.
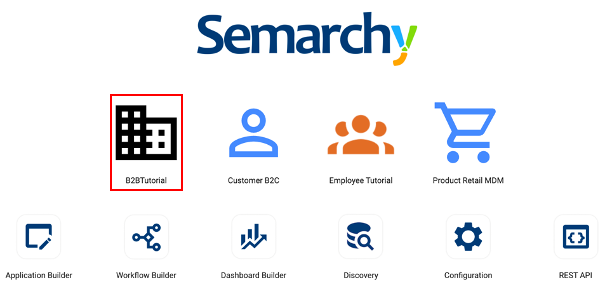
- Return to the Welcome page and click on B2BTutorial.
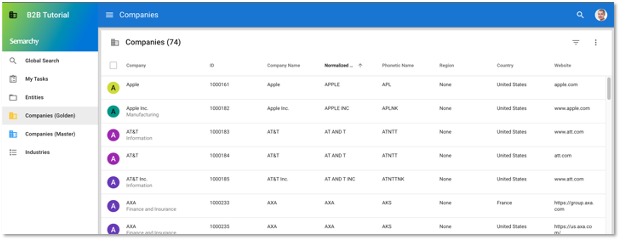
- Click on Companies (Golden) in the navigation drawer.
- Click the Select all checkbox in the collection header to select all records, open the action menu, and then click Delete.
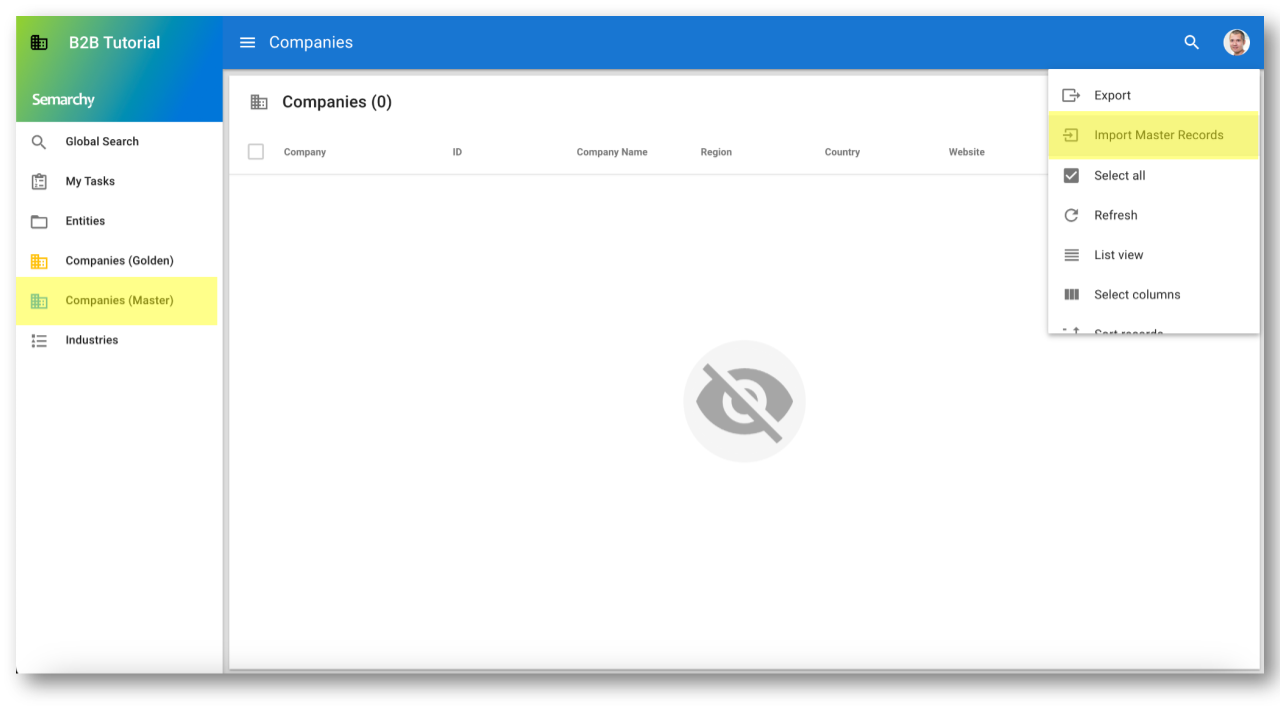
- Click on Companies (Master) in the navigation drawer.
- Open the action menu of the Companies collection, and then select Import Master Records.
- From the tutorial resources, select the
data-consolidation\datasets\companies-data.xlsxfile from the tutorial resources. - Click Continue.
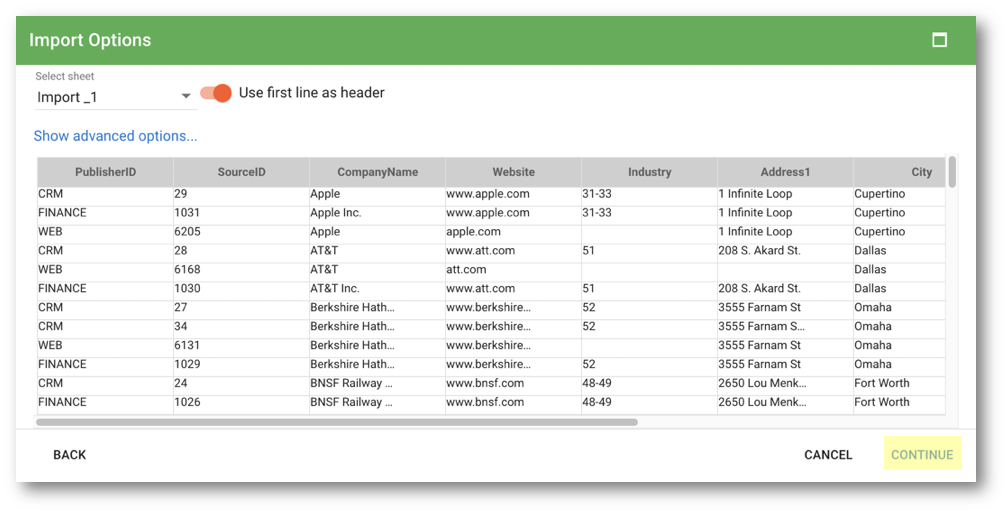
- Click Continue on the next screen to confirm the mapping.
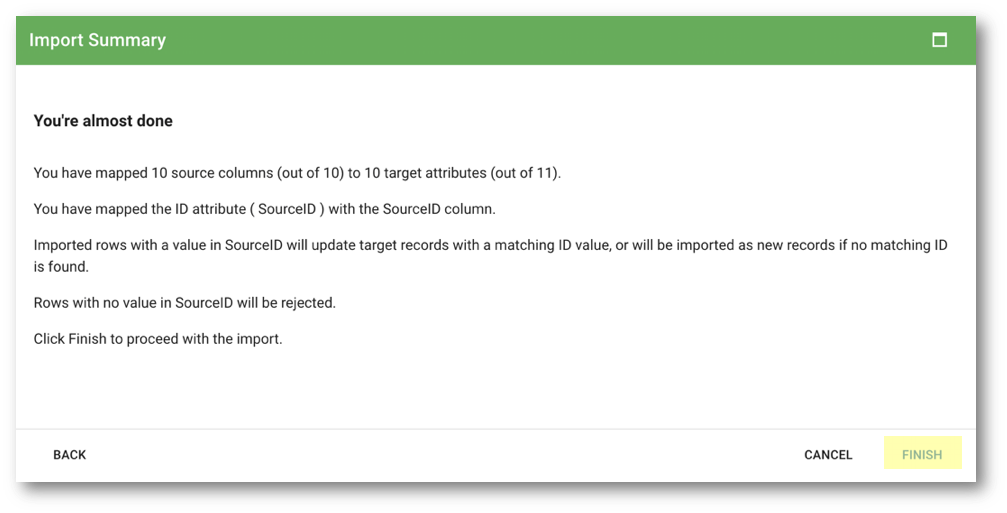
- Click Finish on the Import Summary page.
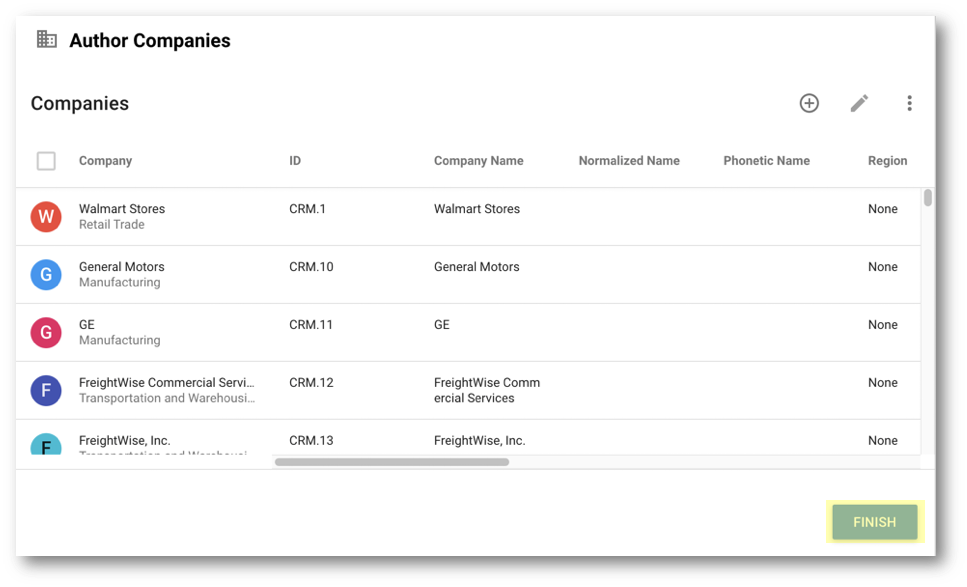
- Review the imported data and click Finish.
- When the toaster indicates "Changes successfully applied," click on Click to refresh to see the data you just loaded.

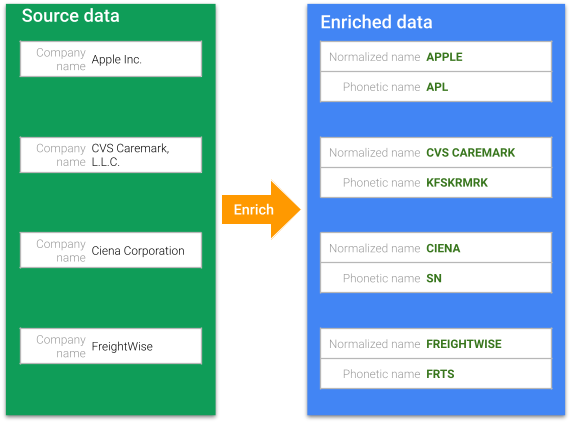
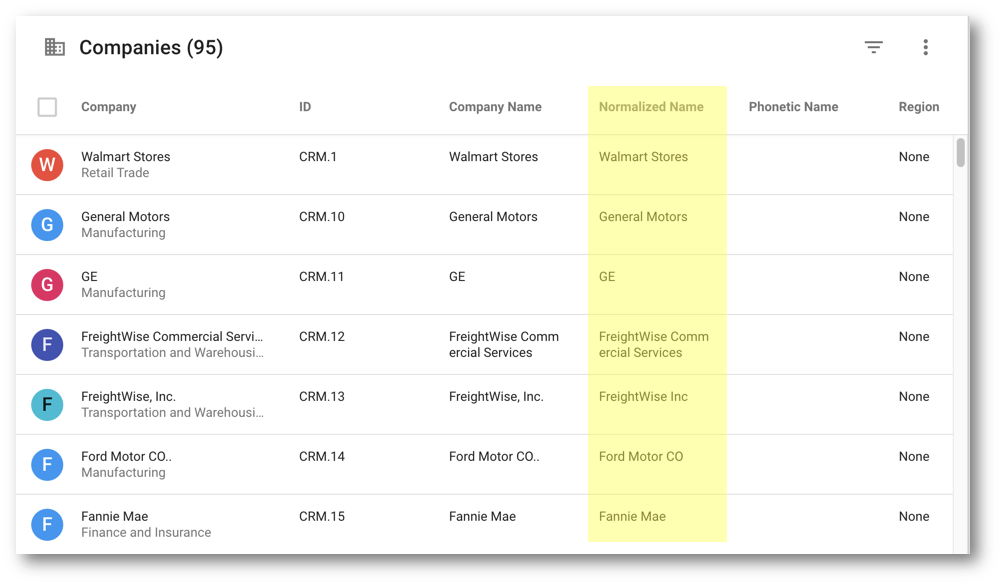
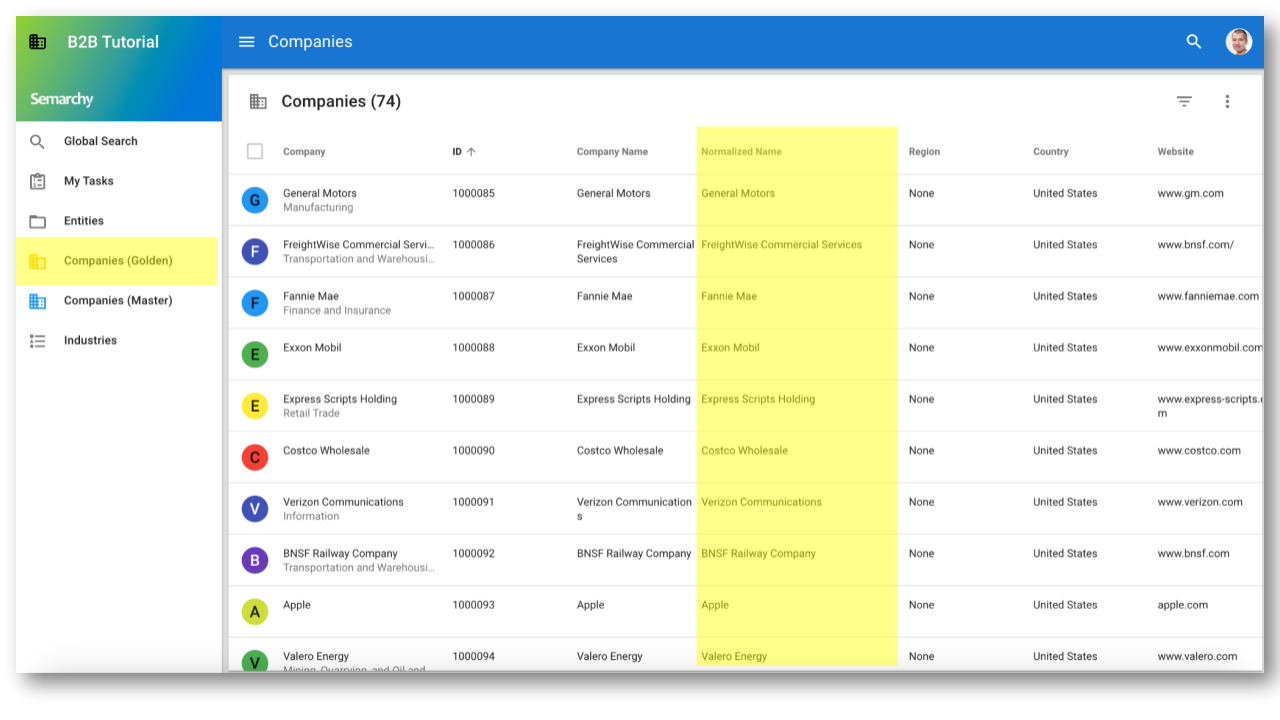
- See that the NormalizedName column is now populated. For instance, the normalized name for FreightWise, Inc. is FreightWise Inc.
- Click on Companies (Golden) in the navigation drawer. The normalized name is also available on golden records.
Improve company name standardization
Your enricher overlooks an important special case: the character "&" is treated like any other, but has a meaning that you want to preserve. For example, we aim for "Ben and Jerry's" and "Ben & Jerrys" to be regarded as a strong match and merged accordingly, potentially without human confirmation. This is a very common special case in match rules. Therefore, you will enhance the enricher to substitute "&" with "AND" before eliminating any punctuation.
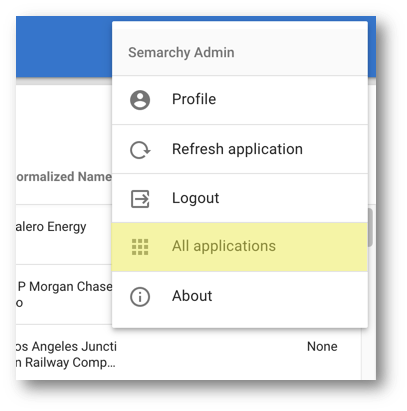
- Click on your avatar picture on the top-right corner of the screen to open the user menu, and select All applications.
- Open the Application Builder and select the B2BTutorial [0.0] model.
- Expand Entities > Company > Enrichers, and double-click on RemovePunctuation.
- Click the Edit expression button next to the enricher's expression.
- Replace the existing expression with the following one (depending on your database) and click OK. Observe that this expression will change company names to uppercase, remove punctuation and replace "&" with "AND".
- On PostgreSQL, use the following expression:
REGEXP_REPLACE(
        REPLACE( UPPER(CompanyName), '&', ' AND ' ),
        '[[:punct:][:blank:]]+', /* find one or more spaces or punctuation marks */
        ' ',                     /* replace with a single space */
        'g'                      /* replace all occurrences */
)
- On Oracle, use the following expression:
REGEXP_REPLACE(
        REPLACE( UPPER(CompanyName), '&', ' AND ' ),
        '[[:punct:][:blank:]]+', /* find one or more spaces or punctuation marks */
        ' '                      /* replace with a single space */
)
- Save your work.
You will observe the benefits of this enhancement when you reload data in the next section.
Congratulations!
You have successfully added the first enricher.
To summarize:
- You have created a SemQL enricher to standardize company names.
- You have deleted and reloaded data to execute your enricher in action.
- You have improved your enricher by removing punctuation.
In the next section, you will add another enricher for name phonetization.
In this section, you will add another enricher to phoneticize names and help matching records.
Learning outcomes
- Using a plug-in enricher to generate a phonetic version of a company name.
- Reloading data to observe the impact of your enricher on the matching process.
Add the phonetization enricher
You will now use the Semarchy xDM Text Enricher plug-in to phoneticize company names. This is an extremely useful technique depending on where your source errors come from.
- Under the Entities > Company node, right-click on Enrichers and select Add API Enricher.
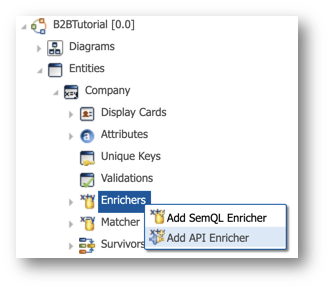
- Enter the following values in the wizard:
- Select the Java Plug-in option.
- Select Semarchy Text Enricher in the drop-down list.
- Enter
PhoneticizeNamein the Name field.
- Click Finish.
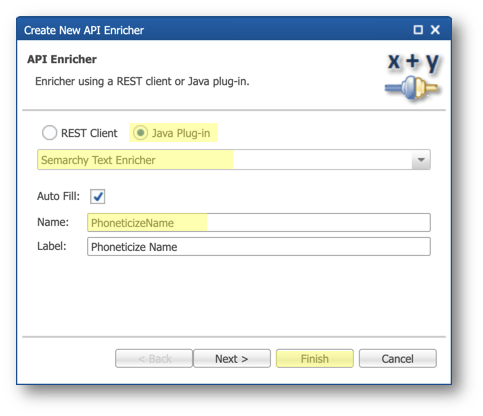
- Configure the transformation: scroll down to the Plug-in Params section. Paste the following value in the Transformation parameter.
DOUBLEMETAPHONE 12 TRUE
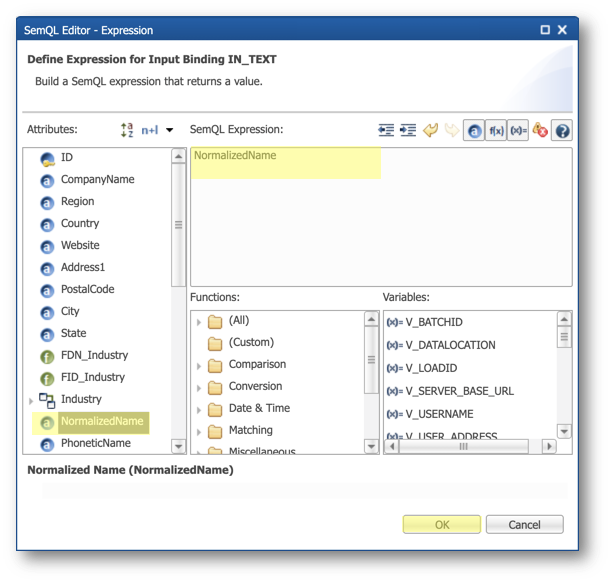
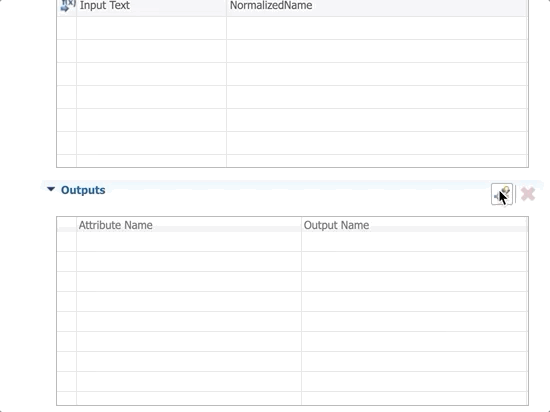
- In the Plug-in Inputs section, click the Edit expression button for the Input Text row.
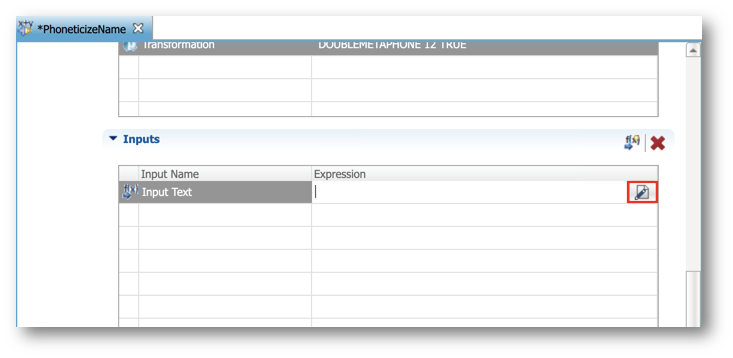
- Double-click on PhoneticName in the Attributes list to add it to the expression and then click OK.
- In the Outputs section, click Define Outputs.
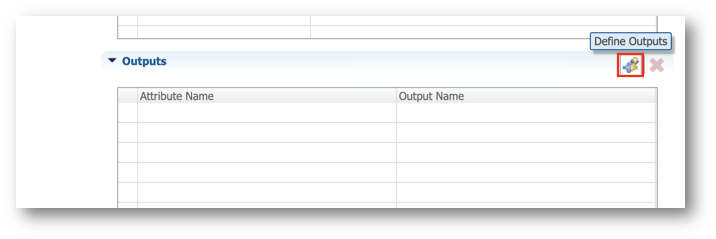
- Add the PhoneticName attribute and select Transformed Text as the Output Name.
- Save your work and validate the model. No error or warning should be reported.
Deploy the model changes
Repeat the same steps to deploy the model changes:
- Go to the Management perspective.
- Right-click on B2BTutorial and select Deploy Model Edition.
- Click Next.
- Click Finish to deploy the changes to the data location.
Reload data
You now need to reload data to see the improved name standardization and the name phonetization.
Repeat the same operations as previously:
- Return to the Welcome page and open the B2B Tutorial application again.
- Click on Companies (Golden) in the navigation drawer.
- Select the Select all checkbox in the collection header to select all records.
- Open the action menu, and click on Delete.
- Select Companies (Master) in the navigation drawer.
- Open the actions menu of the Companies collection, and then select Import Master Records.
- Select the
data-consolidation\datasets\companies-data.xlsxfile from the tutorial resources. - Confirm the import options, mapping, and validate the import summary.
- Review the imported data and click Finish.
- When the toaster indicates "Changes successfully applied," click on Click to refresh.
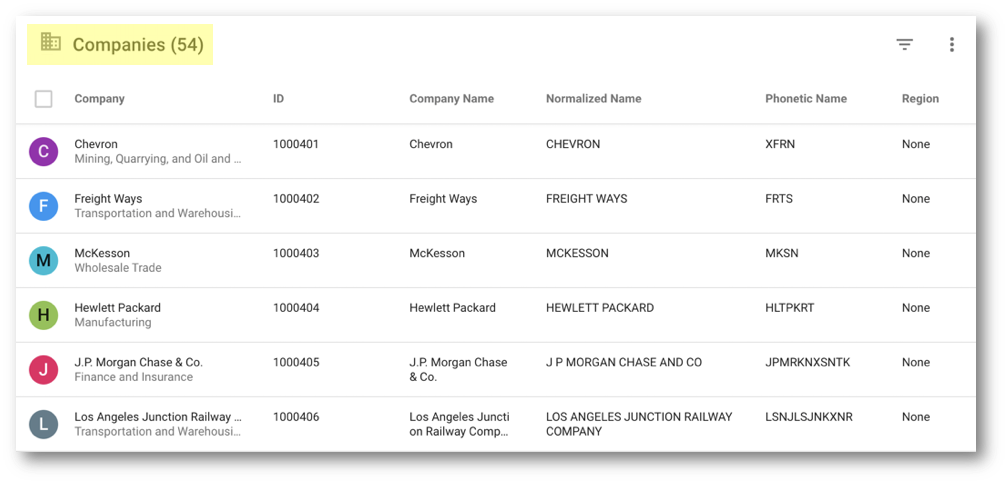
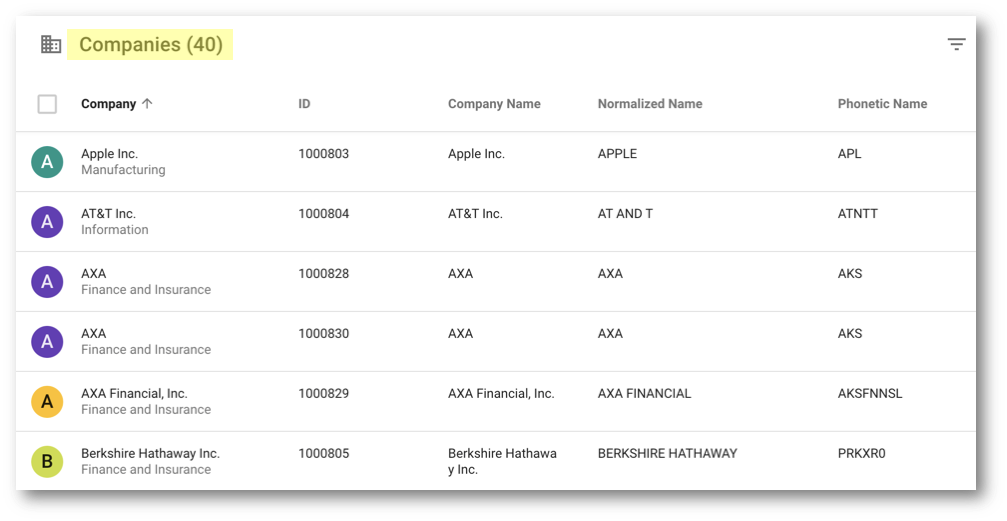
- Click on Companies (Golden) in the navigation drawer to see the enriched golden data. Observe that:
- The Normalized Name column now contains uppercase letters only.
- The value of Normalized Name for J.P. Morgan Chase & Co. is J P MORGAN CHASE AND CO.
- The Phonetic Name column is now populated.
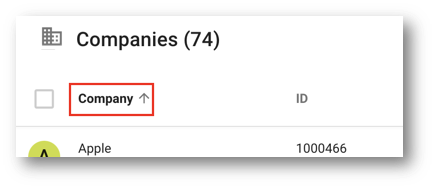
- Click on the Company column header to sort results alphabetically.
- Browse the records and identify duplicates that could be detected by match rules using the NormalizedName or the PhoneticName attributes:
- Hewlett Packard and Hewlett-Packard have slightly different names but the same normalized name or phonetic name.

- FrateWize and Freight Ways have very different normalized names, but the same phonetic name.

Congratulations!
You have successfully added a plug-in enricher.
To summarize:
- You have created a plug-in enricher to phoneticize company names.
- You have deleted and reloaded data.
The next section will focus on updating match rules to make the most of these enriched fields.
Semarchy xDM offers a robust feature for defining multiple match rules with varying match rules and merge policies to determine the actions taken on clusters of potential matches as they transform into golden records.
Learning outcomes
- Improving matching by defining multiple match rules.
- Adding a new enricher to improve the matching.
- Displaying matching metadata in your application.
Multiple match rules and scores
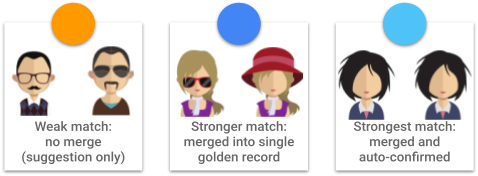
To enhance the matching process, we aim to implement multiple rules and assign distinct confidence scores to each:
- Perfect match: an exact match on both name and address is considered a perfect match for our dataset, warranting a match score of 100.
- Normalized name: our various source systems exhibit differences in punctuation and usage of business entity types like "Inc." and "Corp." By accommodating these variations, matching by name becomes considerably reliable, allowing us to assign a match score of 94.
- Phonetic name: in cases where a name entered differs slightly from the original but still matches the postal code, we remain reasonably confident in these phonetic matches, and assign a match score of 88.
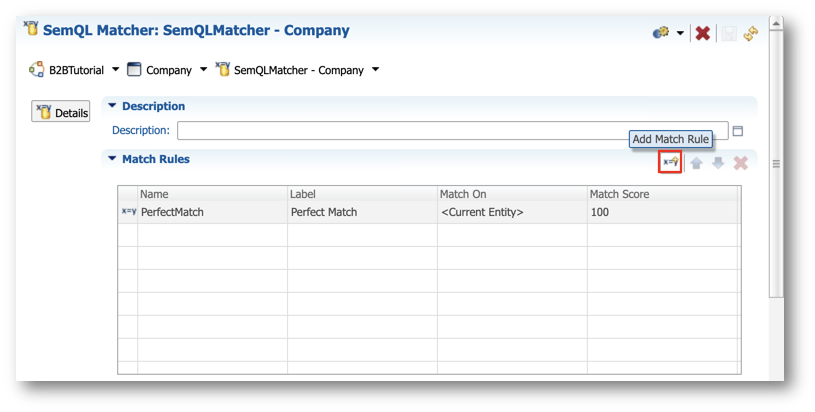
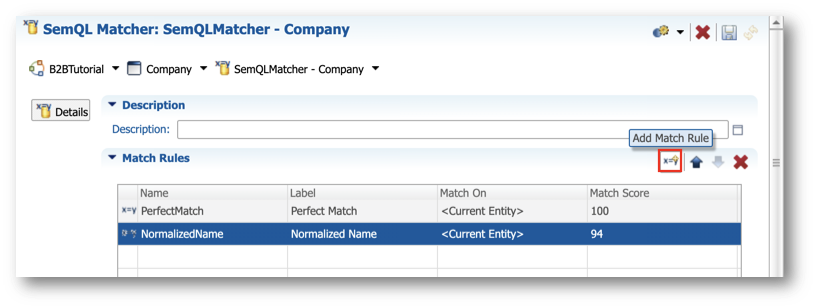
Add match rules
You are now going to add match rules that will leverage the normalized and phonetic names you added previously.
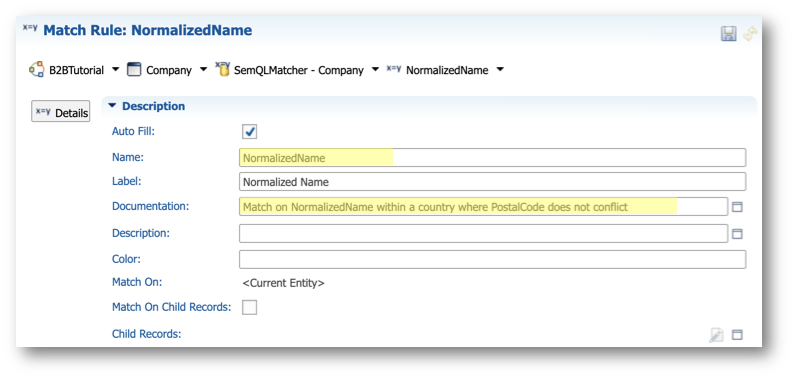
Add a match rule for normalized names
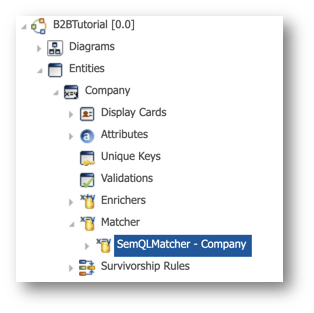
- To open the existing SemQL matcher that you initialized during the previous tutorial unit, Create your first data consolidation application, in the Application Builder, expand Entities > Company > Matcher, and then double-click on SemQLMatcher - Company.
- Click Add Match Rule on top of the Match Rules list.
- Enter the following parameters:
- Name:
NormalizedName - Documentation:
Match on NormalizedName within a country where PostalCode does not conflict
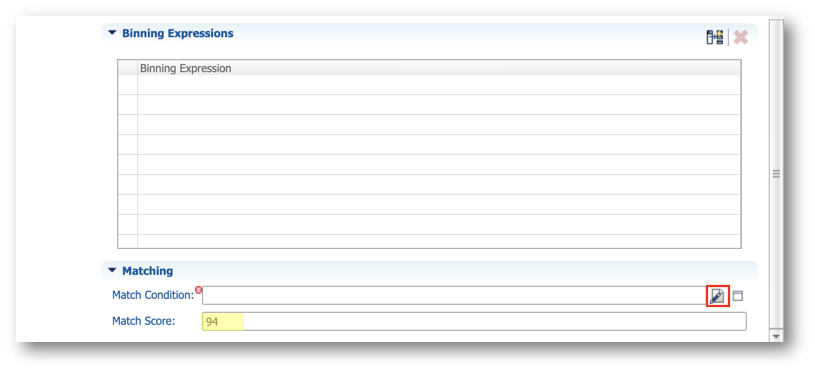
- Scroll down to the Matching section:
- Set the Match Score to
94. - Click the Edit Expression button next to the Match Condition field.
- Paste the following expression in the SemQL editor and click OK.
Record1.NormalizedName = Record2.NormalizedName
AND (
  Record1.PostalCode = Record2.PostalCode
  OR Record1.PostalCode IS NULL OR Record2.PostalCode IS NULL
)
AND Record1.Country = Record2.Country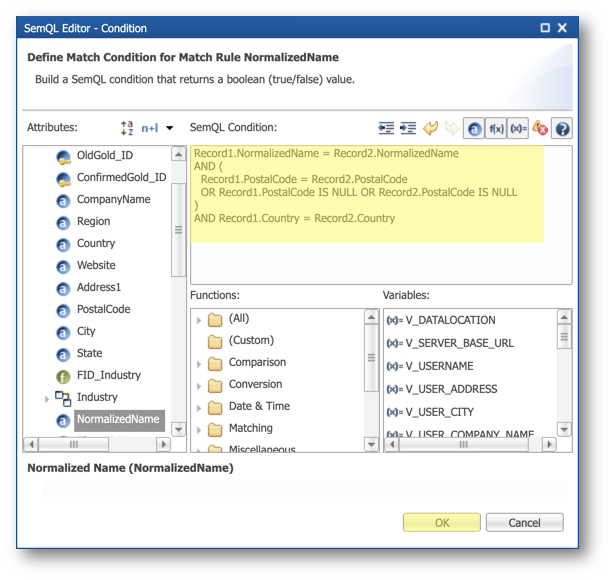
6. Click Save.
Add a match rule for phonetic names
Add a rule for the PhoneticName attribute by following the same procedure:
- Click on SemQLMatcher - Company in the breadcrumb to return to the matcher's configuration.

- Click Add Match Rule on top of the Match Rules list.
- Enter the following values:
- Name:
PhoneticName - Documentation:
Match on PhoneticName within a country where PostalCode does not conflict - Match Condition: copy and paste the expression below.
Record1.PhoneticName = Record2.PhoneticName
AND (
  Record1.PostalCode = Record2.PostalCode
  OR Record1.PostalCode IS NULL OR Record2.PostalCode IS NULL
)
AND Record1.Country = Record2.Country- Match Score:
88

- Save the rule.
- Click again on SemQLMatcher - Company in the breadcrumb to return to the matcher's configuration. Review your matcher, which is now composed of three rules:
- PerfectMatch (score: 100)
- NormalizedName (score: 94)
- PhoneticName (score: 88)

Configure thresholds
Now that new match rules have been defined to identify potential matches, we do not want all matches to merge automatically anymore.
Modify the thresholds for the Company SemQLMatcher accordingly:
- Within the SemQLMatcher editor, scroll down to the Merge Policy section.
- Enter the following thresholds to define when records will be merged automatically:
- Create a golden record from new master records:
85 - Merge unconfirmed golden records:
85 - Merge confirmed golden records:
85 - Merge unconfirmed with confirmed golden records:
85 - Add new master records to an unconfirmed golden record:
85 - Add new master records to a confirmed golden record:
85

- Within the Auto-Confirm Policy section, set the Auto-confirm golden records property to 91. This means that only golden records with a confidence score of 91 or higher will be confirmed and merged automatically.

Deploy, reload and test
- Save your work and validate the model.
- Deploy the model: go to the Management perspective, right-click on the B2BTutorial Data Location, and then select Deploy Model Edition:
- Reload data by repeating the same operations as in ⓵ Standardize company names with an enricher.
- Return to the B2BTutorial application.
- Click on Companies (Golden) in the navigation drawer.
- Select the Select all checkbox in the collection header to select all records, open the actions menu, and then click on Delete.
- Click on Companies (Master) in the navigation drawer, then click the action menu of the Companies collection, and then select Import Master Records.
- Select the
data-consolidation\datasets\companies-data.xlsxfile from the tutorial resources. - Confirm the import options and mapping, and then validate the import summary.
- Review the imported data, and then click Finish.
- When the toaster indicates "Changes successfully applied," click on Click to refresh.
- Click on Companies (Golden) in the navigation drawer to open the enriched golden data.
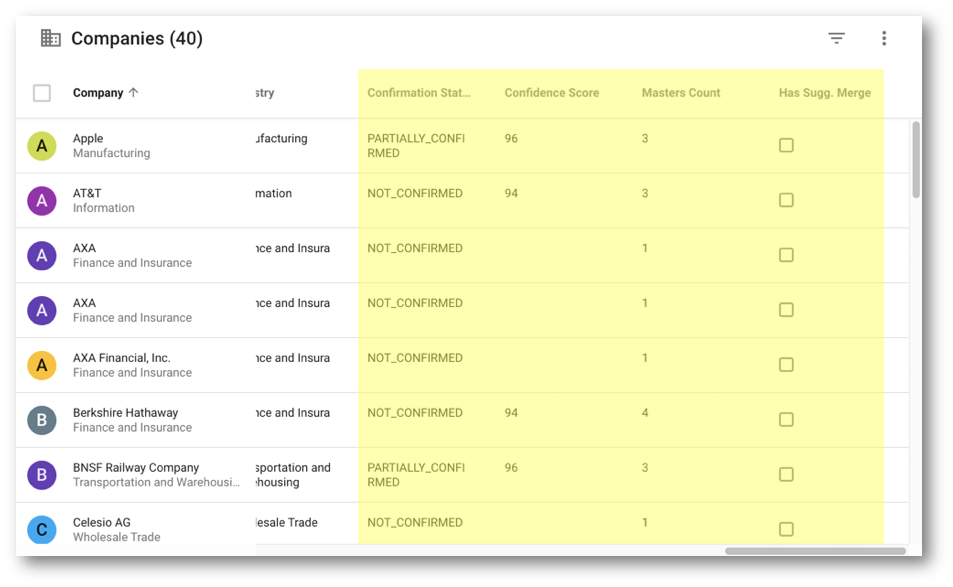
- Observe that the list of golden records now includes 54 records instead of 74 previously. This means that the new matching rules using the normalized and phonetic names allowed to match and merge more records.
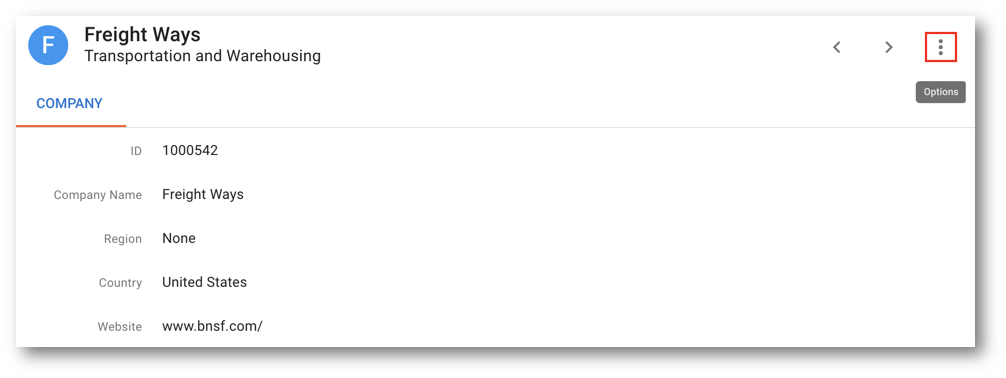
- Sort records by Company and scroll until Freight Ways.
- Note that the FrateWize record is not visible anymore. Verify that it was merged with Freight Ways based on their matching phonetic names:
- Click on the Freight Ways record.
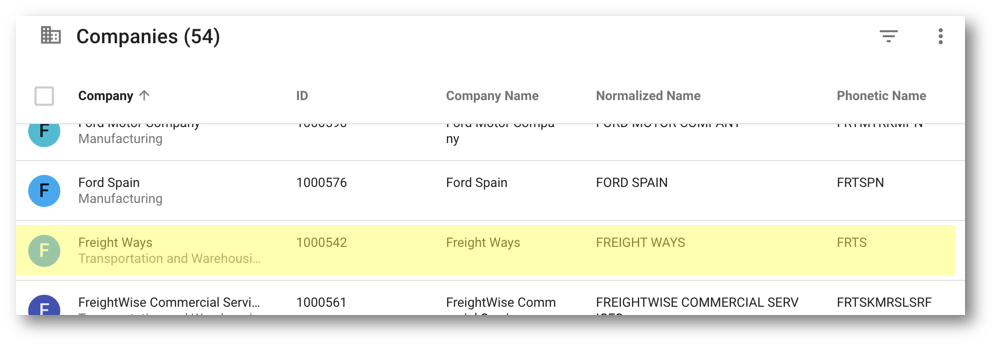
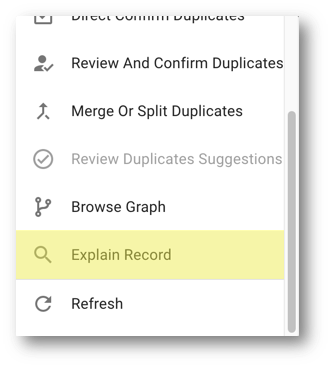
- On the record's browsing form, open the Options menu, and select Explain Record.
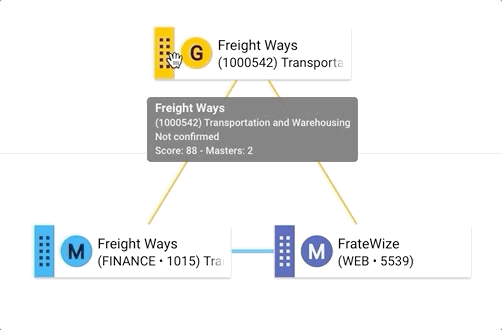
- The golden record's explanation confirms that it was consolidated from the Freight Ways and Frate Wize master records.
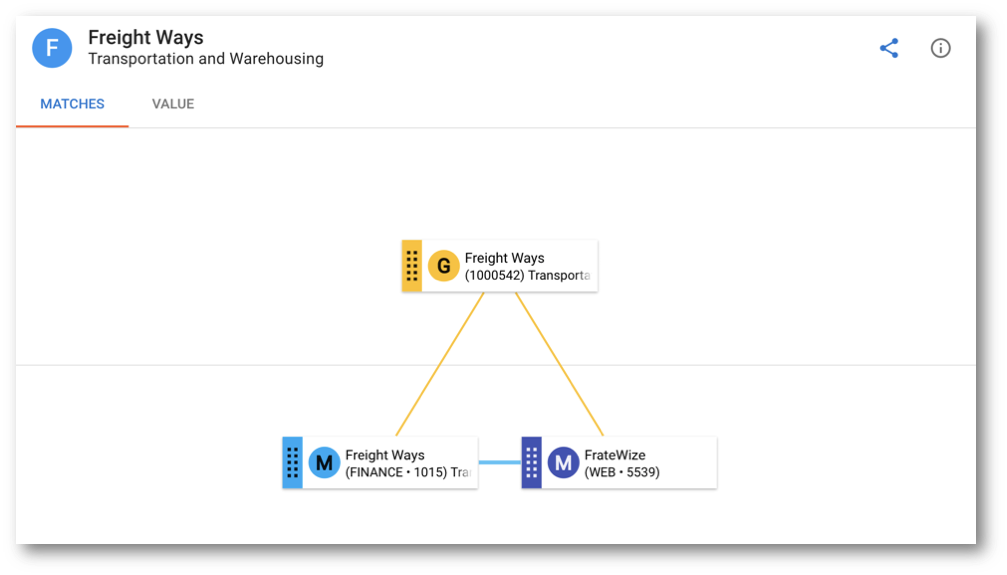
- Hover over the golden record tile to see information about that record. You will notice this record has a score of 88 and is yet to be confirmed (suggested match). Hover over the blue line connecting the master records to reveal their matching rule (i.e., PhoneticName)
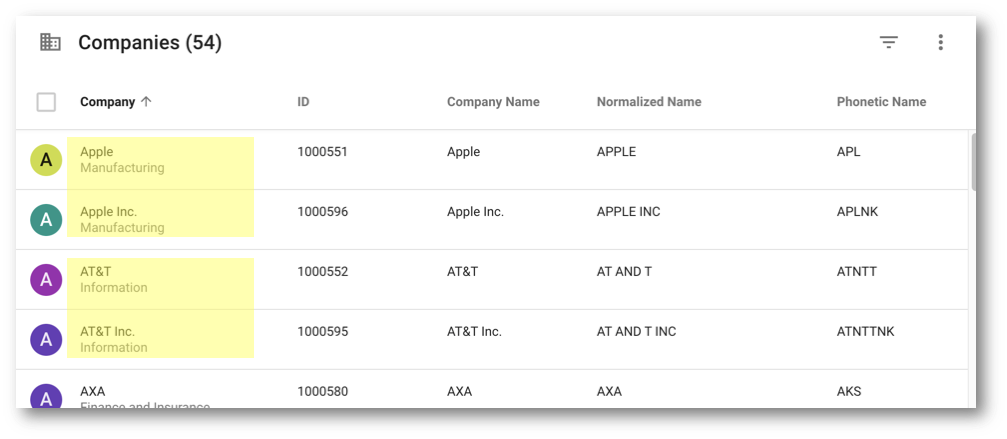
- Click on Companies (Golden) in the navigation drawer to return to the list of golden records. Observe that many records have failed to match because the legal entity type was present in one source, but not in another:
- Apple versus Apple Inc.
- AT&T versus AT&TInc.
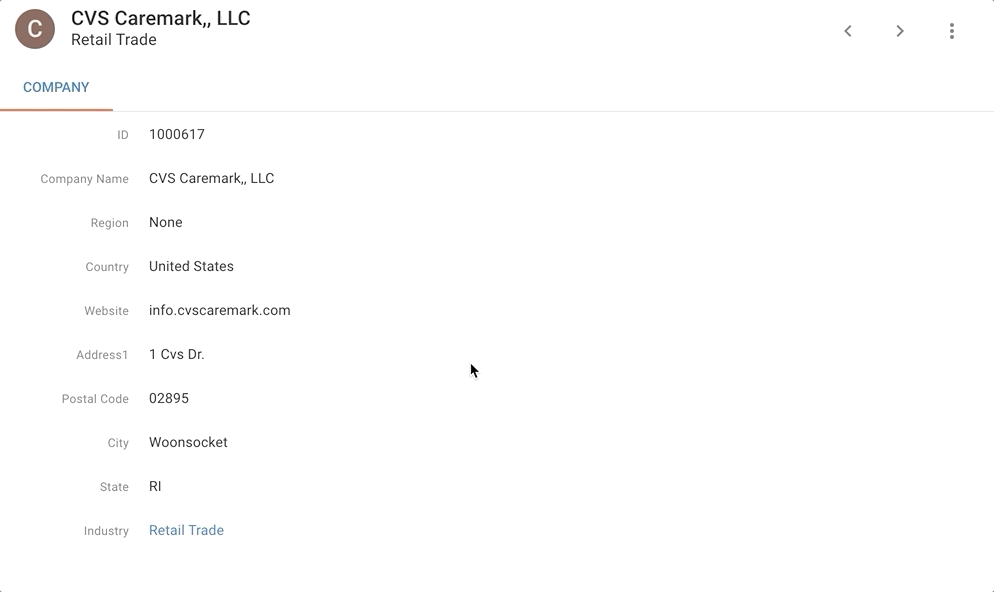
- CVS Caremark versus CVS Caremark, L.L.C versus CVS Caremark,, LLC
- etc.
You will learn how to fix this in the next section.
Congratulations!
You have successfully configured match rules.
To summarize:
- You have added match rules.
- You have configured thresholds.
- You have reloaded data and observed the impact of your match rules.
Next, you will improve the matching process.
To improve matching, we will now add a new enricher which removes business entity type, and adjust the sequence of execution for enrichers as follows:
- Remove punctuation.
- Remove business entity type (new).
- Phoneticize.
This will result in an improved normalized name and will get your matching to a very interesting level.
Learning outcomes
- Improving name standardization
- Changing the sequence of execution for your enrichers
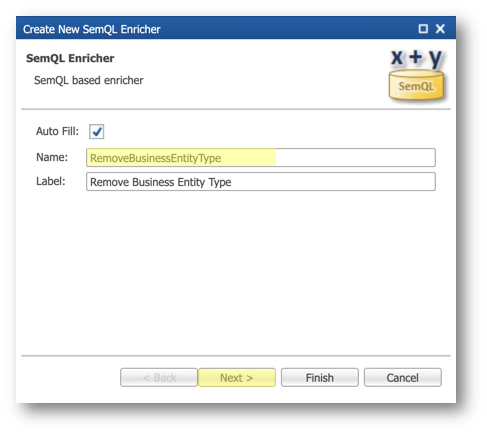
Add the RemoveBusinessEntityType enricher
Start by adding the new enricher that removes business entity types:
- Return to the Application Builder and open the Design perspective.
- Under the Company entity, right-click on Enrichers and select Add SemQL Enricher.
- Enter
RemoveBusinessEntityTypein the Name field and click Next.
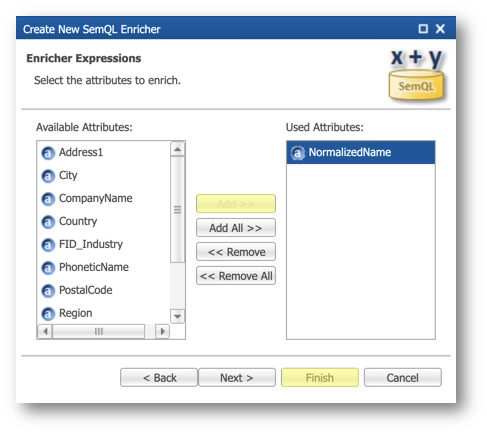
- Define the attribute to enrich: select the NormalizedName attribute, click the Add >> button, then click Finish.
- Click the Edit Expression button next to the NormalizedName attribute in the Enricher Expressions section of the enricher's editor.

- Copy and paste the SemQL expression (note that it enriches
NormalizedNameback toNormalizedName), and then click OK.
REGEXP_REPLACE (
    NormalizedName,
    '[[:blank:]]+(' /* find spaces preceding the business entity type */
     || 'COMPANY|COMPANY[[:blank:]]*INC|CORPORATION|CORP|AND[[:blank:]]*CO|CO|CO[[:blank:]]*INC|INCORPORATED|INC|LIMITED|LTD|ASSOCIATION|ASSOC|' /* Anglo entities */
     || 'L[[:blank:]]*P|L[[:blank:]]*L[[:blank:]]*P|L[[:blank:]]*L[[:blank:]]*L[[:blank:]]*P|L[[:blank:]]*L[[:blank:]]*C|P[[:blank:]]*L[[:blank:]]*C|' /* More Anglo entities */
     || 'S[[:blank:]]*A[[:blank:]]*R[[:blank:]]*L|S[[:blank:]]*A[[:blank:]]*S|' /* French entities */
     || 'A[[:blank:]]*G|G[[:blank:]]*M[[:blank:]]*B[[:blank:]]*H|'              /* German entities */
     || 'S[[:blank:]]*A|S[[:blank:]]*L|'                                        /* Spanish entities */
     || 'K[[:blank:]]*K|G[[:blank:]]*K|'                                        /* Japanese entities */
     || ')[[:blank:]]*$',
    ''  /* replace the business entity type with an empty string */
)

- Save your work.
Change the enricher sequence
By default, the latest enricher is executed last. We will now change the sequence so that RemoveBusinessEntityType is executed after RemovePunctuation and before PhoneticizeName.
- Double-click on Enrichers in the Model Design view.
- Select the new enricher RemoveBusinessEntityType and click the Move up button once to move it between RemovePunctuation and PhoneticizeName.
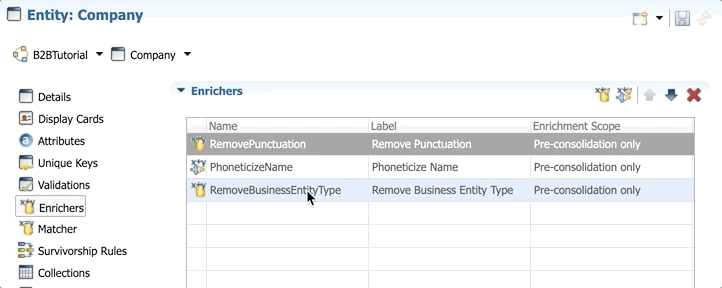
- Save your work.
Deploy, reload, and test
- Validate the model.
- Deploy the model.
- Return to the B2B Tutorial application and repeat the same steps to reload data:
- Delete all data from the Companies (Golden) collection.
- Go to Companies (Master) and import the
data-consolidation\datasets\companies-data.xlsxfile from the tutorial resources again.
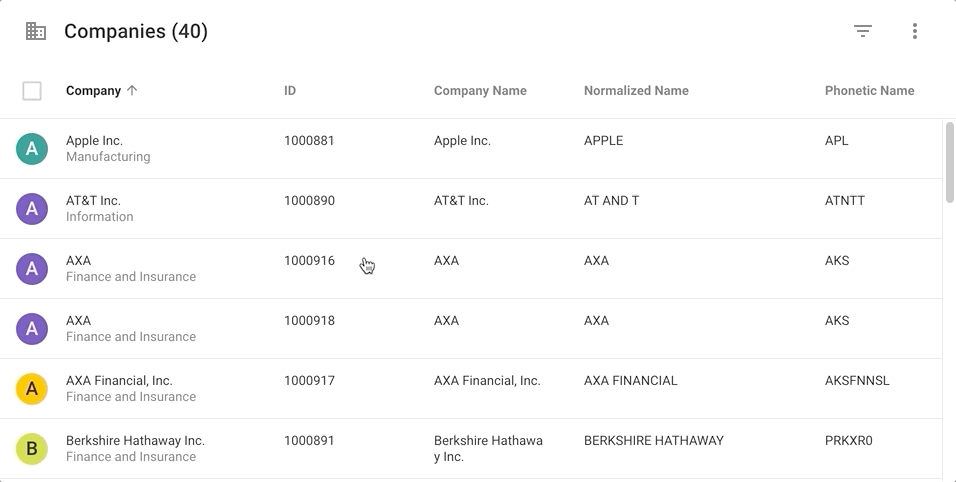
- Go to Companies (Golden) to see the resulting golden records:
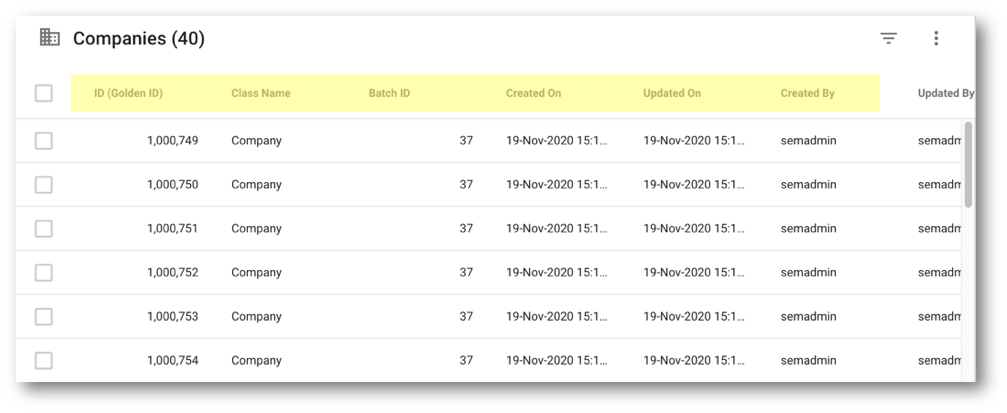
- The list is now composed of 40 golden records (instead of 54 previously), which means that more master records could be matched and merged.
- Observe that there is only one golden record for Apple, AT&T, CVS Caremark (instead of two previously because of the different entity types).
- Open the CVS Caremark,, LLC record and select Explain Record in the actions menu.
- Observe that the new enricher allowed to match CVS Cavemark, LLC with CVS Cavemark.
Display the matching results
You already reviewed the merged records in the golden data. Semarchy xDM keeps track of various additional metadata regarding the matches, which you will now make accessible to data stewards.
- Return to the Application Builder.
- Go to Entities > Company > Collections, and double-click on CompanyCollection to open the Collection editor.
- Drag and drop the Confirmation Status attribute from the Attributes list to the list of columns of the CompanyCollection.
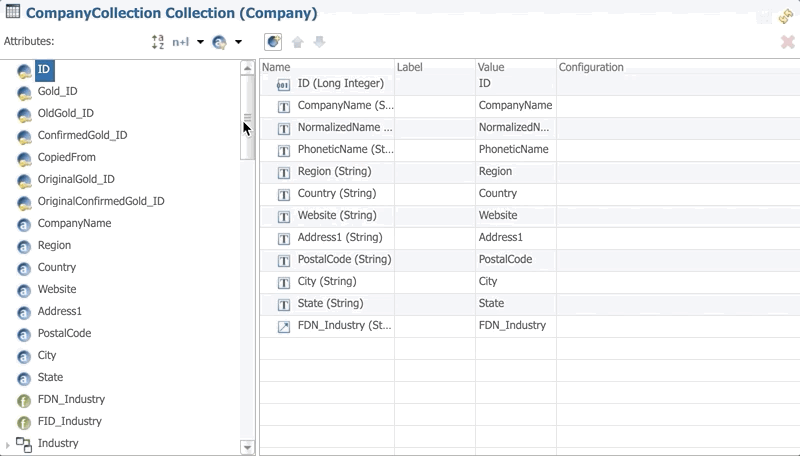
- Repeat the same operation for the following columns:
- Confidence Score
- Masters Count
- Has Suggested Merge
- Save the collection.
- Match rules were not changed, so there is no need to redeploy. SImply refresh the application:
- Return to the B2B Tutorial application.
- Open the user menu on the upper right corner and select Refresh application.
- Click on Companies (Golden) in the navigation drawer.
- Scroll right to see the new columns:
- Confirmation Status: indicates whether the golden record has its master records confirmed (partially or entirely) or not.
- Confidence Score: the average match score in the match group.
- Masters Count: the number of master records contributing to the golden record.
- Has Sugg. Merge: indicates whether match and merge suggestions are available for this record.
Congratulations!
You have successfully refined match rules with the help of a new enricher. Your model is now able to make matches with all of these variations:
To summarize:
- You have created an additional enricher to improve matching.
- You have optimized the sequence of execution for your enrichers.
- You have displayed some of the matching metadata.
The next section will focus on survivorship rules to select the optimal golden-record values and enable data stewards to override values when needed.
Semarchy xDM offers developers a platform to define survivorship rules, which determine the best value from multiple source records that match and merge. Alongside these automated rules, the xDM application empowers data stewards to override values when the default survivorship rules are inadequate. In the upcoming sections, you will explore numerous interesting features to ensure that your mastered data reaches its highest quality potential.
Learning outcomes
- Understanding the basics of survivorship rules.
- Creating a preferred publisher rule.
- Creating a custom ranking rule.
- Defining the override strategy.
Default survivorship rules
Default rule
In the previous unit, Build your first data consolidation application, you established the default survivorship rule using a preferred publisher consolidation strategy. This strategy involves manually prioritizing publishers and is widely used, particularly for fields where one source system serves as the system of record for that item. Semarchy xDM automatically applies the default rule to any attributes that are not explicitly assigned to another rule. Now, in this section, you will define explicit survivorship rules for groups of correlated attributes.
ID survivorship rule
The ID survivorship rule determines the winning source ID in the golden record. Typically, this technical rule is transparent to end-users. Its significance becomes apparent in scenarios such as when a data steward links a new Contact to a Customer golden record in xDM. Later, if over-matching occurs and the Customer record is split into two records, the Contact data remains associated with the winning source ID.
Configure the address survivorship rule
For addresses, we want to implement the following rule:
- Within the US, we prioritize addresses from the ERP.
- Outside the US, we prioritize addresses from the WEB publisher. If unavailable, we prioritize FINANCE, followed by CRM.
- In cases where we have two records from the most trusted source, the latest record should be used.
To implement this modification of the standard preferred publisher strategy, you will employ a custom ranking approach.
- Return to the Application Builder.
- Right-click on Survivorship Rules and select Add Survivorship Rule.
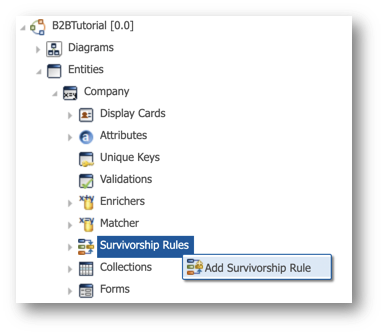
- Enter
Addressin the Name field and click Finish.

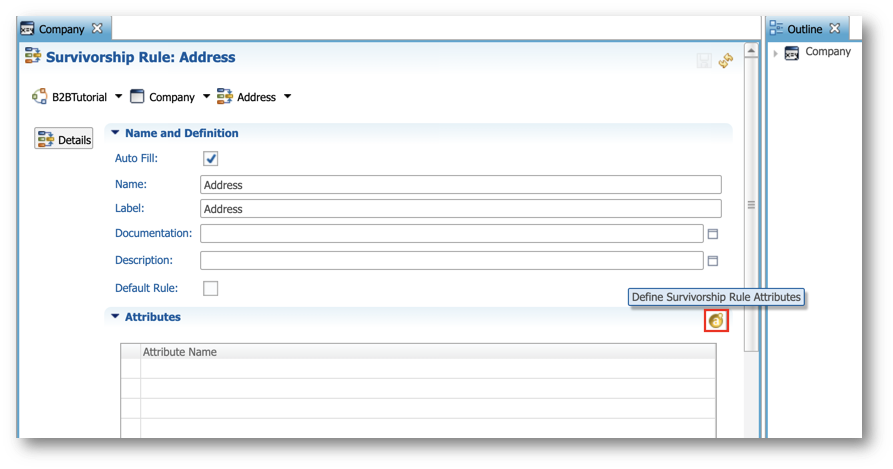
- Click Define Survivorship Rule Attributes.
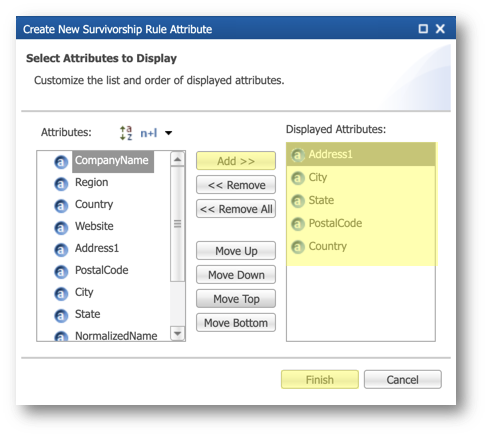
- Select and add the following attributes to the Displayed Attributes list by clicking the Add button:
- Address1
- City
- State
- PostalCode
- Country
- Click Finish.
- Scroll down to the Consolidation Rule section.
- Keep Custom Ranking as the consolidation strategy.
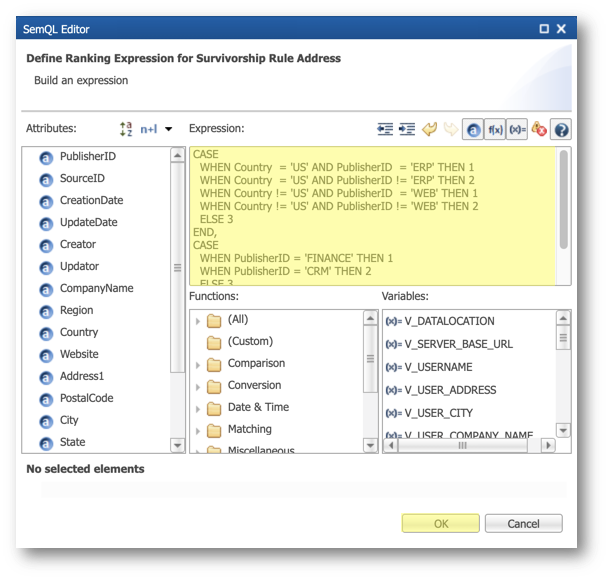
- Click the Edit Expression button next to the Ranking Expression field.
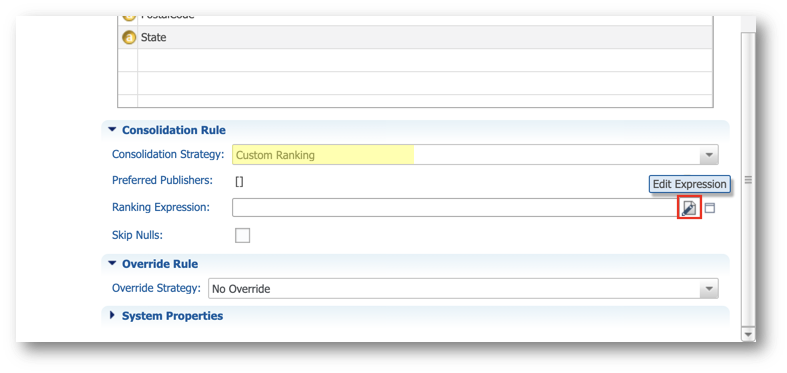
- Enter the following expression and then click OK.
CASE
  WHEN Country  = 'US' AND PublisherID  = 'ERP' THEN 1
  WHEN Country  = 'US' AND PublisherID != 'ERP' THEN 2
  WHEN Country != 'US' AND PublisherID  = 'WEB' THEN 1
  WHEN Country != 'US' AND PublisherID != 'WEB' THEN 2
  ELSE 3
END,
CASE
  WHEN PublisherID = 'FINANCE' THEN 1
  WHEN PublisherID = 'CRM' THEN 2
  ELSE 3
END,
UpdateDate DESC
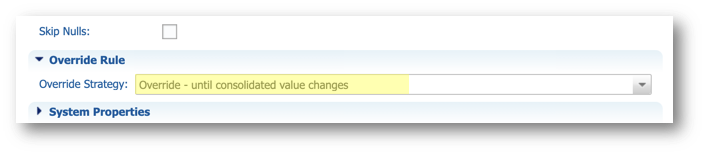
- Select Override - until consolidated value changes in the Override Strategy.
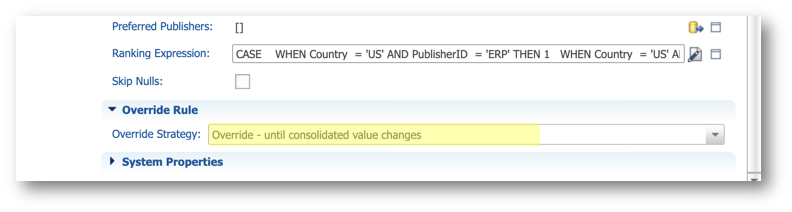
- Save your work.
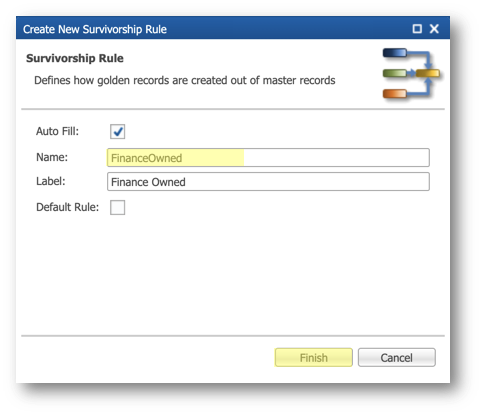
Configure the Finance-owned survivorship rule
In the context of our B2B Tutorial application, the Finance team is responsible for these attributes:
- CompanyName
- Region
- Website
- Industry
Data stewards are allowed to override them. However, if the Finance team provides an updated value, their input should take precedence once again. Hence, we will employ the Override - until consolidated value changes strategy.
- Add a new survivorship rule as you did in the previous section.
- Enter
FinanceOwnedin the Name field.
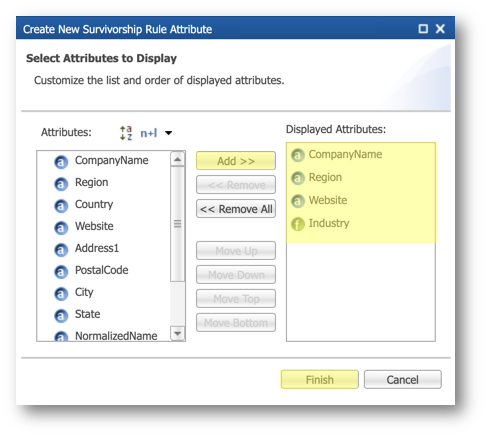
- Click Define Survivorship Rule Attributes.
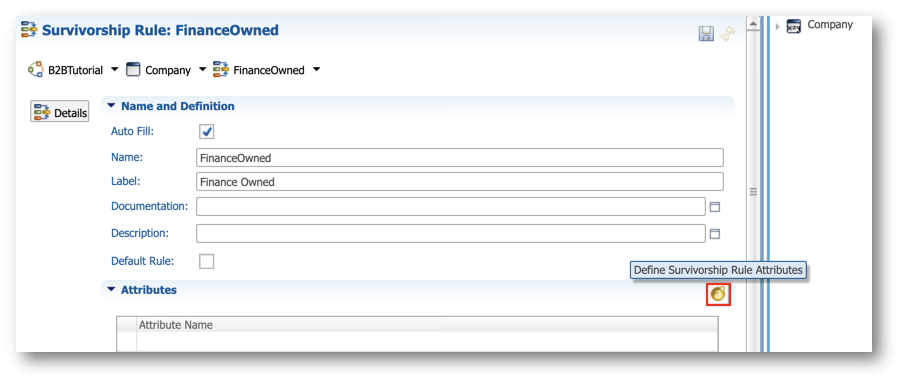
- Add the following attributes:
- CompanyName
- Region
- Website
- Industry
- Click Finish.
- In the Consolidation Rule section:
- Select Preferred Publisher as the consolidation strategy.
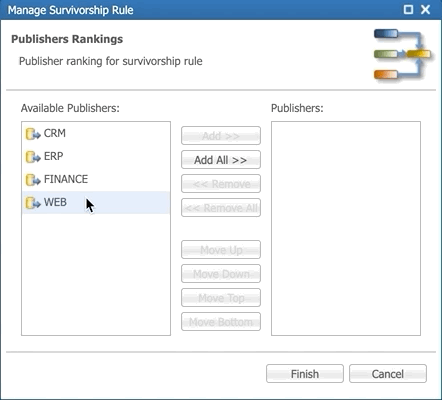
- Click the Select Publishers button next to the Preferred Publishers property.
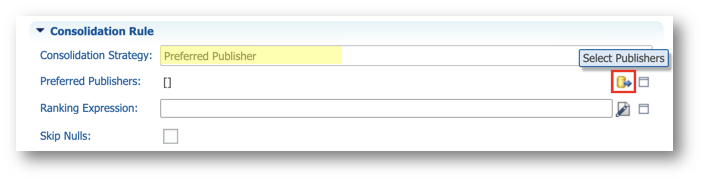
- Add publishers in the following order and then click Finish:
- FINANCE
- WEB
- ERP
- CRM
- Select Override - until consolidated value changes as the override strategy in the Override Rule section.
- Save your work.
Deploy and reload
To apply the new survivorship rules, you must deploy the changes and reload data. Repeat the steps that you performed when you configured the match rules:
- Validate the model and check that no error is raised.
- Deploy the model.
- Return to the B2B Tutorial application and repeat the same steps to reload the data:
- Delete all data from the Companies (Golden) collection.
- Go to Companies (Master) and import the
data-consolidation\datasets\companies-data.xlsxfile from the tutorial resources.
In the next section, you will connect to your application to observe the impact of your new rules.
Congratulations!
You have successfully defined survivorship rules. Now, your golden records will be correctly calculated from each cluster of master records that are matched together, using data from the most relevant publisher for each attribute.
To summarize:
- You have created a preferred publisher rule.
- You have created a custom ranking rule.
- You have defined the override strategy.
The next section will demonstrate how all your rules function within your application.
You will now use the Entities view to observe the results of your match and survivorship rules.
The Entities view is provided by default with all applications to browse, for all entities, the following data:
- Golden data
- Master data
- Source data (loaded from publishers)
- Source authoring (authored by users)
- Records (golden, source) with errors
This view provides extensive details and proves highly beneficial during the design phase. Later on, you can customize your business views to showcase precisely what your business users require.
To use the Entities view:
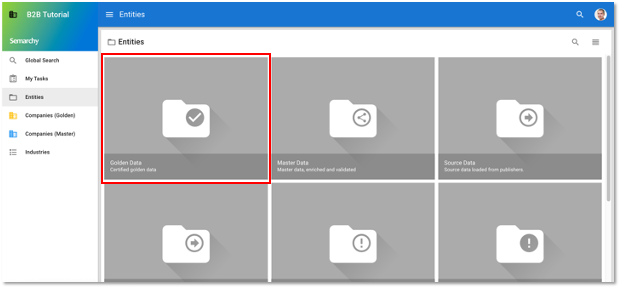
- In the B2B Tutorial application, click on Entities in the navigation drawer, and then click the Golden Data tile.
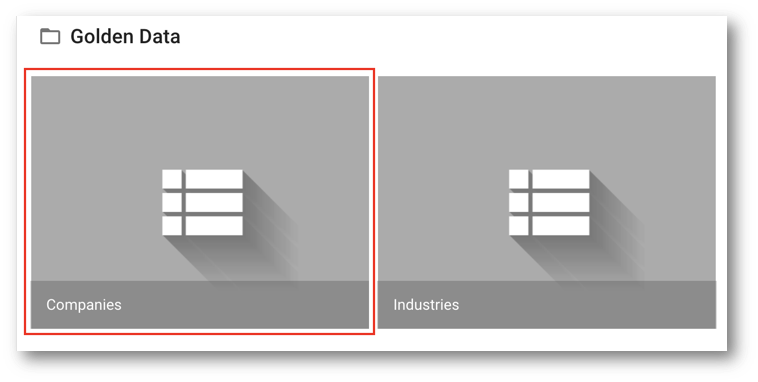
- Click the Companies tile.
- The list of golden records is displayed.
- Click on any column header (e.g., Company Name) to sort records.

- To select and reorder columns, proceed as follows:
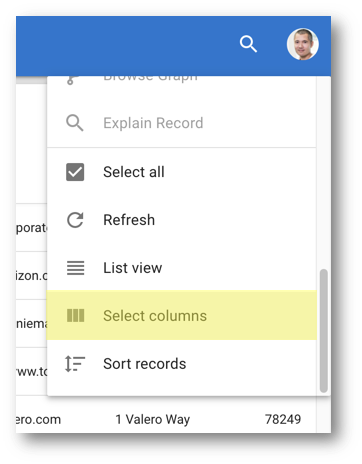
- Open the Options menu.
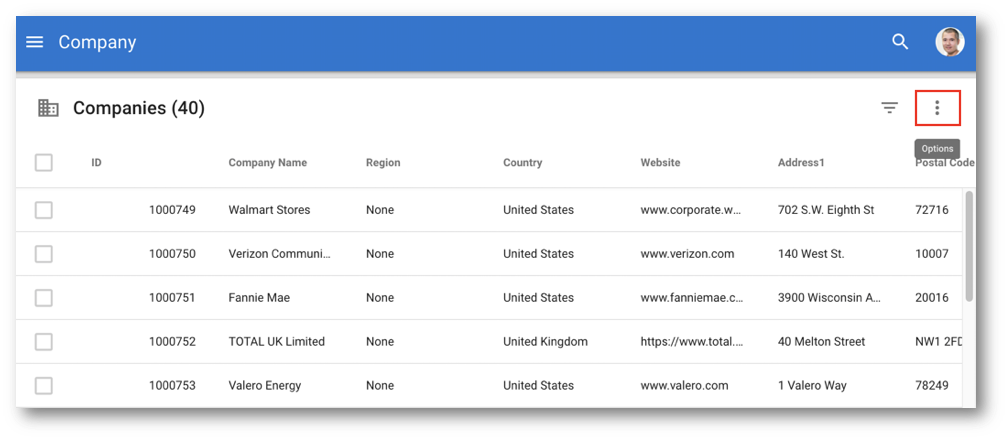
- Click Select columns.
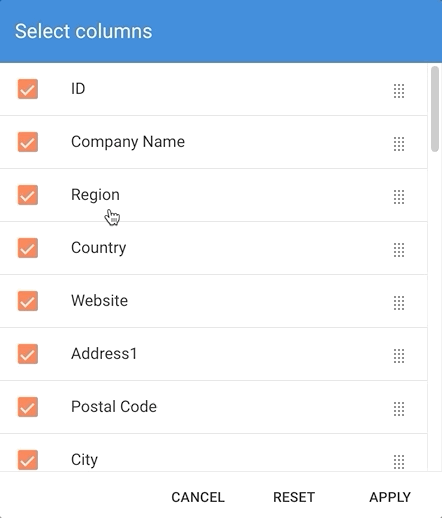
- Select or deselect columns to show or hide them.
- Drag and drop them to change their order.
- Click Apply to go back and refresh the list.
- Scroll horizontally to see all attributes from the entity:
- Business data: Company Name, Address1, etc.
- Attributes populated by enrichers: NormalizedName, PhoneticName
- Technical attributes: creation/last update date and user, batch ID
- Match and merge metadata: Confidence Score, Masters Count, etc.
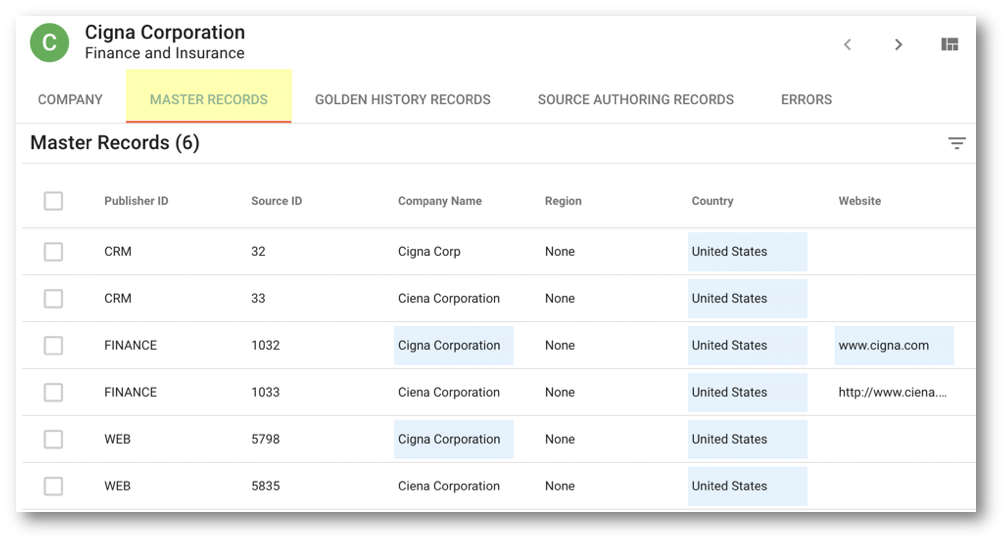
- Locate the Masters Count column. This column indicates how many master records are linked to a golden record.
- Click twice on its header to sort the table in descending order.
- Click on the highest value (first row) to open the record.
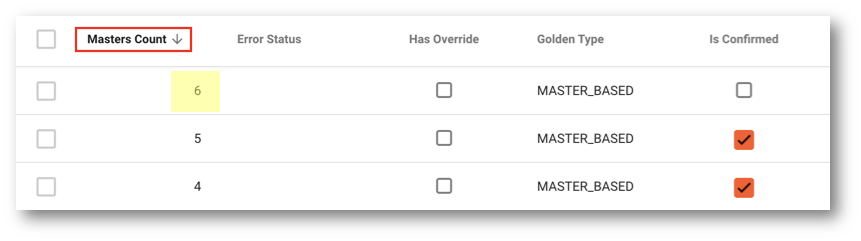
- Select the Master records tab to see all master records this record is linked to. Observe that the values highlighted in blue are the ones that contributed to the golden record, as per the survivorship rules you have configured. For instance, the values of Company Name, Website, Industry in the golden record are coming from the FINANCE publisher which was set as the preferred publisher for them.
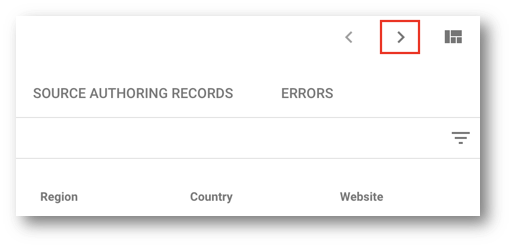
- Click the Next (>) button to go to the next record.
- Observe how this second record was consolidated, according to the survivorship rules:
- Address attributes were consolidated according to the Address survivorship rule.
- CompanyName, Website, and Industry were consolidated as per the Finance-owned rule.
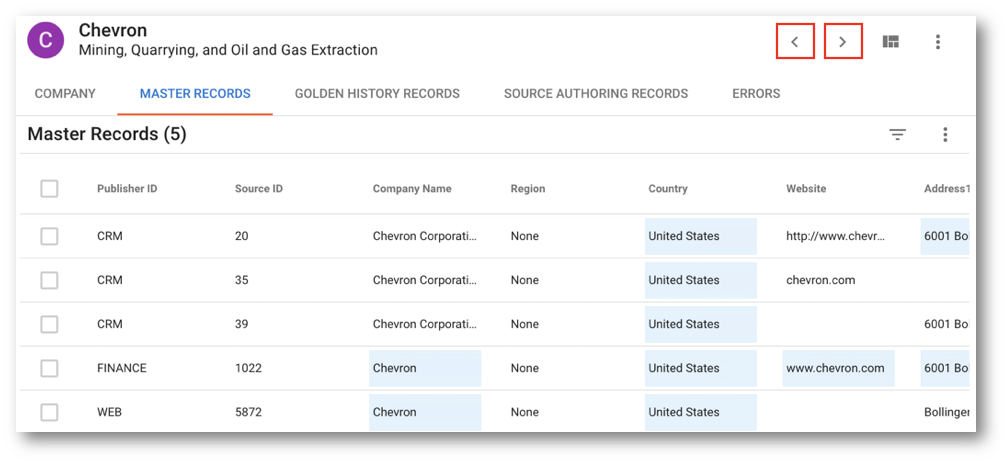
- You can browse and review other records by clicking the Previous (<) and Next (>) buttons.
Well done! In this unit, you have learned to enrich, match, and merge data within your first data consolidation application.
Learning recap
- You have created match rules.
- You have created enrichers to facilitate these match rules.
- You have defined survivorship rules and selected the best value from the various source records that are matched together.
Next steps
If you have not done so already, you can follow the Data Authoring track and create your first data authoring application, or the Data Publishing & Consumption track to learn how to query and load data using the SQL and REST APIs.
Thank you for completing this tutorial.