Welcome to this tutorial! The purpose of this unit is to create a first process that orchestrates the loading of a Datamart and writes a report file.
What you'll learn
- Process design
- Process steps orchestration
- Database automation actions
- SQL actions
- How to write a file in a process
- Variables
- Scripting
Before you start
In this tutorial, we assume that you have already installed Semarchy xDI Designer and followed the two previous tutorial units: Create Your First Data Flow With Semarchy xDI and Work With Mappings. The process will run the mappings that you have designed in these units.
If you have not installed the Designer yet, follow the Install Semarchy xDI Designer tutorial from the main tutorials page. Additional setup information can also be found in the installation guide.
Enjoy this tutorial!
A Process is a set of Actions executed by the runtime engine.
It allows defining, organizing, and orchestrating low-level actions (such as file operations, operating systems commands, SSH, FTP, SQL queries, and more...) and high-level components, such as mappings or other processes.
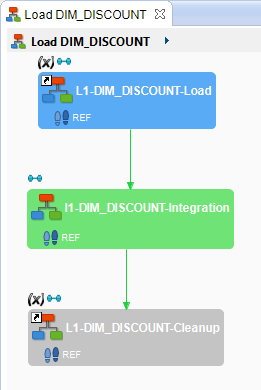
When running a mapping, xDI automatically generates a process based on the sources, targets, and the other design elements (stages, rules, filters, joins, etc.) defined in the mapping. For example, the process generated by xDI when running the Load DIM_Discount mapping created during the Create Your First Data Flow With Semarchy xDI tutorial looks as follows:
You can also create processes manually to define and organize actions. The main goal of this tutorial is to create a process to automate the loading of the Datamart database.
Create the Load All Datamart process
Create the Load All Datamart process:
- Expand the Tutorial – Fundamentals project.
- Right-click the Processes folder.
- Select New > Process.
- Set the File name to Load All Datamart, then click Finish.
- The process editor opens.
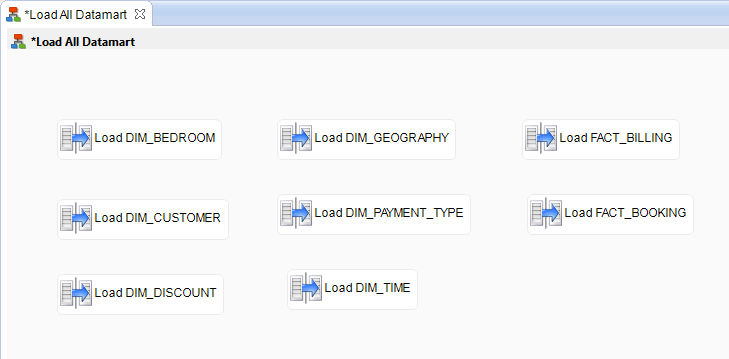
Add the mappings
You will now add all the mappings you designed in the Create Your First Data Flow With Semarchy xDI and Work With Mappings tutorials:
- In the Project Explorer, navigate to Tutorial – Fundamentals > Mappings.
- Drag and drop the Load DIM_BEDROOM mapping into the process editor.
- Repeat the operation for all the mappings located in the same folder.
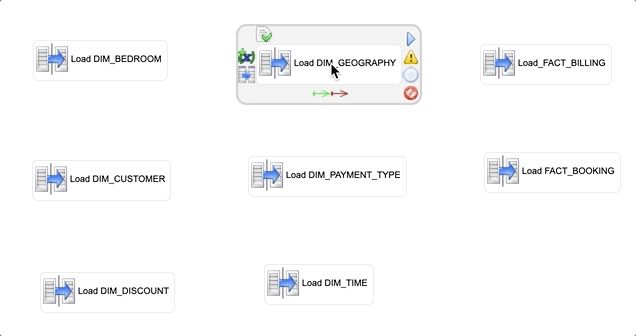
Create links
By default, xDI runs each step of a process concurrently. However, since some tables in the Datamart model are related with foreign keys, you must define the execution sequence of the mappings linking the process steps:
- Select the Load DIM_GEOGRAPHY step in the process editor.
- Select the
 green arrow and drag it onto the Load DIM_CUSTOMER step.
- Repeat the same procedure to add the following links:
Start step | End step |
DIM_CUSTOMER | FACT_BOOKING |
DIM_TIME | FACT_BOOKING |
DIM_BEDROOM | FACT_BOOKING |
DIM_CUSTOMER | FACT_BILLING |
DIM_TIME | FACT_BILLING |
DIM_DISCOUNT | FACT_BILLING |
DIM_PAYMENT_TYPE | FACT_BILLING |
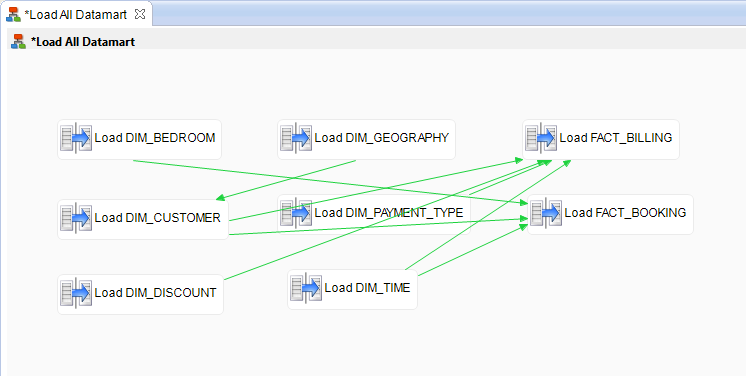
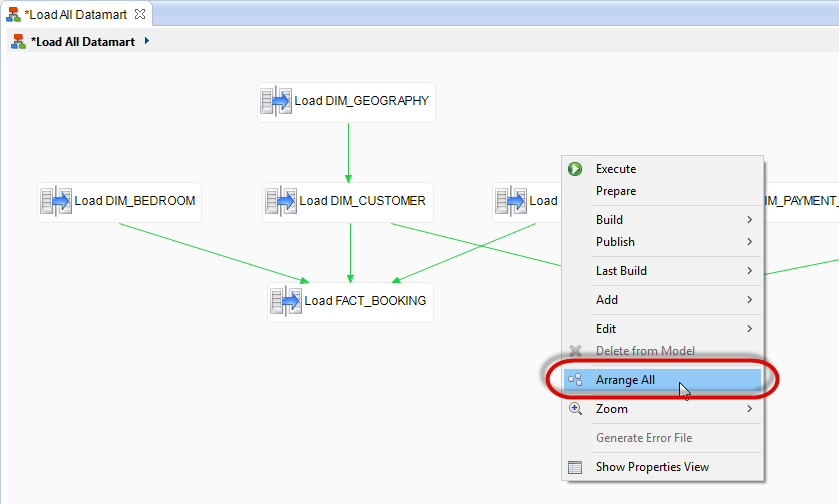
- Reorganize the process layout to make the process easier to read: Right-click the process diagram background and select Arrange All.
- Click the
 icon in the Designer toolbar or press CTRL+S to save the process.
Run the process
- Right-click the background of the process.
- Select Run and go to the Statistic view to check the results:
Name | Value |
|
|
|
|
|
|
|
|
In the next step, you will learn about empty steps.
Empty steps are used in Semarchy xDI to define specific synchronization points or to improve the readability of a process.
Later in this tutorial, you will add steps that must run before all the mappings, and other steps that must run after all the mappings. This requires adding two empty steps that define synchronization points:
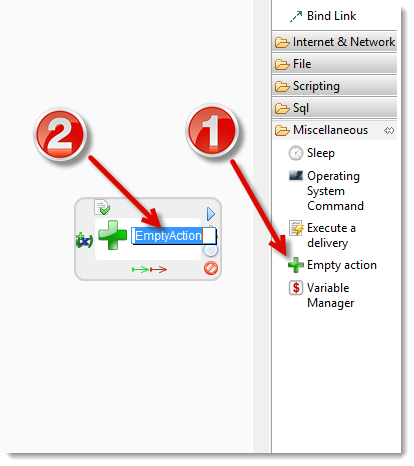
- In the Palette, expand the Miscellaneous section.
- Select
 Empty action.
 - Click the process background to add the empty action.
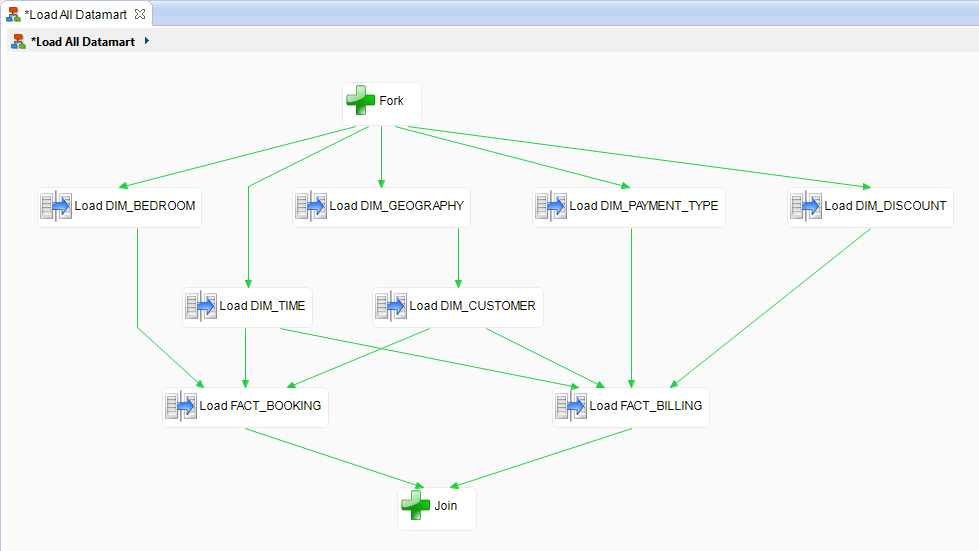
- Rename the action to Fork.
- Follow the same procedure as in the Create an orchestration process section to link this step to the other steps of the loading procedure:
Start step | End step |
Fork | Load DIM_GEOGRAPHY |
Fork | Load DIM_TIME |
Fork | Load DIM_BEDROOM |
Fork | Load DIM_DISCOUNT |
Fork | Load DIM_PAYMENT_TYPE |
- Follow the same steps to create an empty action called Join that ends the loading procedure.
Start step | End step |
Load FACT_BOOKING | Join |
Load FACT_BILLING | Join |
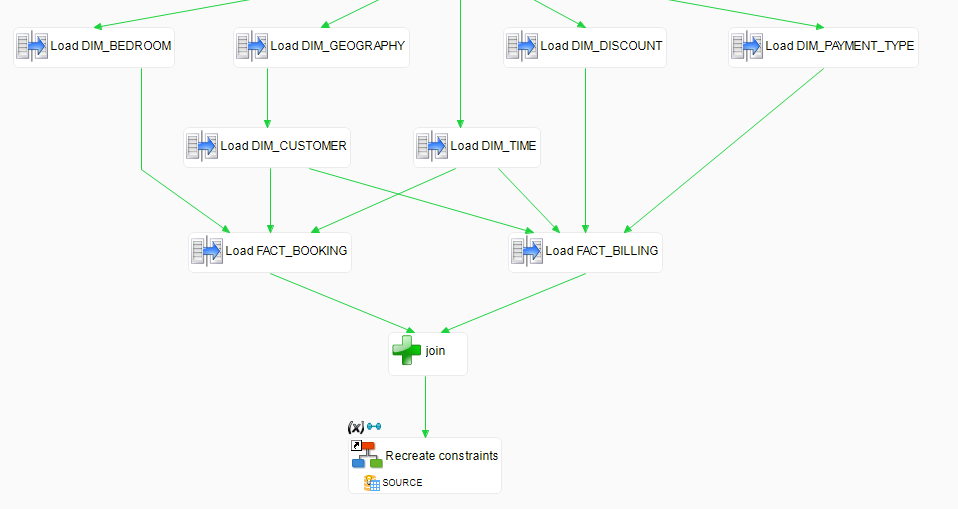
- Make sure the process now looks as follows:
In the next step, you learn how to disable and re-enable constraints before and after the database load.
Add a step to disable all constraints
xDI templates allow automating actions on metadata to automatically generate processes and industrialize development activities. For example, a template can iterate on the list of tables of a database schema to operate.
In this section, you will leverage templates to disable all constraints at the beginning of the loading procedure and re-create them afterward.
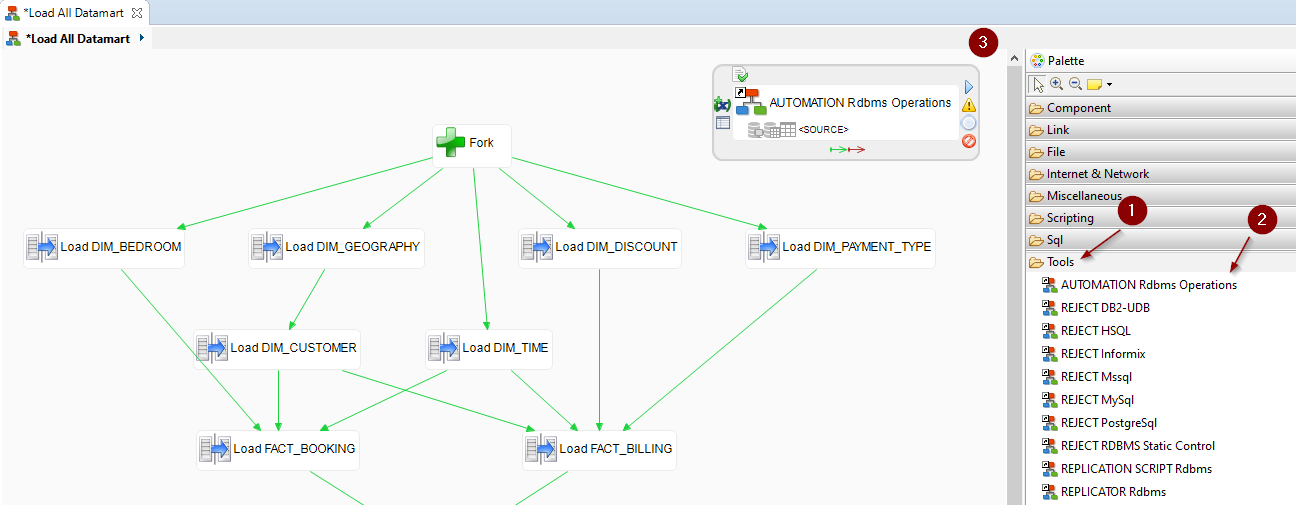
- In the Palette, expand the Tools section.
- Select the
 AUTOMATION Rdbms Operations template.
 - Click on the process background to add the step.
- Select the AUTOMATION Rdbms Operations step on the diagram.
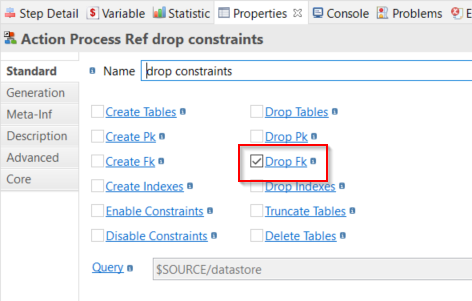
- In the Properties view, set the Name to Drop constraints.
- Click the Drop Fk property name and make sure that the box is checked.
- In the Project Explorer, navigate to Tutorial - Common Metadata > Datamart > Datamart.
- Define the schema for which constraints must be disabled: Drag and drop the HOTEL_DATAMART schema onto the SOURCE Metadata Link placeholder of the Drop constraints step.
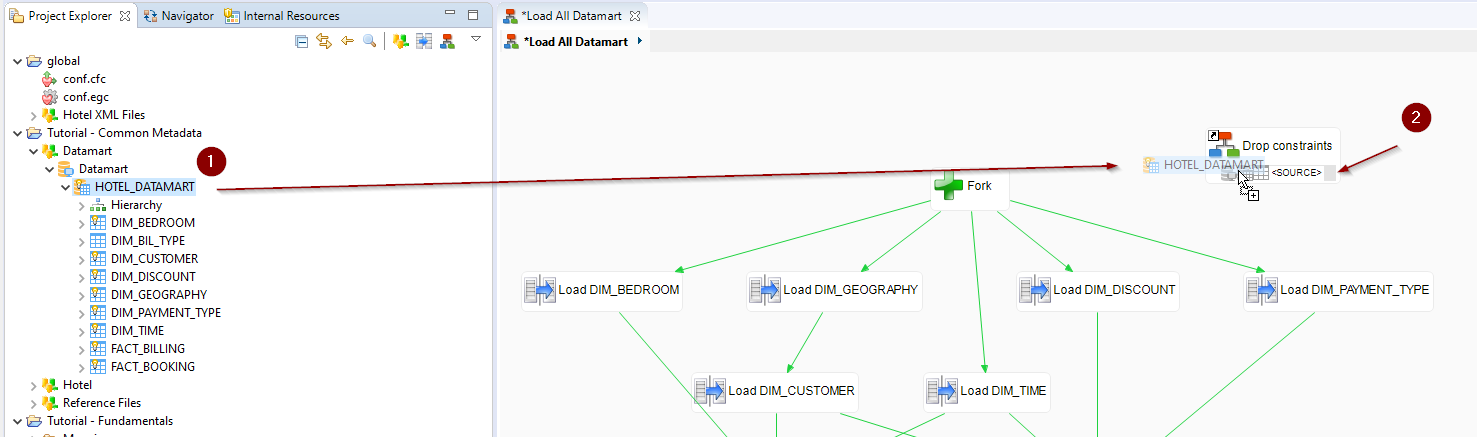
- Finally, link this step to the current start step Fork.

Add a step to reactivate all constraints
Proceed in the same way to create a step that recreates all constraints on the schema:
- Add a AUTOMATION Rdbms Operations step from the Palette.
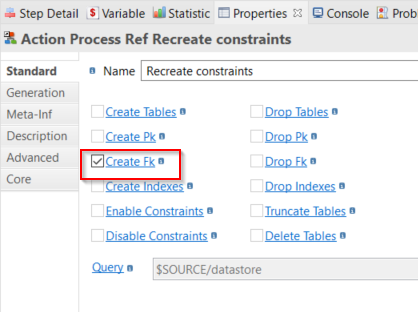
- Set the Name of the step to Recreate constraints.
- Select Create Fk instead of Drop Fk in the step's properties.
- Add a link from the Join step to the Recreate constraints step.
- Save the process.
Run the process
- Run the process and go to the Statistic view to check the results:
Name | Value |
|
|
|
|
|
|
|
|
- Double-click the Drop constraints step on the process execution diagram. The sub-process opens in a new tab.
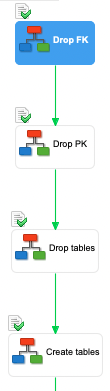
- Double-click the Drop FK step. This step contains one sub-process (Fk for table) composed of one iteration per table that contains foreign keys.
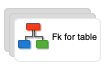
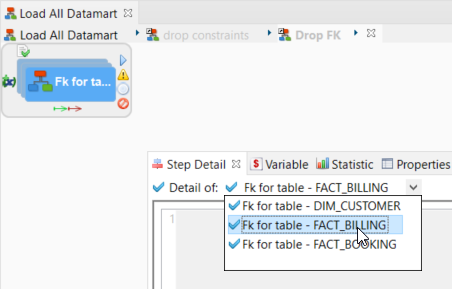
- Select the sub-process Fk for table.
- Open the Step Detail view.
- Open the Detail of drop-down list to choose the iteration of the sub-process to consult and select Fk for table – FACT_BILLING.
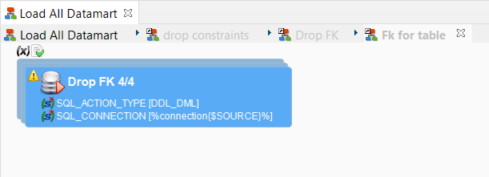
- Double-click the Fk for table step to open the sub-process that corresponds to the selected iteration. Observe that the action it contains is Drop FK 4/4 because the FACT_BILLING table contains 4 foreign keys.
- In the Step Detail tab, select the Drop FK - FK_FACT_BILLING_CUS option in the Detail of drop-down list.
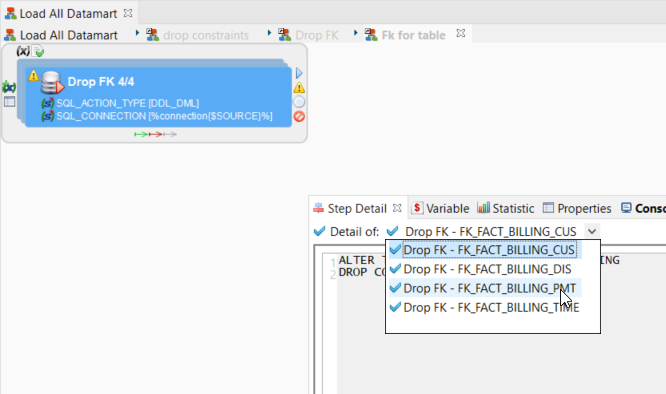
- The generated code for the removal of the FK_FACT_BILLING_CUS constraint for the FACT_BILLING table is displayed in the same view:

- Repeat the same operations to view the generated code for the other constraints on the same table.
- Using the breadcrumb, navigate back to the Drop FK sub-process:

- Follow the same procedure as for the FACT_BILLING to explore the iterations for the other tables (DIM_CUSTOMER, FACT_BOOKING).
Congratulations
Great job! You have enriched your process to disable and re-enable constraints on the target database before and after the data loads.
In the next step, you will purge tables and initialize data in the target datastore.
In this step, you will:
- Add a step to purge existing data at the beginning of each execution.
- Initialize the tables with default data.
Add a data purge
To purge the data from the target tables:
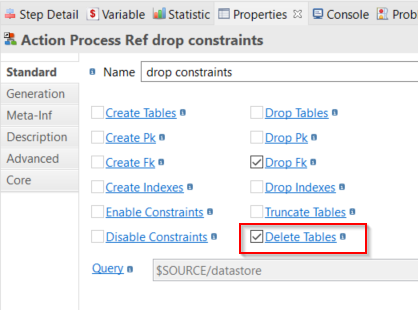
- Select the Drop constraints step you added previously.
- In the Properties view, select the template parameter Delete Tables in addition to Drop Fk to purge all data from the target tables.
Initialize the tables
In this section, you will insert default data into some of the target tables by performing a SQL INSERT.
- In the Palette, expand the Sql section.
- Select the
 Sql Operation action.
 - Click inside the process background to create the action.
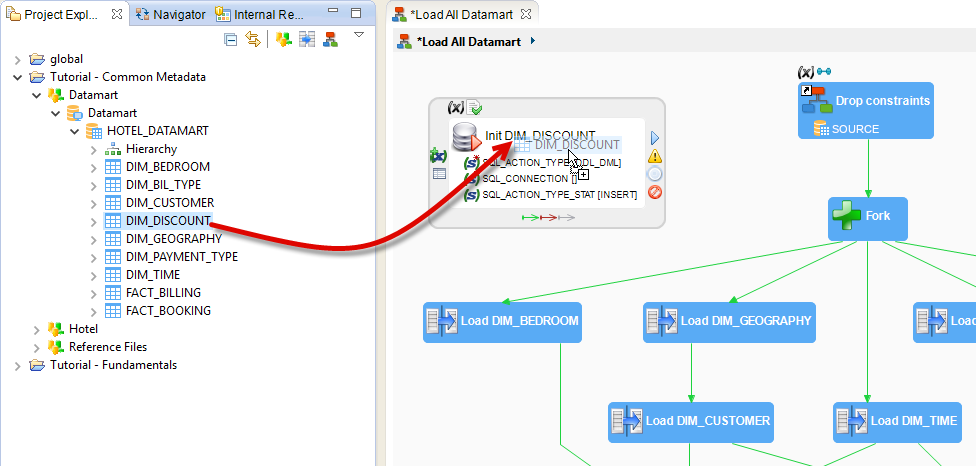
- Set the action's name to Init DIM_DISCOUNT.
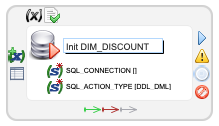
- In the Properties view, click the Sql Action Type Stat parameter to enable it and set its value to
INSERT.
- In the Expression Editor view, enter the following SQL statement:
insert into HOTEL_DATAMART.DIM_DISCOUNT (DIS_RANGE, DIS_MIN, DIS_MAX) values ('No discount',NULL,NULL);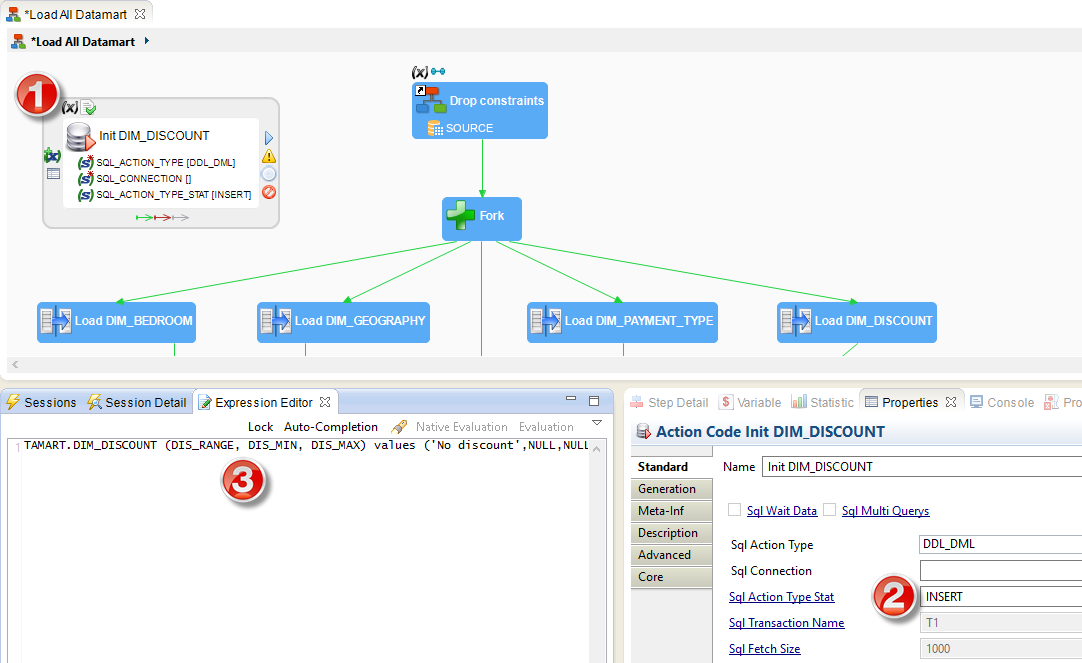
- The Init DIM_DISCOUNT action needs a connection to run the SQL statement. Drag and drop the DIM_DISCOUNT datastore onto the header (title) of this action to create the metadata link.
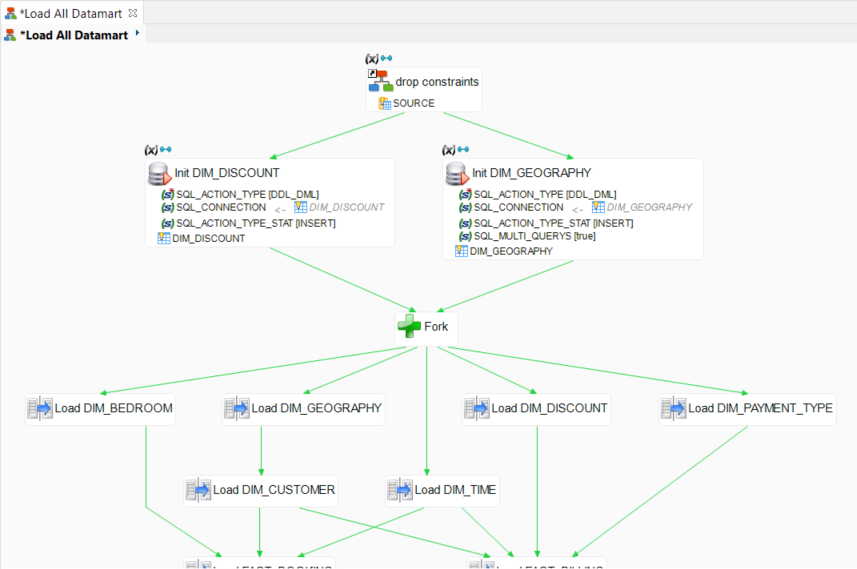
- Create another SQL action with the following properties:
Property | Value |
Name | Init DIM_GEOGRAPHY |
Expression |
|
Sql Action Type Stat |
|
Sql Multi Queries | checked(true) |
- Drag and drop the DIM_GEOGRAPHY datastore onto the header (title) of this action to create the metadata link.
- Finally, link these two actions so that they run concurrently between the Drop constraints and Fork steps.
- Save the process, run it, and then go to the Statistics view to review the results:
Name | Value |
|
|
|
|
|
|
|
|
|
|
Congratulations!
From now on, the Load All Datamart process will reset data in the target tables every time it runs.
In the next step, you will create an execution report at the end of the process.
In this step, you will enrich your process by writing a report file. The content of this report will use session variables.
How to use session variables?
When running a process, xDI deals with a lot of information:
- Execution duration of each step
- Temporary folder of the runtime engine
- Hostname and port of the runtime engine
- Session name
- Name of each step
- And more...
All these details are available as Session Variables:
- The variables that apply to the entire session are directly available in the Variables tab of the Session Details view.
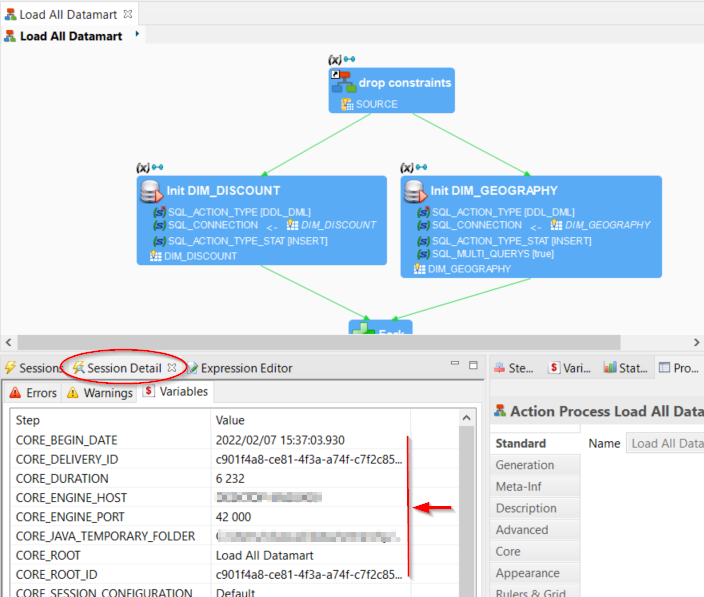
- Other variables are dynamically created and set at each step of the process. The Variables view shows the variables of the selected step.
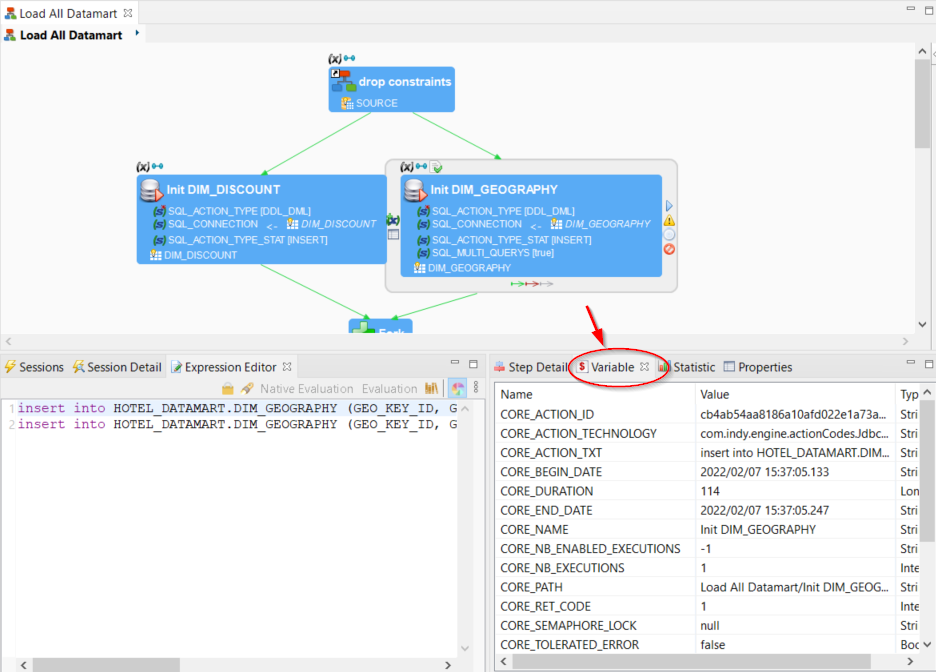
To refer to a variable, you must use its full name which includes the variable path, followed by its name:
/VAR/indicates a global Session Variable (the «/» represents the root of the session).- For a step-level variable, the full name contains the relative or absolute path to the step, followed by the variable name. For example,
../refers to a variable from the/VAR/
At any stage of a session execution, you can retrieve the value of a variable with the following syntax: ${ .This syntax is replaced by the value of the variable.
Examples:
Variable | Value |
| Execution duration of the session |
| Execution duration of the Init step |
| Execution duration of the First Value action which is in the Init step |
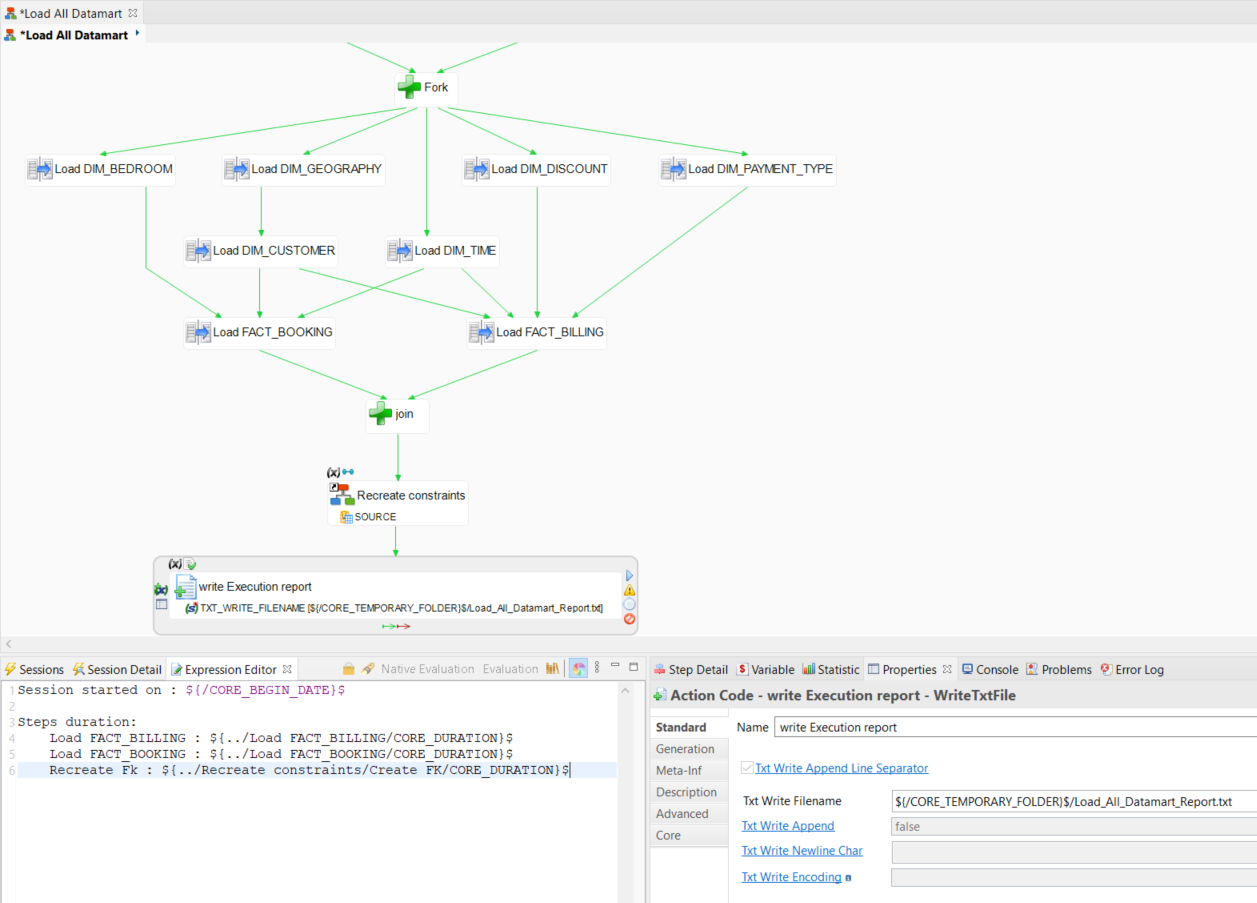
Create the execution report file
Add a step to write a report containing the execution details:
- In the Palette, expand the File section.
- Select the
 Write a File action and add the action to the process.
 - Set the name of the action to Write Execution Report.
- In the Properties view, set the Txt Write Filename parameter to
${/CORE_TEMPORARY_FOLDER}$/Load_All_Datamart_Report.txt
This parameter defines a file path with theCORE_TEMPORARY_FOLDERsession variable that contains the path of the runtime engine's temporary folder.
- Open the Expression Editor view and enter the following text to define the content of the report file:
Session started on: ${/CORE_BEGIN_DATE}$
Steps duration:
   Load FACT_BILLING: ${../Load FACT_BILLING/CORE_DURATION}$
   Load FACT_BOOKING: ${../Load FACT_BOOKING/CORE_DURATION}$
Recreate Fk : ${../Recreate constraints/Create FK/CORE_DURATION}$- Link this step so that it runs after recreating the constraints.
- Run the process and go to the Statistic view to check the results:
Name | Value |
|
|
|
|
|
|
|
|
|
|
- Review the code executed by the Write Execution Report step. Select the Executed tab in the Step Detail view to see the text with the variables' values.
- Retrieve and verify the content of the generated file Load_All_Datamart_Report.txt in the
runtime/tempfolder of your xDI installation.
Congratulations!
The Load All Datamart process writes an execution report for each execution. In the next step, you will enrich the report with scripting.
Scripting in Semarchy xDI
The scripting feature in xDI allows developing scripts called by processes to customize their behavior.
Scripting can be used by adding dedicated process actions or by injecting script blocks in conditions, texts, process parameters, etc.
The general syntax to use scripting in xDI is:
%e(language){<script>}e(language)%The scripting languages available in xDI are:
groovyjython(Python syntax)rhino(JavaScript syntax)
Moreover, xDI provides an API named __ctx__ that allows designers to directly interact with the runtime engine through scripting. The __ctx__ API can be used with any of the languages listed above.
In this step, you will use scripting to add execution statistics to the report file.
Fetch the statistics in the report file
You will now modify the Write Execution Report process step to add the numbers of processed and inserted rows to the report.
To fetch these statistics, you will use the __ctx__.sumVariable() function that aggregates the values of a given variable:
__ctx__.sumVariable(): returns the sum of the values of theVARvariable for the whole session.__ctx__.sumVariable(,: returns the sum of the values of the) VARvariable for the STEP step.
- Select the Write Execution Report step in the process editor.
- In the Expression Editor, add the following content after the existing expression:
Total Rows: %e(rhino){__ctx__.sumVariable("SQL_NB_ROWS")}e(rhino)%
Total Inserts: %e(rhino){__ctx__.sumVariable("SQL_STAT_INSERT")}e(rhino)%
Inserts into FACT_BILLING: %e(rhino){__ctx__.sumVariable("SQL_STAT_INSERT","../Load FACT_BILLING")}e(rhino)%- Run the process again and open the report file. The report now contains the number of processed and inserted rows.
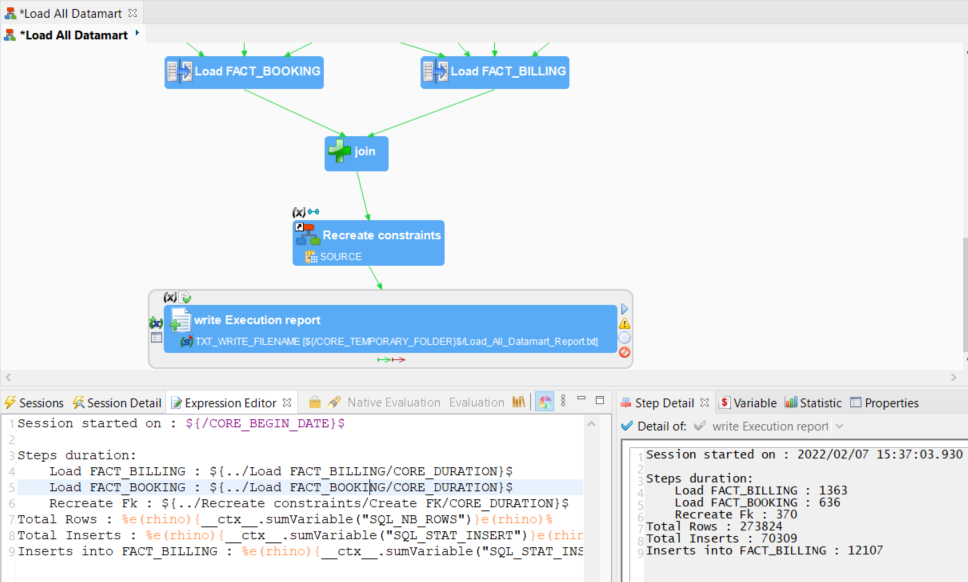
Congratulations!
You have successfully used scripting to enrich your report.
Great job going through this tutorial! You have learned how to create a process using Semarchy xDI.
What we've covered
- You created a process to orchestrate data loads in a database schema.
- You added steps to disable and enable constraints.
- You added SQL steps to truncate tables and insert data.
- You used variables and scripting to create a report file.