In this tutorial, you will learn how to implement data quality rules in Semarchy xDM in order to standardize your data and detect duplicates.
Learning outcomes
- Designing enrichers to standardize and augment your data.
- Implementing validations and duplicates detection rules to check your data.
- Plugging the rules in the user interface and deploy your changes.
- Testing your rules in the MDM application.

Learning track
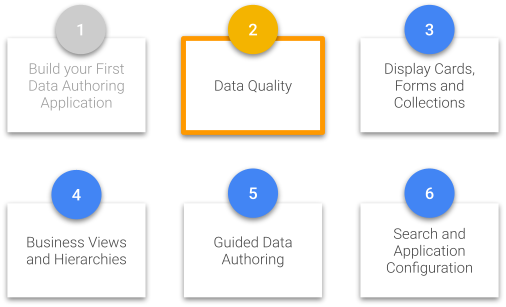
This tutorial is the second unit within the Data Authoring track.
Before starting this tutorial, you must complete the first unit, Build your first data authoring application.
If you have not completed this prerequisite, return to the Tutorials menu.
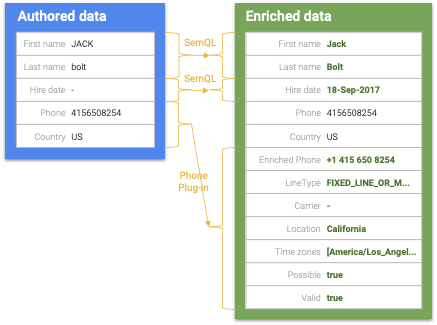
Semarchy xDM allows you to create enrichers to normalize, standardize, and enrich data loaded or authored in your application. Several enrichers can be defined for an entity. They are executed in sequence.
You will learn how to define two types of enrichers:
- SemQL enrichers, which define rules using the SemQL language.
- API enrichers, which use Java to perform more complex data transformations or external API calls (e.g., to look up information from a remote micro-service such as Google Maps).
In this section, you will:
- Create a SemQL enricher to standardize first and last names.
- Add a default value to the hire date if it is empty.
- Create a complex type to store additional phone attributes.
- Use a plug-in enricher to standardize phone numbers and populate these attributes.
Learning outcomes
- Creating SemQL enrichers.
- Creating a complex type.
- Creating API enrichers.
Add the StandardizeNames enricher
We will use SemQL enrichers to perform basic data standardization on the employees' FirstName and LastName attributes. The objective is to ensure that these attributes consistently have the first letter capitalized and the subsequent letters in lowercase.
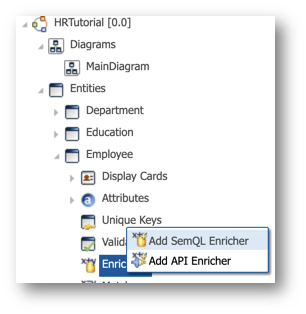
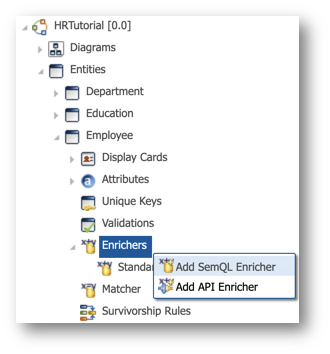
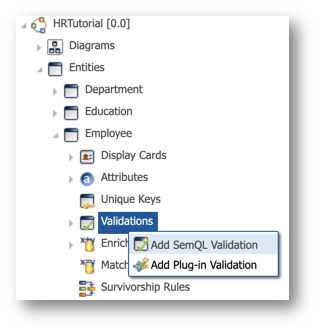
- Open your HRTutorial model in the Application Builder and navigate to Entities > Employee > Enrichers.
- Right-click the Enrichers node and then select Add SemQL Enricher.
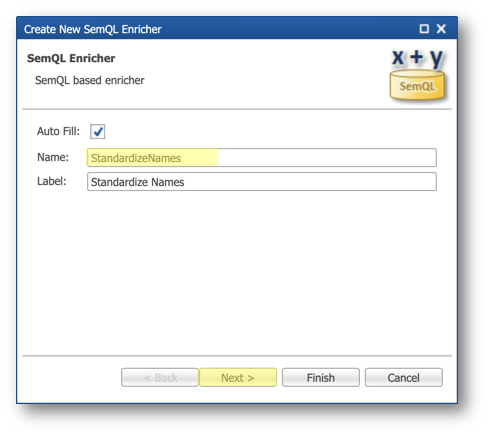
- Set the Name to
StandardizeNamesand then click Next.
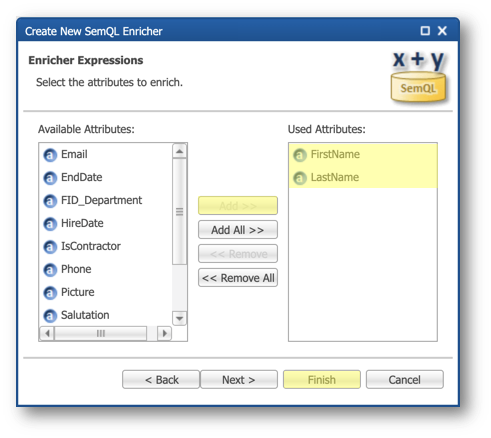
- Select the FirstName and LastName attributes in the Available Attributes list, click Add to add them to the Used Attributes list, and then click Finish.
- Enter the SemQL expression for each attribute in the Enricher Expressions section:
- FirstName:
INITCAP(FirstName) - LastName:
INITCAP(LastName)
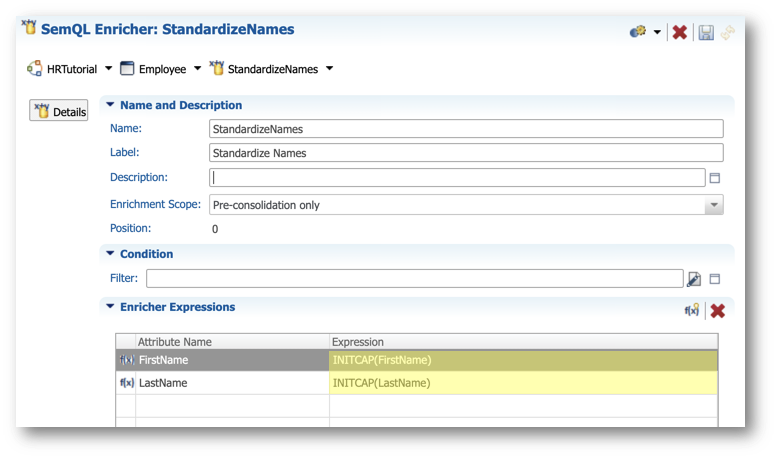
- Save your work.
Add the DefaultHireDate enricher
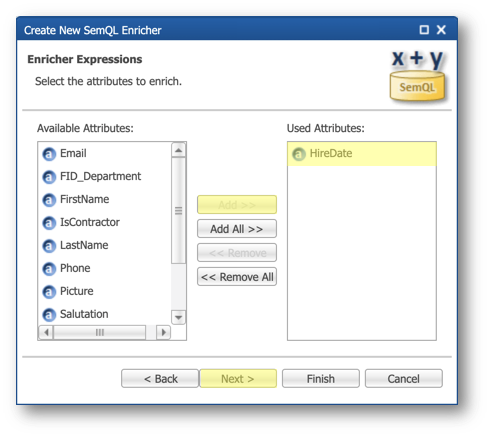
You will now create another SemQL enricher to assign a default date to the HireDate attribute if no date was provided.
- Navigate again to Entities > Employee > Enrichers.
- Right-click the Enrichers node and select Add SemQL Enricher.
- Set the Name to
DefaultHireDateand click Next. - Add HireDate to the Used Attributes list, and click Next.
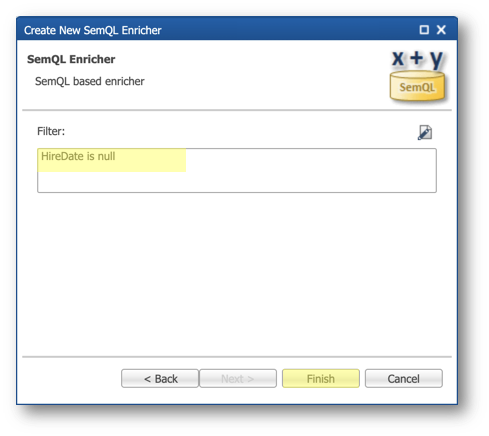
- To ensure that the enricher is triggered only if HireDate is not set, enter the following SemQL in the Filter field:
HireDate is null - Click Finish.
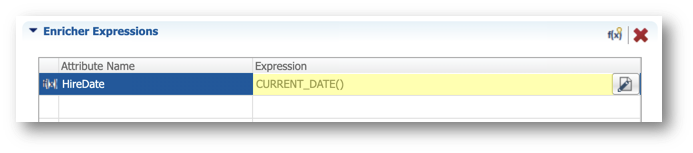
- In the Enricher Expressions section, set the Expression of the HireDate attribute with the following expression:
CURRENT_DATE()
- Save your work.
Add the StandardizePhone enricher
In this section, you will use the Phone enricher plug-in to standardize and enrich phone numbers. This plug-in exposes several outputs given a phone number and a country of origin.
Add the PhoneType complex type
You first need to create a complex type that will be populated by the phone enricher.
- Right-click the Complex Types node in the Model Design view, and then select Add Complex Type.
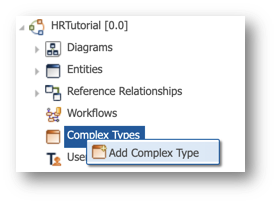
- Enter
PhoneTypein the Name field, and click Finish.
- Select the Definition Attributes finger tab and then click the Add Definition Attribute button.
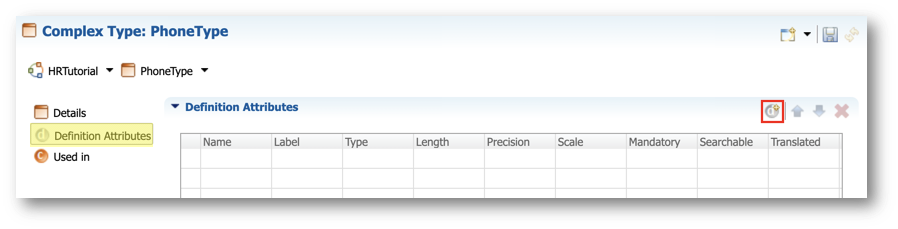
- Enter the following values, and then click Finish:
- Name:
Country - Length:
2
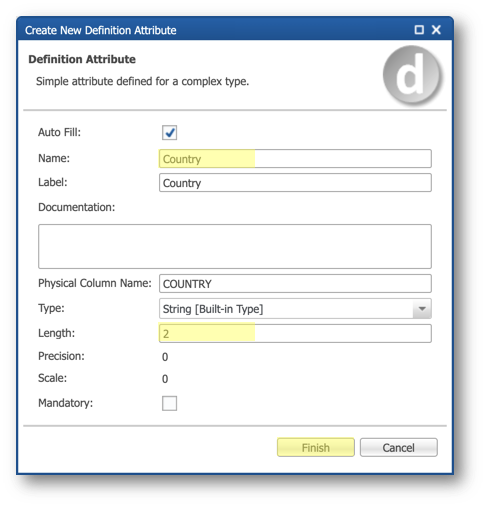
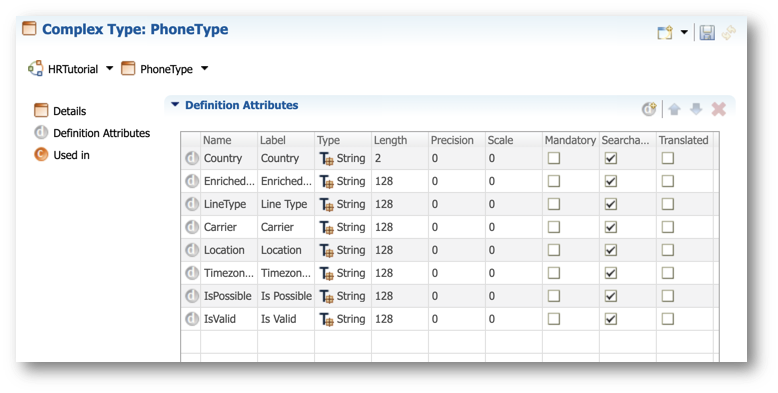
- Repeat the same steps to add all the following attributes.
Attribute | Datatype | Notes |
Country | String(2) | ISO-3166-1 country code for this phone |
EnrichedPhone | String(128) | Standardized phone number |
LineType | String(128) | Type of line guessed by the plug-in |
Carrier | String(128) | Name of the carrier when available |
Location | String(128) | Name of the guessed location of the phone |
Timezones | String(128) | Time zones for this phone |
IsPossible | String(128) | Whether this phone is possible |
IsValid | String(128) | Whether this phone is valid |
- Check the result and save your work.
- Go back to the Details finger tab, click the Define button, and then click the Define Display Name button.
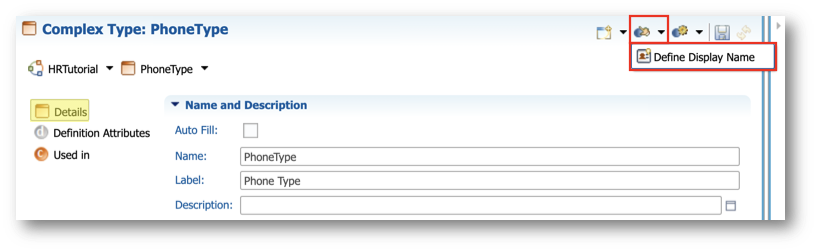
- Click Next in the first step of the wizard.
- Add the EnrichedPhone attribute to the Selected Attributes list, and then click Finish.
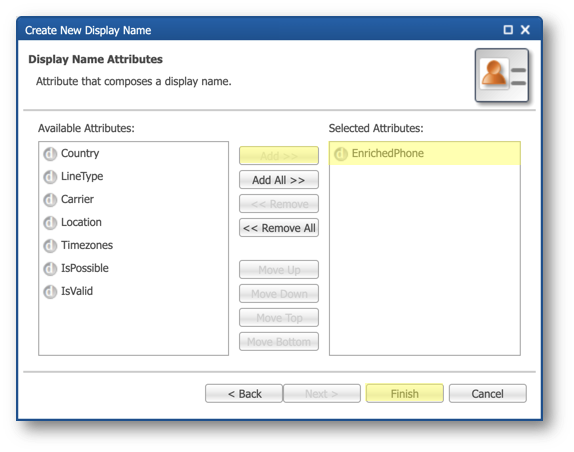
- Save your work.
- Expand the Employee entity under Entities > Employee in the Model Design view, right-click Attributes, and select Add Complex Attribute.

- Enter the following values, and then click Finish.
- Name:
EnrichedPhone - Type: PhoneType [Complex Type]
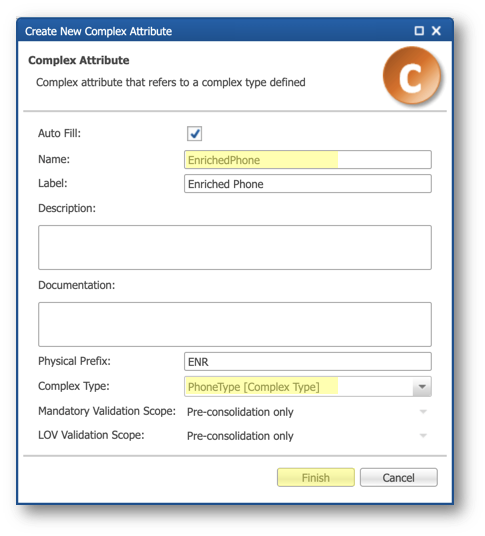
- Save your work.
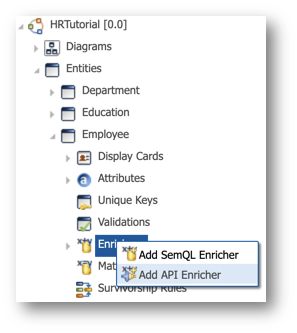
Add the phone enricher
The Phone enricher plug-in accepts several inputs and produces several outputs such as the standardized phone or the geolocation of the phone line.
- Navigate again to Entities > Employee in the Model Design view.
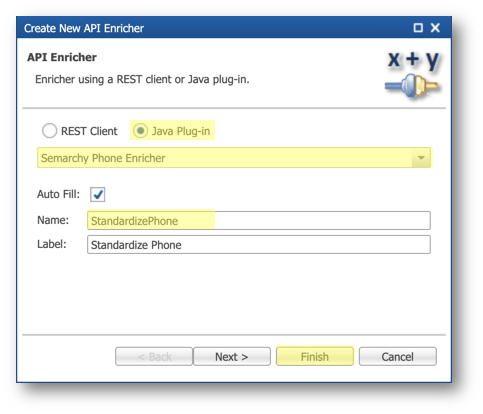
- Expand the Employee entity, right-click Enrichers, and select Add API Enricher.
- Enter the following values, and then click Finish:
- Select Java Plug-in.
- Select the Semarchy Phone Enricher in the drop-down list.
- Enter
StandardizePhonein the Name field.
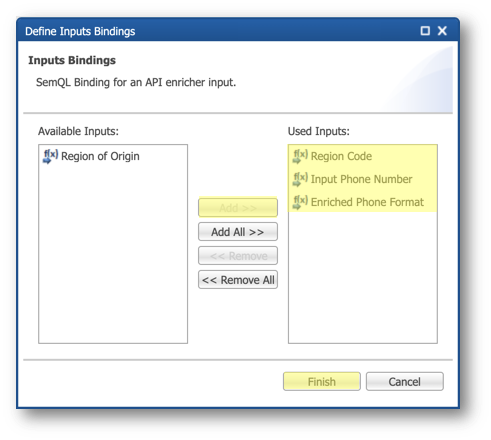
- Scroll down to the Inputs section of the editor, and then click the Define Inputs button.
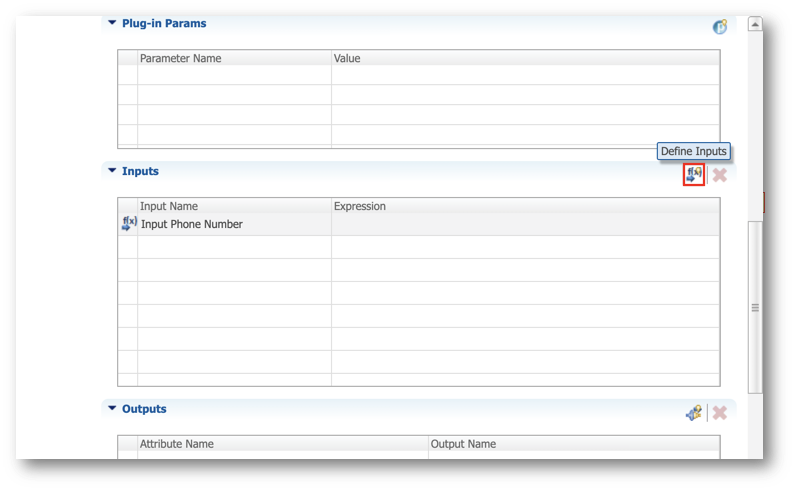
- Select the Region Code, Input Phone Number and Enriched Phone Format inputs, click the Add button to add them to the Used Inputs list, and then click Finish.
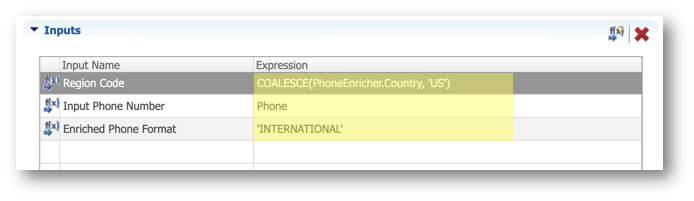
- For each input listed in the Inputs section, set the following expressions in the Expression column:
- Region Code:
COALESCE(EnrichedPhone.Country, 'US') - Input Phone Number:
Phone - Enriched Phone Format:
'INTERNATIONAL'
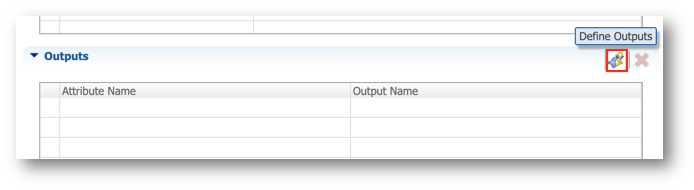
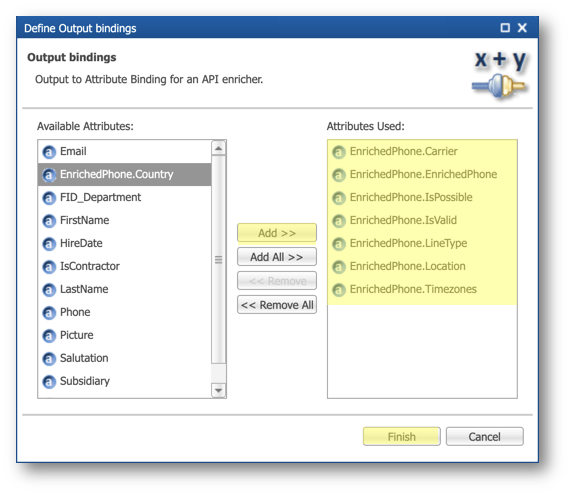
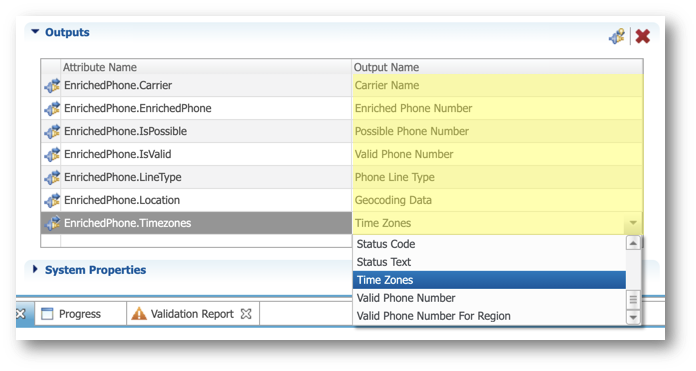
- Scroll down to the Outputs section and click the Define Outputs button:
- Add the following attributes to the Attributes Used list, and then click Finish:
- EnrichedPhone.Carrier
- EnrichedPhone.EnrichedPhone
- EnrichedPhone.IsPossible
- EnrichedPhone.IsValid
- EnrichedPhone.LineType
- EnrichedPhone.Location
- EnrichedPhone.Timezones
- Select the following values in the Output Name column for each Attribute Name from the Outputs list:
Attribute Name | Output Name |
EnrichedPhone.Carrier | Carrier Name |
EnrichedPhone.EnrichedPhone | Enriched Phone Number |
EnrichedPhone.IsPossible | Possible Phone Number |
EnrichedPhone.IsValid | Valid Phone Number |
EnrichedPhone.LineType | Phone Line Type |
EnrichedPhone.Location | Geocoding Data |
EnrichedPhone.Timezones | Time Zones |
- Check the enricher configuration in the Inputs and Outputs sections, and then save your work.

Congratulations!
You have successfully added data standardization rules to your model.
To summarize:
- You have created a SemQL enricher to standardize first and last names.
- You have set a default value to the hire date using another SemQL enricher.
- You have created a complex type to hold additional phone attributes.
- You have used a plug-in enricher to standardize phone numbers and populate those attributes.
The next section will focus on adding validation and match rules.
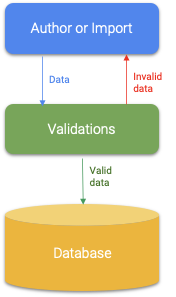
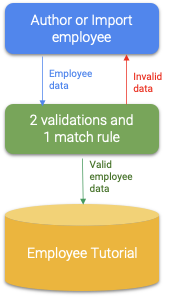
Semarchy xDM provides a range of data validation rules during the data authoring process. These rules serve as a protective barrier, preventing the input or importation of erroneous data into the hub. While some rules are implicit, such as mandatory attributes, lists of values, or referential integrity, others can be explicitly defined, such as SemQL validations, plug-in validations, and match rules.
In this section, you will discover how to utilize SemQL for data validation, in order to ensure data consistency. You will be guided through the following tasks:
- Crafting a SemQL validation rule to verify that an employee's hire date precedes their contract end date.
- Establishing a SemQL validation rule to enforce the email as mandatory when an employee is designated as a contractor.
- Creating a SemQL match rule to prohibit the creation of duplicate employee records.
Learning outcomes
- Creating SemQL validations.
- Creating match rules.
Validate end dates
An employee's contract end date should either be null if the employee is still in the company, or be later than their hire date.
You are now going to add a validation that applies this rule.
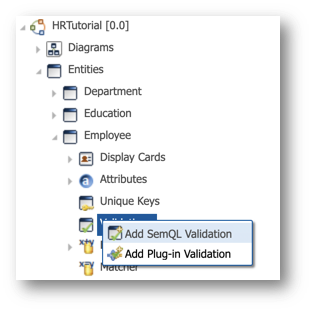
- Go to Entities > Employee > Validations in the Model Design view of the Application Builder.
- Right-click Validations and select Add SemQL Validation.
- Fill in the wizard with the following values and then click Finish:
- Name:
CheckEndDate - Description:
End date must be greater than the hire date - Condition:
(EndDate is null) OR (EndDate > HireDate)
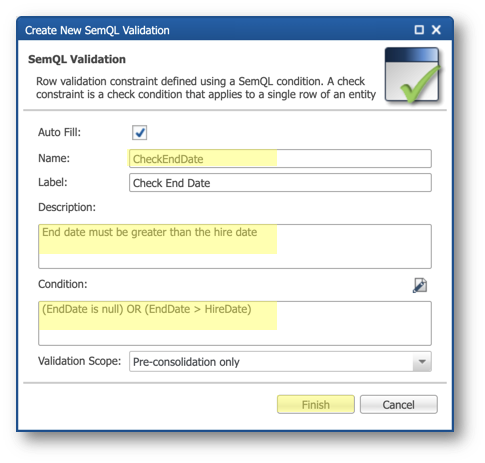
- Save your work.
Validate emails
You will now add a rule that makes the email mandatory only if the employee is a contractor.
- Navigate again to Entities > Employee > Validations in the Model Design view.
- Right-click Validations, and then select Add SemQL Validation.
- In the wizard, enter the following values, and click Finish:
- Name:
CheckContractorEmail - Description:
Contractors must have an email address - Condition:
(IsContractor = '1' and Email is not null) OR IsContractor = '0'
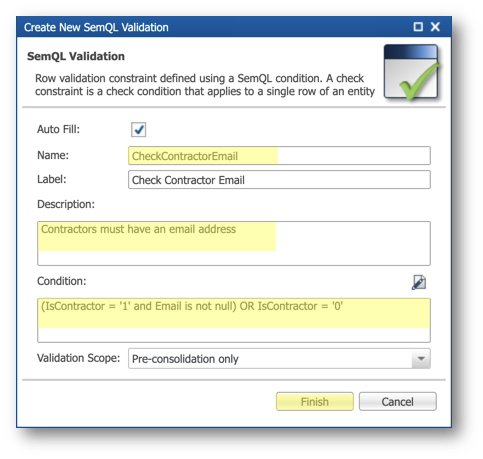
- Save your work.
Prevent duplicates
Preventing users from creating duplicate records is considered a best practice. In this section, you will create a match rule intended to prevent the creation of an employee record if another employee with identical first and last names already exists within the same subsidiary.
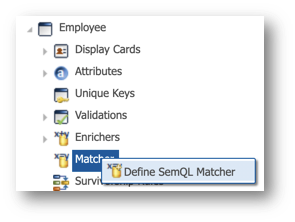
- Go to Entities > Employee > Matcher in the Model Design view.
- Right-click Matcher and select Define SemQL Matcher.
- In the Description field, type
Prevent duplicate employees,and click Finish.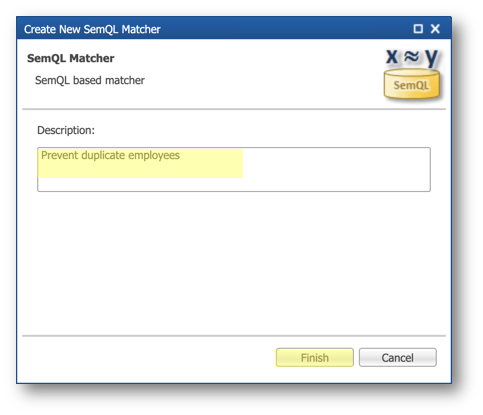
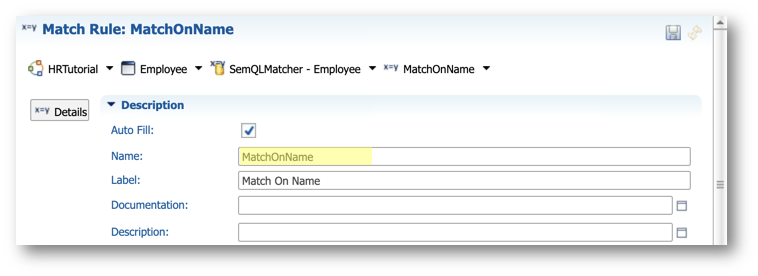
- Click the Add Match Rule button in the Match Rules section of the SemQL Matcher Editor.
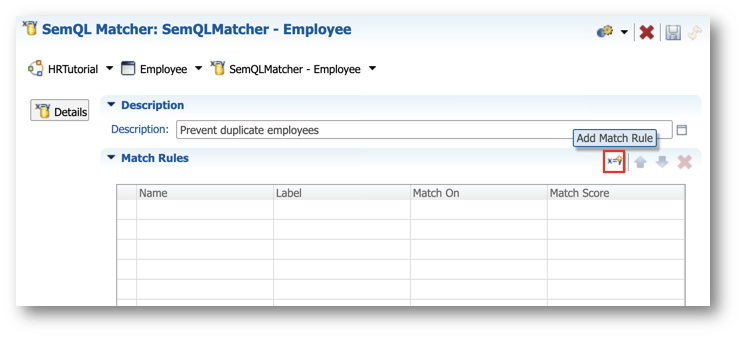
- Set the Name of your match rule to
MatchOnName.
- Scroll down to the Matching section, and click the Edit Expression button.
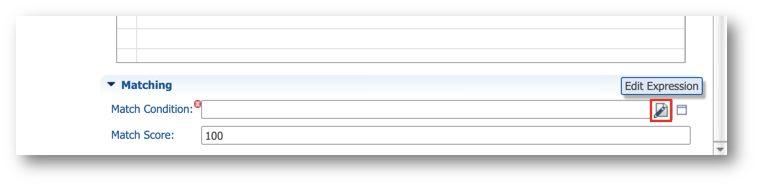
- In the SemQL Condition field, copy the expression below and click OK.
Upper(Record1.FirstName) = Upper(Record2.FirstName)
and Upper(Record1.LastName) = Upper(Record2.LastName)
and Record1.Subsidiary = Record2.Subsidiary
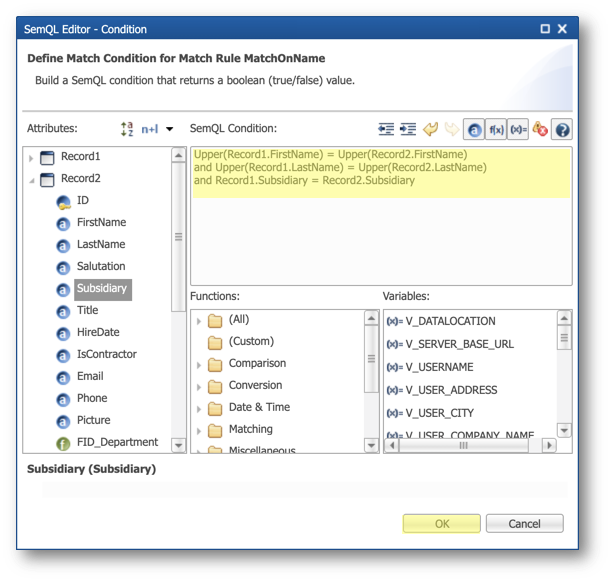
- Save your work.
Congratulations!
You have successfully added validation and match rules to your model.
To summarize:
- You have created a SemQL validation to check that the hire date precedes the end date.
- You have created another SemQL validation to make the email information mandatory when an employee is a contractor.
- You have created a SemQL match rule to prevent the creation of duplicate employees.
The next section will focus on integrating enrichers and validation rules into the user interface, as well as deploying a new version of your application.
Semarchy xDM gives you the flexibility to control exactly which rules should apply when users are authoring data using a stepper.
- Enrichers can be triggered upon data modification or upon entering or exiting a step.
- Validations can be triggered when users are entering data in forms or when data is submitted to your application.
In this section, you will learn how to make the enrichers and validation rules effective in the MDM application. You will:
- Modify the EmployeeForm form to add the missing phone enricher attributes.
- Modify the AuthorEmployee stepper to activate the rules.
- Deploy your changes.
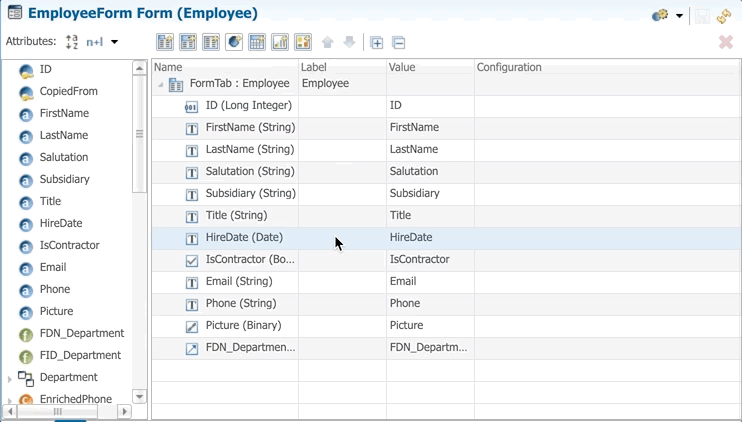
Modify the EmployeeForm form
You will now modify the EmployeeForm form to add the enriched phone attributes and reorganize the form fields.
- In the Application Builder, navigate to Entity > Employee > Form, and double-click EmployeeForm.
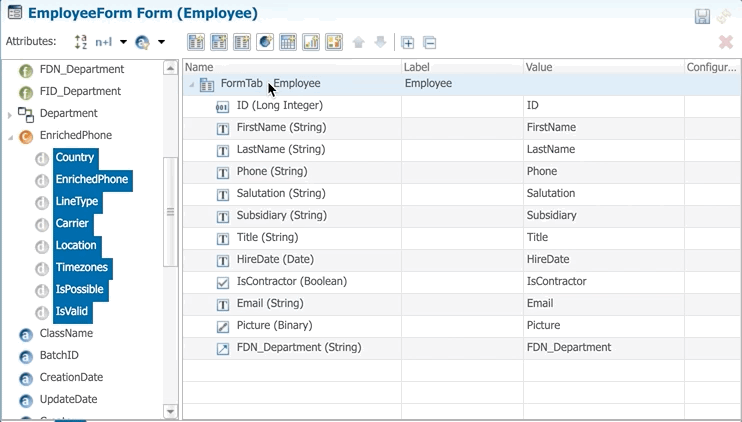
- Select the Phone attribute in the form's tree view, and then use the Move Up button to move this attribute between LastName and Salutation.
- In the Attributes list, expand the EnrichedPhone attribute and select all the attributes it is composed of (hold the
Shiftkey and select the first and last attribute).

- Drag and drop the selected attributes to the form's tree view between Phone and Salutation.
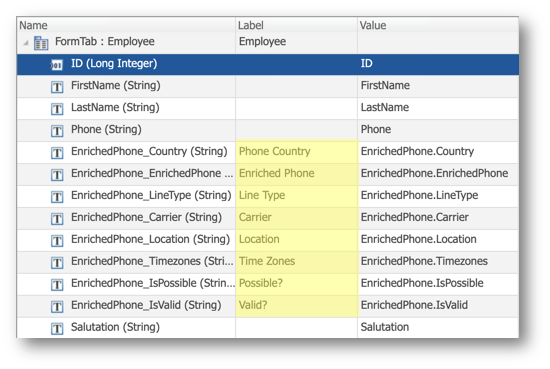
- Enter the following values in the Label column of these new attributes:
- EnrichedPhone_Country:
Phone Country - EnrichedPhone_EnrichedPhone:
Enriched Phone - EnrichedPhone_LineType:
Line Type - EnrichedPhone_Carrier:
Carrier - EnrichedPhone_Location:
Location - EnrichedPhone_Timezones:
Time Zones - EnrichedPhone_IsPossible:
Possible? - EnrichedPhone_IsValid:
Valid?
- Select the FDN_Department attribute and use the Move Up button to move it between Title and HireDate (or you can drag and drop the attribute to the target location).
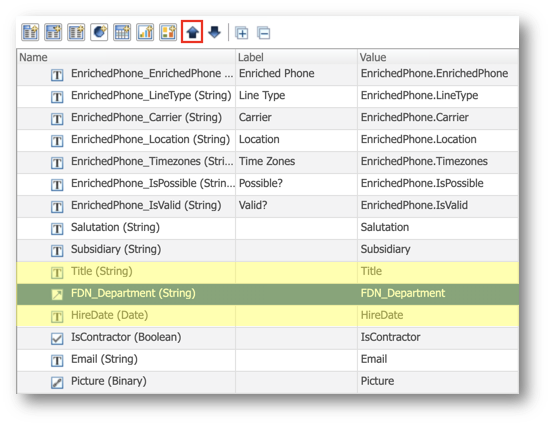
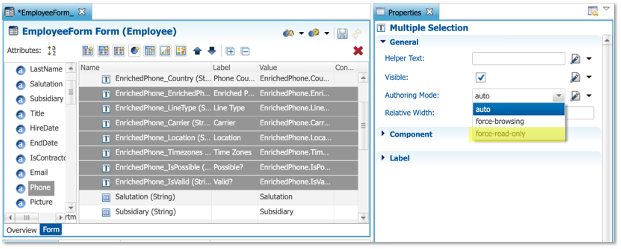
- Make the EnrichedPhone_Country attribute read-only:
- Select EnrichedPhone_Country.
- Select the General tab in the Properties view.
- Select force-read-only from the Authoring Mode drop-down menu.

- Select the following attributes, and force them all to read-only authoring mode:
- EnrichedPhone_EnrichedPhone
- EnrichedPhone_LineType
- EnrichedPhone_Carrier
- EnrichedPhone_Location
- EnrichedPhone_Timezones
- EnrichedPhone_IsPossible
- EnrichedPhone_IsValid
- Save your work.
Modify the AuthorEmployee stepper
Before you deploy your changes, you need to modify the AuthorEmployee stepper to enable the validations and enrichers that you defined in the previous sections.
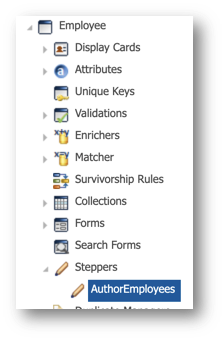
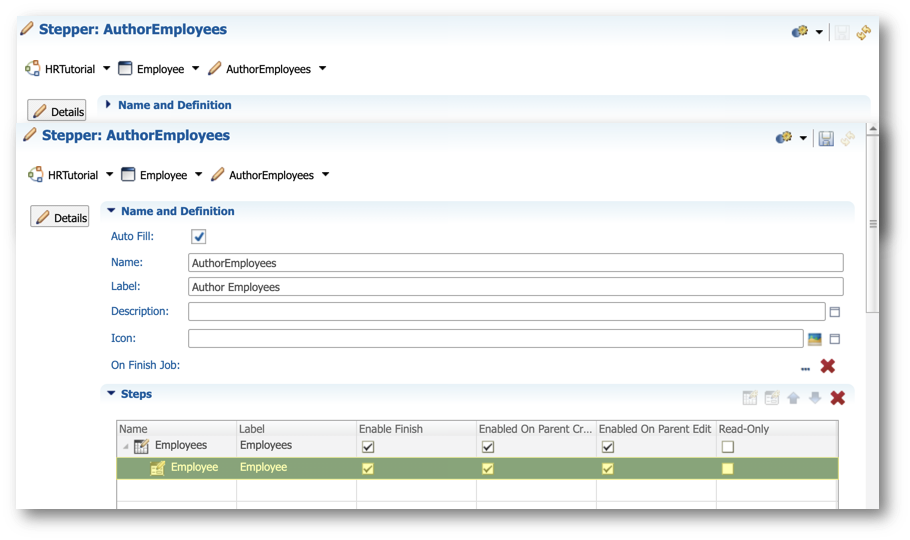
- Go to Entities > Employee > Steppers in the Model Design view, and double-click AuthorEmployees.
- Configure the validations to perform on stepper finish:
- Scroll down to the Validations section of the editor.
- Select the first row of the table (
DETECT_DUPS) and then select Warn in the On Stepper Finish column.
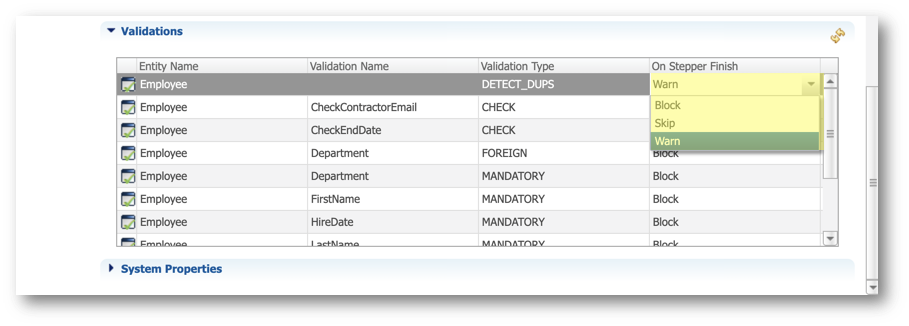
- Select all the other rows. To do so, hold the
Shiftkey, select the CheckContractorEmail row, and then select the last row of the table. Right-click the selection and then select Block. This makes all the selected validations blocking the completion of the employee stepper.
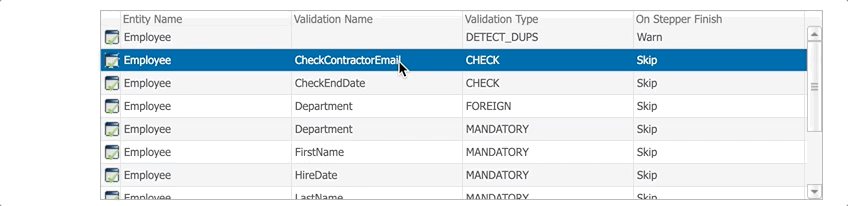
- Scroll up to the Steps section and select the second step: Employee.
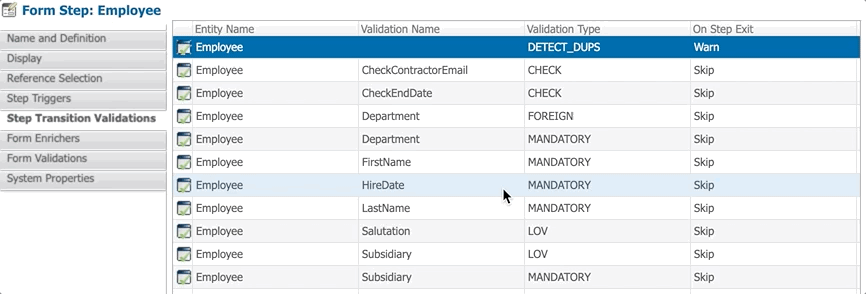
- In the Properties view, open the Step Transition Validations finger tab, select the first row of the table (
DETECT_DUPS), and then select Warn in the On Step Exit column.
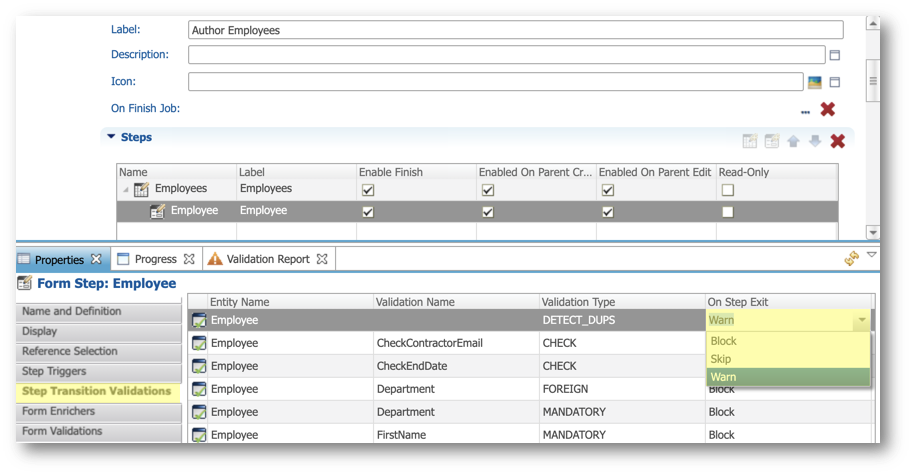
- Make all other validations blocking for step transitions:
- Select all rows starting from the second one (i.e., CheckContractorEmail).
- Right-click this selection and then select Block.
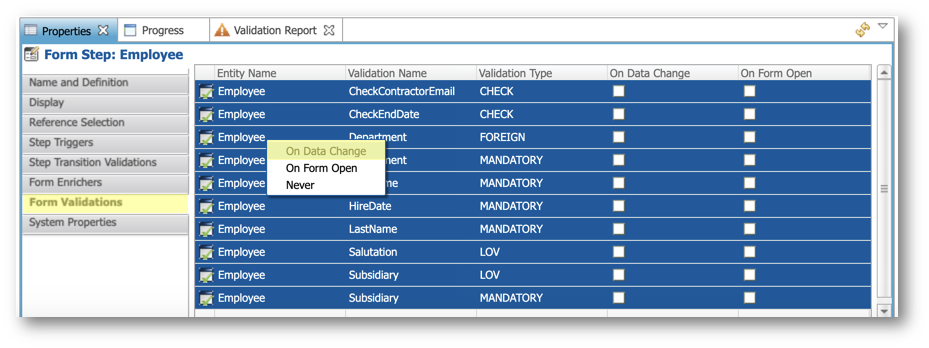
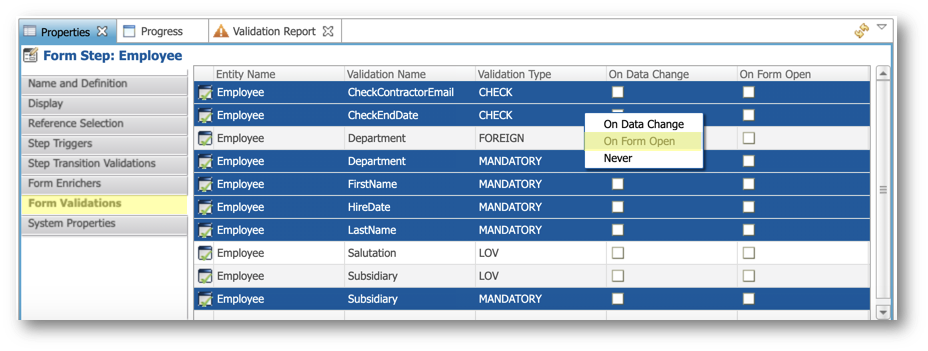
- Configure all validations on data change:
- Select the Form Validations finger tab.
- Select all rows in the table.
- Right-click the selection and select On Data Change.
- Configure validations on form opening:
- Select the following rows: CheckContractorEmail, CheckEndDate, Department|MANDATORY, FirstName, HireDate, LastName, and Subsidiary|MANDATORY (hold the
Controlkey—orCommandon macOS—and select). - Right-click this selection.
- Select On Form Open.
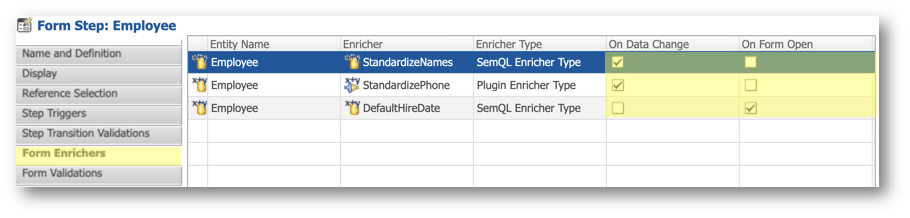
- Set up the execution of enrichers:
- Select the Form Enrichers finger tab.
- Select On Data Change for StandardizeNames and StandardizePhone.
- Select On Form Open for DefaultHireDate.
- Save your work.
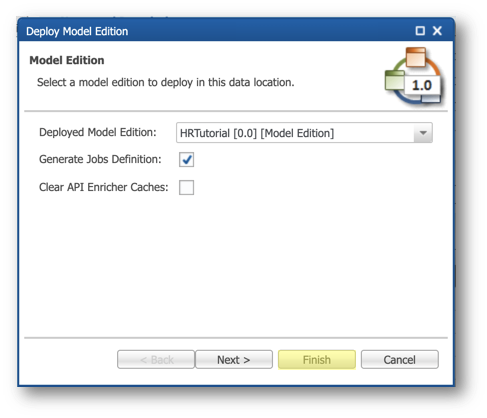
Deploy the model changes
You are now ready to deploy your changes, have a first glance at the employee creation form, and see the impact of your changes.
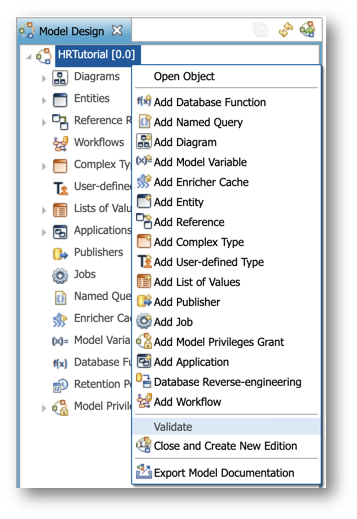
- In the Application Builder, right-click on the root node in the Model Design View, corresponding to the HRTutorial [0.0] model, and then select Validate. The validation report should raise no error.
- Go to the Management perspective of the Application Builder.

- Right-click on your data location EmployeeTutorial and select Deploy Model Edition.
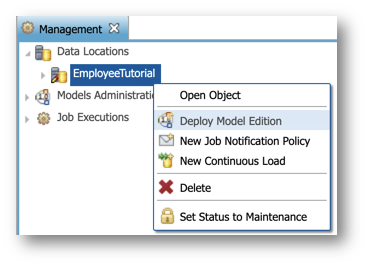
- Click Finish in the wizard to deploy your model changes.
Congratulations!
You have successfully integrated validations and enrichers, and deployed the changes to your application.
To summarize:
- You have modified the EmployeeForm form to added missing attributes.
- You have modified the AuthorEmployee stepper to activate rules.
- You have deployed your changes.
The next section will showcase all the rules in action within your application.
In this section of the tutorial, you will try several combinations for creating employee records, in order to view your enrichers and validations in action in the user interface.
Enrichers in action
Previously, you created three enrichers to standardize names, enrich phone information, and set the default hire date. To see them in action:
- Open your application from the Welcome page.

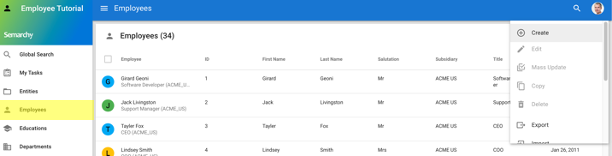
- In the navigation drawer, select Employees, open the Options menu, then select Create.
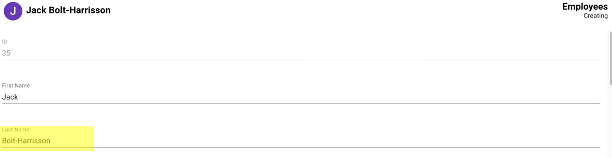
- Type
jackin the First Name field andBOLT-HarriSsonin the Last Name field.
Notice how the StandardizeNames enricher re-formats values automatically.
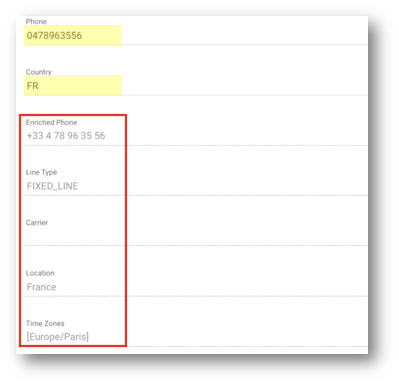
- Enter
0478963556in the Phone field andFRin the Country field.
Observe the outputs of the phone enricher:
- Scroll down to the Hire Date field, which has automatically been set to the current date.
- Discard your changes: click again on Employees in the navigation drawer, and then click Discard all on the pop-up window that appears.

Validations in action
Previously, you added two custom validations on top of the built-in validations, and enabled them in the AuthorEmployee stepper. To see them in action:
- In the navigation drawer of your application, select Employees, open the Options menu, and select Create.
- Type
Jackin the First Name field andBoltin the Last Name field, then click Finish.
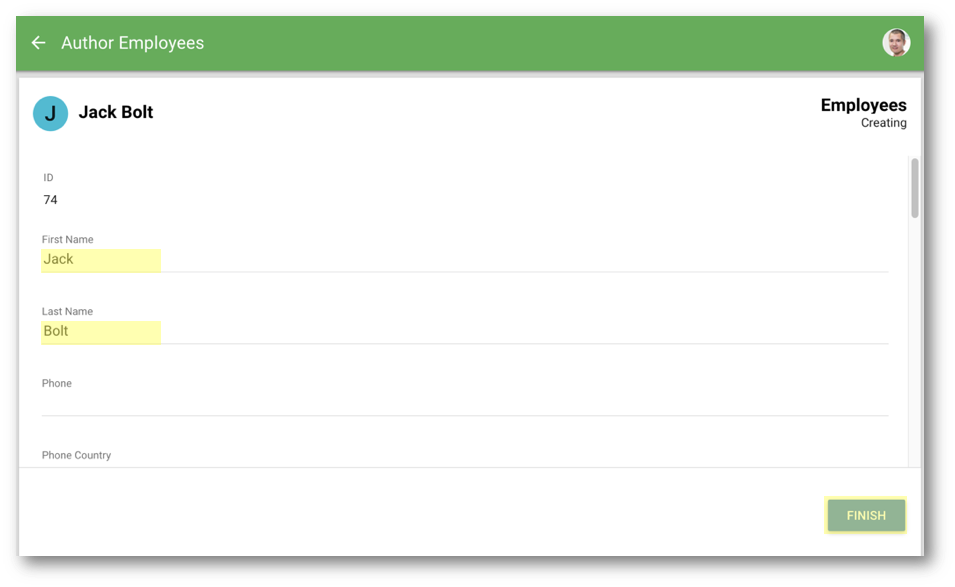
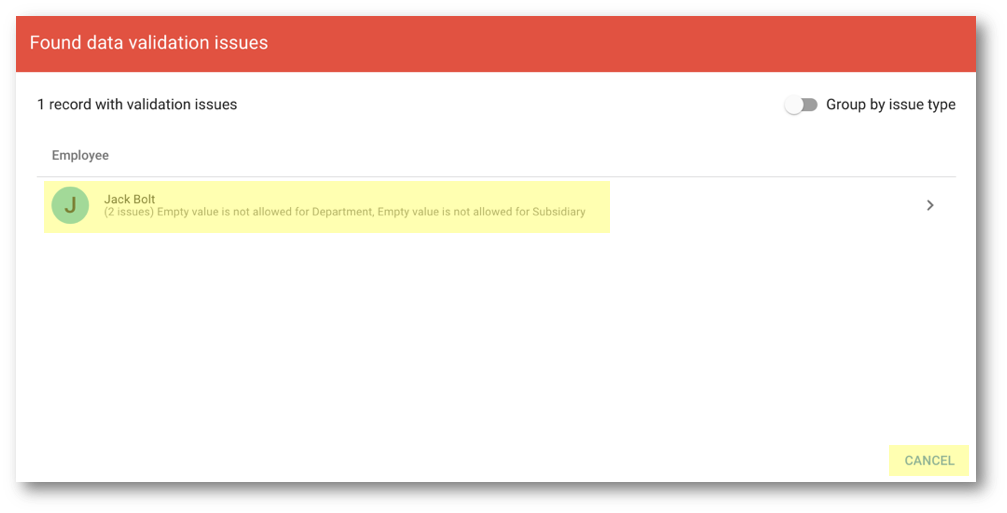
- Two validation issues are raised. Click Cancel.
- Fill in the following fields:
- Subsidiary:
ACME EU - Title:
Senior Consultant - Department:
Consulting
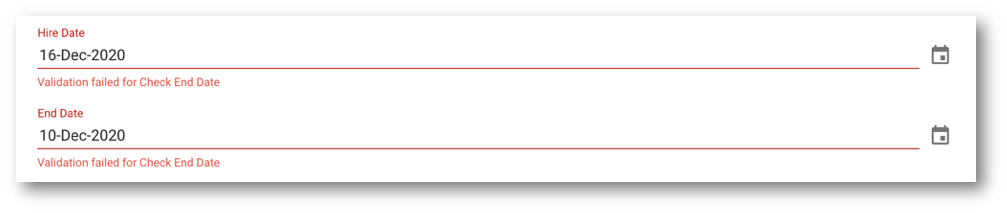
- Set the End Date value to a date preceding the hire date.
Notice the error message.
- Select Is Contractor.
Notice the error message due to the missing email address.

- Fix the erroneous data:
- Set End Date to one month after the Hire Date.
- In the Email field, enter jack.bolt@acme-eu.com.
- Click Finish to submit the creation of your record.
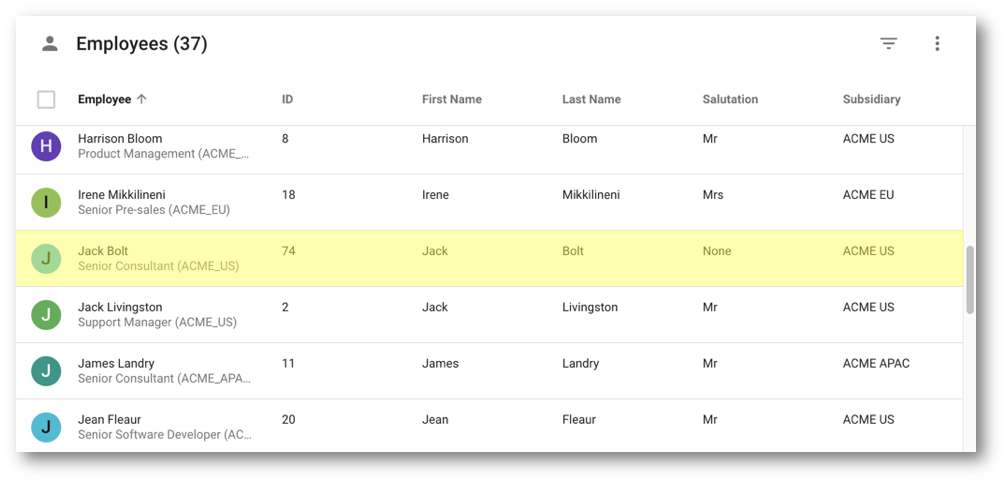
- Wait until the toaster menu at the bottom left corner of the screen indicates "Changes successfully applied," and then select Click to refresh.

- Jack Bolt's record is now available in the list of employees.
Matching in action
Previously, you created a match rule to prevent the creation of duplicate employee records based on their name and subsidiary.
- In the navigation drawer, select Employees, open the Options menu, and select Create.
- Fill in the following fields and then click Finish.
- First Name:
JACK - Last Name:
BOLT - Phone:
0478897889 - Phone Country:
FR - Subsidiary:
ACME EU - Department:
Consulting
- Notice the error message stating that a duplicate has been found.
- Select the record to see the details.
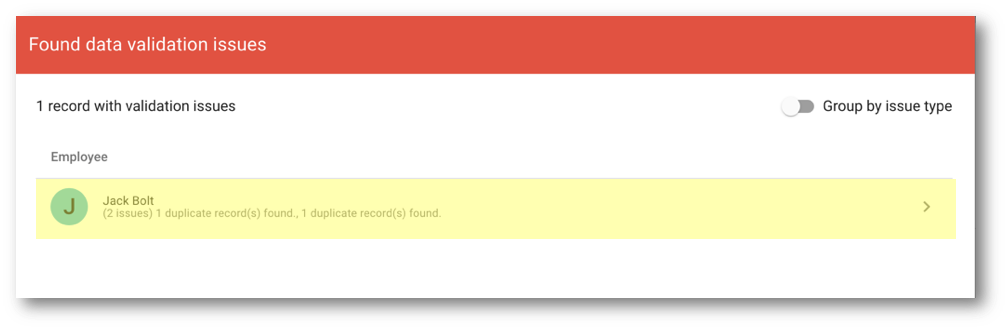
- Click Resolve duplicate issue.
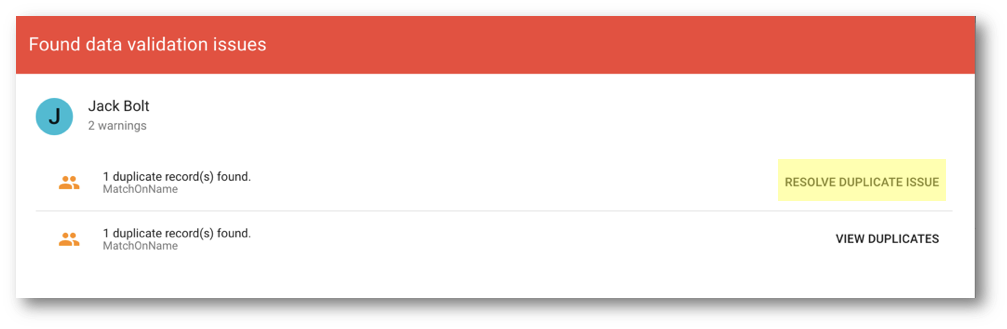
- Select the second record (i.e., the existing employee with the same name and subsidiary) by clicking on its avatar, and then click Replace.
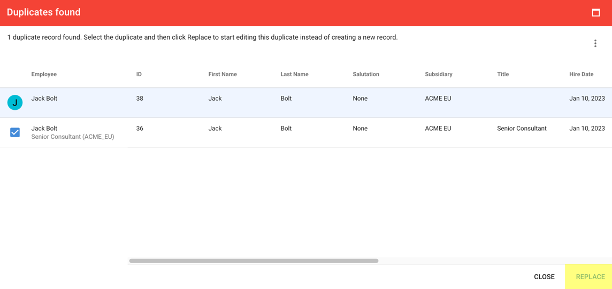
- The editing form for the existing record is displayed in replacement of the creation form.
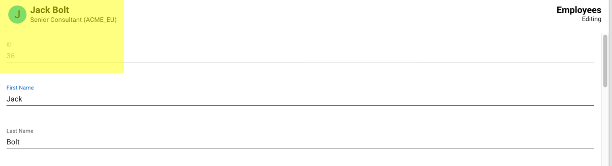
- Complete this record's Phone and Phone Country fields with the values you entered on the other record, and then click Finish.
- Phone:
0478897889 - Phone Country:
FR
- The existing record has been updated with phone information, and the creation of a duplicate has been avoided.
Congratulations!
You have successfully used the employee record creation form to see the rules in action.
To summarize:
- You have learned how enrichers standardize and enrich data while creating an employee record.
- You have learned how validations prevent users from creating erroneous or incomplete data.
- You have learned how match rules prevent the creation of duplicate employee records.
Great job! You have completed the second unit of the Data Authoring track by implementing your first rules for data quality and deduplication.
To summarize:
- You have created enrichers to standardize your data.
- You have added data validation rules to prevent introducing erroneous data into the hub.
- You have enabled custom rules and deployed your changes.
- You have used your application to observe the rules in action.
Next steps
In the next unit, Display cards, forms, and collections, you will learn how to customize the user interface by designing display cards, forms, and collections.
Thank you for completing this tutorial.