| This is documentation for Semarchy xDM 2023.1, which is no longer supported. For more information, see our Global Support and Maintenance Policy. |
User tasks
This page explains how to add user tasks to workflow definitions. User tasks allow business users to perform actions in workflow instances.
|
Data-driven workflows, available in Semarchy xDM 2023.1 and later, are subject to specific licensing requirements; please confirm your eligibility to use such new functionality by consulting your license agreement or by contacting your Semarchy account representative prior to use. All customers can still use the workflow feature available in previous versions (now known as legacy workflows). For more information, see Workflows (legacy). |
The Assignment Condition property enables data-driven assignment in workflows. This determines the candidates and assignees for user tasks.
-
Candidates are all the users who can claim a task. The list of candidates is determined by the Assignee Required Role and the Assignment Condition properties.
-
Assignees are the users who are assigned to a task. The assignee is selected manually when:
-
A candidate claims the task.
-
Next Task Assignee is selected on the previous task.
-
If the list of candidates only contains one candidate (auto-assignment).
-
Add a user task
To add a user task to a workflow definition:
-
Click the
 Create Step button.
The Add Step dialog appears. -
From the Type drop-down list, select UserTask.
-
In the Name field, enter a name for the user task.
-
Click Create. The step is added to the diagram:

-
Click the step you just added. The side panel sweeps in from the right.
-
Set the user task properties.
User task properties
General properties
| Property | Required | Description | ||
|---|---|---|---|---|
Label |
Optional |
Label given to the user task. This label is visible in the diagram. |
||
Icon |
Optional |
Image displayed:
Click the |
||
Application |
Required |
Application in which the user task is processed. |
||
Assignee Required Role |
Optional |
User role to which the current task can be assigned. If <None> is selected (default), any user can claim and process this task. |
||
Optional |
SemQL expression to determine the assignee for the task. The condition may be used instead of Assignee Required Role or in addition to it. Click the For more information on all the attributes, see Workflow attributes. Only the workflow initiator can be a candidate for the task
Username = UserTaskInstance.StepInstance.WorkflowInstance.InitiatorName
|
|||
Assignee Can Release |
Optional |
Determines whether the user to whom the current task is assigned can release it. |
||
Task Type |
Required |
Type of user task. Possible value is:
|
||
Entity |
Required |
Entity to author using the current user task. |
||
Stepper |
Required |
Stepper to use to author data in the workflow.
|
||
Enable Candidate Notifications |
Optional |
Sends notifications to the candidates for this task informing them that the task is available to be claimed. |
||
Enable Assignee Notifications |
Optional |
Sends a notification to inform the assignee when this task is assigned to them. |
My Tasks configuration
| Property | Required | Description |
|---|---|---|
Collection |
Required |
Collection to use to display the task items in the My Tasks view of the application. |
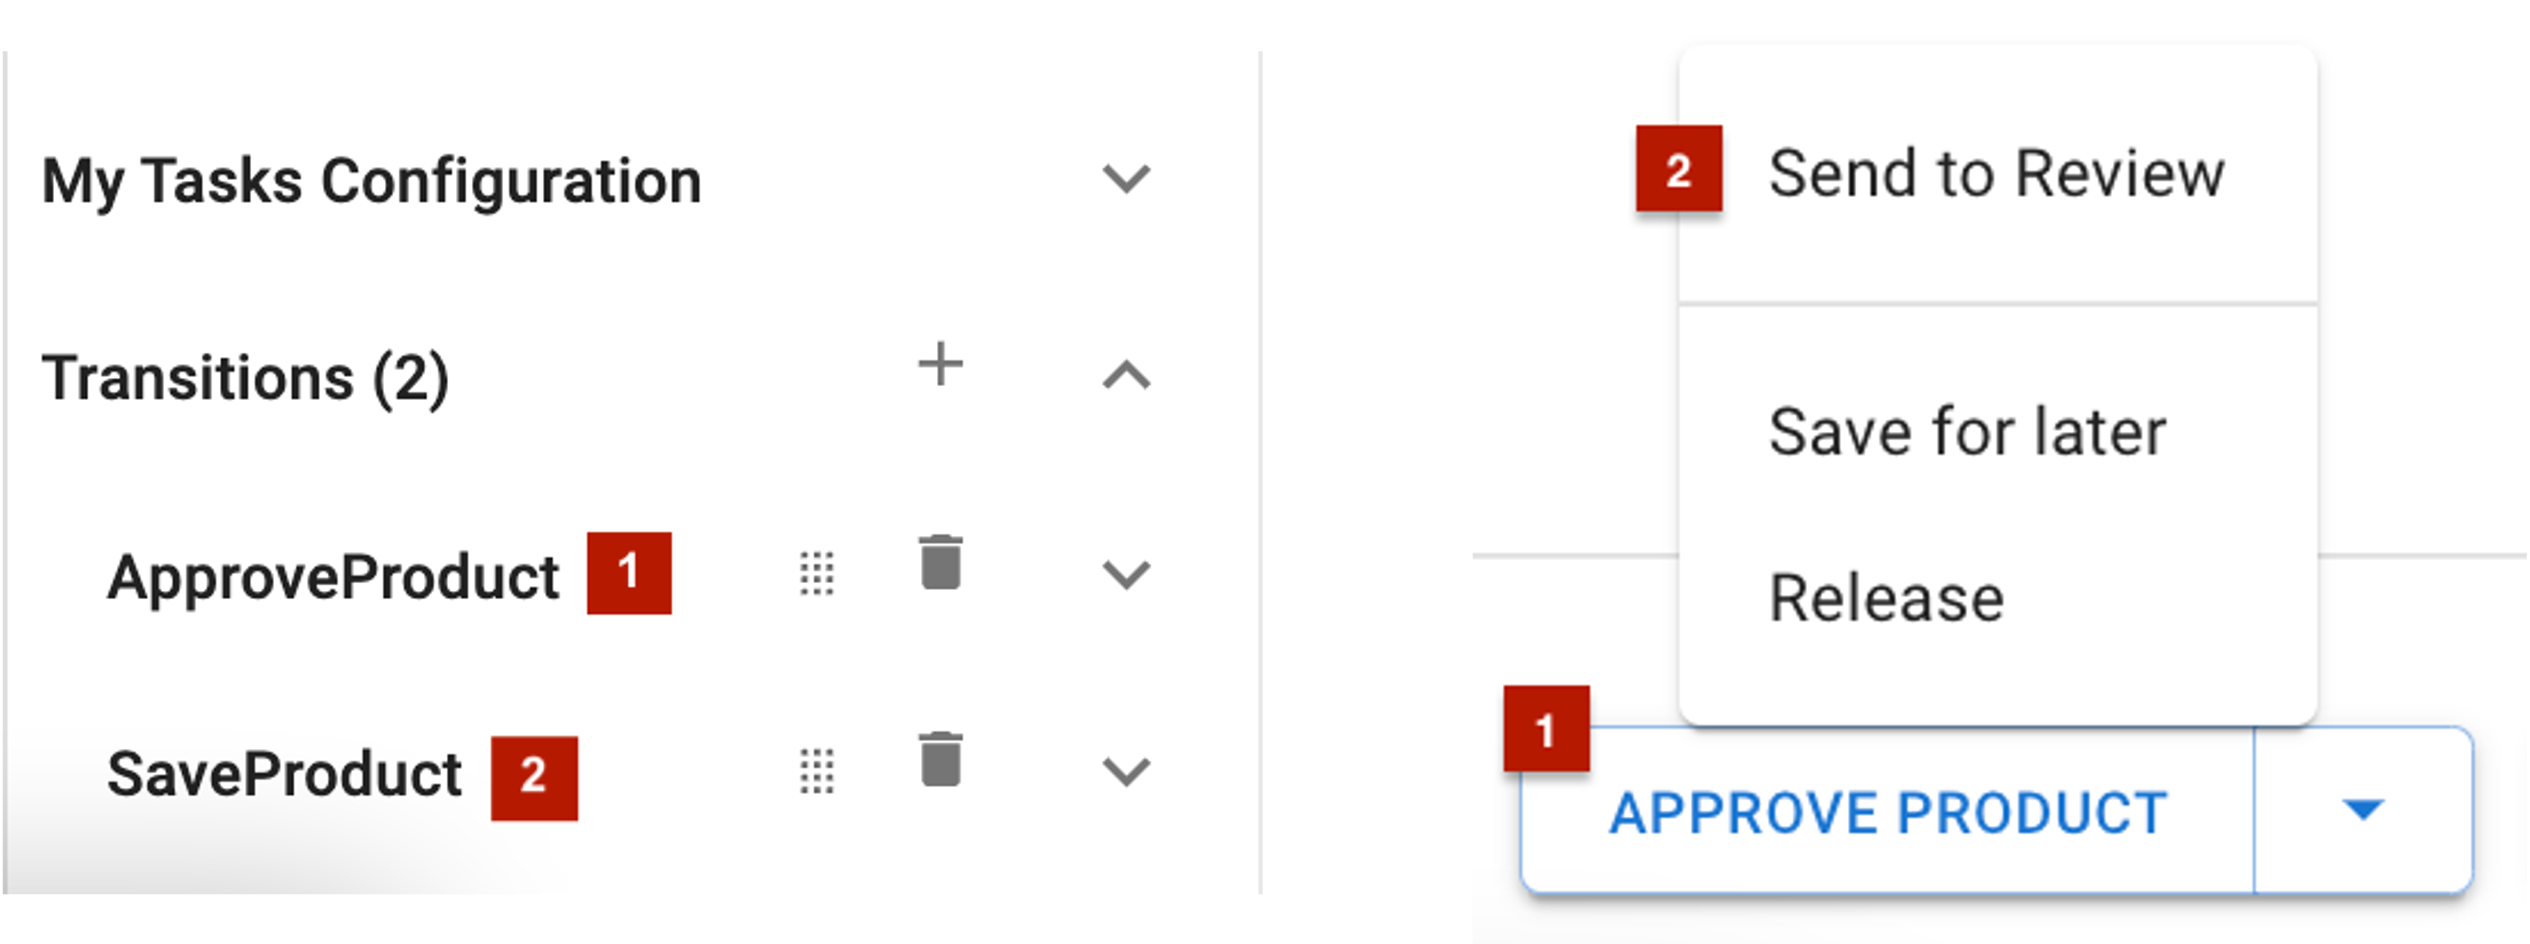
Transitions
A user task must have at least one transition. Transitions determine the different steps that the workflow can move to after the current step.
When multiple transitions are available in a stepper, business users can select a transition that the workflow should move along.
The first transition is visible as primary action on the split button. The remaining transitions are considered secondary actions and can be accessed by expanding the split button.
| The button also contains other default actions like Save for later and Release. |
To add a transition:
-
Click the
 Create button to create a transition.
 -
In the Add Transition dialog, enter a name for the transition.
-
Click Create.
-
In the side panel, expand the transition you just created and set its properties.
General transition properties
| Property | Required | Description |
|---|---|---|
Target Step |
Required |
Step that should follow the current step. |
Name |
Required |
Technical name given to the transition. Click the |
Label |
Required |
Label given to the transition. This label displays:
|
Icon |
Optional |
Image to display in the workflow diagram as well as in steppers. Click the |
Required Role |
Optional |
Role required to perform the transition. The value <None> allows users with all roles to perform the transition. The transition is not available if the current task assignee does not have the specified role. |
Available From My Tasks |
Optional |
Determines whether the transition is available in My Tasks. |
User Task Completion Required |
Optional |
Determines whether the user task needs to be completed to perform the transition. Selecting this option makes the transition unavailable until the stepper is completed. |
Behavior On Transition |
Required |
Defines how the data is processed after the transition. Possible values are:
|
Show the Wait Dialog |
Optional |
Displays a dialog after the transition is triggered informing the user that the transition is being processed. This dialog is visible until the user hides it, another user task is initiated, the workflow enters or exits a parallel block, or when the workflow is complete. Users can click Run in Background to hide the dialog. |
Transition parameters
The Transition Parameters section allows to select which parameters are displayed to users within a transition dialog. This dialog appears at the conclusion of a workflow step and the initiation of the subsequent one, if any.
| Property | Description | ||
|---|---|---|---|
Enable Next Task Assignee Selection |
Allows the current task assignee to select an assignee for the next task in the workflow. The selection can be made in the transition dialog.
|
||
Mandatory Next Task Assignee Selection |
Only applies if Enable Next Task Assignee Selection is selected. Makes it mandatory for the current assignee to select an assignee for the next task. |
||
Enable Description |
Allows the current assignee to enter a description in the transition dialog. |
||
Enable Comment |
Allows the current assignee to enter a comment in the transition dialog. |
||
Mandatory Comment |
Only applies if Enable Comment is selected. Makes it mandatory for the current assignee to enter a comment. |
||
Enable Priority |
Allows the current assignee to select the priority in the transition dialog. |
||
Enable Due Date |
Allows the current assignee to specify a due date in the transition dialog. |
||
Mandatory Due Date |
Only applies if Enable Due Date is selected. Makes it mandatory for the current assignee to specify a due date. |
||
Enable Attachments |
Allows the current assignee to add attachments. |
||
Mandatory Attachments |
Only applies if Enable Attachments is selected. Makes it mandatory for the current assignee to add an attachment. |
Notifications
Notifications inform users when a user task in a workflow instance is assigned to them or to a team they belong to. Notifications are sent by email and are triggered by the following events:
-
When a task is assigned to a list of candidates, a candidate notification is sent to these users.
-
When a task is assigned (manually or automatically) to a single user, an assignee notification is sent to that user.
| Workflow email notifications are sent using the first SMTP Notification Server defined as default server in Configuration. |
Candidate notifications
The Enable Candidate Notifications user task property defines whether notifications should be sent to candidate assignees for a user task.
If this option is selected and the user task is not automatically assigned to a single user, then a notification is sent to all candidate assignees:
-
When the task is created and the list of candidates computed.
-
When the administrator manually refreshes the list of candidates (see Workflow administration for more details).
-
When the task is released.
To disable candidate notifications:
-
Designers can unselect the Enable Candidate Notifications option.
-
Users can also disable all candidate notifications by switching off the Assigned to my team toggle in My Tasks > Notification Settings and clicking Save.
Assignee notifications
The Enable Assignee Notifications user task property defines whether a notification should be sent to the assignee of a task.
If this option is selected and the user task is assigned to a single user, then a notification is sent to the assignee:
-
In the case of an automatic assignment, for example when the computed list of candidate assignees only contains one user.
-
When the administrator manually refreshes the list of candidates and this list only contains one user, to whom the task is automatically assigned. See Workflow administration for more details.
-
When the task is automatically assigned to the next task assignee.
-
If the task is assigned by a workflow administrator. See Workflow administration for more details.
To disable assignee notifications:
-
Designers can unselect the Enable Assignee Notifications option.
-
Users can also disable all assignee notifications by switching off the Assigned to me toggle in My Tasks > Notification Settings and clicking Save.
Customize email notifications
The layout of email notifications is pre-defined. Also, the notifications are sent in the language defined in the user’s profile. However, designers can customize the following elements:
-
The branding of notifications using the application properties of the user task. Refer to Configure the Application Branding for more information.
The following application properties can be customized:
-
Title Bar Default Color: header color of the email template. If this property is not set, the xDM default title bar color is used.
-
Logo: image of the image library to use as the application logo. Defaults to
images://default/logo.pngwith height set to 50 and width set to Keep ratio.For optimal rendering, using SVG image files is not recommended, as this format is not supported by many email clients. -
Title: application’s title.
-
-
Record data displayed in notifications by setting the Display Card property for the concerned entity in the Entities section of the workflow definition. If no display card is selected, then the default display card of the entity is used. For more information, see Display cards.
User-dependant built-in variables (such as V_USERNAME) included in the primary or secondary text expressions of display cards are ignored in workflow email notifications. -
The subject and textual content of notifications using custom translations. For more information, see Custom translations.