This tutorial will guide you through the process of loading data into Semarchy xDM using the REST API. It covers updating existing golden records and creating a new record from a simulated source system. This tutorial is based on the Customer B2C Demo application, and provides hands-on experience with the REST API using email, phone number, and address data.
Learning outcomes
- Navigating the REST API documentation and finding the
CREATE_LOAD_AND_SUBMITaction sample payload. - Running a validation rule and enricher without persisting the records in xDM.
- Loading data in xDM via the REST API.
Learning track
This tutorial is the last unit within the Data Publishing & Consumption track, which is composed of SQL-based and REST-based tutorials.
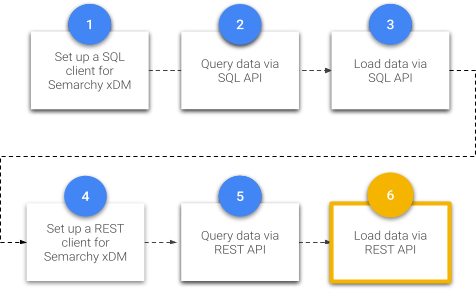
Before following this tutorial, you must have set up Semarchy xDM and completed the Customer B2C demo tutorial. Additionally, you must complete the five other tutorials from the Data Publishing & Consumption track so that you have an integration job and Postman already set up, and are familiar with core integration concepts.
If you have not completed these prerequisites, return to the Tutorials menu.
Otherwise, enjoy this tutorial!
In this section, you will verify:
- The presence of the INTEGRATE_ALL job in the CustomerB2CDemo model.
- The functionality of Postman authentication and the ability to query data from xDM.
Check the integration job
In this tutorial, you will use the "load and submit data" function in the REST API. To use this function, you need to have an integration job set up in your model.
To check that you have an integration job correctly set up:
- In the Application Builder, go to the CustomerB2CDemo model.
- Under Model Design, go to the Jobs node.
- Confirm that you have the integration job INTEGRATE_ALL that includes all the entities in the CustomerB2CDemo model.
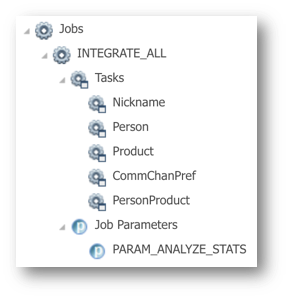
If you do not have the INTEGRATE_ALL job correctly set up, review the Load data via SQL tutorial in the Data Publishing & Consumption track, and look for the "Set up an integration job" section.
Check Postman
You will use the Postman application to load and update data in xDM via the REST API. If you do not have Postman set up yet, refer to the Set up a REST client for Semarchy xDM tutorial in the Data Publishing & Consumption track.
To test that Postman is correctly set up:
- Open up the Postman application.
- Check in the Authorization tab that your authentication parameters are correct:
- Type: Basic Auth
- Username:
semadmin - Password: as per your environment setup (see the Set up a REST client for Semarchy xDM tutorial)

- Substitute your public IP address or public DNS address and port in this request URL, and insert it in the URL field:
http://[public_dns_or_ip_address]:[port]/semarchy/api/rest/query/CustomerB2CDemo/Person/GD
- Check the
GETmethod is selected, click Send, and check that results are returned in the bottom Body section.
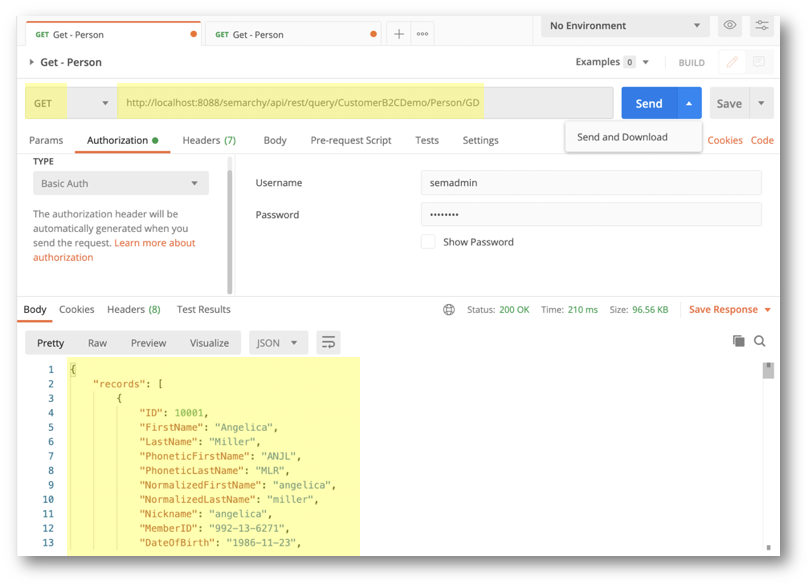
If your Postman application is working correctly, then you are ready to proceed to the next section. If you are not able to connect or if your request fails, refer to the Set up a REST client for Semarchy xDM tutorial for step-by-step guidance on setting up Postman.
Congratulations!
Now that you have confirmed that an integration job and Postman are correctly set up, you will use the REST API documentation to begin constructing your payload to update data in xDM.
Before we begin constructing REST calls to load data, take a look at the REST API documentation that Semarchy xDM generates for you. This is a fantastic resource that will help you construct your REST URLs and minimize the risk of typos and other human errors.
The Retrieve data via the REST API tutorial provides additional guidance on the REST API documentation.
Get the sample payload
In this tutorial, you will use the CREATE_LOAD_AND_SUBMIT action to load data in one step. This action is equivalent to the continuous loads feature when loading data via SQL where xDM handles getting a load ID and submitting the load for you. You can learn how to use continuous loads in the Semarchy xDM documentation and by completing the Load data via SQL tutorial.
You will now dive into the REST API documentation to grab the sample CREATE_LOAD_AND_SUBMIT request so you can load data.
- Go to the REST API documentation URL. Remember to substitute your public ID address or public DNS address instead of using our server's information:
http://[public_dns_or_ip_address]:[port]/semarchy/api/rest/api-ui/index.html?domain=data&data-location=CustomerB2CDemo - Click on Publish Data in the left menu.
- Click on the Create a load option in the left menu.
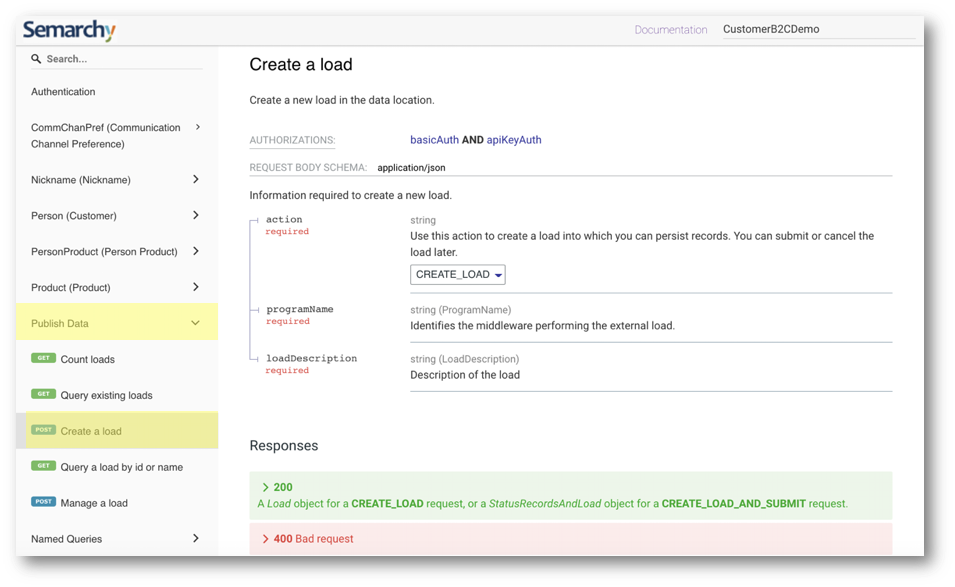
- In the action drop-down menu, choose
CREATE_LOAD_AND_SUBMIT.
Here, you can find many helpful resources to help you build the request payload. For example, if you drill into persistOptions all the way down to validations to see ValidationType, you can see all the possible values forValidationType.

- Scroll further down to locate the Responses heading. These are sample responses that illustrate the possible responses you may receive when loading data. If your load fails, look up the response for troubleshooting clues.
- Look for the request samples. Click on the POST caret drop-down button.
You will need this URL for the request in Postman later. - Under Payload, select
CREATE_LOAD_AND_SUBMITin the Example drop-down list.
The sample payload includes placeholder values that serve as examples for the values you need to substitute in your environment. It is the recommended starting point for loading data later in this tutorial. You will revisit this sample payload when building the request in Postman.
Congratulations!
You have learned how the REST API documentation works.
To summarize:
- You have browsed the REST API documentation.
- You have located the sample payload for the
CREATE_LOAD_AND_SUBMITaction. - You have copied the sample payload and will use it to load data in the following sections.
Next, you will customize the payload and make a POST request to load data via the REST API in Postman.
The ability to load data into xDM in near real-time is critical to delivering value to the business. For example, if your organization has a call center application that needs to update customer information in Semarchy xDM in near real-time, the REST API is the best way to integrate these two applications.
In the rest of this tutorial, we will focus on loading customer information via the REST API as well as triggering data enrichments and validations to ensure the new information meets your organization's data quality standards.
Learning outcomes
- Understanding the structure of the
CREATE_LOAD_AND_SUBMITpayload in the REST API. - Checking if a customer's updated email address is valid.
- Running a request URL in Postman.
Background
Imagine the scenario where a customer calls into the customer service center to update her information. This section will guide you through how to check the customer's information for data quality issues before persisting it in xDM.
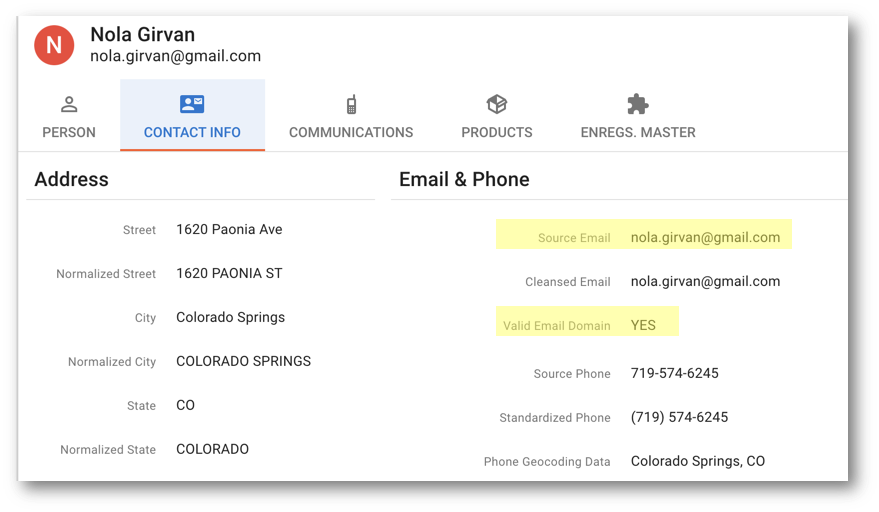
Begin by pulling up the customer golden record of Nola Girvan. To find her information:
- Open the Customer B2C Demo application.
- Go to the Customers business view.
- Use the search filter to search
nola.
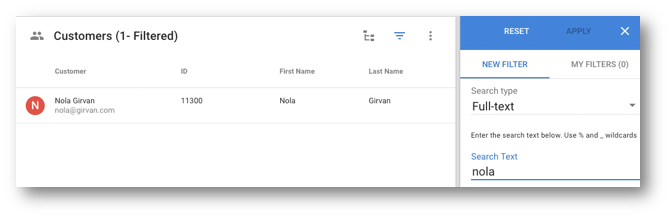
- Open Nola Girvan's record. Go to the Contact Info tab. Notice that the Valid Email Domain field for this customer shows NO.
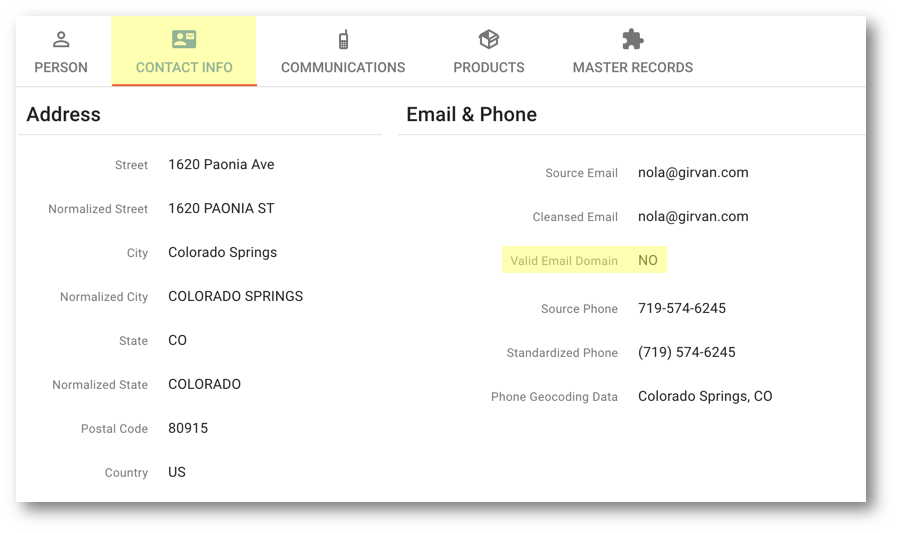
When Nola Girvan's record was initially loaded, xDM used the Semarchy Email enricher to enrich her email address, which was flagged as invalid.
Subsequently, Nola received a postcard in the mail asking her to contact customer service to update her information and ensure she receives the latest promotions by email.
Nola calls customer service to update her email address from nola@girvan.com to nola.girvan@gmail.com. When the customer service representative attempts to update her record in the system, the information undergoes a data quality check in Semarchy xDM before it is permanently saved. This maintains high data quality standards, which can be a challenge in CRM, marketing, and call center systems.
In the CustomerB2CDemo model, the InvalidEmail validation rule assesses email address validity using the Semarchy Email validator. This validator accepts an email address as input and returns a boolean value to indicate whether the email is valid. It performs syntax checks and is configured for MX records lookup to verify the domain.
Set up Postman
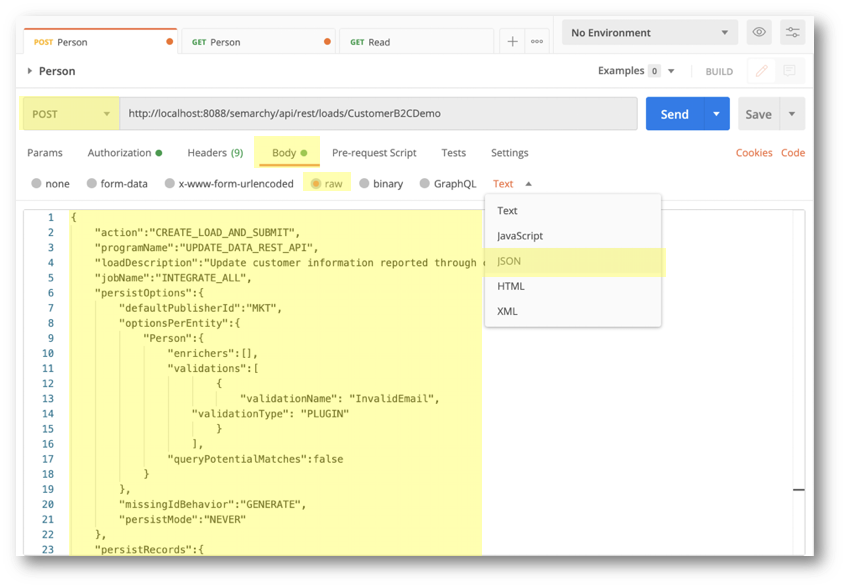
Open your Postman application. As you build your request in Postman, you will learn how to use the POST method for loading and where to edit the payload.
To check whether Nola's new email is valid using the InvalidEmail validation rule:
- Copy and paste the request URL from the REST API documentation into Postman. Remember to substitute your public IP address or public DNS address:
http://[host]:[port]/semarchy/api/rest/loads/CustomerB2CDemo - Change the method from
GETtoPOST. This change should cause the Body tab to become enabled. - Click the Body tab.
- Click the raw radio button. This should give you a text editor panel.
- Copy (using the Copy button on top of the payload) and paste your sample payload from the REST API documentation. This is the sample payload to send to Semarchy xDM.
- Click on Text to drop the list for content types, and select JSON.
- Now, we will modify the payload to call the REST API with an invalid email address.
For your convenience, we modified the sample payload for you. Copy the payload below and paste it into the Postman text editor. Alternatively, you can modify the existing payload you copied from the REST API documentation.
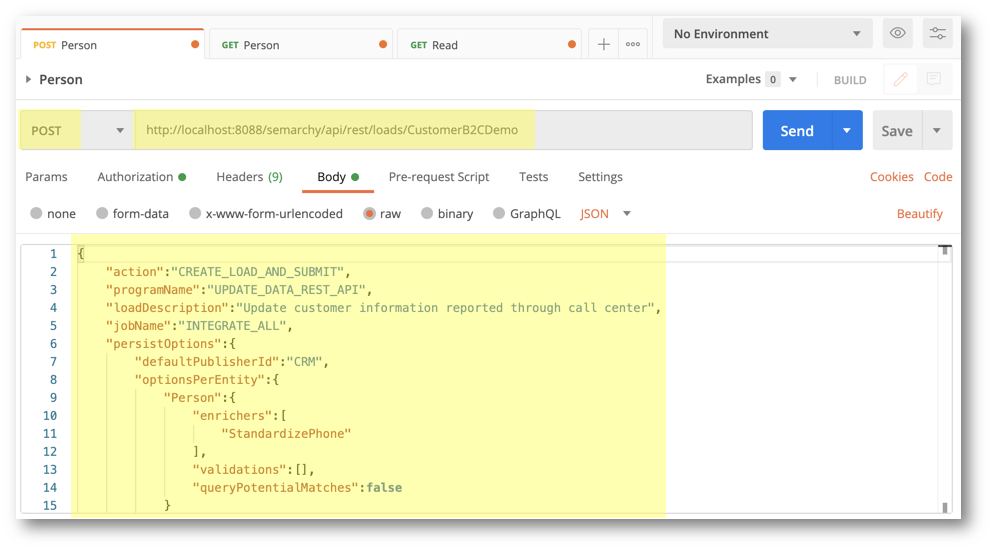
{ "action":"CREATE_LOAD_AND_SUBMIT",
"programName":"UPDATE_DATA_REST_API",
"loadDescription":"Update customer information reported through call center",
"jobName":"INTEGRATE_ALL",
"persistOptions":{
"defaultPublisherId":"MKT",
"optionsPerEntity":{
"Person":{
"enrichers":[],
"validations":[
{
"validationName": "InvalidEmail",
"validationType": "PLUGIN"
}
],
"queryPotentialMatches":false
}
},
"missingIdBehavior":"GENERATE",
"persistMode":"NEVER"
},
"persistRecords":{
"Person":[
{
"SourceID":"1368178",
"SourceEmail":"nola.girvan@gmail.co"
}
]
}
}
Note the following points of interest:
"programName":"UPDATE_DATA_REST_API"is informational. You should come up with your own descriptiveprogramNamefor your REST API environment.- For
"jobName":"INTEGRATE_ALL",you should use the same job name as the one in your model. - We set
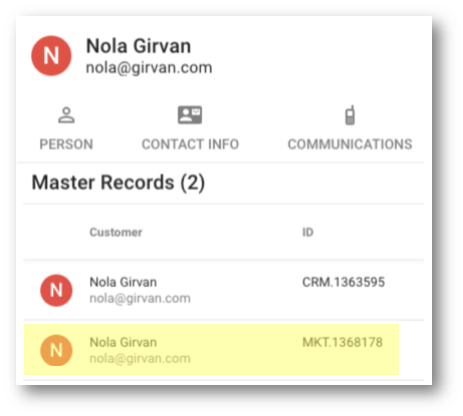
"persistMode":"NEVER", which performs a dry-run to test your records and cancels the job so the records are not saved. - We are loading the source record
"SourceID":"1368178"from MKT, not the golden record. This master record shows up as MKT.1368178:
We deliberately introduced in the payload a typo to the email where the trailing m is missing in "SourceEmail":"nola.girvan@gmail.co". xDM can catch these errors to improve data quality.
- Click Send in Postman.
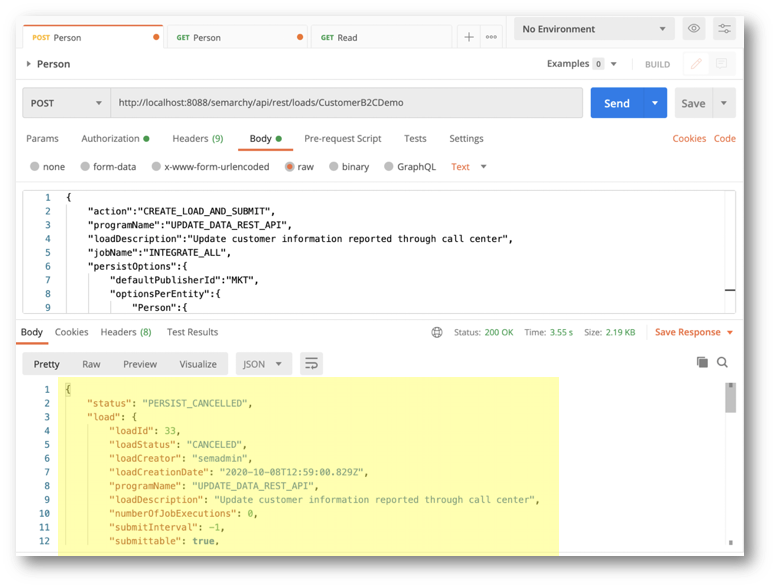
The response you receive from Semarchy xDM should look like the following:
{
    "status": "PERSIST_CANCELLED",
    "load": {
        "loadId": 99,
        "loadStatus": "CANCELED",
        "loadCreator": "semadmin",
        "loadCreationDate": "2018-11-17T01:40:55.317Z",
        "programName": "UPDATE_DATA_REST_API",
        "loadDescription": "Update customer information reported through call center",
        "numberOfJobExecutions": 0,
        "submitInterval": -1,
        "submittable": true,
        "loadType": "EXTERNAL_LOAD"
    },
    "records": {
        "Person": [
            {
                "entityName": "Person",
                "recordValues": {
                    "CleansedEmail": "nola.girvan@gmail.com",
                    "Address.Country": "US",
                    "ValidEmailDomain": "1",
                    "NormalizedFirstName": "NOLA",
                    "PersonType": "CUSTOMER",
                    "NormalizedLastName": "GIRVAN",
                    "SourceEmail": "nola.girvan@gmail.co",
                    "Address.Street": "1620 Paonia Ave",
                    "DeleteOperation": null,
                    "StandardizedPhone": "(719) 574-6245",
                    "Address.State": "CO",
                    "Address.PostalCode": "80915",
                    "ValueStatus": "NORMAL",
                    "Nickname": "nola",
                    "DateOfBirth": "1980-04-10",
                    "DeleteAuthor": null,
                    "FirstName": "Nola",
                    "Address.City": "Colorado Springs",
                    "SourceID": "1368178",
                    "DeletePath": null,
                    "DeleteDate": null,
                    "PhoneticFirstName": "NL",
                    "PhoneticLastName": "JRFN",
                    "SourcePhone": "719-574-6245",
                    "PublisherID": "MKT",
                    "PhoneGeocodingData": "Colorado Springs, CO",
                    "LastName": "Girvan"
                },
                "failedValidations": [
                    {
                        "validationType": "PLUGIN",
                        "validationName": "InvalidEmail"
                    }
                ],
                "potentialMatches": []
            }
        ]
    }
}
Look for the failedValidations object. This response from xDM shows that the email address failed the InvalidEmail enricher. This is expected. If there was no error, meaning the email address is valid, then the failedValidations object would be empty.
Congratulations!
You have successfully checked the validity of an email address using the Semarchy Email validator in a REST call.
To summarize:
- You have learned how to navigate Postman to set up a
POSTcall. - You have run a
POSTaction to call the validation check without persisting the results (using"persistMode":"NEVER"). - You have observed the
failedValidationsresponse from xDM when the email address was invalid.
Next, you will load Nola's valid email address (i.e., after the typo has been rectified) and compare how the response differs.
The customer service representative found the typo in Nola's email and rectified it to nola.girvan@gmail.com. Now that you know how to verify the validity of an email address, you are ready to load the updated email address into xDM.
Learning outcomes
- Modifying the payload to persist the record.
- Loading a record into xDM via the REST API.
- Understanding the difference between creating and updating a record in xDM.
Load data into xDM
Consider a scenario where the customer service representative intends to update Nola's email address to nola.girvan@gmail.com. Try the request again to observe the variations in results.
- Modify the payload. First, fix the email by adding the trailing
mtoSourceEmailso that it reads:"SourceEmail":"nola.girvan@gmail.com". - Fix the
persistModefromNEVERtoIF_NO_ERROR_OR_MATCHso that it reads"persistMode":"IF_NO_ERROR_OR_MATCH".
Your payload should look like the following:
{
    "action":"CREATE_LOAD_AND_SUBMIT",
    "programName":"UPDATE_DATA_REST_API",
    "loadDescription":"Update customer information reported through call center",
    "jobName":"INTEGRATE_ALL",
    "persistOptions":{
        "defaultPublisherId":"MKT",
        "optionsPerEntity":{
            "Person":{
                "enrichers":[],
                "validations":[
                                {
                                        "validationName": "InvalidEmail",
                                        "validationType": "PLUGIN"
                                }
                                        ],
                "queryPotentialMatches":false
            }
        },
        "missingIdBehavior":"GENERATE",
        "persistMode":"IF_NO_ERROR_OR_MATCH"
    },
    "persistRecords":{
        "Person":[
            {
                "SourceID":"1368178",
                "SourceEmail":"nola.girvan@gmail.com"
            }
        ]
    }
}
- Click Send. The response you receive from Semarchy xDM should look like the following:
{
    "status": "PERSISTED",
    "load": {
        "loadId": 100,
        "loadStatus": "PENDING",
        "loadCreator": "semadmin",
        "loadCreationDate": "2018-11-17T01:42:05.504Z",
        "programName": "UPDATE_DATA_REST_API",
        "loadDescription": "Update customer information reported through call center",
        "loadSubmitDate": "2018-11-17T01:42:05.561Z",
        "batchSubmitter": "semadmin",
        "batchId": 66,
        "integrationJobName": "INTEGRATE_ALL",
        "integrationJobQueueName": "Default",
        "numberOfJobExecutions": 0,
        "submitInterval": -1,
        "submittable": true,
        "loadType": "EXTERNAL_LOAD"
    },
    "records": {
        "Person": [
            {
                "entityName": "Person",
                "recordValues": {
                    "CleansedEmail": "nola.girvan@gmail.com",
                    "Address.Country": "US",
                    "ValidEmailDomain": "1",
                    "NormalizedFirstName": "NOLA",
                    "PersonType": "CUSTOMER",
                    "NormalizedLastName": "GIRVAN",
                    "SourceEmail": "nola.girvan@gmail.com",
                    "Address.Street": "1620 Paonia Ave",
                    "DeleteOperation": null,
                    "StandardizedPhone": "(719) 574-6245",
                    "Address.State": "CO",
                    "Address.PostalCode": "80915",
                    "ValueStatus": "NORMAL",
                    "Nickname": "nola",
                    "DateOfBirth": "1980-04-10",
                    "DeleteAuthor": null,
                    "FirstName": "Nola",
                    "Address.City": "Colorado Springs",
                    "SourceID": "1368178",
                    "DeletePath": null,
                    "DeleteDate": null,
                    "PhoneticFirstName": "NL",
                    "PhoneticLastName": "JRFN",
                    "SourcePhone": "719-574-6245",
                    "PublisherID": "MKT",
                    "PhoneGeocodingData": "Colorado Springs, CO",
                    "LastName": "Girvan"
                },
                "failedValidations": [],
                "potentialMatches": []
            }
        ]
    }
}
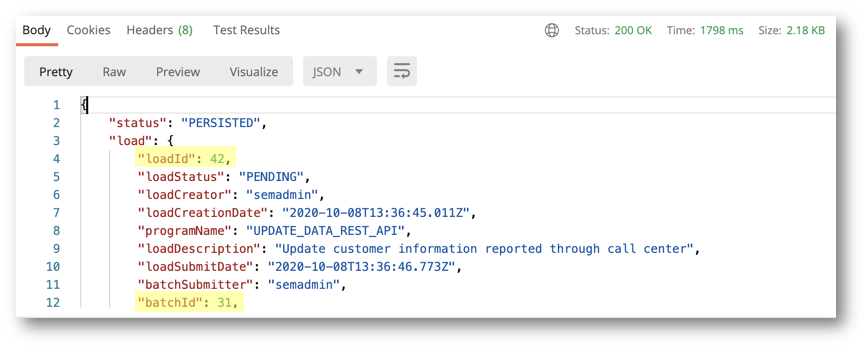
You will know that the job succeeded if you see the status indicates the record was persisted: "status": "PERSISTED".
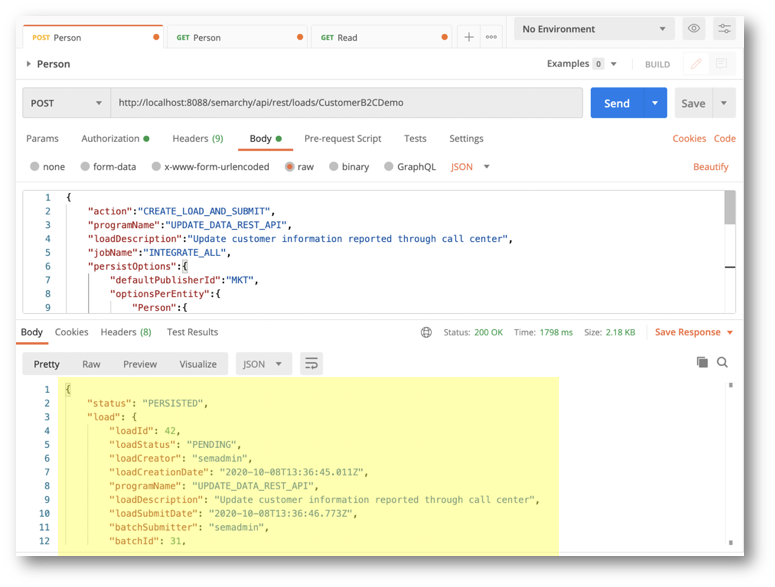
- Retrieve the values of the
loadIdand thebatchIdin the REST response (respectively 42 and 31 in our example).
- Check the status of the integration batch:
- Open the Application Builder.
- In the Management perspective, unfold the CustomerB2CDemo data location in the navigation menu.
- Open the Latest Integration Batches item.
- Find the batch that corresponds to the batchId you retrieved during the previous section (31 in our example).
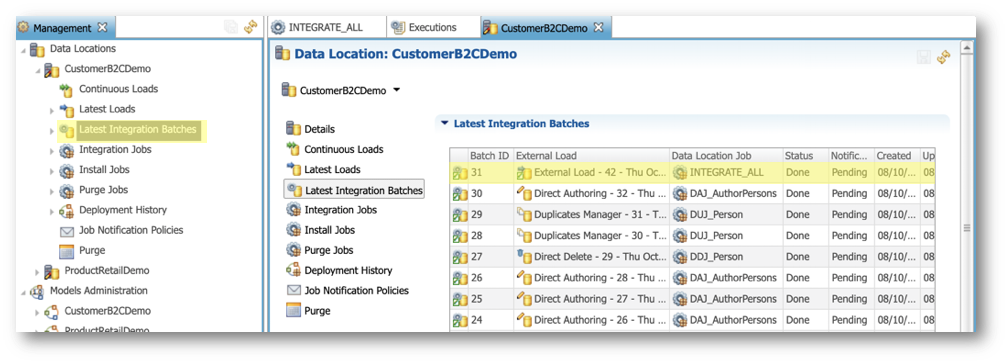
- Double-click this batch and notice that it was finished without any error. Note that the External Load link provides the value of the load ID you retrieved during the previous section (42 in our example):
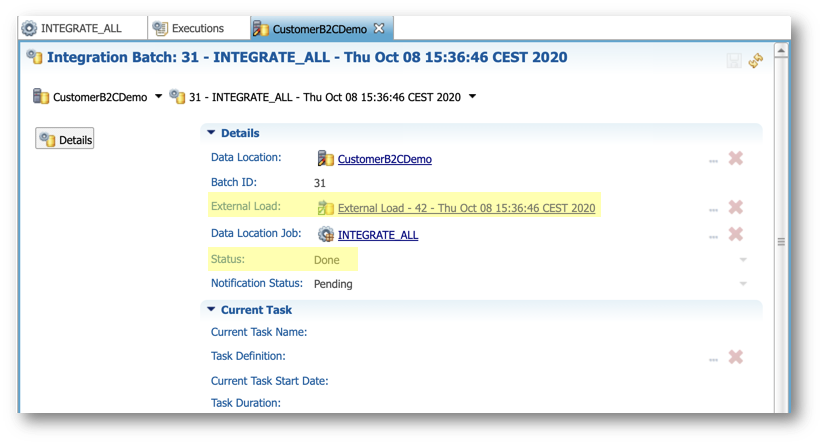
- Click on the External Load link to navigate to the load:
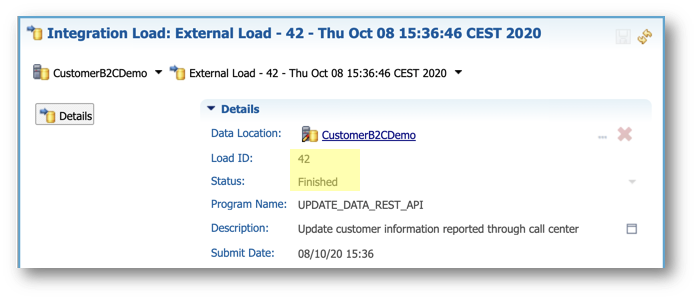
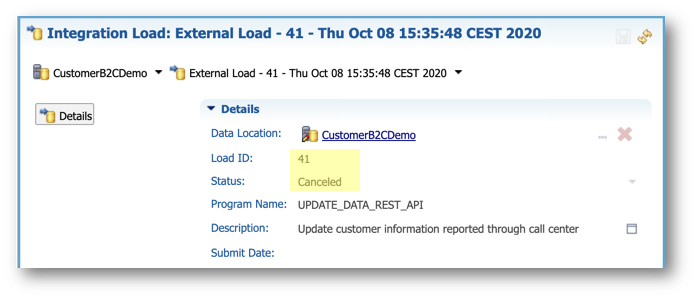
- Open the Latest Loads item from the navigation menu to view all previous loads.
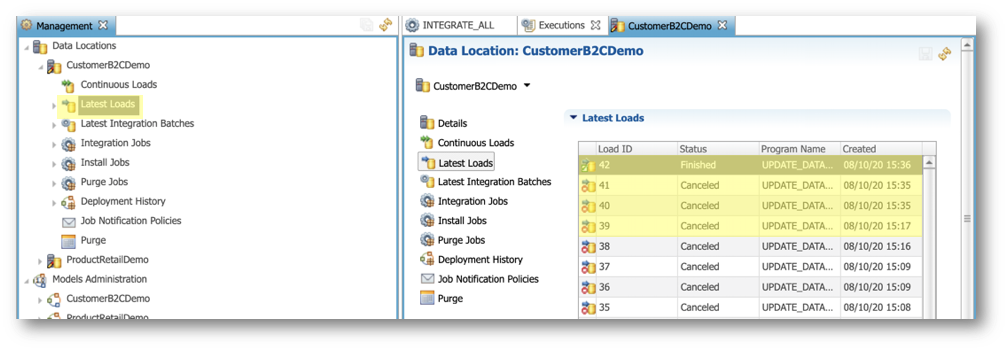
- Load 42 succeeded but notice that previous loads have a Canceled status because we set the
persistModetoNEVER, which prevented them from being persisted.
- Check the Customer B2C Demo application to confirm that Nola's email successfully updated.
Great job! You successfully updated Nola's email and fixed it from an invalid to a valid email address.
Congratulations!
You have successfully loaded data by updating an email address using a REST call.
To summarize:
- You have modified the payload to persist data
"persistMode":"IF_NO_ERROR_OR_MATCH". - You have loaded a record into xDM via the REST API and checked that the load and integration job succeeded.
- You have learned the difference between creating and updating a record in xDM. Essentially, the process is the same, the sole difference being whether the record already existed in xDM.
Now that you know how to load data via the REST API, the next section will guide you through another data quality check. Instead of a dry run of a validation rule, you will perform a dry run of an enricher, and eventually persist the data.
You have just learned how to validate incoming data and boost data quality. This involved checking data against a validation rule, and then persisting the data with error-free, updated information.
Another way to improve data quality involves data enrichment. In this section, you will focus on enriching customer information through the REST API to align with your organization's data quality standards. Then, you will load the record via the REST API.
Learning outcomes
- Enriching the customer's updated phone number.
- Understanding the difference between a validation rule and an enricher.
- Loading the updated information in xDM via the REST API.
Background
Consider a second scenario: a customer contacts the customer service center to update her phone number. This section will guide you through the process of assessing the customer's information for data quality issues before persisting it in xDM.
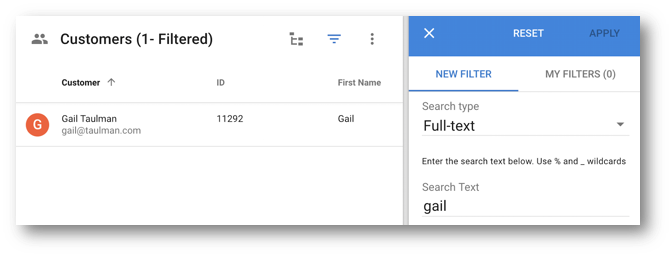
Start by accessing the customer golden record of Gail Taulman. To find her information:
- Open the Customer B2C application.
- Go to the Customers business view.
- Use the search filter to search
gail.
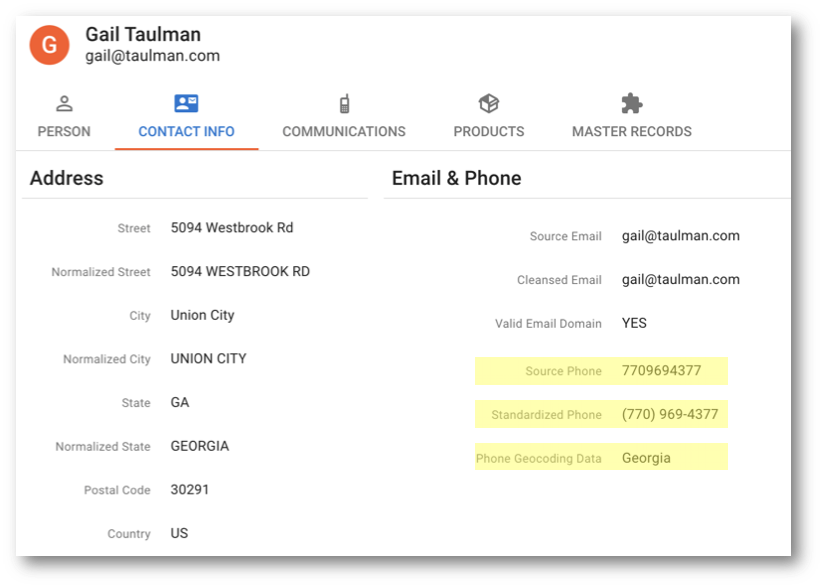
- Open Gail Taulman's record and go to the Contact Info tab. Notice that the Source Phone field for this customer shows the phone number but is missing the area code. As a result, the Phone Geocoding Data field is empty.
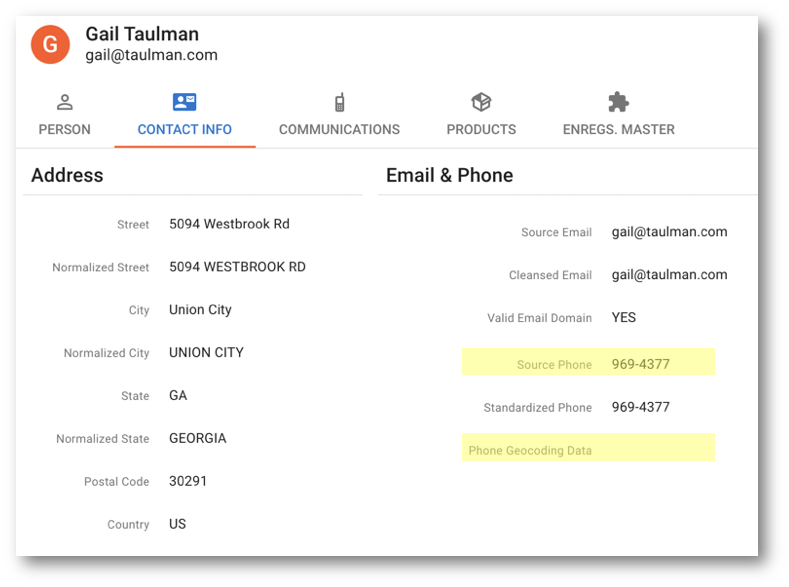
When Gail Taulman's record was initially loaded, xDM attempted to enrich her phone number using the Semarchy Phone enricher. However, the enricher was not able to geocode the phone number because it was missing the area code. This situation is unacceptable for most national or regional organizations, because a missing area code means they cannot contact the customer.
As a result, Gail received a postcard in the mail asking her to call the customer service center to update her information and ensure that she receives communications regarding any issues with her account.
Gail calls customer service to add the area code 770 to her phone number. When the customer service representative attempts to update her record in the system, the information undergoes a preliminary check in Semarchy xDM before it is saved permanently. This maintains high data quality standards, which can be a challenge in CRM, marketing, and call center systems.
In the CustomerB2CDemo model, an enricher named StandardizePhone is configured on the Person entity.

This enricher rule uses the Semarchy Phone enricher, which accepts a phone number as input and returns various outputs. These outputs include a standardized version of the phone number (adhering to different international formatting standards), the region code, status, line type (mobile, landline, etc.), and numerous other potential results.
Use the phone enricher
The CustomerB2CDemo model already includes the StandardizePhone enricher. This enricher standardizes the phone number to the NATIONAL format (e.g., (123) 456-7890) and provides geocoding data.
To check Gail's updated phone number, run the enricher via the REST API:
- Paste the request URL that you copied from the REST API documentation into Postman. Remember to substitute your public IP address or public DNS address:
http://[host]:[port]/semarchy/api/rest/loads/CustomerB2CDemo
- Double check the method is set to
POST.
- In the Body tab, select the raw radio button. This should give you a text editor panel.
- Paste the following payload:
{
    "action":"CREATE_LOAD_AND_SUBMIT",
    "programName":"UPDATE_DATA_REST_API",
    "loadDescription":"Update customer information reported through call center",
    "jobName":"INTEGRATE_ALL",
    "persistOptions":{
        "defaultPublisherId":"CRM",
        "optionsPerEntity":{
            "Person":{
                "enrichers":[
                    "StandardizePhone"
                ],
                "validations":[],
                "queryPotentialMatches":false
            }
        },
        "missingIdBehavior":"GENERATE",
        "persistMode":"IF_NO_ERROR_OR_MATCH"
    },
    "persistRecords":{
        "Person":[
            {
                "SourceID":"1418027",
                "SourcePhone":"7709694377"
            }
        ]
    }
}
Note the following points of interest:
- For
"jobName":"INTEGRATE_ALL", you must use the name of the job in your model. - The
optionsPerEntityspecifies the enricher to run in the REST call.
"optionsPerEntity":{
            "Person":{
                "enrichers":[
                    "StandardizePhone"
]- We set
"persistMode":"IF_NO_ERROR_OR_MATCH"which saves the record to xDM if there are no errors. - We are loading the source record
"SourceID":"1418027"from CRM.
- We input the phone number in the
persistRecordssection,"SourcePhone":"7709694377".
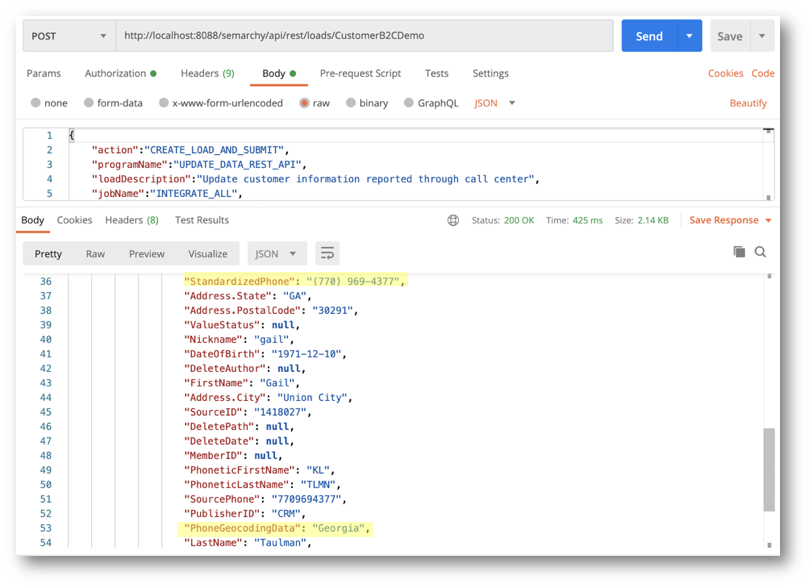
- Click Send. The response you receive from Semarchy xDM should look like the following:
{
    "status": "PERSISTED",
    "load": {
        "loadId": 102,
        "loadStatus": "PENDING",
        "loadCreator": "semadmin",
        "loadCreationDate": "2018-11-19T20:37:33.981Z",
        "programName": "UPDATE_DATA_REST_API",
        "loadDescription": "Update customer information reported through call center",
        "loadSubmitDate": "2018-11-19T20:37:34.064Z",
        "batchSubmitter": "semadmin",
        "batchId": 67,
        "integrationJobName": "INTEGRATE_ALL",
        "integrationJobQueueName": "Default",
        "numberOfJobExecutions": 0,
        "submitInterval": -1,
        "submittable": true,
        "loadType": "EXTERNAL_LOAD"
    },
"records": {
        "Person": [
            {
                "entityName": "Person",
                "recordValues": {
                    "CleansedEmail": "gail@taulman.com",
                    "Address.Country": "US",
                    "ValidEmailDomain": "1",
                    "NormalizedFirstName": "GAIL",
                    "PersonType": "PROSPECT",
                    "NormalizedLastName": "TAULMAN",
                    "SourceEmail": "gail@taulman.com",
                    "Address.Street": "5094 Westbrook Rd",
                    "DeleteOperation": null,
                    "StandardizedPhone": "(770) 969-4377",
                    "Address.State": "GA",
                    "Address.PostalCode": "30291",
                    "ValueStatus": null,
                    "Nickname": "gail",
                    "DateOfBirth": "1971-12-10",
                    "DeleteAuthor": null,
                    "FirstName": "Gail",
                    "Address.City": "Union City",
                    "SourceID": "1418027",
                    "DeletePath": null,
                    "DeleteDate": null,
                    "PhoneticFirstName": "KL",
                    "PhoneticLastName": "TLMN",
                    "SourcePhone": "7709694377",
                    "PublisherID": "CRM",
                    "PhoneGeocodingData": "Georgia",
                    "LastName": "Taulman"
                },
                "failedValidations": [],
                "potentialMatches": []
            }
        ]
    }
}
- Analyze the response: the
"SourcePhone": "7709694377"shows the input you sent to xDM via the REST API payload. The enricher updated the two fields"StandardizedPhone": "(770) 969-4377"and"PhoneGeocodingData": "Georgia". Not only has the enricher formatted the phone number, it identified the phone as being from Georgia, which is consistent with Gail's address in Union City, GA.
- Access again the Contact info tab for customer Gail Taulman and observe that Source Phone, Standardized Phone and Geocoding Data have been updated.
Congratulations!
You have learned how to load data in xDM using the REST API while enriching a record.
To summarize:
- You have set up the payload to call the StandardizePhone enricher.
- You have learned why you might want to use an enricher to "soft validate" data.
- You have persisted an updated phone number and examined the REST response from xDM.
Well done! You have run your first REST POST requests to load data into Semarchy xDM via the REST API.
Learning recap
- You have learned how to set up Postman to run
POSTrequests. - You have used the REST API documentation in greater depth, including grabbing the
CREATE_LOAD_AND_SUBMITaction sample payload. - You have run a validation check or enricher to test a record's data quality without persisting the record in xDM.
- You have loaded data in xDM via the REST API.
- You are now able to differentiate between a validation rule and an enricher, and understand the reasons for choosing an enricher over a validation rule.
Next steps
You will find more details on data integration—including using SQL and the REST API—in the Data Publishing & Consumption track.
Additional tutorials on designing applications are also available in the Data Authoring and Data Consolidation tracks.
To explore our tutorials, return to the main Tutorials menu.
Thank you for completing this tutorial.