This tutorial will guide you through the process of retrieving data from Semarchy xDM using the REST API.
Knowing how to query data using the REST API is essential to building a successful MDM program. While typical approaches involve middleware tools or custom programs to query and load data from xDM, some business cases require integration developers to connect Semarchy xDM to an external system via the REST API. This approach facilitates near real-time queries and contrasts with batch loading, which is better handled through SQL.
In this tutorial, you will learn to use simple queries and named queries.
This tutorial is based on the Customer B2C Demo application, and provides hands-on experience with retrieving fuzzy-matching entities and understanding the functionality of the REST API.
Learning outcomes
- Retrieving all records from a table via the REST API.
- Retrieving records via the REST API using record IDs.
- Retrieving records via the REST API using customers' first names.
- Understanding the principles of building custom API requests.
- Setting up and using named queries.
Learning track
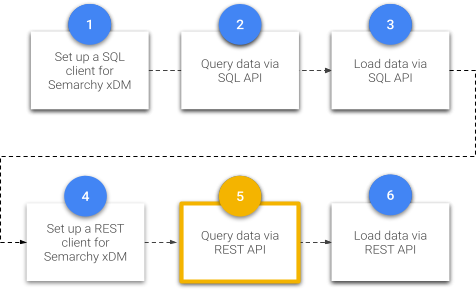
This tutorial is part of the Data Publishing & Consumption track, which is composed of SQL-based and REST-based tutorials.
Before following this tutorial, you must have set up Semarchy xDM and completed the Customer B2C demo tutorial. Additionally, you must have configured a REST client, which is described in the Set up a REST client for Semarchy xDM.
If you have not completed these prerequisites, return to the Tutorials menu.
Otherwise, enjoy this tutorial!
The REST API is available at the following base URL:
http://[host]:[port]/semarchy/api/rest
In the rest of the tutorial, this URL may be referred to as the [base_url].
Each operation in the REST API is available under this base URL. The minimum structure for a request is [base_url]/query/[data_location_name]/[entity_name]/[view_type].
Parameters definition:
[data_location_name]: name of the data location to query (e.g.,CustomerB2CDemo)[entity_name]: name of the entity to query (e.g.,Person)[view_type]: type of data view to query (e.g.,GDfor golden data)
The URL may also take additional parameters.
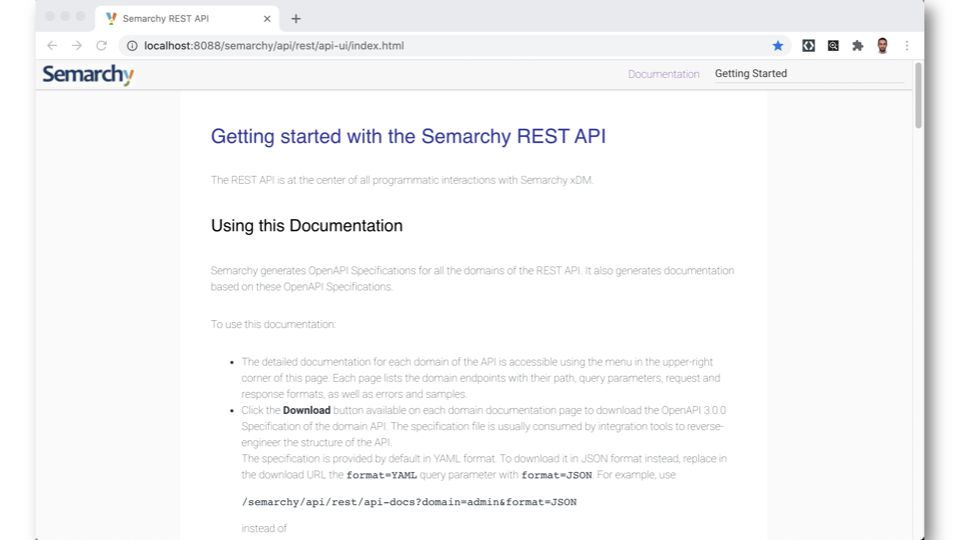
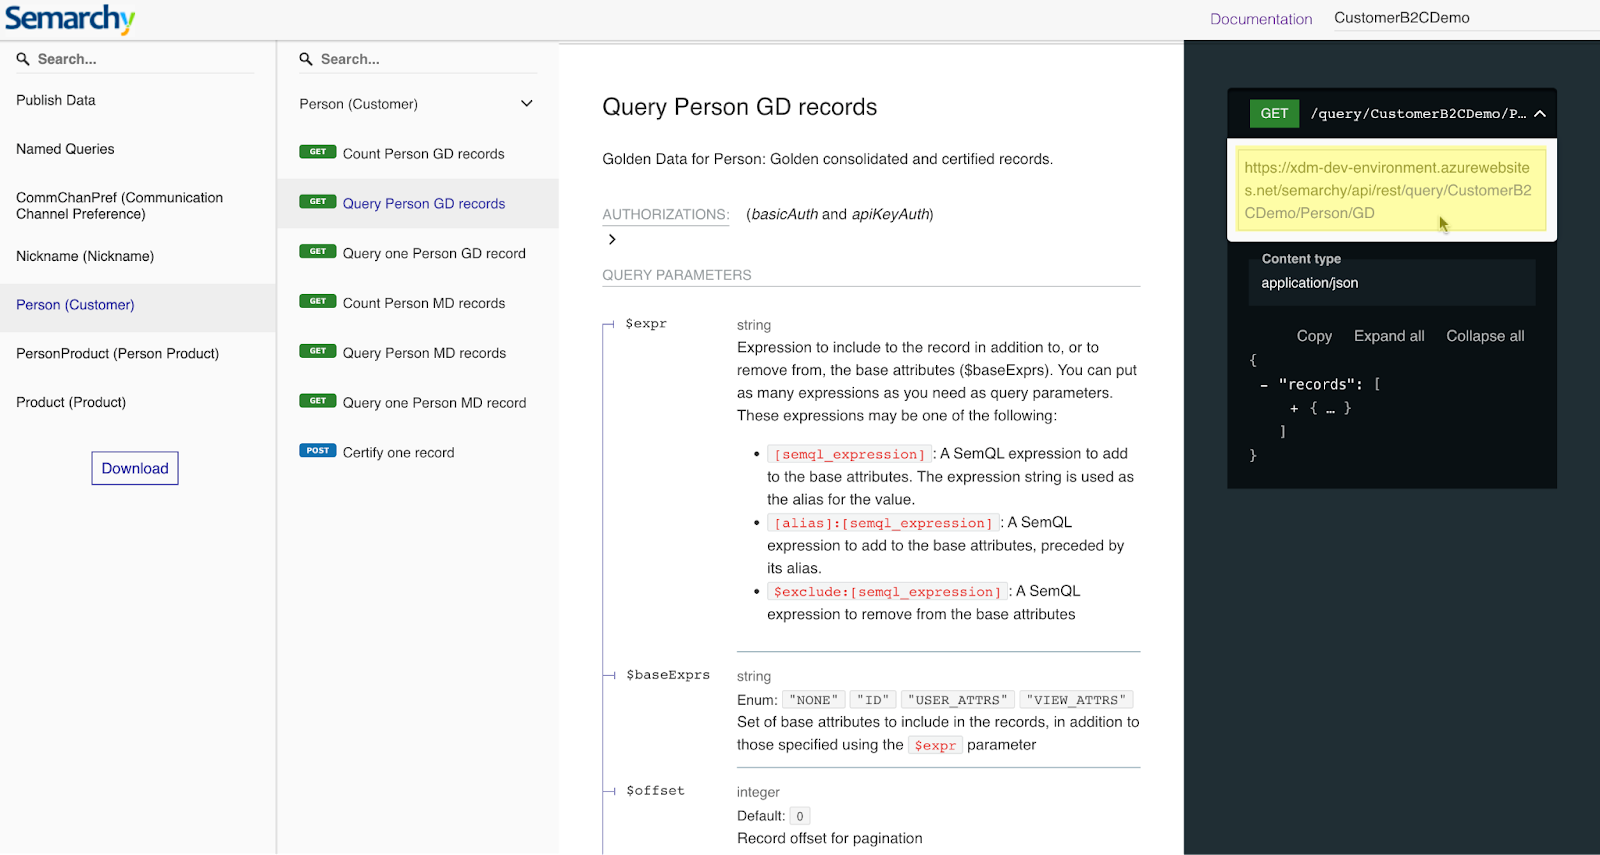
Before we begin constructing the REST call, take a look at the REST API documentation that Semarchy xDM generates for you automatically. This is a fantastic resource that will help you construct your REST URLs and minimize the risk of errors.
You can find the REST API documentation at the following URL:
http://[public_dns_or_ip_address]:[port]/semarchy/api/rest/api-ui/index.html
On a typical on-premises instance of xDM, the REST documentation URL is http://localhost:8088/semarchy/api/rest/api-ui/index.html
- Navigate the documentation by clicking on the drop-down menu in the upper right corner to find the menu.
- Under Data Management - Data Location, click on CustomerB2CDemo.
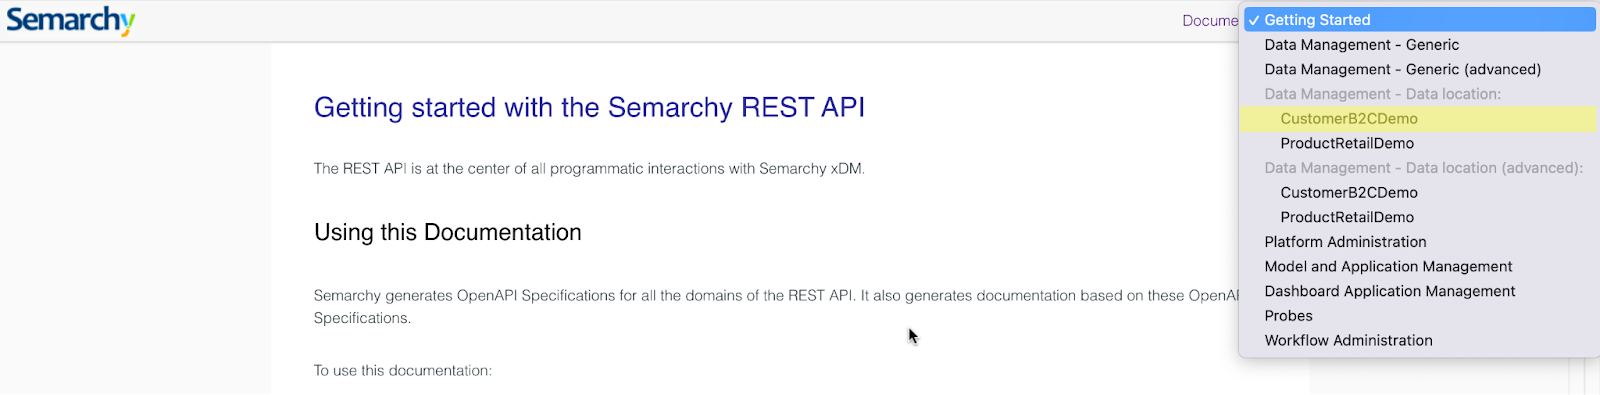
All entities from the data location are listed in the left menu.
- Click on the Person (Customer) entity. A secondary side navigation menu shows all available operations.
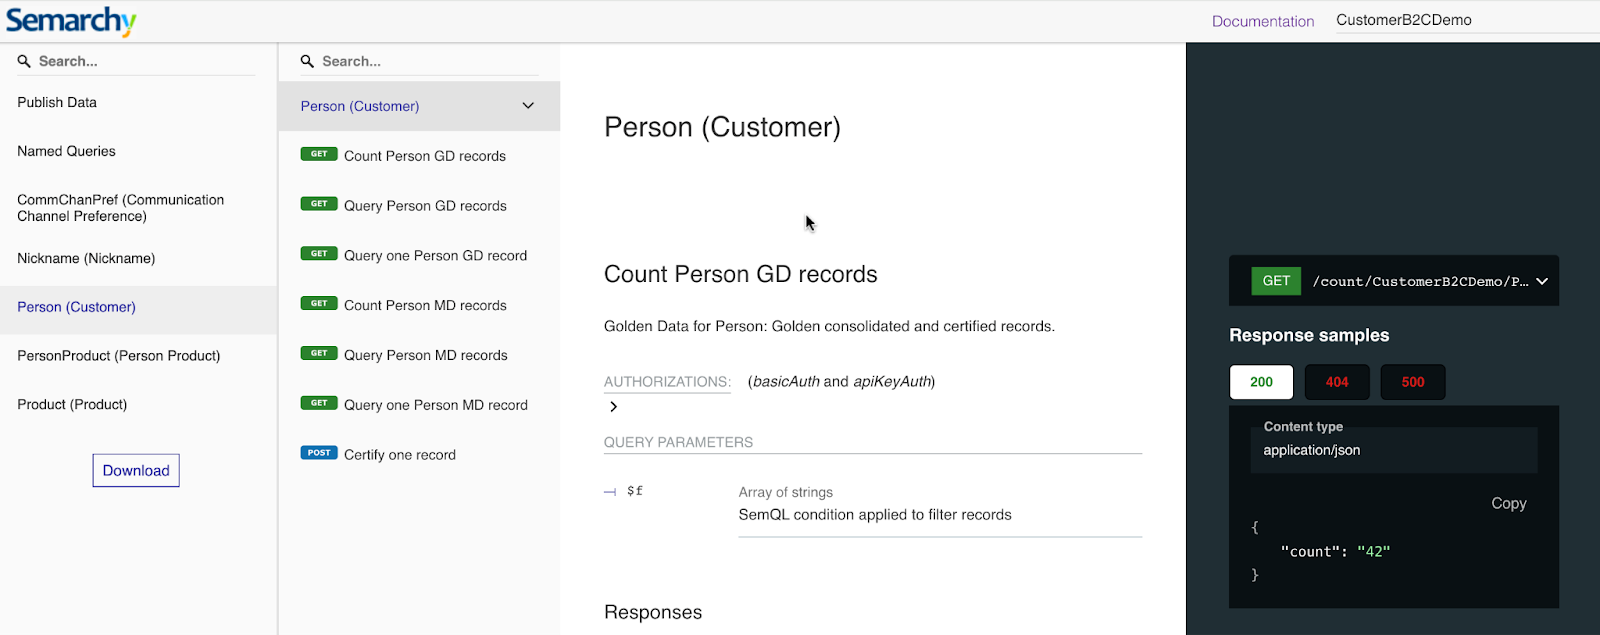
- Click on Query Person GD records. There you can see a sample request which we will build from scratch in the next section to retrieve all golden records for an entity.
In this section, you will learn how to retrieve all records from a table using the REST API. You will query the Source Data (SD), Master Integration (MI) data, and Golden Data (GD) tables for one entity.
Learning outcomes
- Building a basic request URL to retrieve all records from a table.
- Querying the
Source Data(SD),Master Integration(MI) data, andGolden Data(GD) tables using the REST API.
Retrieve golden data (GD)
You will retrieve all the customer records in the Person entity from the CustomerB2CDemo data location. The template request you need is:
[base_url]/query/[data_location_name]/[entity_name]/[view type]/[record_ID]
For golden data records, the value for the view_type parameter is GD.
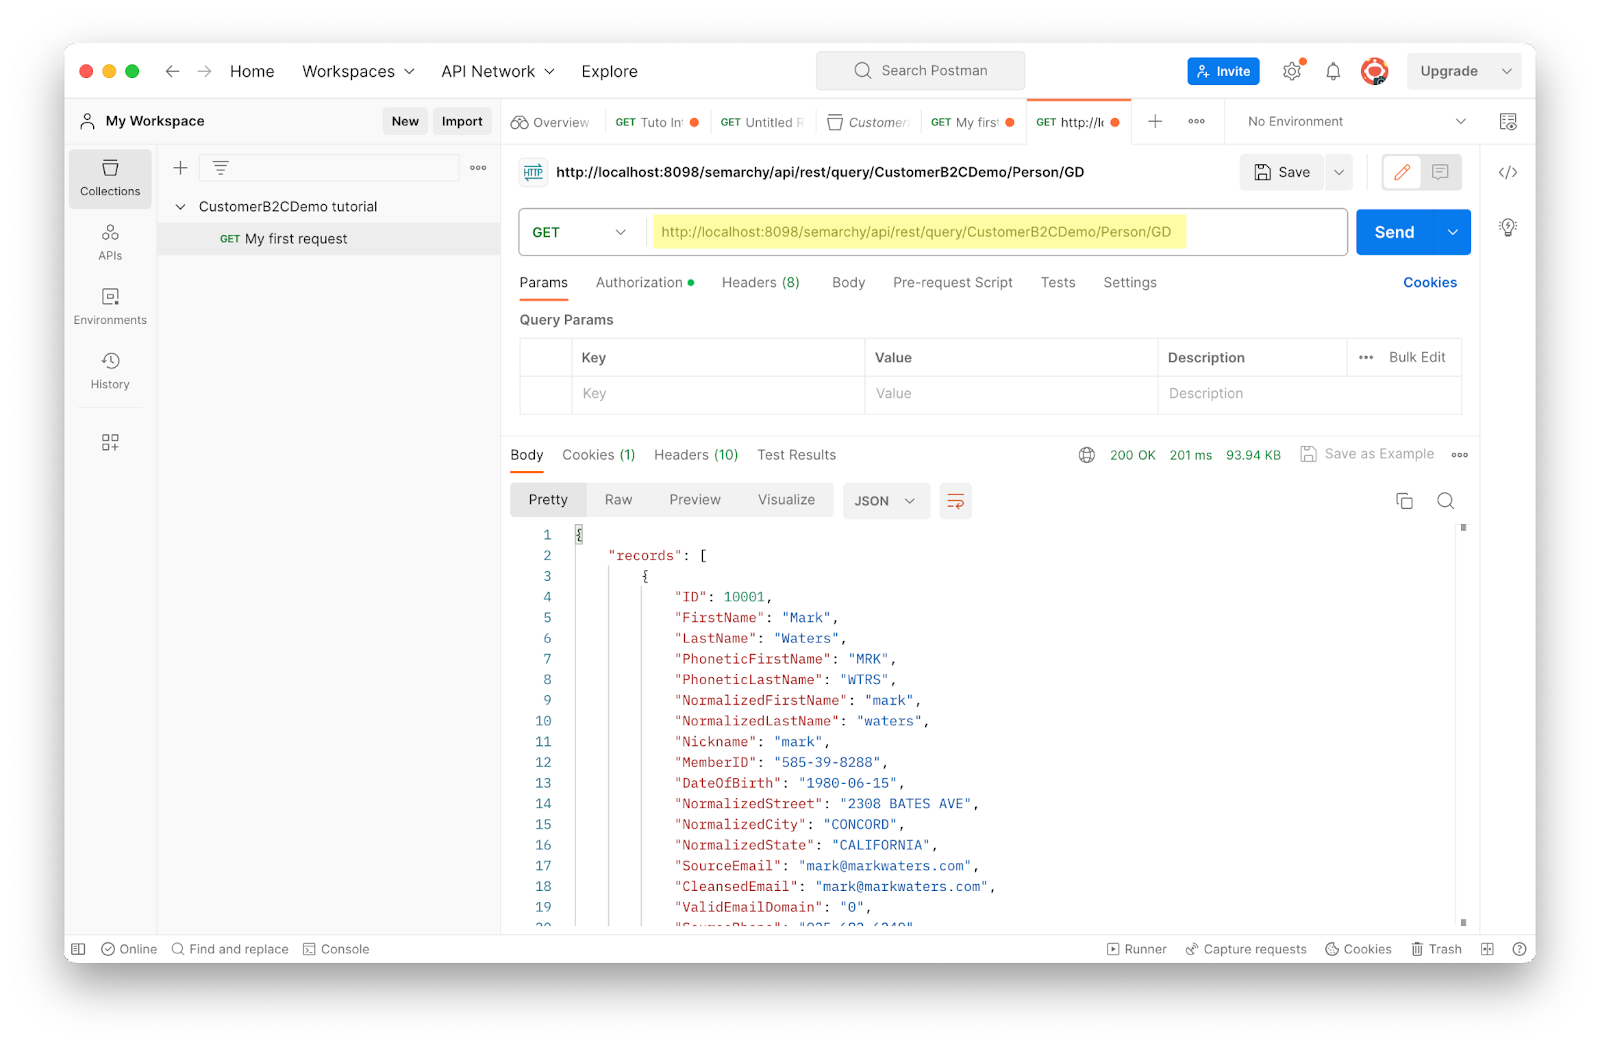
[base_url]/semarchy/api/rest/query/CustomerB2CDemo/Person/GD
You need to modify the request to use your host and port:
- If you installed xDM on your local computer using the Install Semarchy xDM on-premises tutorial, then use the host
localhost, and the port8088:
http://localhost:8088/semarchy/api/rest/query/CustomerB2CDemo/Person/GD
- If you installed xDM on AWS or Azure, you will need your public DNS or IP address. Since the port is
80, you will not need to include it in your request URL.
To test this first request:
- Open Postman.
- Enter the customized request URL in the request field.
- Check the request is using the
GETmethod. - Check in the Authorization tab that you have provided your semadmin credentials. If you have not, please refer to the Set up a REST client for Semarchy xDM tutorial.
- Click on Send.
If you have correctly set up the authorization with your credentials, you should see results returned. These are all the customer golden data records returned in JSON format.
Retrieve master integration (MI) data
- Replace the url used in the previous section with the following one (do not forget to change host and port):
http://: /semarchy/api/rest/query/CustomerB2CDemo/Person/MI - Click on Send.
Retrieve all source data (SD) records
- Replace the url used in the previous section with the following one (do not forget to change host and port):
http://: /semarchy/api/rest/query/CustomerB2CDemo/Person/SD - Click on Send.

Note the difference of results for GD, MI and SD tables.
Congratulations!
Great job! You successfully queried xDM via REST API. To summarize:
- You learned the structure of a request URL using xDM's REST API.
- You ran a first set of basic requests in Postman and examined the results.
This is just a preview of what you can do with xDM REST API. In the next section, you will learn how to get a record with its identifier.
In this section, you will learn how to retrieve a record using its golden-record identifier. This is useful for example, if your organization has a call center application that needs to retrieve from Semarchy xDM up-to-date data for a customer known by their ID.
Learning outcomes
- Constructing a request URL using the customer's ID.
- Running the request URL in Postman.
Retrieve the golden-record ID
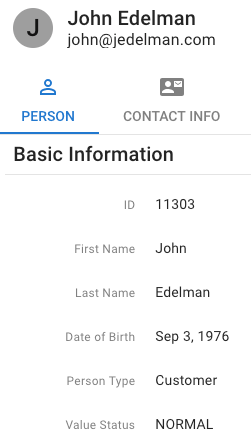
For the needs of this tutorial, you must retrieve the ID of the customer golden record Mary-Ann Markes. You will use this ID within your REST request.
The value for this ID is specific to your environment as it depends on the order in which records were processed by Semarchy xDM.
To retrieve this golden-record ID, proceed as follows:
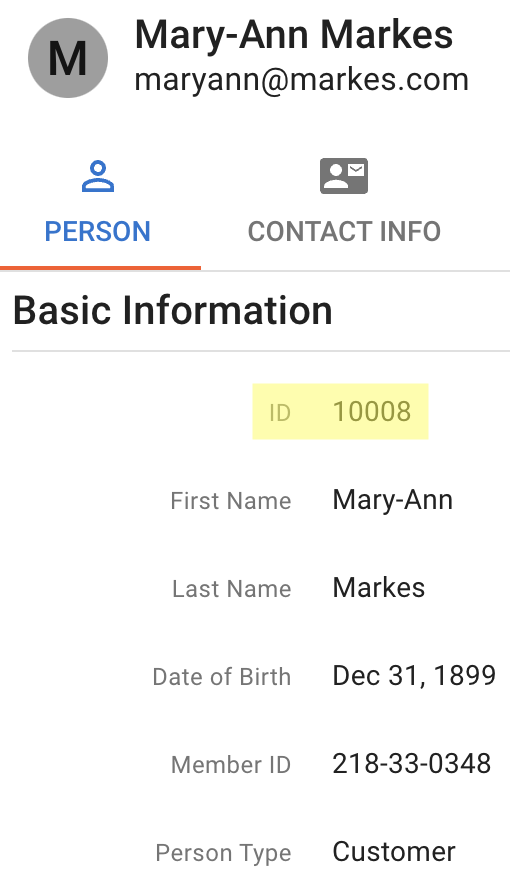
- Connect to the Customer B2C Demo application.
- Navigate to the list of customers.
- Search for Mary-Ann Markes.
- Open the record and retrieve the golden-record ID from the Basic Information tab.
In the example below, the golden record has the ID 10008.
Construct the request
As indicated by the REST API documentation, use the GET method to retrieve a single customer record. This is the skeleton of the REST call for searching by customer ID:
[base_url]/query/[data_location_name]/[entity_name]/[view type]/[record_ID]
In practice, you will use the view GD to query golden records. Your request will look like:
http://[host]:[port]/semarchy/api/rest/query/CustomerB2CDemo/Person/GD/[record_id]
Launch the request in Postman
To send this request in Postman:
- Enter your request URL into the request field. Remember to substitute your public IP address or public DNS address and port.
- Double-check the method is
GET. - Click Send.
- See the results returned in JSON format.
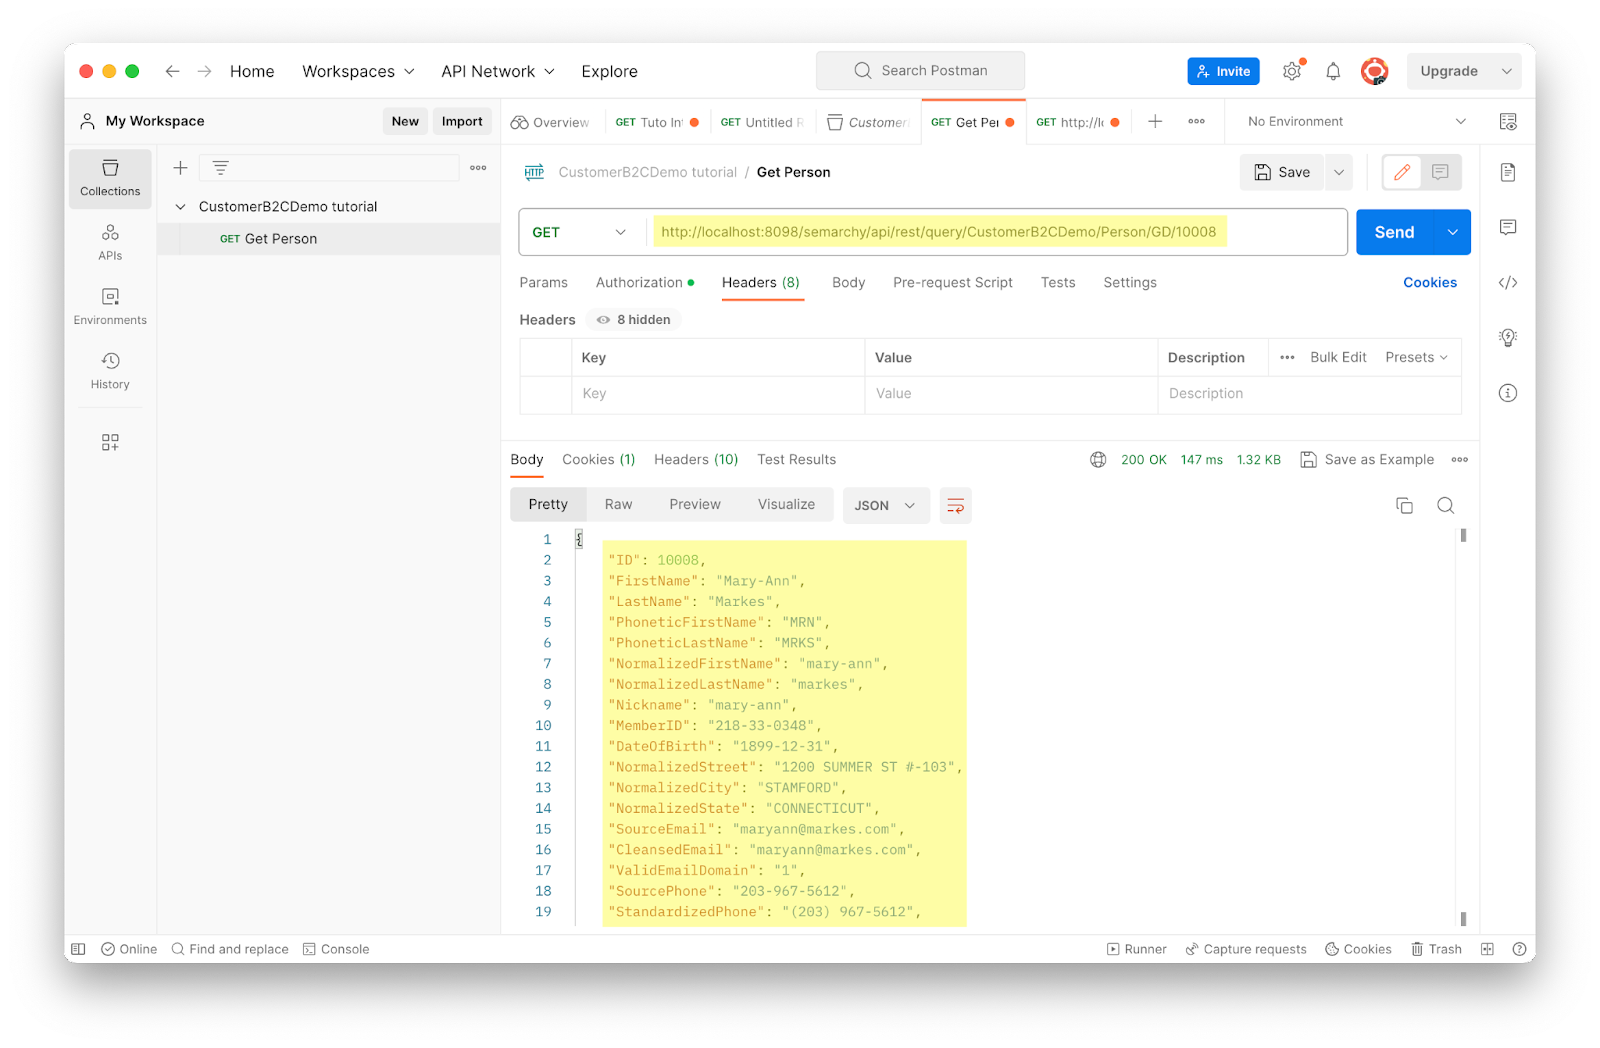
This is the result you can expect:
{
    "ID": 10008,
    "FirstName": "Mary-Ann",
    "LastName": "Markes",
    "PhoneticFirstName": "MRN",
    "PhoneticLastName": "MRKS",
    "NormalizedFirstName": "MARY-ANN",
    "NormalizedLastName": "MARKES",
    "Nickname": "mary-ann",
    "DateOfBirth": "1899-12-31",
    "SourceEmail": "maryann@markes.com",
    "CleansedEmail": "maryann@markes.com",
    "ValidEmailDomain": "1",
    "SourcePhone": "203-967-5612",
    "StandardizedPhone": "(203) 967-5612",
    "PhoneGeocodingData": "Stamford, CT",
    "ValueStatus": "HIGH",
    "PersonType": "CUSTOMER",
    "Address": "1200 Summer St #-103 Stamford CT 06905 US",
    "Address.Street": "1200 Summer St #-103",
    "Address.City": "Stamford",
    "Address.State": "CT",
    "Address.PostalCode": "06905",
    "Address.Country": "US"
}
Note how the information differs from the data you can see in the application UI and the SQL query results observed in the Load data via the SQL API tutorial.
Congratulations!
You learned how to construct a request URL using a record's ID.
In the next section, you will learn a more advanced request URL to look up a customer record based on first names and no IDs. This involves using a SemQL expression to search through all customer records.
In the previous section, you learned how to retrieve a customer record using the customer's account ID. However, customers frequently find themselves without their account ID readily available. Customer service representatives will frequently ask customers for other identifying details, such as their first and last name or address.
Following this business case, we will build on the previous request URL using the customer's name instead of account number.
Learning outcomes
- Navigating the prebuilt REST API documentation.
- Constructing a request URL using SemQL filters.

Retrieve a record by last name
The REST API allows external systems in your organization to retrieve records in xDM using filters. In this section, you will use the GET method to retrieve a single customer record by its name, using a SemQL filter.
In our environment, we selected the customer golden record of John Edelman to retrieve data. We will retrieve their record using their last name, Edelman.
Construct the request
This is the skeleton of the REST call using a filter:
[base_url]/query/[data_location_name]/[entity_name]/[view type]?$f=[SemQL_filter]
In practice, this is what request URL looks like on a typical on-premises quick-start instance:
http://localhost:8088/semarchy/api/rest/query/CustomerB2CDemo/Person/GD?$f=LastName%20LIKE%20%27Edelman%27
The SemQL filter originally started as LastName LIKE 'Edelman'.
Remember to substitute the spaces in the URL with %20 and the single quotes with %27. For more information about percent encoding (also called URL encoding), see the "Percent-encoding" Wikipedia page.
Launch the request in Postman
To run this request in Postman:
- Enter your request URL into the request field.
- Double-check the method is
GET. - Click Send.
- Observe the results returned in JSON format.
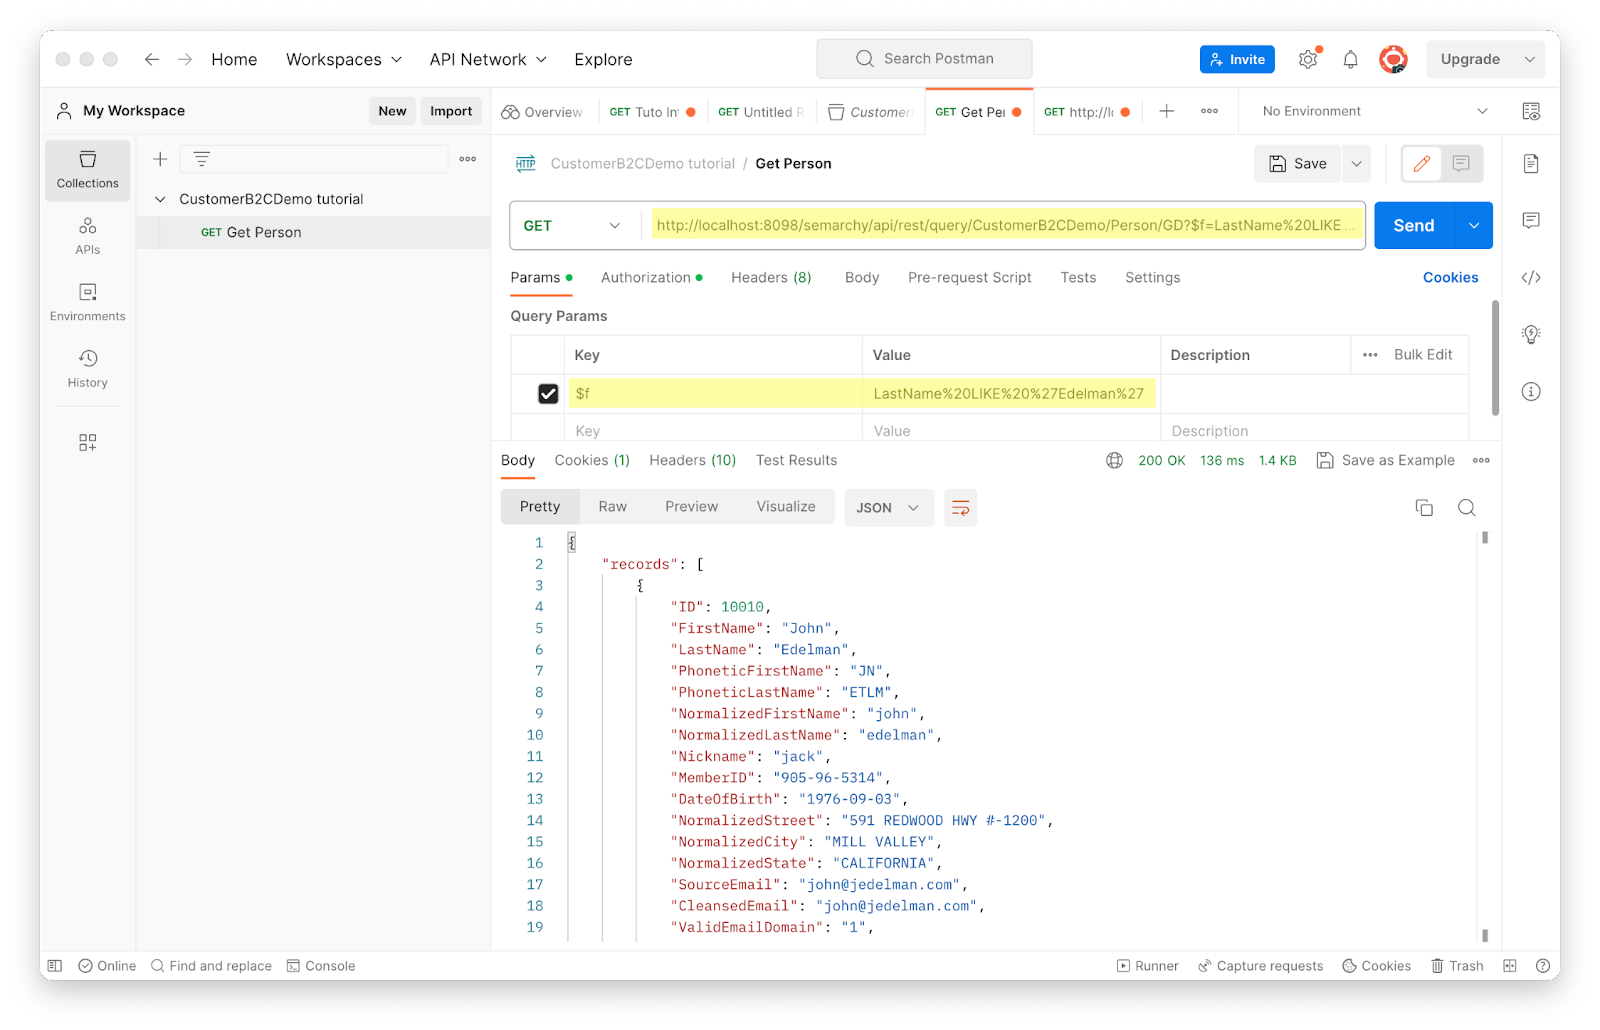
Note that the $f parameter was correctly interpreted by Postman as a query parameter (in the Params tab).
This is the result you can expect:
{
    "records": [
        {
            "ID": 11303,
            "FirstName": "John",
            "LastName": "Edelman",
            "PhoneticFirstName": "JN",
            "PhoneticLastName": "ETLM",
            "NormalizedFirstName": "JOHN",
            "NormalizedLastName": "EDELMAN",
            "Nickname": "jack",
            "DateOfBirth": "1976-09-03",
            "SourceEmail": "john@jedelman.com",
            "CleansedEmail": "john@jedelman.com",
            "ValidEmailDomain": "1",
            "SourcePhone": "415.381.9176",
            "StandardizedPhone": "(415) 381-9176",
            "PhoneGeocodingData": "Mill Valley, CA",
            "ValueStatus": "NORMAL",
            "PersonType": "CUSTOMER",
            "Address": "591 Redwood Hwy #-1200 Mill Valley CA 94941 US",
            "Address.Street": "591 Redwood Hwy #-1200",
            "Address.City": "Mill Valley",
            "Address.State": "CA",
            "Address.PostalCode": "94941",
            "Address.Country": "US"
        }
    ]
}
Note how the information differs from the data you can see in the application UI and the SQL query results observed in the Load data via the SQL API tutorial.
Congratulations!
In this section, you have built an advanced request URL using a filter that allowed you to filter on the customer's last name with a SemQL filter instead of account number.
To summarize:
- You learned how to construct a request URL using SemQL filters.
- You learned the importance of percent-encoding reserved characters.
Next, you will learn about named queries and how to build a custom data structure to create a customized REST endpoint.
In the previous section, you learned how to retrieve a customer record using a SemQL filter that queries the customer's last name.
So far in this tutorial, you have used predefined REST endpoints, such as retrieving a single record and using filters. There will be situations where you need a custom REST endpoint because your systems require a special data structure.
In this section, you will learn how to create a named query in the model design. Then you will use the named query in Postman to retrieve the custom data structure.
Learning outcomes
- Understanding what a named query is and how it works.
- Creating a named query in the Application Builder.
- Calling the basic named query in Postman.
Create a named query
To create a named query in the model designer:
- Go to the Application Builder. You will need to log in as a user with Application Design privileges (most likely semadmin).
- Open the CustomerB2CDemo model.
- Right-click the Named Queries node and select Add Named Query.

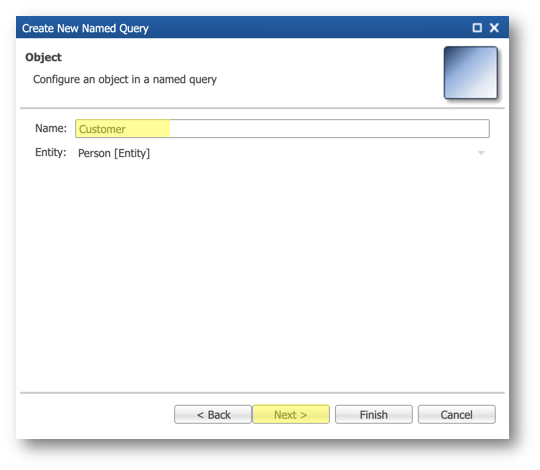
- Enter the following values:
- Name:
PersonByIDWithProducts - Entity:
Person [Entity]
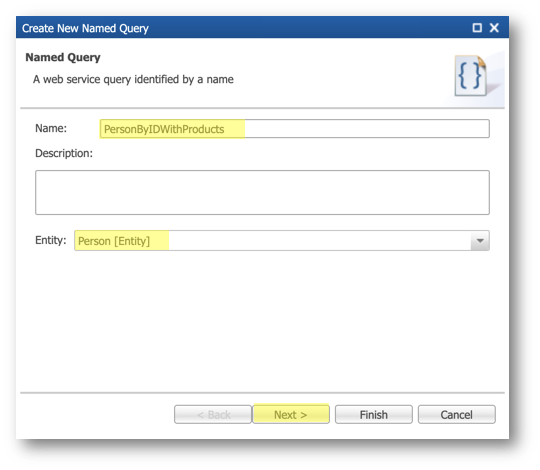
- Click on Next.
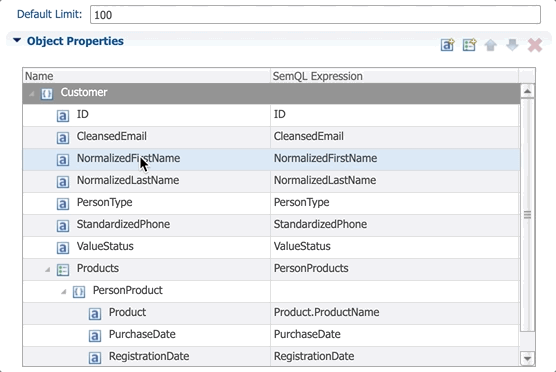
- Give the object the name
Customerand then click Next.
- Select the following Object Properties:
- ID
- CleansedEmail
- NormalizedFirstName
- NormalizedLastName
- PersonType
- StandardizedPhone
- ValueStatus
- Reference Relationship: PersonProductsPerson
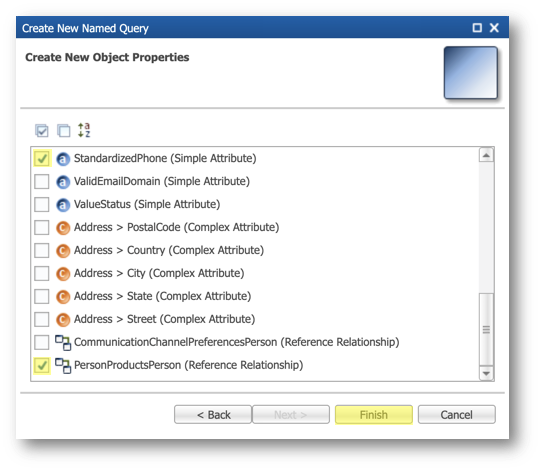
- Click Finish.
- Select the PersonProducts object in the Object Properties table view. In the Properties views, rename this object to
Products.
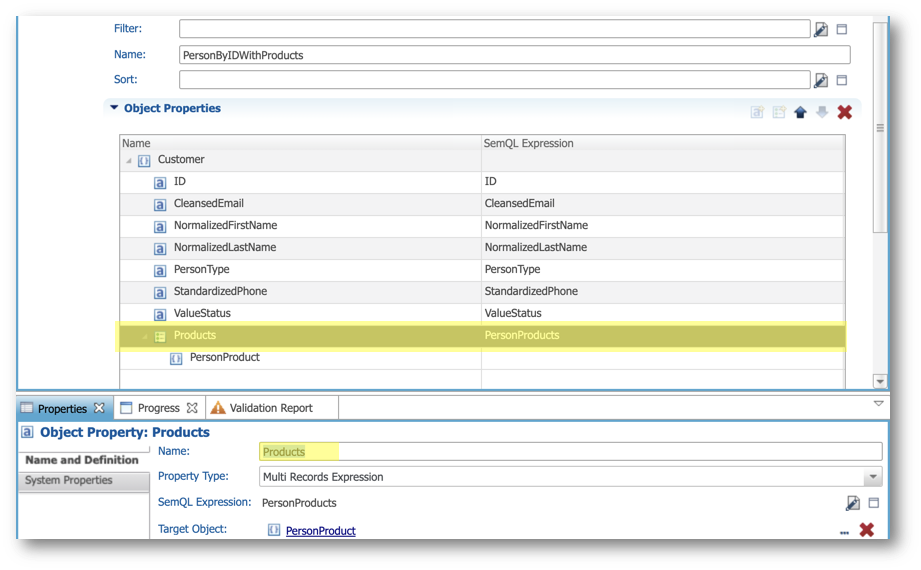
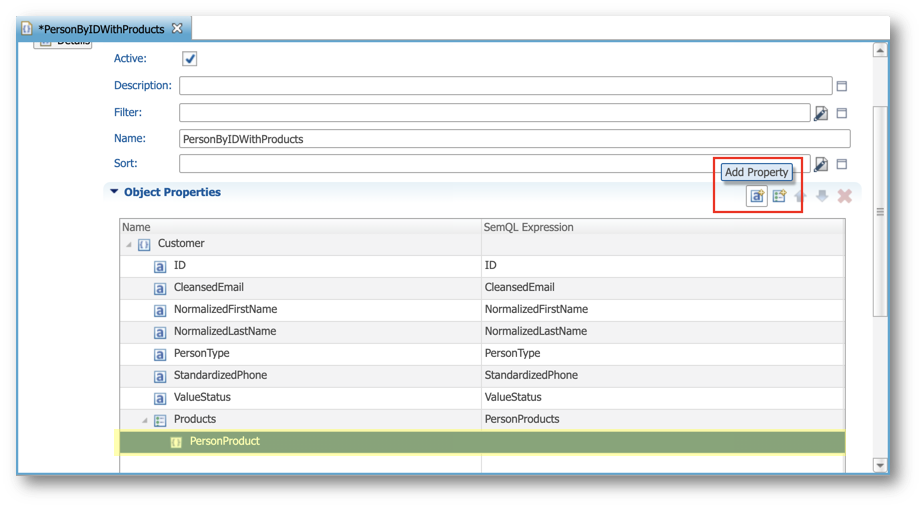
- Expand the Products object properties.
- Select the PersonProduct node and add a new property.
- On the Object Property screen, set the following values:
- Property Type:
Value Expression - SemQL Expression: click the Edit button and then enter
Product.ProductName - Name:
Product
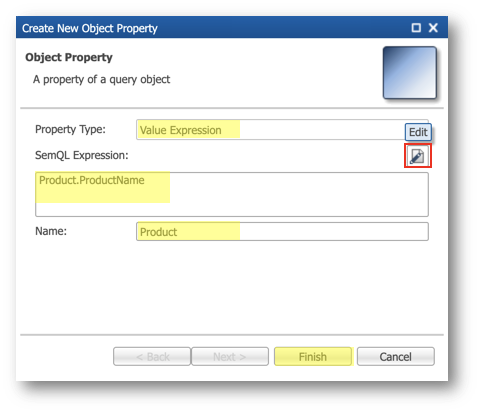
- Click Finish.
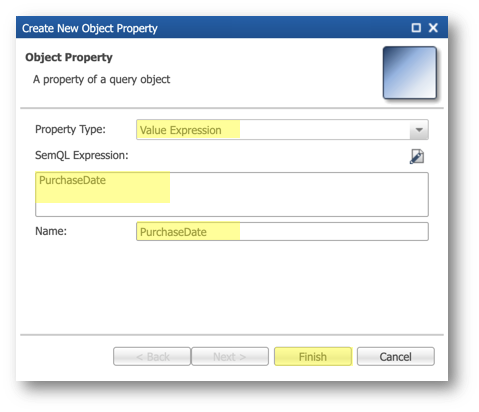
- Select the PersonProduct node again. Add a new property again.
- On the Object Property screen, set the following:
- Property Type:
Value Expression - SemQL Expression:
PurchaseDate - Name:
PurchaseDate
- Select the PersonProduct node again. Add a new property again.
- On the Object Property screen, set the following:
- Property Type:
Value Expression - SemQL Expression:
RegistrationDate - Name:
RegistrationDate

- Save this named query.

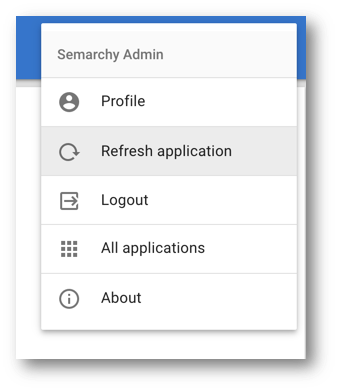
- For the new named query to take effect, you need to refresh the application. Go back to the Customer B2C Demo application, click the user profile button, and click Refresh application.
- You are now ready to use this named query in Postman and observe the results of a custom REST endpoint.
Call the named query
We will call the named query to view the results. This is the skeleton of the REST call using a named query:
[base_url]/named-query/[data_location_name]/[named_query]/[view type]
In practice, this is what our request looks like on an on-premises quick-start xDM instance:
http://localhost:8088/semarchy/api/rest/named-query/CustomerB2CDemo/PersonByIDWithProducts/GD
To run this request in Postman:
- Enter your request URL into the request field.
- Double check the method is
GET. - Click Send.
- Observe the results returned in JSON format.
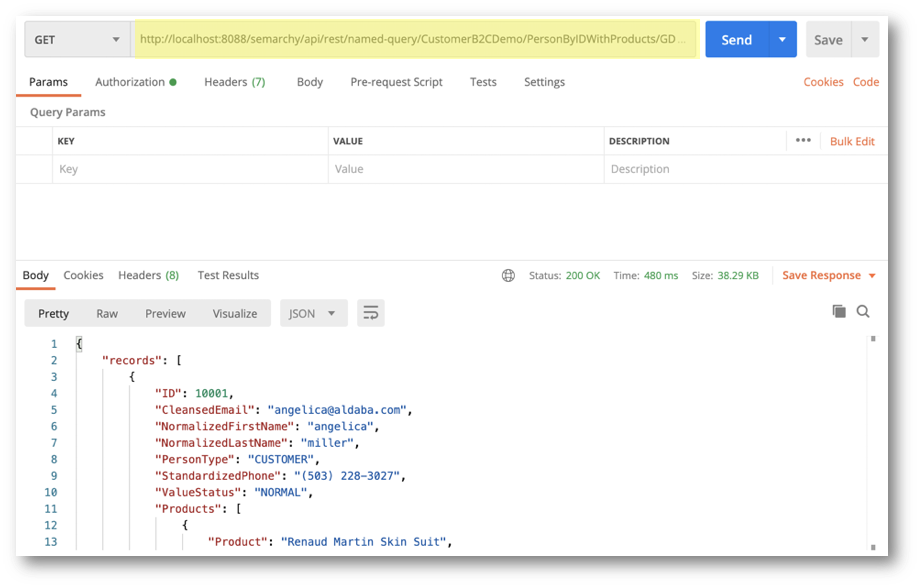
The result you should see is all the customer golden records with their corresponding products:
{
    "records": [
        {
            "ID": 10001,
            "CleansedEmail": "angelica@aldaba.com",
            "NormalizedFirstName": "angelica",
            "NormalizedLastName": "miller",
            "PersonType": "CUSTOMER",
            "StandardizedPhone": "(503) 228-3027",
            "ValueStatus": "NORMAL",
            "Products": [
                {
                    "Product": "Renaud Martin Skin Suit",
                    "PurchaseDate": "2016-12-23",
                    "RegistrationDate": "2017-03-13"
                },
                {
                    "Product": "Streamliner Saddle",
                    "PurchaseDate": "2015-11-04",
                    "Registrationdate": "2015-12-14"
                }
            ]
        },
        {
            "ID": 10002,
            "CleansedEmail": "saraj@yahoo.com",
            "NormalizedFirstName": "sara",
            "NormalizedLastName": "johnson",
            "PersonType": "CUSTOMER",
            "StandardizedPhone": "(415) 472-3289",
            "ValueStatus": "NORMAL",
            "Products": [
                {
                    "Product": "Foxy Elite Cycling Shoes",
                    "PurchaseDate": "2016-10-12",
                    "Registrationdate": "2016-10-16"
                },
                {
                    "Product": "Renaud Martin Skin Suit",
                    "PurchaseDate": "2016-05-09",
                    "Registrationdate": "2016-05-11"
                },
                {
                    "Product": "Streamliner Saddle",
                    "PurchaseDate": "2016-04-12",
                    "Registrationdate": "2016-05-10"
                }
            ]
        },
...(continued)
    ]
}
Note that the list of products linked to each customer is returned by the named query with the Product, PurchaseDate and RegistrationDate properties.
Congratulations!
You have successfully created a named query. Named queries are useful for creating custom data structures to support your organization's specific requirements when integrating Semarchy xDM with other systems.
To summarize:
- You have learned how to create a named query in the Application Builder.
- You have discovered the different objects available for you to build your named query.
- You have run a named query in Postman and observed the results with a nested array showing a customer's products.
Next, you will build on the basic named query you created by adding query parameters that allow you to filter results.
In the previous section, you learned how to create a basic named query. This resulted in a custom REST endpoint for retrieving a customer record along with their associated products.
In this section, you will build upon the named query by incorporating more advanced functionalities. You will add query parameters that allow you to filter results with a SemQL expression, similar to the filter you used in ⓺ Get a customer record by last name.
Learning outcomes
- Adding query parameters to your named query in the Application Builder.
- Adding a filter in your named query.
- Constructing two different request URLs that use your named query.
- Calling the advanced named query in Postman.
Add a query parameter
In a customer support call center scenario, the customer service representative needs to retrieve customer details from the call center system. They will typically request information like email address or account ID, which both can serve as identifiers.
To submit this identifier information to xDM through the REST API endpoint, we use query parameters.
To create a query parameter in the named query:
- Go to the Application Builder.
- Open the PersonByIDWithProducts named query you created in the previous section.
- Add a new query parameter.

- On the Query Parameter screen, set the following:
- Name:
IDENTIFIER - Binding Name:
QUERY_PARAM_IDENTIFIER - Parameter Data Type:
String - Default value: leave empty
- Mandatory: leave unchecked (this query parameter will be optional)
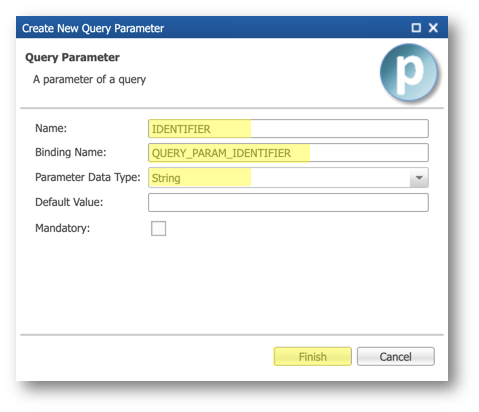
- Remember to save your named query. You need to refresh the application for the query parameter to take effect (or, if this is more convenient, you also have the option to deploy the model without transitioning to the front-end application).

Non-regression test
Start by testing that your named query is still working: use the same request that you used in the previous section in Postman to call the named query.
http://[host]:[port]/semarchy/api/rest/named-query/CustomerB2CDemo/PersonByIDWithProducts/GD
You should get the same results as before adding the parameter.
Create a filter
Adding query parameters is the first operation required to filter the records xDM retrieves. The second operation involves setting up a filter that uses these query parameters. The filter is a SemQL expression that compares the incoming information with the existing data in xDM.
To create the filter and see how it works with query parameters:
- Scroll to the top of the named query configuration in the Application Builder.
- Find the Filter field, and open the SemQL editor.
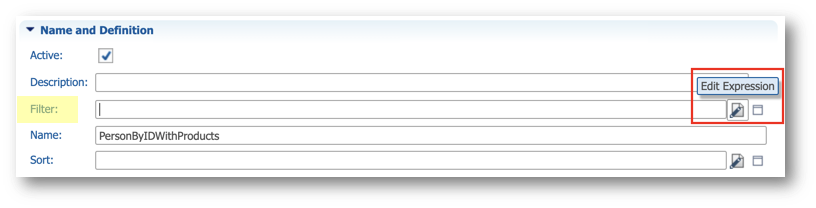
- Copy and paste the SemQL expression for your database.
- Oracle:
SEM_NUMBER_TO_CHAR( ID ) = :QUERY_PARAM_IDENTIFIER
OR CleansedEmail = :QUERY_PARAM_IDENTIFIER
OR REGEXP_REPLACE( StandardizedPhone, '[^[:digit:]]', '' ) = REGEXP_REPLACE( :QUERY_PARAM_IDENTIFIER, '[^[:digit:]]', '' )
- PostgreSQL:
SEM_NUMBER_TO_CHAR( ID ) = :QUERY_PARAM_IDENTIFIER
OR CleansedEmail = :QUERY_PARAM_IDENTIFIER
OR REGEXP_REPLACE( StandardizedPhone, '[^[:digit:]]', '', 'g' ) = REGEXP_REPLACE( :QUERY_PARAM_IDENTIFIER, '[^[:digit:]]', '', 'g' )
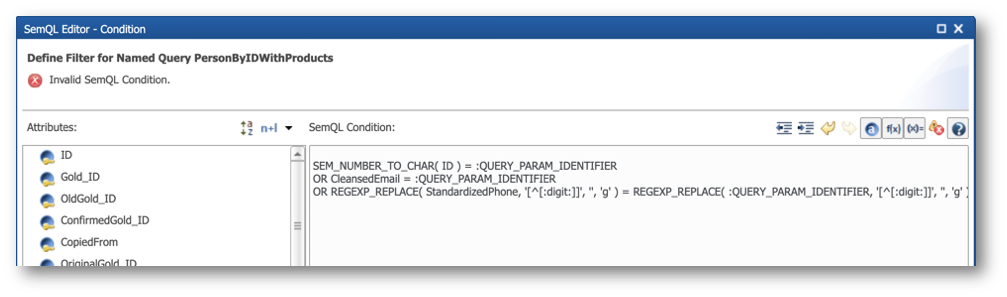
- Save the named query and refresh the application.
Call the updated named query
To use the named query, include the parameters in the request URL. In this section, you will learn how to update your request URL to include the query parameters and their corresponding values (i.e., the arguments).
These are the three identifiers that this named query can accept:
- Customer's account ID
- Email address
- Phone number
The IDENTIFIER query parameter is set up to only accept strings. However, the filter is able to check for account IDs, email addresses, and phone numbers. It converts an account ID into a string for comparison with the ID in xDM and removes non-digit characters from a phone number for comparison with the phone number in xDM.
This is the skeleton of the REST call using a named query:
[base_url]/named-query/[data_location_name]/[named_query]/[view type]?IDENTIFIER=[customer_ID_or_cleansed_email_or_phone_number]
After the IDENTIFIER query parameter, you can provide the customer's account ID, email address, or phone number.
Retrieve a record with the customer's account ID
First, start with the customer's account number (golden record ID).
Picture a scenario where customer Toni Mattos contacts the customer support helpline regarding a warranty issue. The customer support representative requests Toni's account number to access her information. Toni provides her account number (i.e., her golden record ID): 11299. The following is an example of the request that the call center system can make to retrieve Toni's record from xDM:
http://[host]:[port]/semarchy/api/rest/named-query/CustomerB2CDemo/PersonByIDWithProducts/GD?IDENTIFIER=11299
To run this request in Postman:
- Enter your request URL into the request field. Remember to substitute your public IP address or public DNS address.
- Double check the method is
GET. - Click Send.
- Observe the results returned in JSON format.
The result you should see is Toni Mattos' information and the corresponding products she has purchased and registered:
{
    "records": [
        {
            "ID": 11299,
            "CleansedEmail": "toni@mattos.com",
            "ValueStatus": "HIGH",
            "StandardizedPhone": "(321) 727-6512",
            "NormalizedFirstName": "TONI",
            "PersonType": "CUSTOMER",
            "NormalizedLastName": "MATTOS",
            "PersonProducts": [
                {
                    "Product": "Carbonite Century ",
                    "PurchaseDate": "2016-07-15",
                    "RegistrationDate": "2016-08-04"
                },
                {
                    "Product": "Renaud Martin Skin Suit",
                    "PurchaseDate": "2014-09-17",
                    "RegistrationDate": "2014-11-26"
                },
                {
                    "Product": "Renaud Martin Skin Suit",
                    "PurchaseDate": "2016-08-20",
                    "RegistrationDate": "2016-10-08"
                },
                {
                    "Product": "Renaud Martin Skin Suit",
                    "PurchaseDate": "2016-10-09",
                    "RegistrationDate": "2016-10-29"
                },
                {
                    "Product": "Renaud Martin Skin Suit",
                    "PurchaseDate": "2015-06-16",
                    "RegistrationDate": "2015-07-23"
                },
                {
                    "Product": "Streamliner Saddle",
                    "PurchaseDate": "2015-03-24",
                    "RegistrationDate": "2015-05-10"
                }
            ]
        }
    ]
}
Notice that the attributes related to the person are not in a user-friendly order. In the next section, you will reorder the attributes so that the first name and last name attributes come after the ID.
Reorder the attributes in the named query
To reorder the attributes so that they are in a logical order:
- Go to the named query PersonByIDWithProducts in the Application Builder.
- Use the Move Up and Move Down arrows to rearrange the object properties to be in the following order:
- ID
- NormalizedFirstName
- NormalizedLastName
- StandardizedPhone
- CleansedEmail
- PersonType
- ValueStatus
- Products
- Refresh the application so that the new property order takes effect.
Retrieve a record with the customer's email
In case the customer does not have her account number, here is how you could retrieve her customer account information based on her email:
http://[host]:[port]/semarchy/api/rest/named-query/CustomerB2CDemo/PersonByIDWithProducts/GD?IDENTIFIER=toni%40mattos.com
To run this request in Postman:
- Enter your request URL into the request field. Remember to substitute your public IP address or public DNS address.
- Double check the method is
GET. - Click Send.
- Observe the results returned in JSON format.
The result you should see is Toni Mattos' information and the corresponding products she has purchased and registered:
{
    "records": [
        {
            "ID": 11299,
            "NormalizedFirstName": "TONI",
            "NormalizedLastName": "MATTOS",
            "StandardizedPhone": "(321) 727-6512",
            "CleansedEmail": "toni@mattos.com",
            "PersonType": "CUSTOMER",
            "ValueStatus": "HIGH",
            "Products": [
                {
                    "Product": "Carbonite Century ",
                    "PurchaseDate": "2016-07-15",
                    "RegistrationDate": "2016-08-04"
                },
                {
                    "Product": "Renaud Martin Skin Suit",
                    "PurchaseDate": "2014-09-17",
                    "RegistrationDate": "2014-11-26"
                },
                {
                    "Product": "Renaud Martin Skin Suit",
                    "PurchaseDate": "2016-08-20",
                    "RegistrationDate": "2016-10-08"
                },
                {
                    "Product": "Renaud Martin Skin Suit",
                    "PurchaseDate": "2016-10-09",
                    "RegistrationDate": "2016-10-29"
                },
                {
                    "Product": "Renaud Martin Skin Suit",
                    "PurchaseDate": "2015-06-16",
                    "RegistrationDate": "2015-07-23"
                },
                {
                    "Product": "Streamliner Saddle",
                    "PurchaseDate": "2015-03-24",
                    "RegistrationDate": "2015-05-10"
                }
            ]
        }
    ]
}
Retrieve a record with the customer's phone number
In case the customer does not have her account number or email, here is how you could retrieve her customer account information using her phone number (321) 727-6512:
http://[host]:[port]/semarchy/api/rest/named-query/CustomerB2CDemo/PersonByIDWithProducts/GD?IDENTIFIER=3217276512
To run this request in Postman:
- Enter your request URL into the request field. Remember to substitute your public IP address or public DNS address.
- Double check the method is
GET. - Click Send.
- Observe the results returned in JSON format.
The result you should see is Toni Mattos' information and the corresponding products she has purchased and registered. Here is an excerpt of what you can expect:
{
    "records": [
        {
            "ID": 11299,
            "NormalizedFirstName": "TONI",
            "NormalizedLastName": "MATTOS",
            "StandardizedPhone": "(321) 727-6512",
            "CleansedEmail": "toni@mattos.com",
            "PersonType": "CUSTOMER",
            "ValueStatus": "HIGH",
            "Products": [
                {
                    "Product": "Carbonite Century ",
                    "PurchaseDate": "2016-07-15",
                    "RegistrationDate": "2016-08-04"
                },
                {
                    "Product": "Renaud Martin Skin Suit",
                    "PurchaseDate": "2014-09-17",
                    "RegistrationDate": "2014-11-26"
                },
                {
                    "Product": "Renaud Martin Skin Suit",
                    "PurchaseDate": "2016-08-20",
                    "RegistrationDate": "2016-10-08"
                },
                {
                    "Product": "Renaud Martin Skin Suit",
                    "PurchaseDate": "2016-10-09",
                    "RegistrationDate": "2016-10-29"
                },
                {
                    "Product": "Renaud Martin Skin Suit",
                    "PurchaseDate": "2015-06-16",
                    "RegistrationDate": "2015-07-23"
                },
                {
                    "Product": "Streamliner Saddle",
                    "PurchaseDate": "2015-03-24",
                    "RegistrationDate": "2015-05-10"
                }
            ]
        }
    ]
}
Congratulations!
You have learned how to retrieve data in xDM using an advanced named query, including:
- Adding query parameters to your named query.
- Adding a filter to your named query.
- Constructing request URLs filtering on both IDs and emails to use the advanced named query.
Well done! You have run your first REST GET requests to retrieve data from Semarchy xDM.
Learning recap
- You have learned how to retrieve data using the REST API (including retrieving all records and a single record using an ID).
- You have filtered the records returned by xDM using a SemQL filter.
- You have created a custom REST endpoint using a named query.
- You have learned how to call the named query and return a nested response with the Person and purchased Products data.
Next steps
In the next unit of the Data Publishing & Consumption track, you will learn how to load data using the REST API.
To explore other resources, return to the Tutorials menu.
Thank you for completing this tutorial.