This tutorial will guide you through the process of loading data into Semarchy xDM using the SQL API. It covers basic and advanced queries, along with crucial data integration concepts. Using the Customer B2C Demo application, you will gain hands-on experience loading fuzzy-matching entities and learning how integration jobs work.
Learning outcomes
- Understanding the principles of SQL-driven integration loads in xDM.
- Configuring an integration job and continuous load.
- Submitting an external load for customers' product data using SQL.
- Executing an advanced query to update customer data with delta detection using SQL.
- Truncating data from an xDM data location.
Learning track
This tutorial is the last SQL-based unit within the Data Publishing & Consumption track.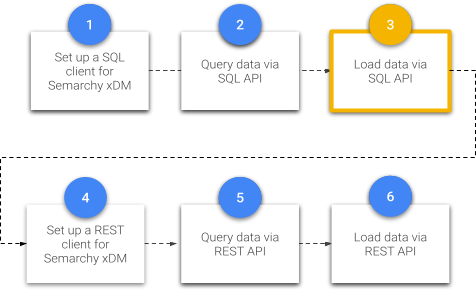
Before beginning this unit, be sure to complete:
- One of the Quick install tutorials: Install Semarchy xDM on-premises, Install Semarchy xDM on AWS, or Install Semarchy xDM on Azure.
- The Customer B2C demo tutorial.
- The first two tutorials of the Data Publishing & Consumption track: Set up an SQL client for Semarchy xDM and Query data via the SQL API.
All these tutorials are available from the Tutorials menu.
If you have not already done so, click the button below to download resources such as the SQL helper files that will be used within this tutorial.
Enjoy this tutorial!
This section covers the background concepts to understand how the sequences of tasks work in integration jobs.
Learning outcomes
- Understanding the role of an integration job and the certification process.
- Understanding the fuzzy-matching-entity integration process.
- Understanding fuzzy-matching-entity publishers and primary keys.
- Understanding the basic-entity integration process.
- Understanding basic-entity primary keys.
Definitions
Integration job
An integration job takes records from source systems and runs them through the certification process.
This job is generated from the business rules defined in the Application Builder, including validation rules and enrichers. It uses the data structures automatically created in the MDM hub when deploying the model edition.
Certification process
The certification process is a sequence of automated tasks to create and certify golden data from various sources:
- Source records coming from other applications called publishers.
- Records authored by users directly in Semarchy xDM.
- Delete operations.
- Matching decisions taken by data stewards in Semarchy xDM.
The certification process takes these various sources and applies the rules and constraints defined in the model in order to create, update, or delete golden data.
Fuzzy-matching-entity integration process
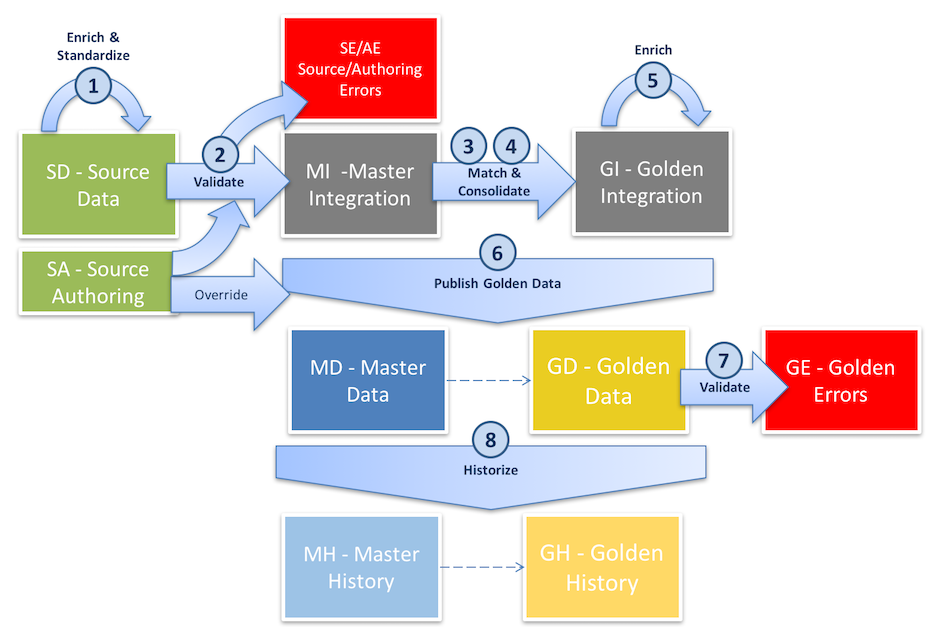
The integration process for fuzzy-matching entities involves matching master records to create golden records.
The fuzzy-matching-entity integration process follows these steps:
- After loading the source data (or authoring source data directly in xDM), pre-consolidation enrichers run on records that have not yet gone through the matching and consolidation process.
- Pre-consolidation validation rules check data for errors. Records that breach validation rules are placed in the
Source Error(SE) table. These records do not proceed downstream and require human intervention. - Records that proceed further end up in the
Master Integration(MI) table where they are matched. Match rules and thresholds determine whether master records should match and merge, while survivorship rules establish winning values in golden records. - Concurrently, records are consolidated in the same table.
- Golden records move to the
Golden Integration(GI) table, where post-consolidation enrichers run. - xDM publishes master records to the
Master Data(MD) table and golden records to theGolden Data(GD) table. - Post-consolidation validation rules check for errors in golden data. Erroneous records are placed in the
Golden Error(GE) table and excluded from further processing. - If historization is enabled, xDM captures record history in the
Master History(MH) andGolden History(GH) tables.
Basic-entity integration process
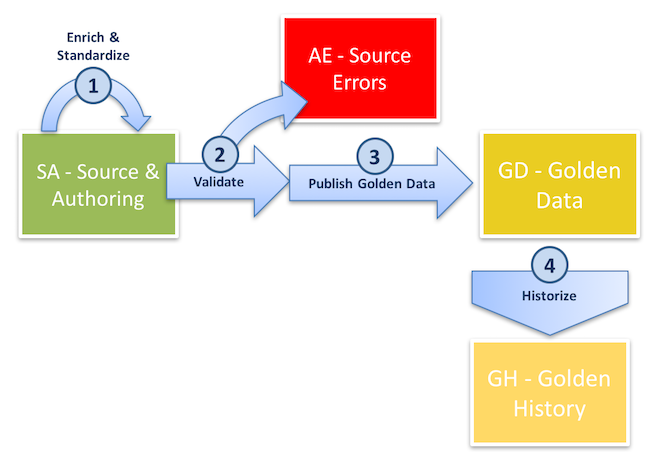
Unlike the fuzzy-matching-entity integration process, the basic-entity integration process does not include any matching or survivorship mechanism. Therefore, basic entities are designed for simple data structures, including reference data and join tables.
The basic-entity integration process follows these steps:
- When a business user enters data, xDM enriches and validates the source data in real-time. If data is loaded, the integration job enriches the source data in the
Source Authoring(SA) tables. - For data loaded into xDM, the integration job validates the data and excludes any records that violate validation rules. Errors are stored in the
Authoring Errors(AE) tables. - Data then becomes golden records, which are stored in the
Golden Data(GD) table. - If historization is enabled, xDM captures record history in the
Golden History(GH) tables.
Basic-entity primary key
A basic entity is a type of entity that is used when there is no duplication of data. This means that basic-entity records have a unique identifier across all systems, like reference data. Basic entities are useful in scenarios where IDs do not matter, such as in join tables designed to model many-to-many relationships. In these cases, xDM can generate a primary key for the basic entity.
Congratulations!
You are now familiar with the foundational concepts of integration jobs in xDM.
To summarize, you have learned:
- The basics about the certification process and integration jobs.
- The integration job process for fuzzy-matching entities.
- How primary keys and publisher codes work for fuzzy-matching entities.
- How the integration job for basic entities differs from its fuzzy-matching-entity equivalent.
- How primary keys work for basic entities.
Next, you will discover how loading data into xDM works. This information is critical for understanding how to initiate integration jobs and how continuous loads work.
Semarchy xDM processes data—that is, runs enrichers, validation, match rules, and so on—in an integration job.
To initiate an integration job, you must load data correctly to notify xDM to start the integration process.
This step, commonly referred to as a load job or an external load in the Semarchy xDM documentation, involves making function calls to initialize and submit the external load to Semarchy xDM. It is only after submitting the external load that xDM initiates the integration job.
Learning outcomes
- Understanding external loads (the three-step process).
- Understanding continuous loads and why they surpass traditional external loads.
External loads
External loads operate through a three-step process:
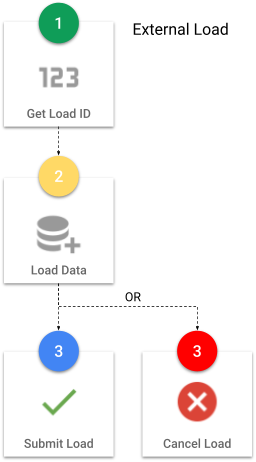
Step 1: Get a load ID
The first step in every external load is to get a load ID by calling a function within the repository schema, SEMARCHY_REPOSITORY.
When you execute the GET_NEW_LOADID function, your call initializes an external load and returns a load ID. This ID serves to track the load in the data location logs. For the parameters accepted by GET_NEW_LOADID, see the code snippet below.
vLoad_id := <repository_schema>.get_new_loadid(
        '<data_location_name>'  /* Data Location Name (as in the UI) */
        '<program_name>'        /* Informational. Identifies the Middleware*/
        '<load_description>'    /* Informational. Describes the load. */
        '<user_name>'           /* User initializing the load. */
          );
Step 2: Insert records
Inserting data into the SD tables (and SA tables for basic entities) is performed using a simple SQL INSERT statement.
Consider the following recommendations:
- When designing the xDM model, ensure the integration job is configured to include the entities you want to process. If an entity is omitted, data can be successfully loaded into source tables, but xDM will not process it.
- Use a database transaction when writing to the
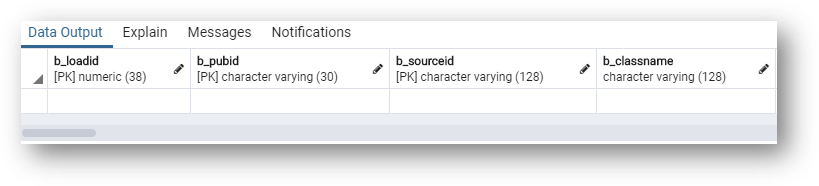
Source Datatables. - Mandatory system columns must be inserted:
B_LOADID: this is the load ID from theGET_NEW_LOADIDfunction call from step 1. In the case of continuous loads, it is the continuous load ID. Note that you can use theGET_CONTINUOUS_LOADIDfunction to retrieve a continuous load ID from the continuous load name.B_CLASSNAME: this is the name of the entity from the model (e.g., Person and Product).B_PUBID: load the publisher code (e.g.,CRMandMKT). This column is only for ID-matching and fuzzy-matching entities.- When loading data for entities that are related by a reference relationship, you must load the child entity with the value of the parent entity's primary key:
- For basic entities, load the single F_ column (e.g., F_).
- For fuzzy-matching entities, load the foreign publisher code FP_ and source ID FS_ (e.g., FP_PERSON and FS_PERSON).
- Remember to commit after completing the data insertion.
Step 3: Submit or cancel the job
After completing the insertion and when you are ready for xDM to process the data, you need to call the SUBMIT_LOAD function in the repository schema (i.e., SEMARCHY_REPOSITORY) to start the integration job.
Upon calling the SUBMIT_LOAD function, your call submits the external load, and the function returns a batch ID. This ID allows you to monitor the integration job in the data location logs. For the parameters accepted by SUBMIT_LOAD, see the code snippet below.
"Submit load" example
vBatch_id := <repository_schema>.submit_load(
        <load_id>                /* Load ID returned by get_new_loadid */
        '<integration_job>'        /* Name of the integration job to trigger. */
        '<user_name>'                /* User who has initialized the load. */
          );
In case you make a mistake or want to cancel the load job for any reason, you can call the CANCEL_LOAD function in the repository schema, SEMARCHY_REPOSITORY.
"Cancel load" example
<repository_schema>.cancel_load(
        <load_id>                /* Load ID returned by get_new_loadid */
        '<user_name>'                /* User who has initialized the load. */
          );
To summarize, you have learned that an external load comprises three major steps:
- Getting a load ID.
- Inserting records.
- Submitting or canceling the load.
Next, you will learn the benefits of continuous loads, which provide a streamlined approach that allows you to focus solely on inserting records.
Continuous loads
Continuous loads are a very convenient feature that allows you to load data into Semarchy xDM in an uninterrupted way, without having to get a load ID or submit the load.
With continuous loads:
- You, as an integration developer, can bypass the initialization and submission of individual external loads. Instead, you configure the continuous load in the data location, get a reserved load ID, and incorporate it into your
INSERTstatements. - Semarchy xDM automatically creates and submits an external load at regular intervals, using the reserved load ID.
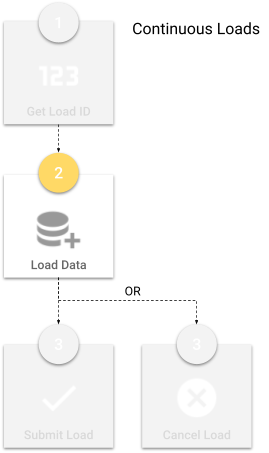
Semarchy xDM automatically submits an external load at the interval that you specified on the continuous load job and then processes the data.
The continuous load feature was designed for xDM users who rely heavily on the REST API and need near-real-time processing of integration jobs. Eliminating the first and last steps of getting a load ID and submitting a load streamlines the data-loading process.
We recommend that all users prioritize continuous loads, as this method is efficient and reduces the overhead required for record processing.
Next, you will see an example of an extract, transform, and load (ETL) tool in action. You will gain insight into how middleware can follow the external load process to insert and initiate an integration job in Semarchy xDM.
Congratulations!
You have successfully learned the foundational concepts of integration jobs in xDM.
To summarize:
- You have discovered how an external load works, including the function calls to get a load ID and submit load jobs.
- You have learned how continuous loads work and why they are superior to external loads.
Next, you will configure an integration job.
In this step, you will learn how to create an integration job. The role of the integration job is to process data submitted in an external load and to run it through xDM's certification process. This is the minimum setup required to load data into xDM.
As the integration job is based on the data model used in the Customer B2C demo tutorial, make sure to complete the tutorial before proceeding with this section if you have not already.
Create the integration job
You will now create an integration job and add all entities in the correct order. You will also set a job parameter to prevent the execution of statistics and optimize processing time.
- In the navigation menu of the Application Builder, right-click on CustomerB2CDemo > Jobs and select Add Job.
- In the Name field, enter
INTEGRATE_ALLand click Next.
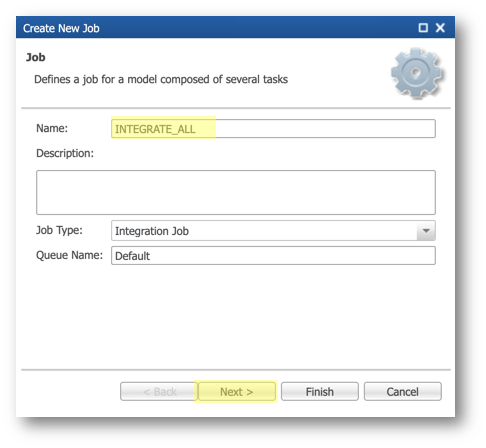
- Add the entities to the integration job in the sequence displayed below, and then click Finish.
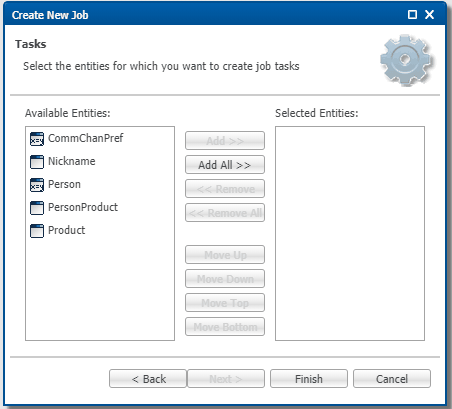
Entities are processed according to the specified order. When entities are linked through references, you must arrange parent entities before their respective child entities. For example, since Person refers to Nickname, Nickname should be placed first, followed by Person.
- Save your work.
Deploy the model changes
In this section, you will deploy the changes made to your model to the CustomerB2CDemo data location to execute your integration job.
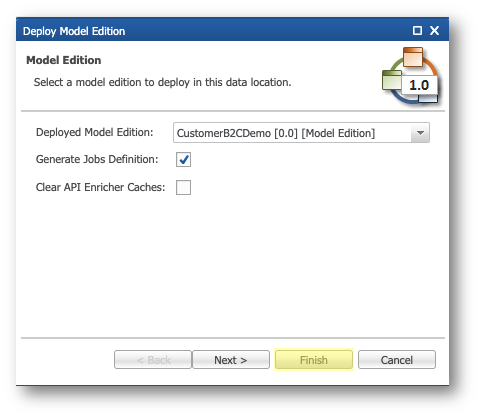
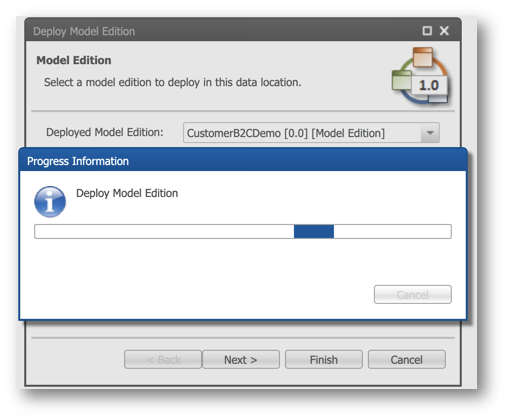
- In the Application Builder, switch to the Management perspective.
- Right-click the CustomerB2CDemo data location and select Deploy Model Edition.
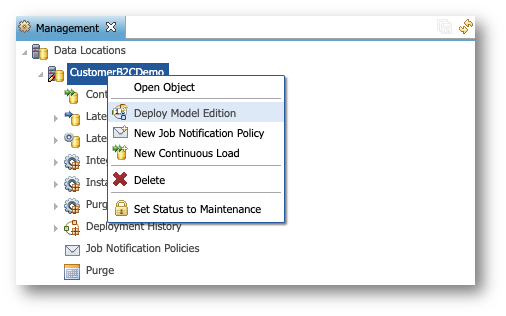
- Do not modify the parameters on the first page and click Finish.
Congratulations!
In this section, you have learned how to set up an integration job.
Next, you will use this integration job to load data using an external load.
To provide hands-on experience in loading data and initiating an integration job, this section guides you through executing SQL scripts to load data into the SA_PERSON_PRODUCT table (the source data table for the Customers' Product entity).
Learning outcomes
- Setting up the staging environment with source data to load.
- Performing grants to get the required privileges for data loading.
- Starting an external load, including initializing a load, inserting data, and submitting the load.
- Viewing data location logs to track the progress of the integration job.
Examine missing data for new customers
Upon loading the updated customer data, the information on previous prospects has been updated to reflect their current status as customers. Review the details of these new customers in the Customer B2C Demo application:
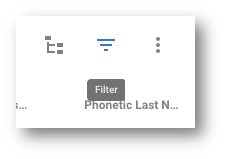
- Under the Browse Data section of the navigation drawer, navigate to the Customers view.
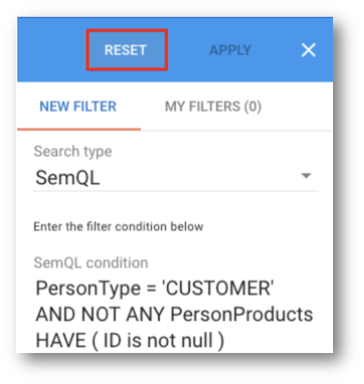
- Click the Filter button.
- From the Search type drop-down menu, select SemQL, and enter the following SemQL expression:
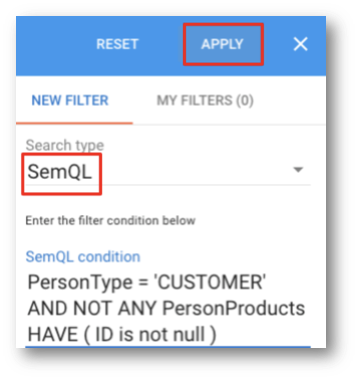
PersonType = 'CUSTOMER' AND NOT ANY PersonProducts HAVE ( ID is not null )
- Click Apply.
- Examine the list of customers who currently do not have any products in xDM.
Congratulations!
You have successfully loaded customers' data using an external load.
Next, you will load the products that these customers purchased. Before proceeding, ensure you have access to the database and an SQL client.
Insert customers' product data
In this section, you will start an external load by manually calling a function to get a load ID from the SEMARCHY_REPOSITORY schema, insert data with the load ID, and finally, submit the data.
Step 1: Get a load ID
To initialize a load, you will call the GET_NEW_LOADID function and provide the correct arguments.
- Connect as
SEMARCHY_REPOSITORY. - Call the
GET_NEW_LOADIDfunction to start an external load.
- On PostgreSQL:
- Execute the following script: postgresql/5-load-1-get-load-id.sql
do
$$

declare
  v_load_id int;
  begin
    v_load_id := semarchy_repository.get_new_loadid (
         'CustomerB2CDemo'       /* Data Location name. case sensitive. Found in Application Builder. */
        ,'manual_etl_script'     /* Informational program name. Identifies the middleware.         */
        ,'load_data_update'      /* Informational. Describes the load.                             */
        ,'manual_etl_user'       /* User initializing the load. (Not found in Application Builder.) */
    );
    raise notice '%', v_load_id;
end;
$$;
- Copy the value returned in the Messages tab. In the example below, the returned load ID is 36.
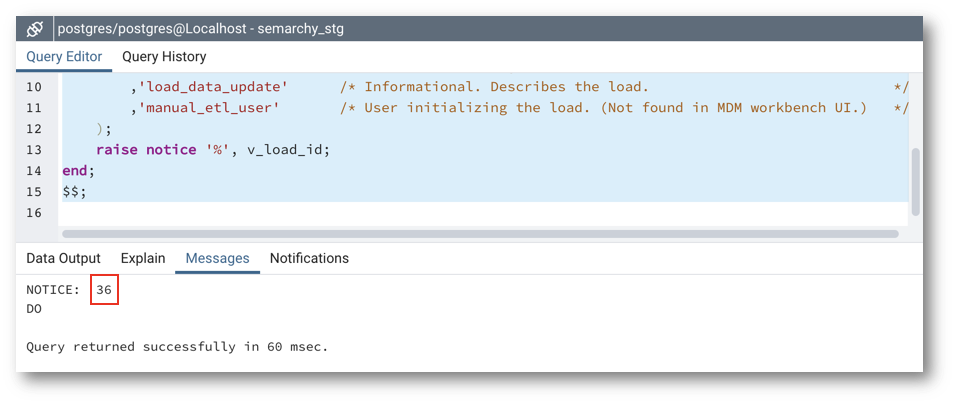
Next, you will add this load ID to the INSERT statement and run it to load data.
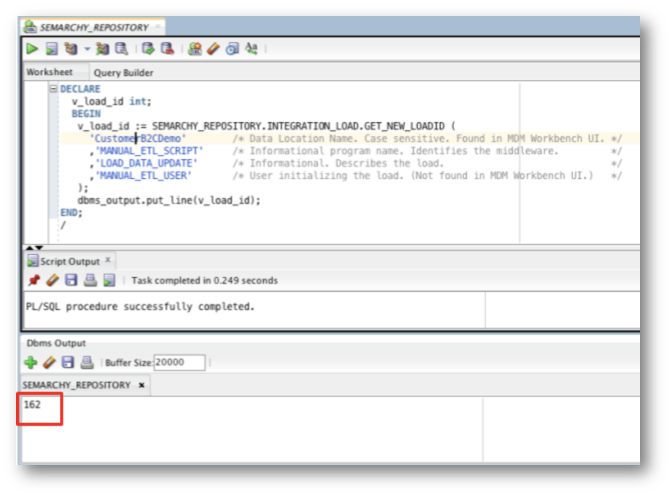
- On Oracle:
- Copy the following statement: oracle/5-load-1-get-load-id.sql
DECLARE
  v_load_id int;
  BEGIN
   v_load_id := SEMARCHY_REPOSITORY.INTEGRATION_LOAD.GET_NEW_LOADID (
        'CustomerB2CDemo'       /* Data Location Name. Case sensitive. Found in Application Builder. */
       ,'MANUAL_ETL_SCRIPT'     /* Informational program name. Identifies the middleware.         */
       ,'LOAD_DATA_UPDATE'      /* Informational. Describes the load.                             */
       ,'MANUAL_ETL_USER'       /* User initializing the load. (Not found in Application Builder.) */
   );
   dbms_output.put_line(v_load_id);
END;
/
- If you are using SQL Developer, activate Dbms Output before executing the function to view the returned load ID.

- Execute the script and copy the value returned in the Dbms Output window.
- On SQL Server, execute the following statement: sqlserver/5-load-1-get-load-id.sql
declare
  @v_load_id int
  begin
   exec semarchy_repository.dbo.get_new_loadid
    @return_value_argument=@v_load_id OUTPUT,
    @p_data_location_name = 'CustomerB2CDemo', /* Data Location Name (as in the UI) */
    @p_program_name = 'manual_etl_script',         /* Informational. Identifies the Middleware */
    @p_load_description = N'load_data_update', /* Informational. Describes the load. */
                                                            /* Note the N to allow accented characters */
    @p_username = 'semadmin'                        /* User initializing the load. */
    print @v_load_id
end
Next, you will add this load ID to the INSERT statement and run it to load data.
Step 2: Insert data
In this step, you will load the source data into the SA_PERSON_PRODUCT table.
- Connect as
SEMARCHY_CUSTOMER_B2C_MDM. - Retrieve the
INSERTstatement that corresponds to your database.
- For PostgreSQL: postgresql/5-load-2-insert-sa-person-product.sql
INSERT INTO semarchy_customer_b2c_mdm.sa_person_product (
   b_loadid,       /* Semarchy system fields */
   b_classname,    /* Semarchy system fields */
   id,
   purchase_date,
   registration_date,
   f_product,
   fp_person,
   fs_person
)
SELECT
   /* load_id */ AS b_loadid, /* Insert the load ID here that was returned from Step 1 */
   'PersonProduct' AS b_classname,            /* Entity name. Found in MDM Workbench UI. */
   stg.id,
   stg.purchase_date,
   stg.registration_date,
   stg.f_product,
   stg.fp_person,
   stg.fs_person
FROM semarchy_customer_b2c_mdm.sa_person_product dest
RIGHT JOIN (
   VALUES
       ('FORCEP24461WD_CRM1353638', to_date('06/23/2018', 'MM-DD-YYYY'), to_date('07/13/2018', 'MM-DD-YYYY'), 'FORCEP24461WD', 'CRM', '1353638'),
       ('FORCEP24461WD_CRM1388894', to_date('02/10/2016', 'MM-DD-YYYY'), to_date('04/02/2016', 'MM-DD-YYYY'), 'FORCEP24461WD', 'CRM', '1388894'),
       ('CARBON4861OK_CRM1987232', to_date('12/19/2016', 'MM-DD-YYYY'), to_date('03/20/2017', 'MM-DD-YYYY'), 'CARBON4861OK', 'CRM', '1987232'),
       ('CARBON4861OK_CRM1373036', to_date('04/28/2014', 'MM-DD-YYYY'), to_date('06/22/2014', 'MM-DD-YYYY'), 'CARBON4861OK', 'CRM', '1373036'),
       ('CARBON4861OK_CRM1380327', to_date('01/17/2016', 'MM-DD-YYYY'), to_date('04/26/2016', 'MM-DD-YYYY'), 'CARBON4861OK', 'CRM', '1380327'),
       ('CARBON4861OK_CRM1385755', to_date('04/23/2015', 'MM-DD-YYYY'), to_date('06/12/2015', 'MM-DD-YYYY'), 'CARBON4861OK', 'CRM', '1385755'),
       ('CARBON4861OK_CRM1391755', to_date('05/23/2016', 'MM-DD-YYYY'), to_date('08/02/2016', 'MM-DD-YYYY'), 'CARBON4861OK', 'CRM', '1391755'),
       ('CARBON4861OK_MKT1387232', to_date('02/16/2016', 'MM-DD-YYYY'), to_date('05/21/2016', 'MM-DD-YYYY'), 'CARBON4861OK', 'MKT', '1387232'),
       ('CARBON4861OK_MKT1388559', to_date('08/30/2015', 'MM-DD-YYYY'), to_date('11/22/2015', 'MM-DD-YYYY'), 'CARBON4861OK', 'MKT', '1388559'),
       ('RENAUD4061LK_CRM1376827', to_date('06/02/2018', 'MM-DD-YYYY'), to_date('07/13/2018', 'MM-DD-YYYY'), 'RENAUD4061LK', 'CRM', '1376827'),
       ('STREAM4961WD_CRM1353638', to_date('09/19/2014', 'MM-DD-YYYY'), to_date('12/21/2014', 'MM-DD-YYYY'), 'STREAM4961WD', 'CRM', '1353638')
) AS stg(id, purchase_date, registration_date, f_product, fp_person, fs_person)
ON dest.id = stg.id
WHERE dest.id IS NULL OR (
   dest.purchase_date <> stg.purchase_date
   OR dest.registration_date <> stg.registration_date
   OR COALESCE(dest.f_product, '') <> COALESCE(stg.f_product, '')
   OR COALESCE(dest.fp_person, '') <> COALESCE(stg.fp_person, '')
   OR COALESCE(dest.fs_person, '') <> COALESCE(stg.fs_person, '')
);

COMMIT;
- For Oracle: oracle/5-load-2-insert-sa-person-product.sql
INSERT into SEMARCHY_CUSTOMER_B2C_MDM.SA_PERSON_PRODUCT (
    B_LOADID      /* Semarchy system fields */
   ,B_CLASSNAME   /* Semarchy system fields */
   ,ID
   ,PURCHASE_DATE
   ,REGISTRATION_DATE
   ,F_PRODUCT
   ,FP_PERSON
   ,FS_PERSON
)
SELECT
    /* load_id */ as B_LOADID    /* Insert the load ID here that was returned from Step 4 */
   ,'PersonProduct' AS B_CLASSNAME /* Entity name. Found in MDM Workbench UI. */
   ,stg.ID
   ,stg.PURCHASE_DATE
   ,stg.REGISTRATION_DATE
   ,stg.F_PRODUCT
   ,stg.FP_PERSON
   ,stg.FS_PERSON
FROM SEMARCHY_CUSTOMER_B2C_MDM.SA_PERSON_PRODUCT dest
RIGHT JOIN (
   VALUES
       ('FORCEP24461WD_CRM1353638', TO_DATE('06/23/2018', 'MM-DD-YYYY'), TO_DATE('07/13/2018', 'MM-DD-YYYY'), 'FORCEP24461WD', 'CRM', '1353638'),
       ('FORCEP24461WD_CRM1388894', TO_DATE('02/10/2016', 'MM-DD-YYYY'), TO_DATE('04/02/2016', 'MM-DD-YYYY'), 'FORCEP24461WD', 'CRM', '1388894'),
       ('CARBON4861OK_CRM1987232', TO_DATE('12/19/2016', 'MM-DD-YYYY'), TO_DATE('03/20/2017', 'MM-DD-YYYY'), 'CARBON4861OK', 'CRM', '1987232'),
       ('CARBON4861OK_CRM1373036', TO_DATE('04/28/2014', 'MM-DD-YYYY'), TO_DATE('06/22/2014', 'MM-DD-YYYY'), 'CARBON4861OK', 'CRM', '1373036'),
       ('CARBON4861OK_CRM1380327', TO_DATE('01/17/2016', 'MM-DD-YYYY'), TO_DATE('04/26/2016', 'MM-DD-YYYY'), 'CARBON4861OK', 'CRM', '1380327'),
       ('CARBON4861OK_CRM1385755', TO_DATE('04/23/2015', 'MM-DD-YYYY'), TO_DATE('06/12/2015', 'MM-DD-YYYY'), 'CARBON4861OK', 'CRM', '1385755'),
       ('CARBON4861OK_CRM1391755', TO_DATE('05/23/2016', 'MM-DD-YYYY'), TO_DATE('08/02/2016', 'MM-DD-YYYY'), 'CARBON4861OK', 'CRM', '1391755'),
       ('CARBON4861OK_MKT1387232', TO_DATE('02/16/2016', 'MM-DD-YYYY'), TO_DATE('05/21/2016', 'MM-DD-YYYY'), 'CARBON4861OK', 'MKT', '1387232'),
       ('CARBON4861OK_MKT1388559', TO_DATE('08/30/2015', 'MM-DD-YYYY'), TO_DATE('11/22/2015', 'MM-DD-YYYY'), 'CARBON4861OK', 'MKT', '1388559'),
       ('RENAUD4061LK_CRM1376827', TO_DATE('06/02/2018', 'MM-DD-YYYY'), TO_DATE('07/13/2018', 'MM-DD-YYYY'), 'RENAUD4061LK', 'CRM', '1376827'),
       ('STREAM4961WD_CRM1353638', TO_DATE('09/19/2014', 'MM-DD-YYYY'), TO_DATE('12/21/2014', 'MM-DD-YYYY'), 'STREAM4961WD', 'CRM', '1353638')
) AS stg(ID, PURCHASE_DATE, REGISTRATION_DATE, F_PRODUCT, FP_PERSON, FS_PERSON)
ON dest.ID = stg.ID
WHERE dest.ID IS NULL OR (
   dest.PURCHASE_DATE <> stg.PURCHASE_DATE
   OR dest.REGISTRATION_DATE <> stg.REGISTRATION_DATE
   OR COALESCE(dest.F_PRODUCT, '') <> COALESCE(stg.F_PRODUCT, '')
   OR COALESCE(dest.FP_PERSON, '') <> COALESCE(stg.FP_PERSON, '')
   OR COALESCE(dest.FS_PERSON, '') <> COALESCE(stg.FS_PERSON, '')
);
COMMIT;
- For SQL Server: sqlserver/5-load-2-insert-sa-person-product.sql
INSERT INTO semarchy_customer_b2c_mdm.dbo.sa_person_product (
   b_loadid,       /* Semarchy system fields */
   b_classname,    /* Semarchy system fields */
   id,
   purchase_date,
   registration_date,
   f_product,
   fp_person,
   fs_person
)
SELECT
   /* load_id */ AS b_loadid, /* Insert the load ID here that was returned from Step 1 */
   'PersonProduct' AS b_classname,            /* Entity name. Found in MDM Workbench UI. */
   stg.id,
   stg.purchase_date,
   stg.registration_date,
   stg.f_product,
   stg.fp_person,
   stg.fs_person
FROM semarchy_customer_b2c_mdm.dbo.sa_person_product dest
RIGHT JOIN (
   VALUES
       ('FORCEP24461WD_CRM1353638', convert(date, '06/23/2018', 101), convert(date, '07/13/2018', 101), 'FORCEP24461WD', 'CRM', '1353638'),
       ('FORCEP24461WD_CRM1388894', convert(date, '02/10/2016', 101), convert(date, '04/02/2016', 101), 'FORCEP24461WD', 'CRM', '1388894'),
       ('CARBON4861OK_CRM1987232', convert(date, '12/19/2016', 101), convert(date, '03/20/2017', 101), 'CARBON4861OK', 'CRM', '1987232'),
       ('CARBON4861OK_CRM1373036', convert(date, '04/28/2014', 101), convert(date, '06/22/2014', 101), 'CARBON4861OK', 'CRM', '1373036'),
       ('CARBON4861OK_CRM1380327', convert(date, '01/17/2016', 101), convert(date, '04/26/2016', 101), 'CARBON4861OK', 'CRM', '1380327'),
       ('CARBON4861OK_CRM1385755', convert(date, '04/23/2015', 101), convert(date, '06/12/2015', 101), 'CARBON4861OK', 'CRM', '1385755'),
       ('CARBON4861OK_CRM1391755', convert(date, '05/23/2016', 101), convert(date, '08/02/2016', 101), 'CARBON4861OK', 'CRM', '1391755'),
       ('CARBON4861OK_MKT1387232', convert(date, '02/16/2016', 101), convert(date, '05/21/2016', 101), 'CARBON4861OK', 'MKT', '1387232'),
       ('CARBON4861OK_MKT1388559', convert(date, '08/30/2015', 101), convert(date, '11/22/2015', 101), 'CARBON4861OK', 'MKT', '1388559'),
       ('RENAUD4061LK_CRM1376827', convert(date, '06/02/2018', 101), convert(date, '07/13/2018', 101), 'RENAUD4061LK', 'CRM', '1376827'),
       ('STREAM4961WD_CRM1353638', convert(date, '09/19/2014', 101), convert(date, '12/21/2014', 101), 'STREAM4961WD', 'CRM', '1353638')
) AS stg(id, purchase_date, registration_date, f_product, fp_person, fs_person)
ON dest.id = stg.id
WHERE dest.id IS NULL OR (
   dest.purchase_date <> stg.purchase_date
   OR dest.registration_date <> stg.registration_date
   OR COALESCE(dest.f_product, '') <> COALESCE(stg.f_product, '')
   OR COALESCE(dest.fp_person, '') <> COALESCE(stg.fp_person, '')
   OR COALESCE(dest.fs_person, '') <> COALESCE(stg.fs_person, '')
);
- Observe the content of this statement and note it includes delta detection: it will insert into the
SA_PERSON_PRODUCTtable only records that have the same ID, but different data. - Find the line
/* load_id */ as B_LOADIDin theINSERTstatement and substitute/* load_id */for the actual load ID retrieved during step 1, "Get a load ID" (in this tutorial example, it is 36). - Paste and execute the
INSERTstatement in your SQL editor. Remember to commit the inserts if auto-commit is not activated.

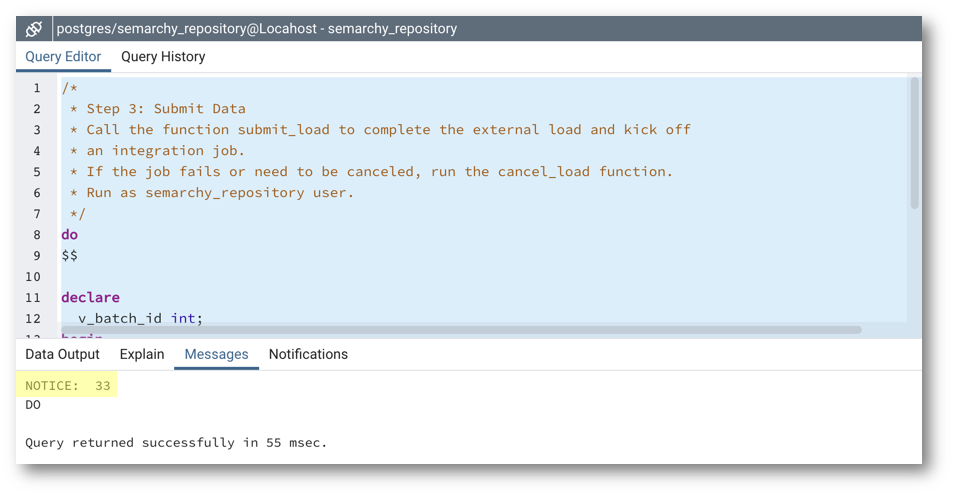
Step 3: Submit data
- Connect as
SEMARCHY_REPOSITORY. - Retrieve the
INSERTstatement that corresponds to your database.
- For PostgreSQL: postgresql/5-load-3-submit-load.sql
do
$$

declare
  v_batch_id int;
begin
  v_batch_id := semarchy_repository.submit_load (
             /* load_id */      /* Load ID returned by get_new_loadid from Step 1 */
            ,'INTEGRATE_ALL'    /* Must exactly match a defined integration job. Found in Application Builder. */
            ,'manual_etl_user'     /* Must exactly match the value used in get_new_loadid in Step 1. */
  );
  raise notice '%', v_batch_id;
end;
$$;
- For Oracle: oracle/5-load-3-submit-load.sql
DECLARE
  v_batch_id int;
BEGIN
  v_batch_id := SEMARCHY_REPOSITORY.INTEGRATION_LOAD.SUBMIT_LOAD (
             /* load_id */     /* Load ID returned by INTEGRATION_LOAD.GET_NEW_LOADID from Step 4 */
            ,'INTEGRATE_ALL'   /* Must exactly match a defined integration job. Found in Application Builder. */
            ,'MANUAL_ETL_USER' /* Must exactly match the value used in MTA_GET_NEW_LOADID in Step 4. */
  );
  dbms_output.put_line(v_batch_id);
END;
/
- For SQL Server: sqlserver/5-load-3-submit-load.sql
declare
  @v_batch_id int
  begin
   exec semarchy_repository.dbo.submit_load
    @return_value_argument=@v_batch_id OUTPUT,
    @p_load_id = /* load_id */, /* Load ID returned by INTEGRATION_LOAD.GET_NEW_LOADID from Step 4 */
        @p_integration_job_name = 'INTEGRATE_ALL',/* Name of the Integration Job to trigger. */
        @p_username = 'semadmin' /* User who has initialized the load. */
        print @v_batch_id
end
- Find in the statement the line
/* load_id */ /* Load ID returned by INTEGRATION_LOAD.GET_NEW_LOADIDfrom Step 4 */and substitute/* load_id */for the actual load ID (in this example, it is 36). - Run the amended statement to submit the load and start the integration job.
- Record the batch ID that the function returns. In this tutorial example, the batch ID is 33.
It is common for batch IDs to differ from load IDs, especially when multiple loads are initialized but not submitted.
Well done! You have learned how to complete a load and start an integration job in xDM. Next, you will learn to check data location logs to monitor the progress of load jobs and integration jobs.
Check the data location logs
Data location logs provide insights into the status of data loads.
To view the data location logs:
- Go to your application. On the Welcome page, click the Application Builder.
- Go to the Management tab. Open the Data Locations > CustomerB2CDemo > Latest Loads node.
- Notice that the latest load 36 is marked as Finished.

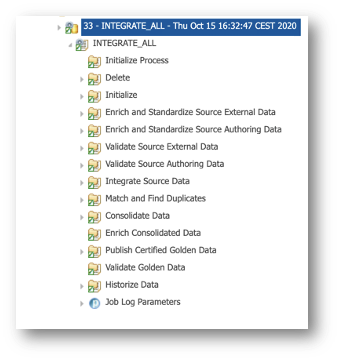
- After submitting the load, you can use the batch ID to track the integration job. Return to the Management perspective and open Data Locations > CustomerB2CDemo > Latest Integration Batches.
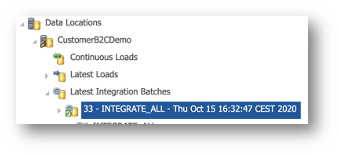
- Drill down the batch to see more details about each step.
Browse the new customers' product data
Now that the integration job batch is complete, examine the updated customers' product data in the Customer B2C Demo application:
- Return to the Customers view in the Customer B2C Demo application.
- Click the Options button again.
- Select Refresh.
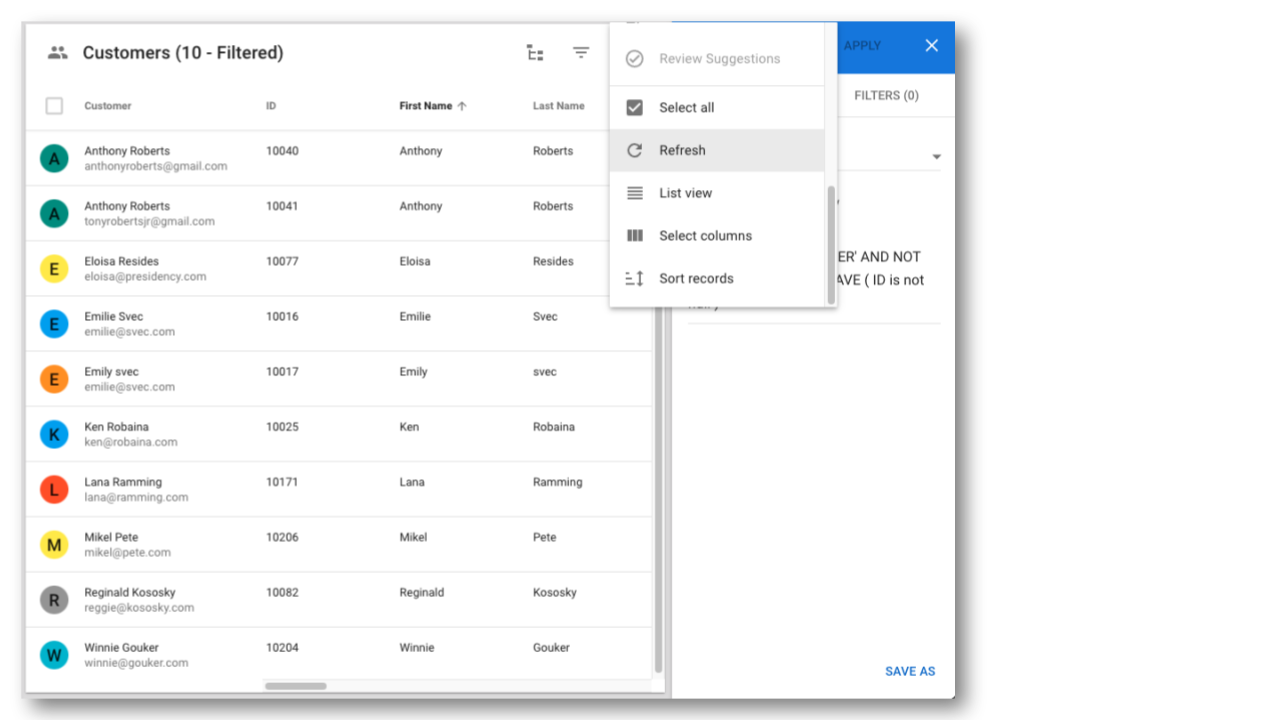
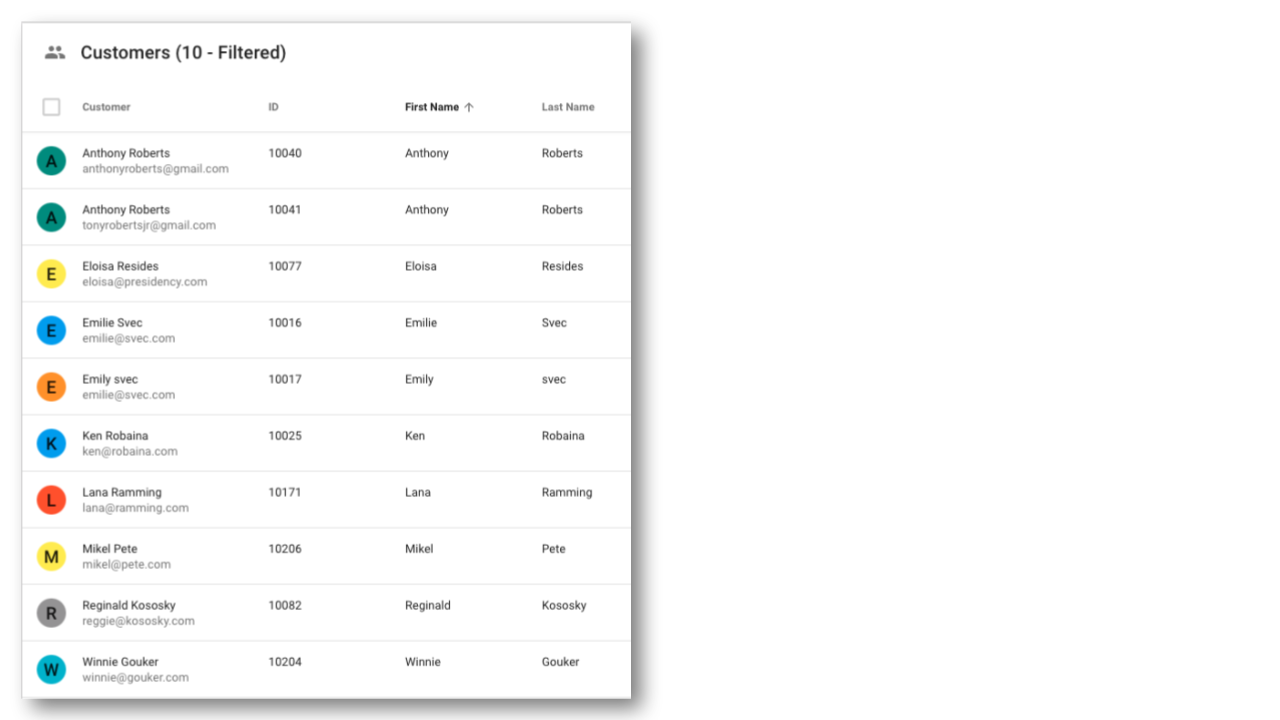
- You will notice that there are no more customer records meeting this filter.
PersonType = 'CUSTOMER' AND NOT ANY PersonProducts HAVE ( ID is not null )
This is because, following your external load, there are no more customers missing their associated product data.
- Disable the filter by clicking Reset on the filter.
- Look for the Person record with the name Winnie Gouker and click on the Products tab.
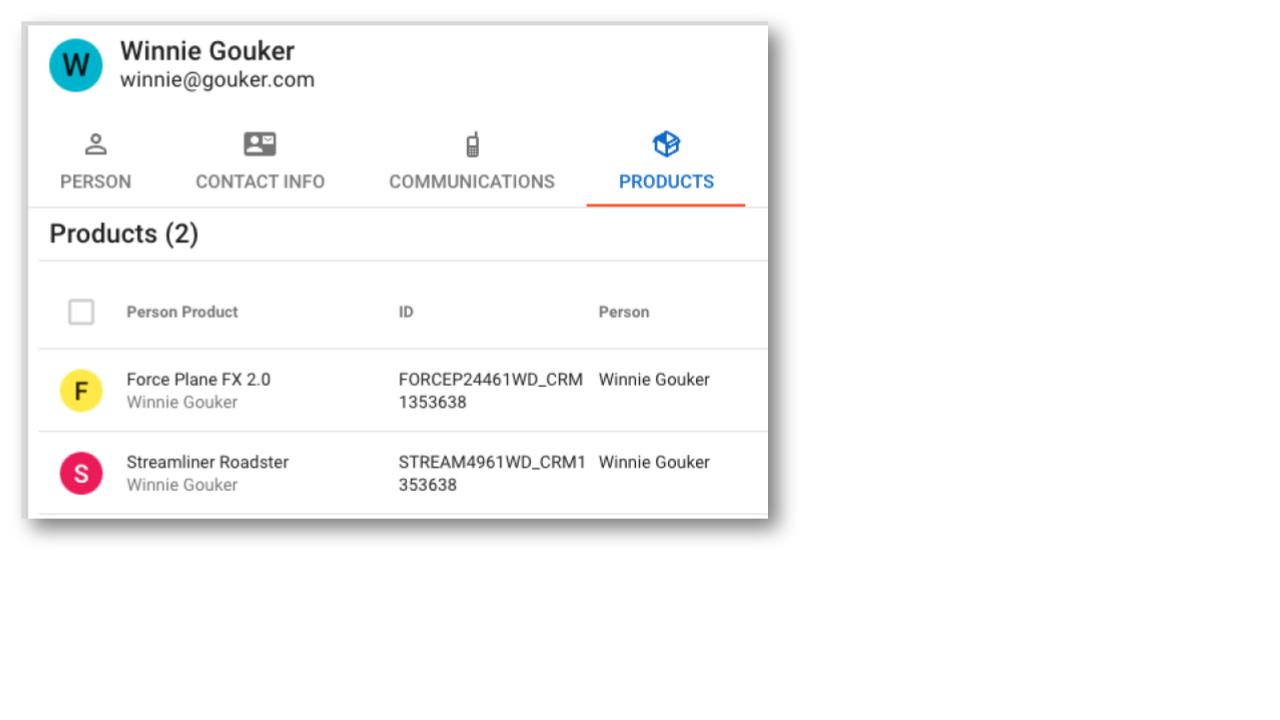
- If you see products under Winnie Gouker and the other customers previously identified as missing products, then you have successfully loaded the data.
Cancel an ongoing load job
There might be instances where you need to halt a load for various reasons:
- You retrieved a load ID, and later decided not to proceed with loading data.
- You (or your ETL) encounter an error while loading data, and you decide to cancel the ongoing load.
This section will guide you through the process of canceling an external load.
- Connect to the repository user,
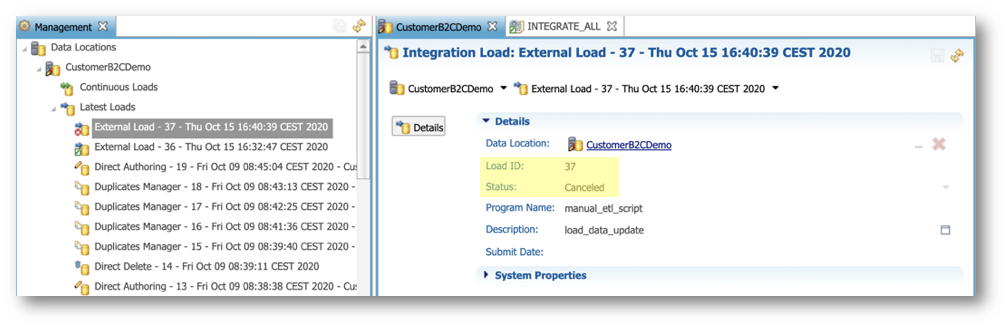
SEMARCHY_REPOSITORY. - Initialize a new load (refer again to the procedure described in step 1, "Get a load ID", in the previous section) and retrieve the load ID (in this tutorial example, it is 37)
- Use the
CANCEL_LOADfunction and substitute/* load_id */with the load ID (in this tutorial example, it is 37).
- On PostgreSQL: postgresql/5-load-4-cancel-load.sql
do
$$

begin
 perform semarchy_repository.cancel_load (
      /* load_id */          /* Load ID returned by get_new_loadid */
     ,'manual_etl_user'      /* Must exactly match the value used in get_new_loadid */
 );
end;
$$;
- On Oracle: oracle/5-load-4-cancel-load.sql
BEGIN
  SEMARCHY_REPOSITORY.INTEGRATION_LOAD.CANCEL_LOAD (
       /* load_id */          /* Load ID returned by INTEGRATION_LOAD.GET_NEW_LOADID */
      ,'MANUAL_ETL_USER'      /* Must exactly match the value used in GET_NEW_LOADID */
  );
END;
/
- On SQL Server: sqlserver/5-load-4-cancel-load.sql
begin
exec semarchy_repository.dbo.cancel_load
        @P_LOAD_ID = /* load_id */    /* Load ID returned by INTEGRATION_LOAD.GET_NEW_LOADID */
        ,@P_USERNAME = 'semadmin'     /* User who has initialized the load. */
end
- Execute the
CANCEL_LOADfunction (with the correct load ID) in your SQL editor. - Check that you successfully canceled the load in the data location logs.
Congratulations!
You have successfully loaded data using an external load and learned how to cancel a load.
Next, you will configure a continuous load that will automatically load data into Semarchy xDM.
You are now going to create a continuous load that will automatically detect and process source data loaded into xDM via the SQL API.
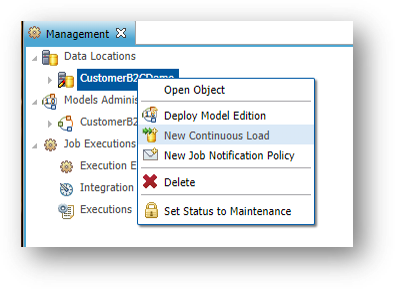
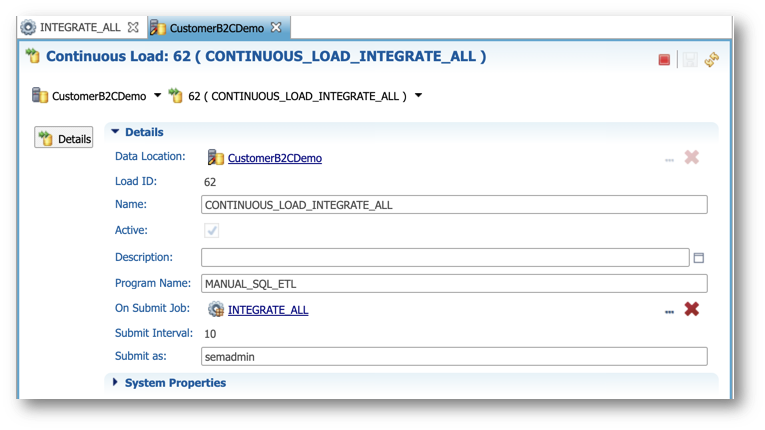
- In the Management tree view, right-click on the
CustomerB2CDemodata location and select New Continuous Load.
- Enter the following values:
- Name:
CONTINUOUS_LOAD_INTEGRATE_ALL - Program Name:
MANUAL_SQL_ETL - On Submit Job:
INTEGRATE_ALL [Data Location Job] - Submit as:
semadmin
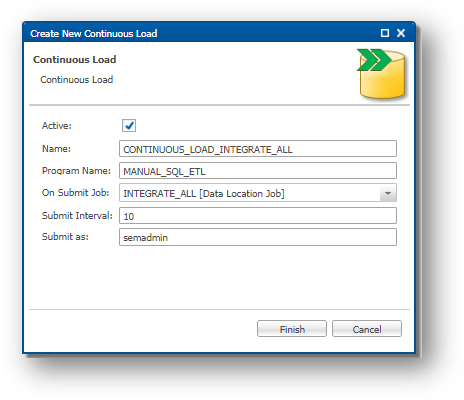
- Click Finish.
Next, you will use this continuous load to update customer data.
You are now going to update data with the continuous load you have set up in the previous section, and see the benefits of continuous loads.
Learning outcomes
- Inserting master customer records, including both the original data you loaded in the "Customer B2C Demo" tutorial and newly updated customer data.
- Using a continuous load ID.
- Performing delta detection to load only new data, avoiding duplication of existing data in xDM.
- Browsing the load in the data location view in xDM.
Examine the original customer data
Before loading updated customer data, examine the current customer data in the Customer B2C Demo application:
- Under Browse Data, navigate to the Customers view.
- Look for the Person record with the name Abe Corbett. If necessary, sort the First Name column alphabetically (A-Z). Note this customer's first and last name.

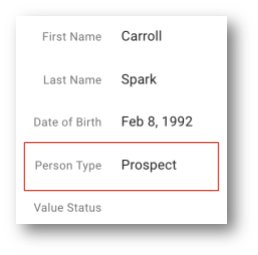
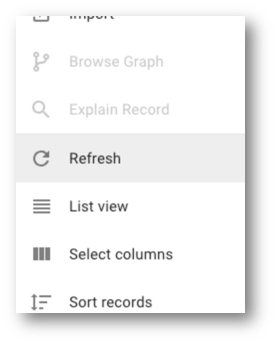
You should find Abe Corbett. - Look for the Person record with the name Carroll Spark. Note the Person Type associated with this record.
You should observe that Carroll's person type is Prospect. - Now, proceed to set up your staging environment for loading customer updates. Ensure you have access to the database and an SQL client.
Load only new customer data using delta detection
In this section, you will load updated customer data into xDM.
The INSERT statements provided below contain both the original records and updated records. This is a common real-world scenario where the source system captures all records. Therefore, it is important to learn how to identify changes and load only the updated records.
- Connect to the
SEMARCHY_CUSTOMER_B2C_MDMschema. - Copy and paste the
INSERTstatements to load records into theSD_PERSONtable.
- On PostgreSQL: postgresql/7-update-1-insert-sd-person.sql
- On Oracle: oracle/7-update-1-insert-sd-person.sql
- On SQL Server: sqlserver/7-update-1-insert-sd-person.sql
- The following instruction retrieves the continuous load ID:
- On PostgreSQL:
semarchy_repository.get_continuous_loadid('CONTINUOUS_LOAD_INTEGRATE_ALL')
- On Oracle:
SEMARCHY_REPOSITORY.INTEGRATION_LOAD.GET_CONTINUOUS_LOADID('CONTINUOUS_LOAD_INTEGRATE_ALL')
- On SQL Server:
exec semarchy_repository.dbo.get_continuous_loadid
        @RETURN_VALUE_ARGUMENT=@v_load_id OUTPUT,
        @P_CONTINUOUS_LOAD_NAME='CONTINUOUS_LOAD_INTEGRATE_ALL'
- Run the
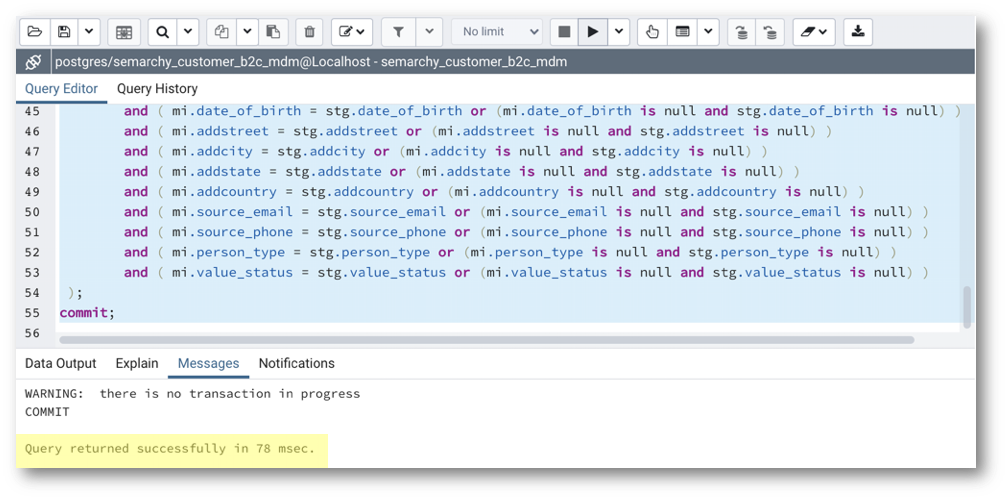
INSERTstatement. Be sure to commit.
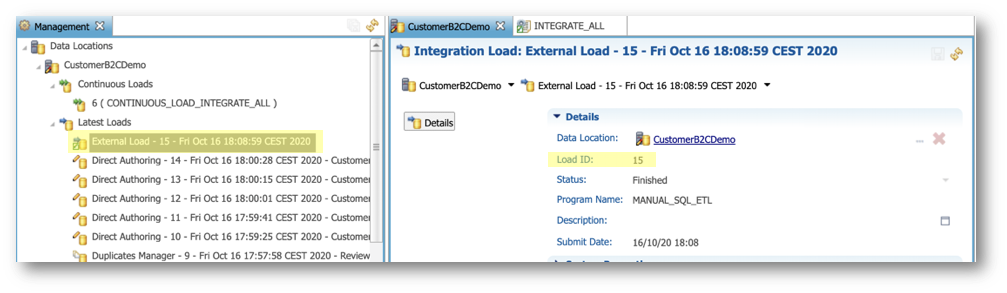
- Return to the Management perspective of the Application Builder and retrieve the latest load under Data Locations > CustomerB2CDemo > Latest Loads. This is the load that was automatically triggered by the continuous load. Note the value of the generated load ID (in the example below, it is 15)
- Find the line
/* load_id */ as B_LOADIDin the insert statement and substitute/* load_id */for the actual load ID retrieved during step 1, "Get a load ID" (in this tutorial example, it is 36). - Substitute
/* load_id */for the actual load ID retrieved during the previous step (15 in our example) in the query below:
- On PostgreSQL and Oracle:
select count(*)
from sd_person
where b_loadid= /* load_id */
- On SQL Server:
select count(*)
from dbo.sd_person
where b_loadid= /* load_id */
- Execute this query and check that it returns 68 records. This is the number of records inserted or updated during the latest load.

After loading the customer updates, switch to the Customer B2C Demo application to check the updates in xDM.
Browse the updated customer data
Now that the updated customer data have been loaded, review the changes to customer data in the Customer B2C application:
- Under Browse Data, navigate to the Customers view.
- Click the Options button.
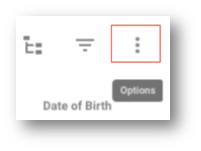
- Select Refresh.
- Look for the Person record with the first name Abe. Note this customer's last name.

You should see Abe Corbett-Lopéz. The customer's last name was updated. - Look for the Person record with the name Carroll Spark. Note the Person Type associated with this record.
You should observe that Carroll's person type is now Customer. This person has been converted from a prospect to a customer, and the record has been updated accordingly.
Congratulations!
You have successfully loaded data updates using SQL with a continuous load.
To summarize:
- You set up a staging environment in the staging schema.
- You granted the necessary privileges to load data into the xDM data location.
- You inserted data into xDM using delta detection to load updates only and avoid redundant reloading of existing data.
Next, you will learn how to truncate data from a data location.
Truncating all data from tables can prove very useful during development. This section explains how to generate and execute the statements for this purpose.
Truncate data on PostgreSQL
- Connect to the
semarchy_customer_b2c_mdmschema using your SQL client. - Open an SQL editor in your SQL client.
- Run the following SQL statement. This statement will generate all the SQL truncate statements you need to execute: postgresql/8-truncate-1-truncate-data.sql.
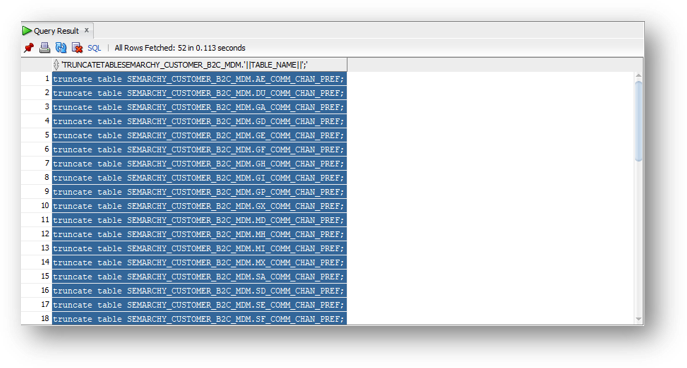
select 'truncate table semarchy_customer_b2c_mdm.' || tablename || ';'
from pg_catalog.pg_tables
where schemaname = 'semarchy_customer_b2c_mdm'  /* set this to your data location schema */
 and tablename not like 'dl_%'                  /* do not truncate these system tables */
 and tablename not like 'ext_%'                 /* do not truncate these system tables */
 and tablename like '%'                         /* add filters as needed for entities    */
order by substr(tablename,3), tablename;
- Copy the generated statements to the clipboard.
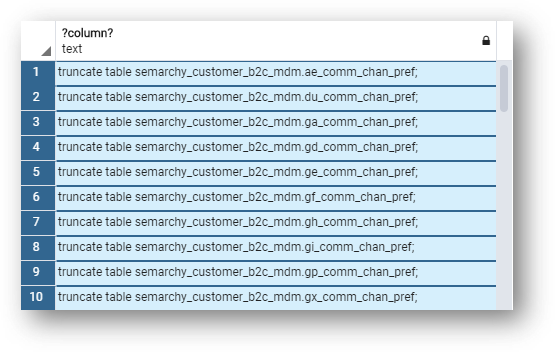
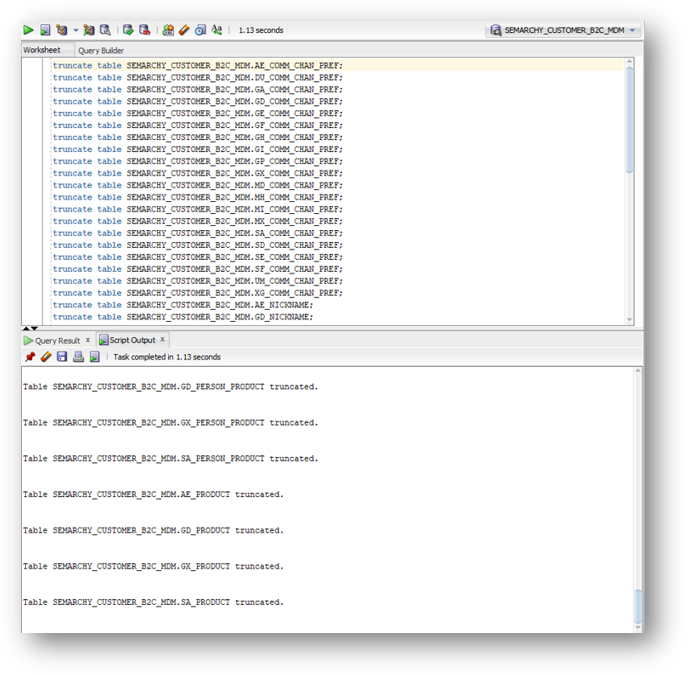
- Paste the generated statements in your SQL editor window and execute them.
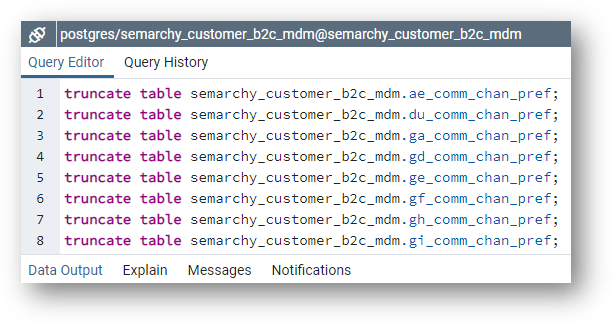
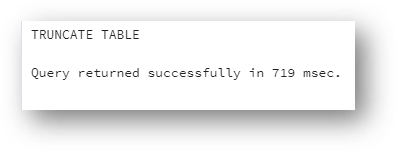
- Refresh the data view and notice that the data has disappeared.
Truncate data on Oracle
- Connect to
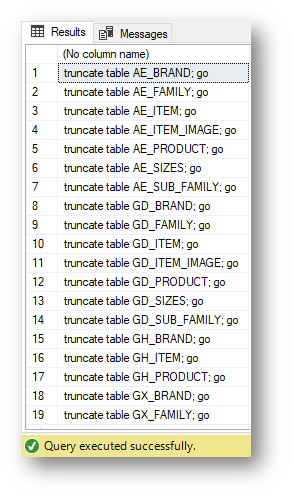
semarchy_customer_b2c_mdm. - Run the truncate generation statement. This statement will generate all the SQL truncate statements you need to execute: oracle/8-truncate-1-truncate-data.sql.
select 'truncate table SEMARCHY_CUSTOMER_B2C_MDM.' || table_name || ';'
from all_tables
where owner='SEMARCHY_CUSTOMER_B2C_MDM' /* set this to your data location schema */
 and table_name not like 'DL_%'         /* do not truncate these system tables */
 and table_name not like 'EXT_%'        /* do not truncate these system tables */
 and table_name like '%'                /* add filters as needed for entities    */
order by substr(table_name,3), table_name;
- Copy these generated statements to the clipboard.
- Paste and run the truncate statements.
- Refresh the data view and notice that the data has disappeared.
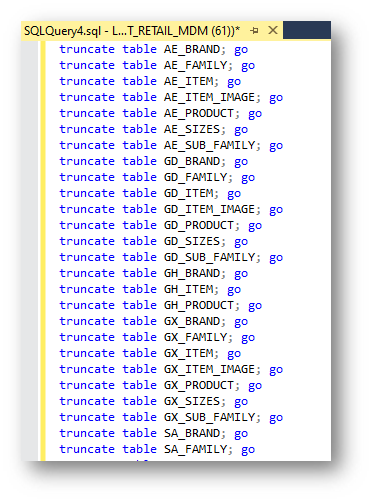
Truncate data on SQL Server
- Connect to
semarchy_customer_b2c_mdm. - Run the truncate generation statement. This statement will generate all the SQL truncate statements you need to execute: sqlserver/8-truncate-1-truncate-data.sql.
SELECT 'truncate table ' + TABLE_NAME +';' + char(10) + 'go'
FROM SEMARCHY_PRODUCT_RETAIL_MDM.INFORMATION_SCHEMA.TABLES /* set this to your data location schema */
WHERE TABLE_NAME NOT LIKE 'DL_%'      /* do not truncate these system tables */
AND TABLE_NAME NOT LIKE 'EXT_%'       /* do not truncate these system tables */
AND TABLE_NAME LIKE '%'               /* add filters as needed for entities    */
ORDER BY SUBSTRING(TABLE_NAME, 1, 3), TABLE_NAME;
- Copy these generated statements to the clipboard.
- Paste and run the truncate statements.
- Refresh the data view and notice that the data has disappeared.
Congratulations!
Yous have successfully truncated data.
Well done! You have completed the SQL-based integration tutorials for Semarchy xDM.
Learning recap
- You have learned how to load data using SQL, using both external and continuous loads.
- You have truncated data from a data location.
- You have learned how integration jobs work and how they differ for fuzzy-matching entities and basic entities.
- You can now track the progress of integration jobs in xDM using the data location logs.
Next steps
You will find more details on data integration—including using the REST API—in the Data Publishing & Consumption track.
Additional tutorials on designing applications are also available in the Data Authoring and Data Consolidation tracks.
To explore these resources, return to the Tutorials menu.
Thank you for completing this tutorial.