This tutorial will help you select and configure an SQL client for accessing the database schemas used by Semarchy xDM.
Learning outcomes
- Selecting an SQL client based on your database.
- If your database is running on AWS or Azure, opening remote access.
- Adding connections to PostgreSQL/Oracle/SQL Server.
- Observing database objects.
Learning track
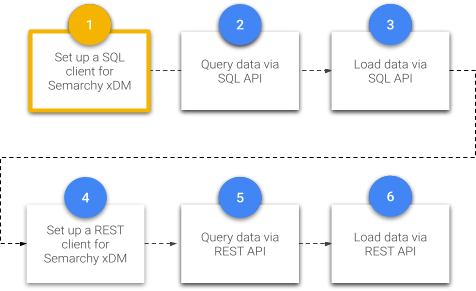
This tutorial is the first unit within the Data Publishing & Consumption track, which is composed of SQL-based and REST-based tutorials.
The current unit is a prerequisite for the next SQL-based units of the Data Publishing & Consumption track.
- Query data via the SQL API demonstrates browsing and querying Semarchy xDM data using the SQL API.
- Load data via the SQL API covers the process of loading data into Semarchy xDM using the SQL API.
The sample customer data in this tutorial is modeled after the customers of a bicycle retailer that sells high-end bikes and cycling accessories.
Before beginning this unit, you must have set up Semarchy xDM and completed the Customer B2C demo tutorial. If you have not yet, follow the Quick Install and Demo Applications tracks from the main Tutorials menu.
Otherwise, enjoy this tutorial!
If you have completed the Install Semarchy xDM on-premises tutorial, then you already have successfully installed a client and used it to run the schema creation statements:
- For PostgreSQL: the default client is pgAdmin.
- For Oracle: Oracle SQL Developer.
- For SQL Server: SQL Server Management Studio.
In that case, you can use this client to connect to the xDM repository and data location schemas. Simply follow the instructions in the section associated with this client.
If you have not installed any SQL client yet, you can install one of those or use DBeaver, a free universal client. Download DBeaver Community Edition, which is sufficient to follow the Data Publishing & Consumption tutorial track.
Now that you have selected an SQL client, you are ready to connect to the database.
If you have installed xDM using the AWS or Azure Quickstart virtual machine:
- First, enable remote connections to the PostgreSQL database installed on the virtual machine. Go to ③ Enable remote connections to PostgreSQL on AWS or Azure.
- Then, go to ④ Connect to PostgreSQL with pgAdmin or ⑦ Connect to any database with DBeaver.
If you have installed xDM on a local machine, connect to the database using the default or universal client:
- For PostgreSQL: go to ④ Connect to PostgreSQL with pgAdmin or ⑦ Connect to any database with DBeaver.
- For Oracle: go to ⑤ Connect to Oracle with SQL Developer or ⑦ Connect to any database with DBeaver.
- For SQL Server: go to ⑥ Connect to SQL Server with SQL Server Management Studio or ⑦ Connect to any database with DBeaver.
Amazon Web Services (AWS) and Microsoft Azure apply default security practices to lock down access to your virtual machine and the PostgreSQL database that is installed on it.
However, to access the PostgreSQL database and perform tasks such as querying and loading data via the SQL API, you need to:
- Configure inbound rules on the virtual machine hosting the database to allow SSH connection.
- Configure your SQL client to connect using an SSH tunnel through the dedicated port.
This section describes how to configure inbound rules on AWS and Azure. The activation of the SSH tunnel is described in the sections dedicated to pgAdmin and DBeaver configuration.
Configure the inbound rules on AWS
In the case of AWS, connecting remotely requires adding two inbound rules to your AWS security group to allow SSH and PostgreSQL access:
- Navigate to the Amazon EC2 Console.
- In the navigation panel, under Network & Security, choose Security Groups.
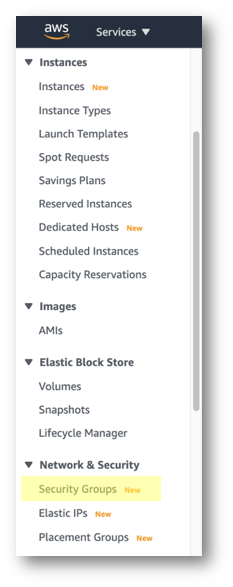
- Click on Security Group ID to retrieve the security group for your instance in the list.
- On the main page of your security group, click Edit inbound rules.
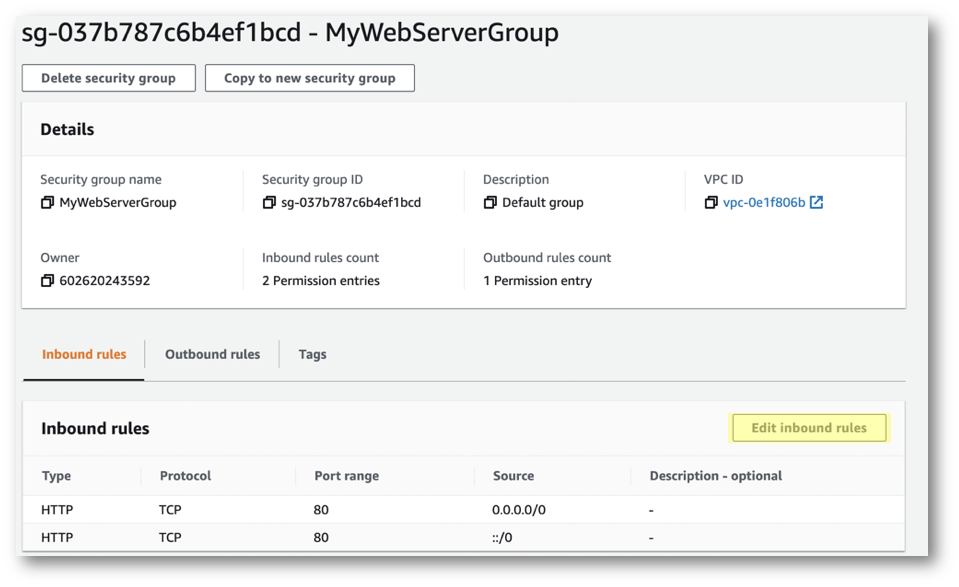
- Click Add rule to add the first rule.
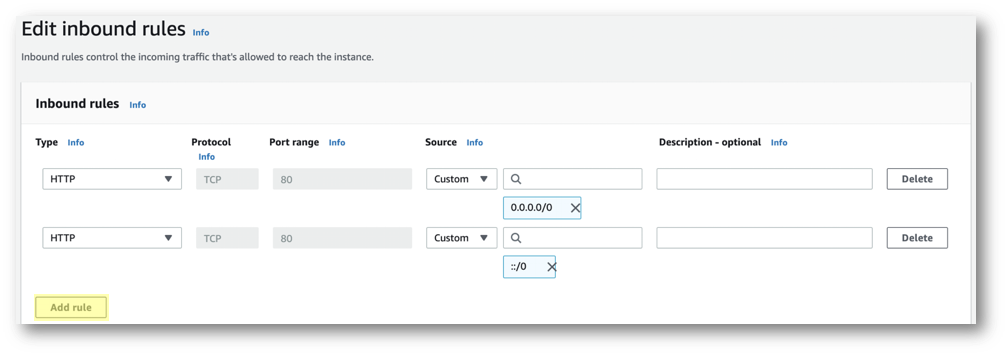
- Enter the following parameters:
- Type: SSH
- Port:
22(pre-selected) - Source: My IP

Skip ahead to ⓸ Connect to PostgreSQL with pgAdmin or ⓻ Connect to any database with DBeaver, depending on the SQL client you are using.
Configure the inbound rules on Azure
In the case of Azure, connection through the SSH port (22) is enabled by default. In this section, you will check that SSH connections have not been restricted, and enable them if needed only.
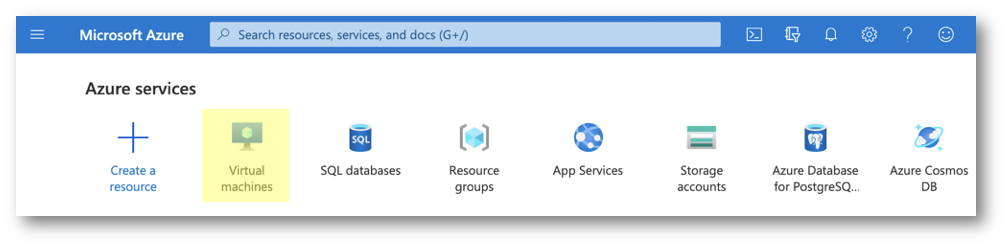
- Navigate to the Azure Portal.
- On the button bar, click the Virtual Machines button.
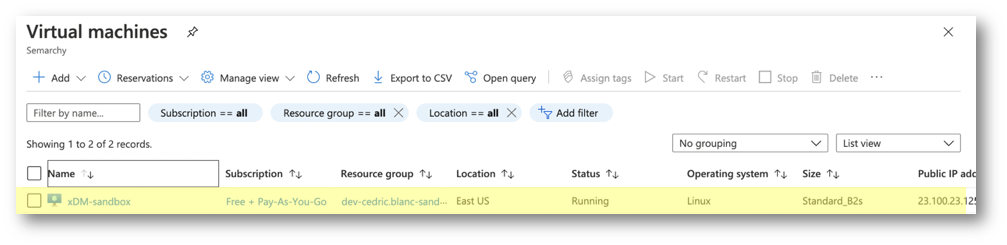
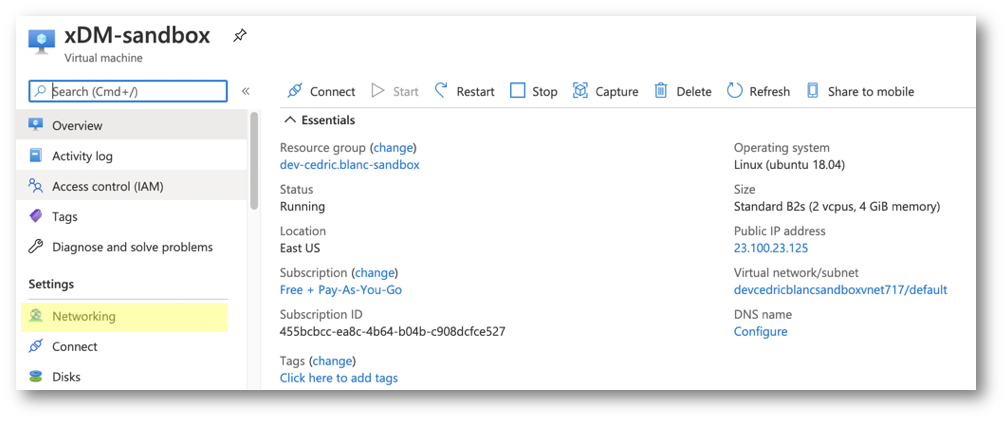
- Click on the name of your virtual machine.
- Click Networking in the left menu to access network settings.
- The list of existing inbound port rules is displayed. Check if connection using port 22 (SSH) is enabled for any source, or at least your IP.
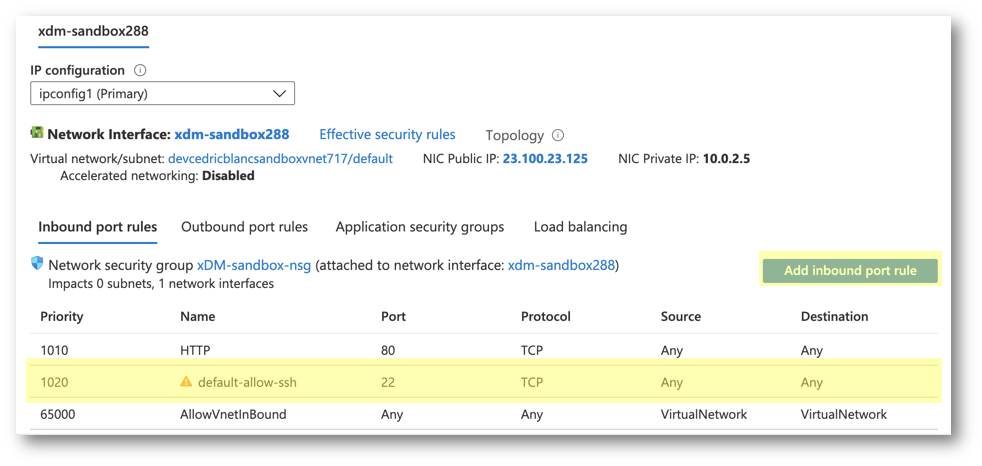
- If no rule exists for port 22, click the Add inbound port rule button to add a new rule for the SSH port and enter the following parameters:
- Source: IP Addresses (recommended) or Any (all sources)
- Source IP addresses:
{your IP address or range of IP you want to grant access to} - Destination: Any
- Destination port ranges:
22 - Protocol: TCP
- Name:
SSH
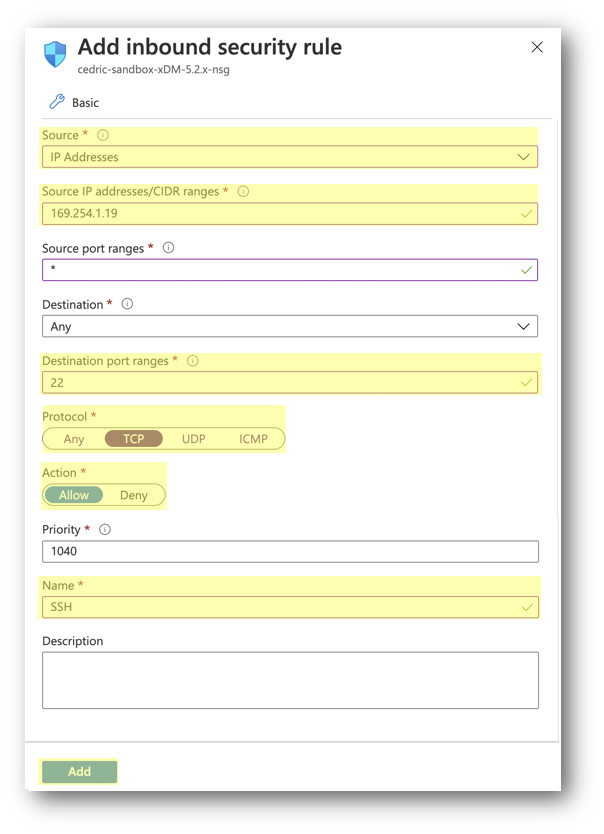
- Click the Add button to finalize the creation of your security rule.
Congratulations!
You have successfully enabled remote connections to PostgreSQL.
Next, you will connect to the database using pgAdmin. If you want to connect using DBeaver instead, go to ⑦ Connect to any database with DBeaver.
In this section, you will add two connections in pgAdmin to access the repository and data location schemas for PostgreSQL.
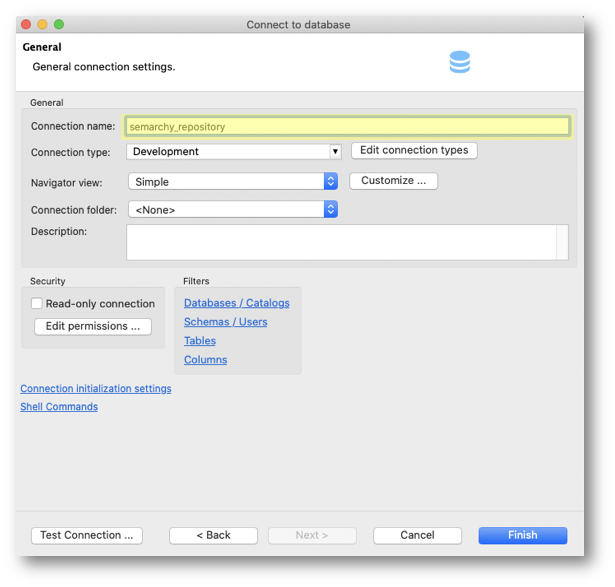
Configure the connection for the Semarchy repository
Adding a connection for semarchy_repository lets you access xDM metadata.
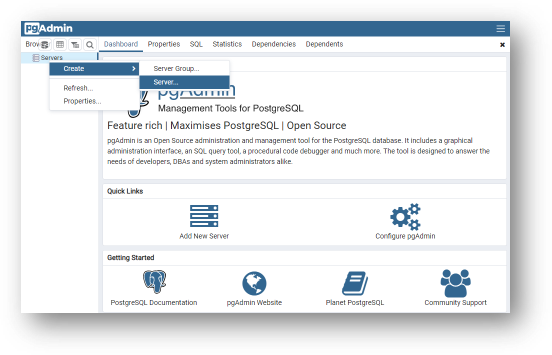
- Right-click on Servers and select Create > Server.
- Name the connection after the schema name (i.e.,
semarchy_repository).
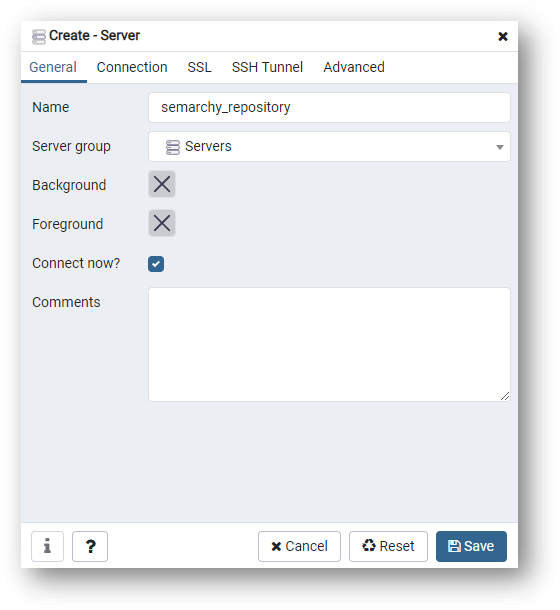
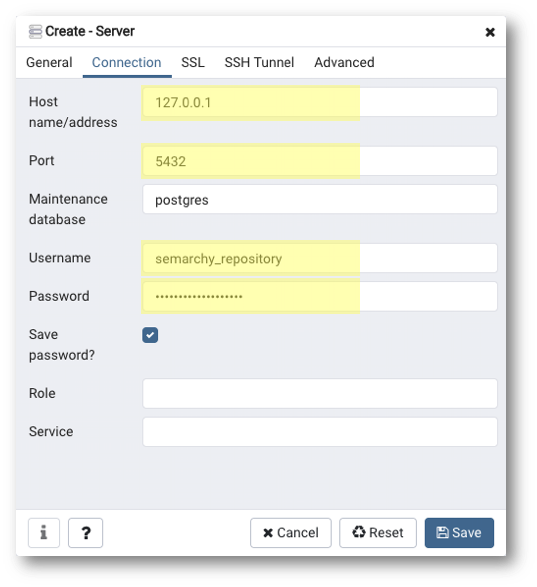
- Click Connection and enter the following connection parameters:
- Host:
{hostname or IP address of the database server}
- For an install on-premises, enter the hostname or IP address of the machine hosting the database server (use127.0.0.1if you have it installed on your local machine).
- For the AWS/Azure Quickstart virtual machine, set this value to127.0.0.1. You will configure an SSH tunnel into the virtual machine. - Port:
{port for the database instance}(5432by default) - Username:
semarchy_repository - Password:
{your password as per your database setup}(by default: same as username)
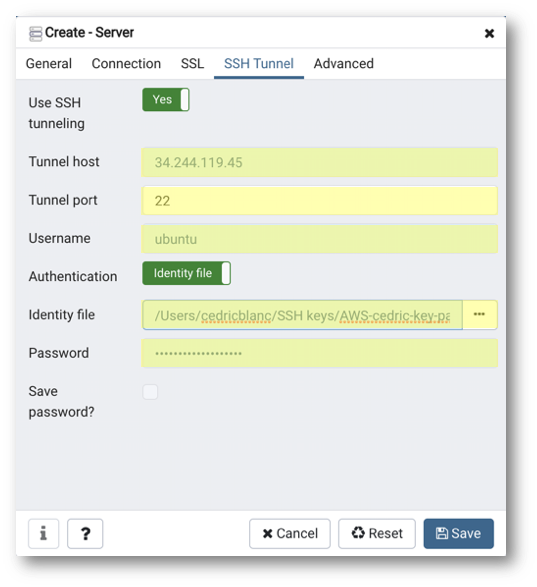
- (Optional) If your database is hosted on an Azure or AWS server, you need to connect using an SSH tunnel. Navigate to the SSH Tunnel tab and enter the following parameters:
- Use SSH tunneling: Yes
- Tunnel host: IP address or DNS name of remote server
- Tunnel port:
22 - Username:
ubuntu - Authentication: Identity file
- Identity file: click the [...] button to select the key pair file you have downloaded during the creation of your remote AWS or Azure instance.
- Password:
{your password for semarchy_repository}(by default: same as username)
- Click Save to finalize the creation of your new connection.
Configure the connection for the data location
Repeat the same operations to add a connection for semarchy_customer_b2c_mdm. This lets you access the data location where business data is stored.
- Right-click on Servers and select Create > Server.
- Name the connection after the schema name (i.e.,
semarchy_customer_b2c_mdm).
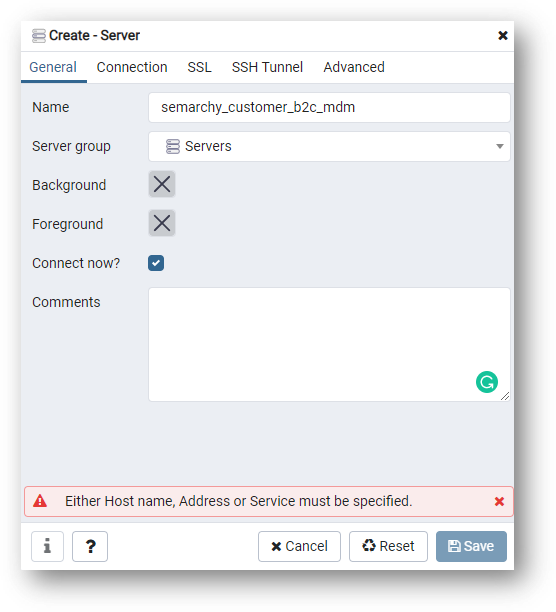
- Enter the parameters for connection on the Connection tab:
- Host:
{same host as for thesemarchy_repositoryconnection} - Port:
{same port as for thesemarchy_repositoryconnection} - Username:
semarchy_customer_b2c_mdm - Password:
{your password as per your database setup}(by default: same as username)

- (Optional) If your database is hosted on an Azure or AWS server, navigate to the SSH Tunnel tab and enter the following parameters:
- Use SSH tunneling: Yes
- Tunnel host:
{IP address or DNS name of remote server} - Tunnel port:
22 - Username:
ubuntu - Authentication: Identity file
- Identity file: click the [...] button to select the key pair file you have downloaded during the creation of your remote AWS or Azure instance.
- Password:
{your password for semarchy_customer_b2c_mdm}(by default: same as username)
- Click Save to finalize the creation of this second connection.
Congratulations!
Now that you have successfully established connections to PostgreSQL schemas, jump to ⑧ Browse the database objects.
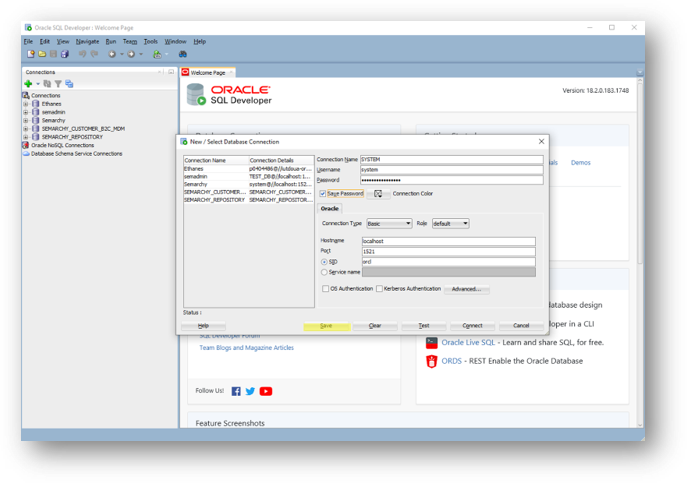
In this section, you will add two connections in SQL Developer to access the repository and data location schemas for Oracle, in addition to the SYSTEM connection.
- Add a connection for SYSTEM. This gives you DBA access to the database.
- Enter the following parameters:
- Connection name:
SYSTEM - Username:
system - Password:
{your password as per your database setup}(by default: same as username) - Hostname:
{hostname or IP address of the database server}(use127.0.0.1if you have it installed on your local machine) - Port:
{port for the database instance}(1521by default) - SID:
{SID for your database instance}(entered during the initial setup)
- Add a connection for
SEMARCHY_REPOSITORY.
Enter the following parameters:
- Connection name:
SEMARCHY_REPOSITORY - Username:
SEMARCHY_REPOSITORY - Password:
{your password as per your database setup}(by default: same as username) - Hostname:
{same hostname as for theSYSTEMconnection} - Port:
{same port as for theSYSTEMconnection} - SID:
{same SID as for theSYSTEMconnection}
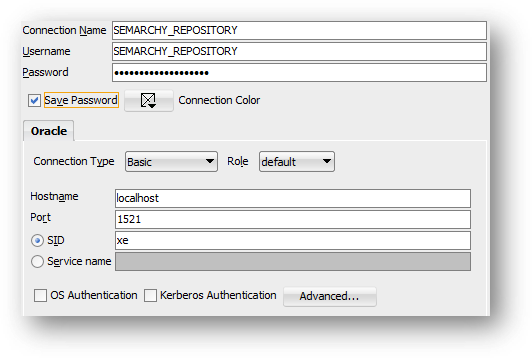
This lets you access xDM metadata.
- Add a connection for
SEMARCHY_CUSTOMER_B2C_MDM.
- Connection name:
SEMARCHY_CUSTOMER_B2C_MDM - Username:
SEMARCHY_CUSTOMER_B2C_MDM - Password:
{your password as per your database setup}(by default: same as username) - Hostname:
{same hostname as for theSYSTEMconnection} - Port:
{same port as for theSYSTEMconnection} - SID:
{same SID as for theSYSTEMconnection}
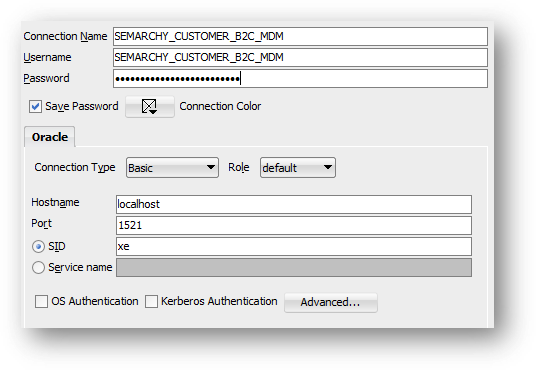
This lets you access the data location where business data is stored.
Congratulations!
Now that you have successfully established connections to Oracle schemas, jump to ⑧ Browse the database objects.
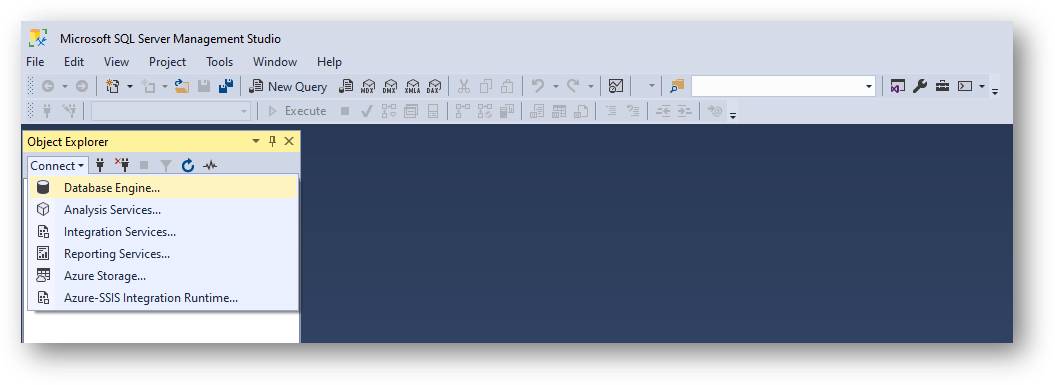
In this section, you will add two connections in SQL Server Management Studio to access the repository and data location schemas.
- In Object Explorer, click Connect and then Database Engine.
- Enter the following parameters:
- Server name:
{hostname or IP address of the database server}(use127.0.0.1if you have it installed on your local machine) - Authentication: SQL Server Authentication
- Login:
SEMARCHY_REPOSITORY - Password:
{your password as per your database setup}(by default: same as login)
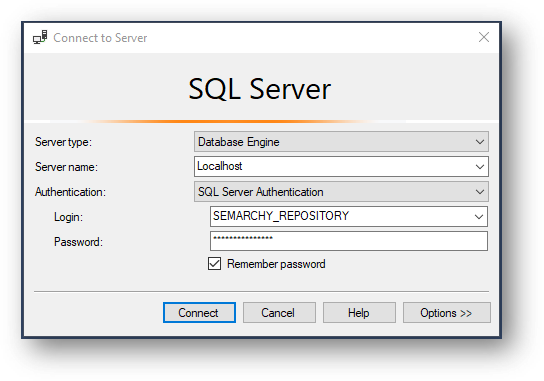
- Click Connect to test the connection.
- Repeat operations 1, 2, and 3 to add the second connection using the following parameters:
- Server name:
{same server name as for theSEMARCHY_REPOSITORYconnection} - Authentication: SQL Server Authentication
- Login:
SEMARCHY_CUSTOMER_B2C_MDM - Password:
{your password as per your database setup}(by default: same as login)
Congratulations!
Now that you have successfully established connections to SQL Server schemas, jump to ⓼ Browse the database objects.
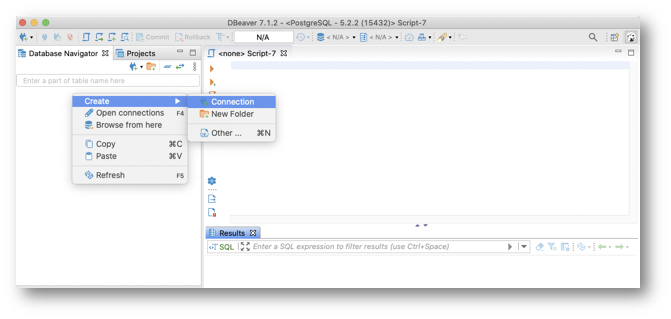
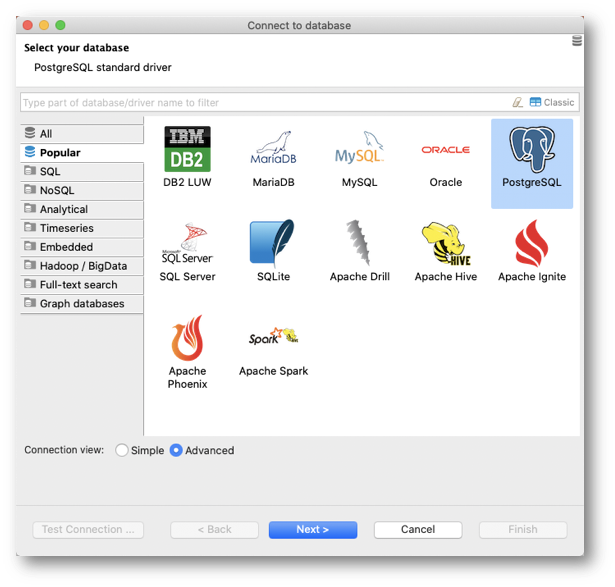
DBeaver allows you to connect to any database (PostgreSQL, Oracle, SQL Server, etc.). The following screenshots are showing PostgreSQL but can be easily adapted to other databases.
In this section, you will add two connections:
- One for
semarchy_repositoryto access xDM metadata. - One for
semarchy_customer_b2c_mdmto access data locations where business data is stored.
Configure the connection for the Semarchy repository
- In the Database Navigator tree view, right-click on the blank area and select Create > Connection.
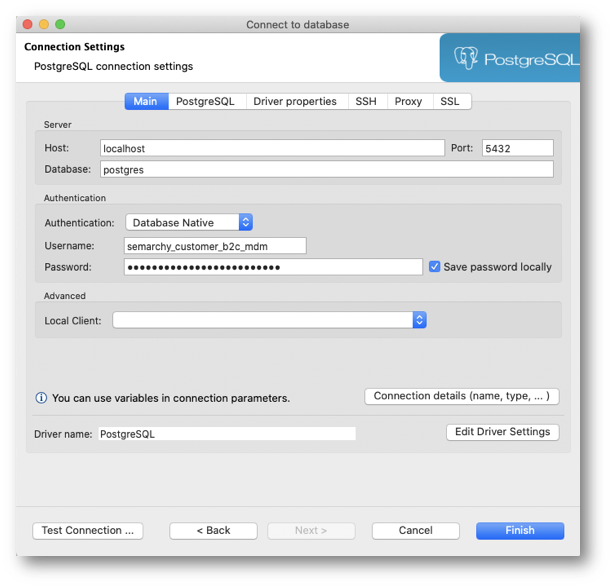
- Select your database type (in the screenshot below: PostgreSQL) and click Next.
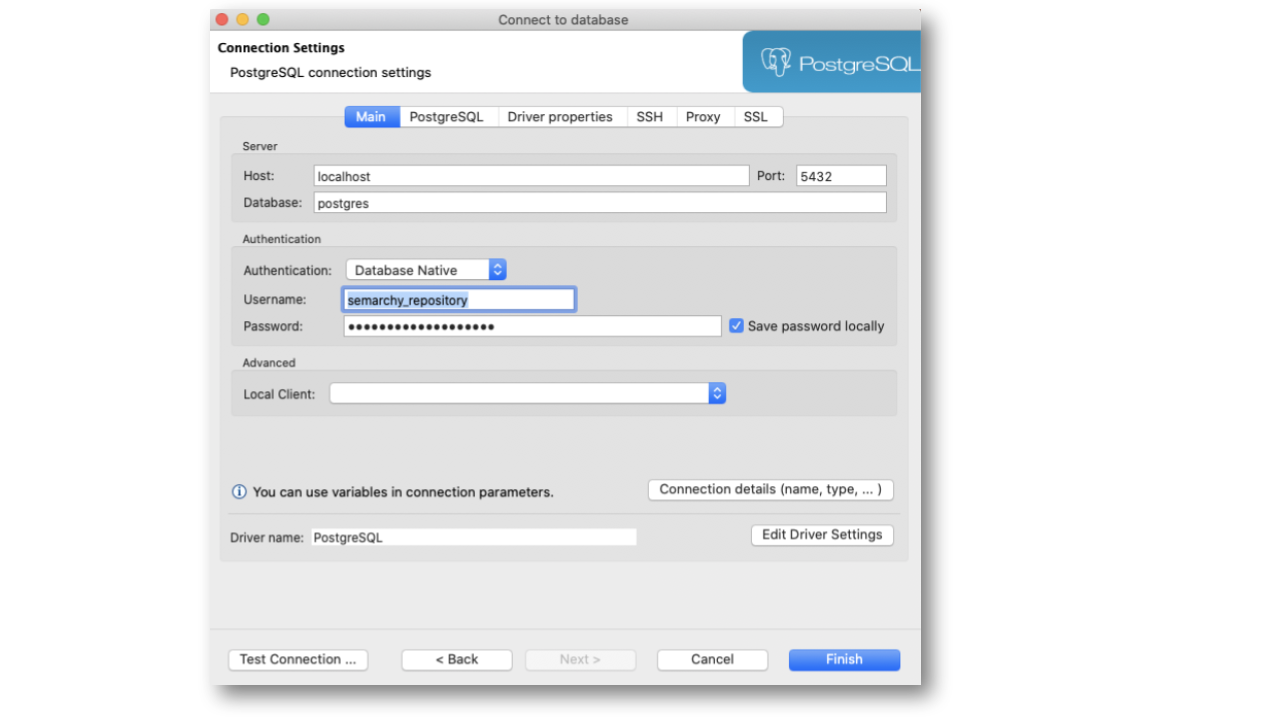
- Enter the following connection parameters:
- Host:
{hostname or IP address of the database server}
- For an install on-premises, the hostname or IP address of the machine hosting database server (use127.0.0.1if you have it installed on your local machine)
- For the AWS/Azure Quickstart virtual machine, set this value to127.0.0.1. You will configure an SSH tunnel into the virtual machine. - Port:
{port for the database instance}(by default,5432for PostgreSQL,1521for Oracle, and1433for SQL Server) - Username:
semarchy_repository - Password:
{your password as per your database setup}(by default: same as username)
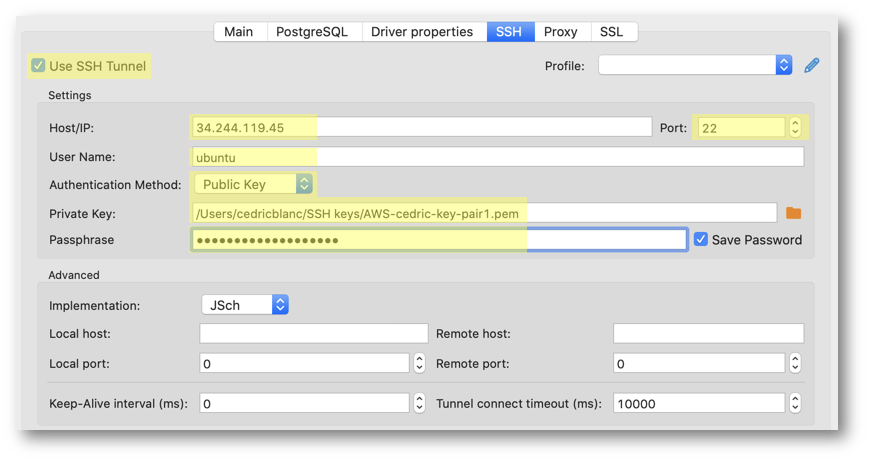
- (Optional) If your database is hosted on an Azure or AWS server, you need to connect using an SSH tunnel. Navigate to the SSH tab and enter the following parameters:
- Use SSH Tunnel: Yes
- Host/IP:
{IP address or DNS name of the remote server} - Port:
22 - Username:
ubuntu - Authentication method: Public key
- Private Key: click the Browse button to select the key pair file you have downloaded during the creation of your remote AWS or Azure instance
- Passphrase:
{your password for semarchy_repository}(by default: same as username)
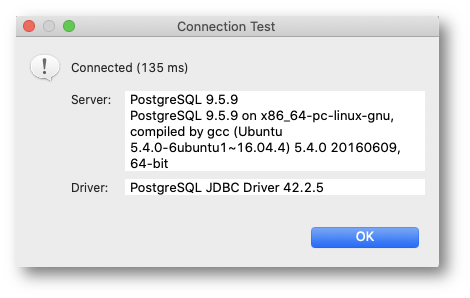
- Click Test Connection and check whether the connection is working. If not, check the parameters again (host, port, username, and password).
- Back to the connection parameters page, click Connection details (name, type, ...).
- Name the connection after the schema name (i.e.,
semarchy_repository). - Click on Finish.
- Click the OK button to save the connection.
Configure the connection for the data location
Repeat the same operations to add a connection for semarchy_customer_b2c_mdm:
- In the Connection Settings window, access the Main tab and enter the following connection parameters:
- Host:
{same hostname as for thesemarchy_repositoryconnection} - Port:
{same port as for thesemarchy_repositoryconnection} - Username:
semarchy_customer_b2c_mdm - Password:
{your password as per your database setup}(by default: same as username)
- If your database is hosted on an Azure or AWS server, you need to connect using an SSH tunnel: navigate to the SSH tab and enter the following parameters:
- Use SSH Tunnel: Yes
- Host/IP:
{IP address or DNS name of the remote server} - Port:
22 - Username:
ubuntu - Authentication method: Public key
- Private Key: click the Browse button to select the key pair file you have downloaded during the creation of your remote AWS or Azure instance.
- Password:
{your password for semarchy_customer_b2c}(by default: same as username)
- Click Test Connection and check the connection is working. If not, check the parameters again (host, port, username, and password).
- Name the connection after the schema name (i.e.,
semarchy_customer_b2c_mdm). - Click OK to finalize the creation.
Congratulations!
Now that you have successfully established connections to the database schemas, you are ready to have a look at the database objects.
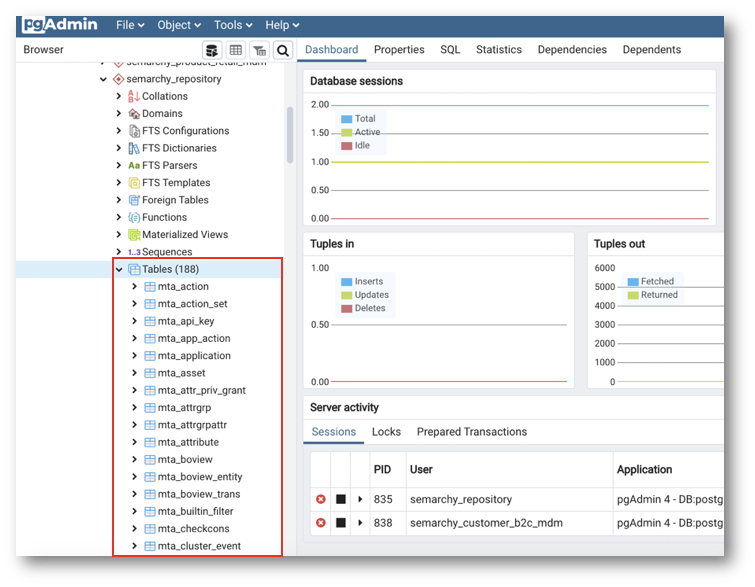
- Open the
semarchy_repositoryconnection and go to databases > postgres > schemas in the left navigation panel. - Browse the
semarchy_repositoryschema and unfold the Tables element.
This schema is composed of technical tables which contain xDM metadata.
- Under the
customer_b2c_mdmconnection, thecustomer_b2c_mdmschema contains all tables of the data location used by the Customer B2C demo application.
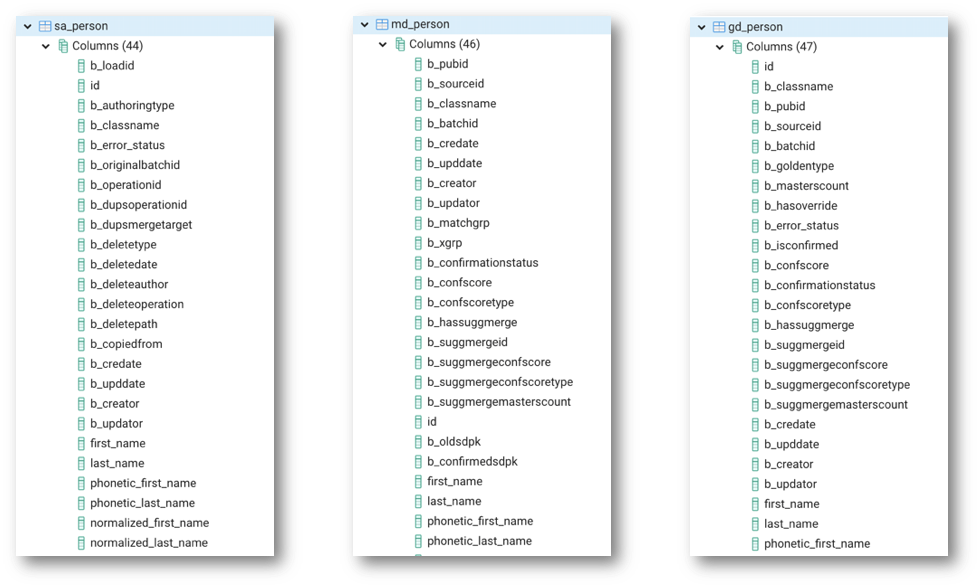
Below are the tables that contain business data for each entity (Nickname, Person, Person_Product, Product, etc.).
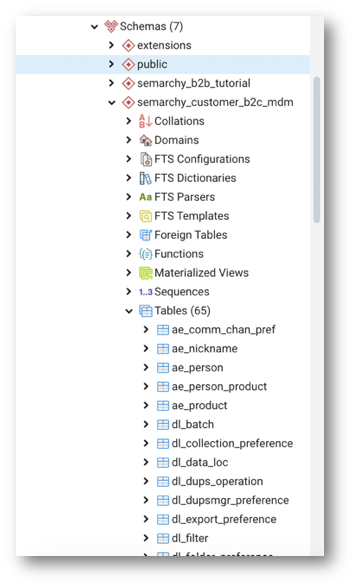
- Observe that table names include:
SD_xxx: source dataSA_xxx: source authoring dataMD_xxx: master dataGD_xxx: golden data
- Observe that the column structure differs across the SD/SA/MD/GD/... tables.
Well done! In this first unit of the Data Publishing & Consumption track, you have learned how to configure an SQL client for Semarchy xDM. You are now ready to query and load data using the SQL API.
Learning recap
- You have selected an SQL client.
- You have opened a remote access (if required).
- You have set up your SQL client to access the database, including adding schema connections.
- You have discovered database objects.
Next steps
In the next unit of the Data Publishing & Consumption track, Query data via the SQL API, you will learn how to query data in xDM via the SQL API. You will learn basic and advanced queries as well as integration concepts, such as the difference between fuzzy-matching and basic entities.
To explore other resources, return to the Tutorials menu.
Thank you for completing this tutorial.