| This is documentation for Semarchy xDM 2024.1, which is no longer actively maintained. For more information, see our Global Support and Maintenance Policy. |
Workflow administration
This page describes how to administer workflows.
|
Data-driven workflows, available in Semarchy xDM 2023.1 and later, are subject to specific licensing requirements; please confirm your eligibility to use such new functionality by consulting your license agreement or by contacting your Semarchy account representative prior to use. All customers can still use the workflow feature available in previous versions (now known as legacy workflows). For more information, see Workflows (legacy). |
Authentication and privileges
Applications or users administrating workflows in Semarchy xDM using the API and the user interface must be authenticated and meet one of the following criteria:
-
Have one role with the Grant full access to the model option selected in the model privileges.
-
Have the Workflow Administrator role, as defined in the workflow definition.
-
Be either the initiator of the workflow instance, or a candidate or an assignee of any user task of the workflow instance (applies to workflow administration REST API, for read-only endpoints only—that is, list or get workflow instances, list or get user task instances).
Workflow administration UI
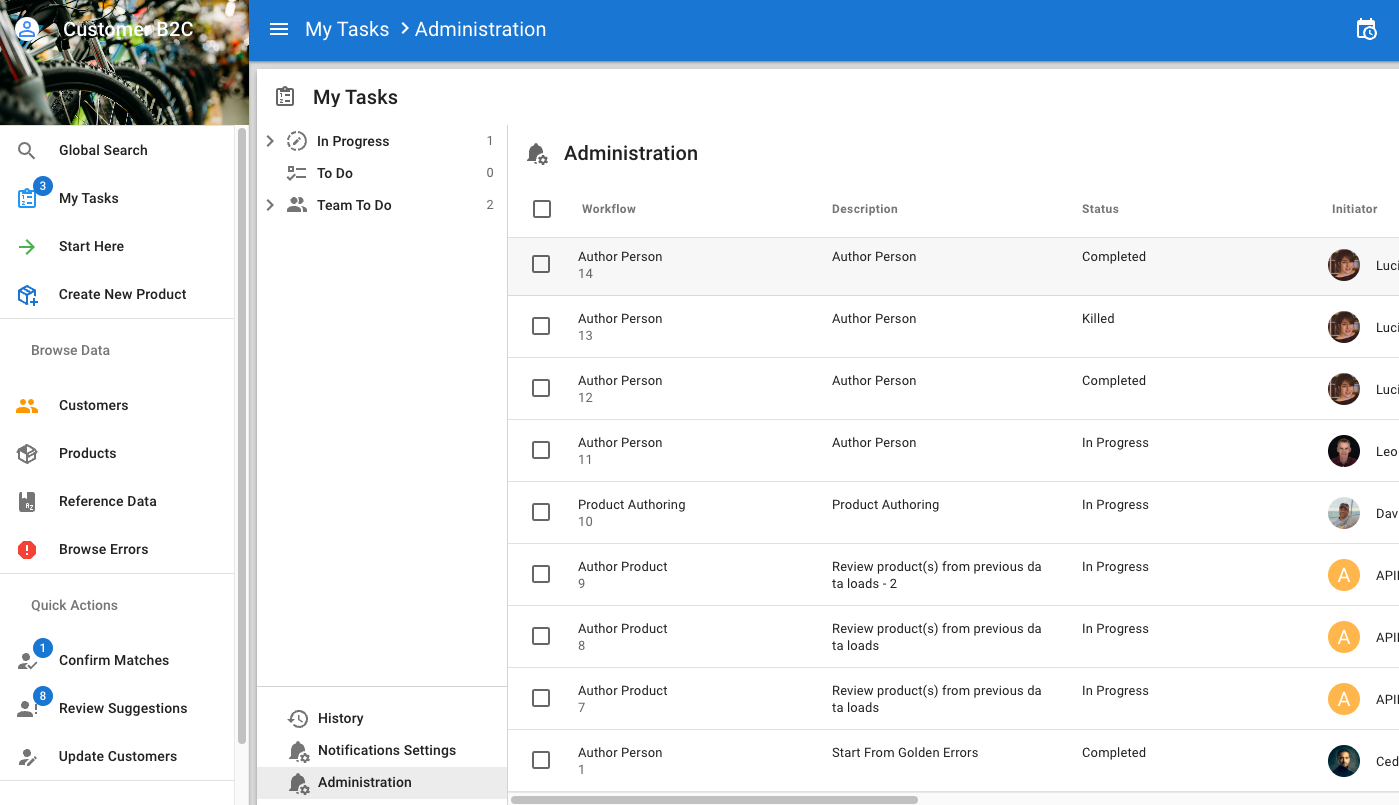
Access the workflow administration section
The workflow administration section is available from My Tasks, by clicking the Administration vertical tab at the bottom of the editor navigation panel.
This section presents the list of workflow instances. The list can be filtered based on the workflow instance ID and the workflow instance status.
You can also access the Administration section using the following URLs:
| View | URL |
|---|---|
Administration section with no filter |
|
Specific search results |
|
Specific workflow instance view |
|
Specific workflow instance editor with a step |
|
Workflow instance list
The workflow administration section displays the list of workflow instances in a tabular format with the following columns:
| Column | Description |
|---|---|
Workflow |
Label of the workflow definition and identifier of the instance. |
Description |
Description of the workflow instance. |
Status |
|
Initiator |
Initiator of the workflow instance. |
Current Root Step |
Step in progress in the given workflow instance. |
Assigned To |
Assignee of the step in progress. If the current root step is part of a parallel block, then this column is empty. |
Start Date |
Start date of the workflow instance. |
End Date |
End date of the workflow instance. |
Due Date |
Due date to complete the workflow instance. |
Priority |
|
Workflow ID |
Identifier of the workflow instance. |
Actions
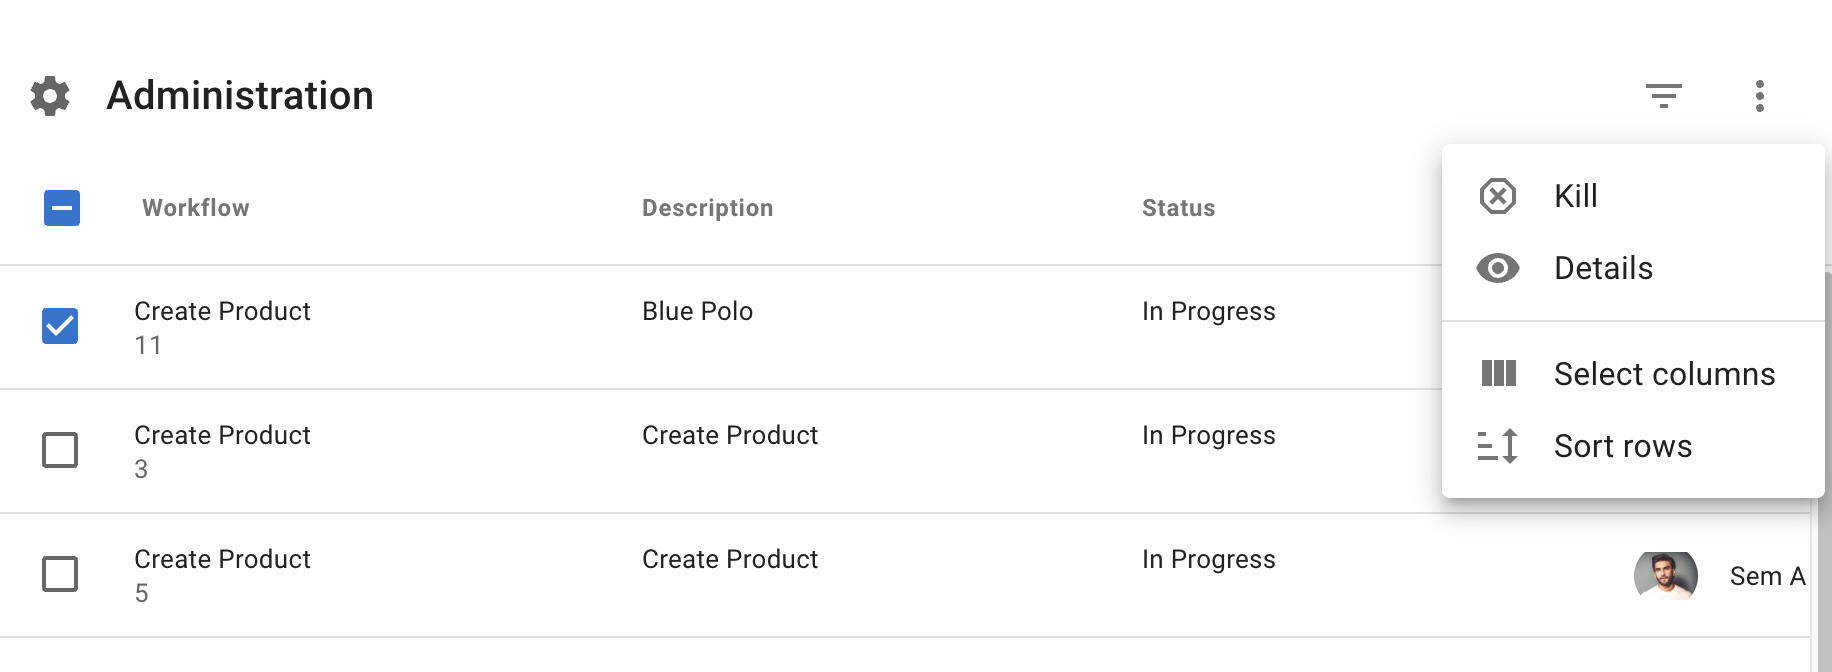
From the Administration section’s ![]() Options menu, you can perform the following actions on the workflow instances:
Options menu, you can perform the following actions on the workflow instances:
-
Kill a workflow instance: select the workflow that you want to cancel and select Kill. The step at which the workflow instance was cancelled is represented with the
 Killed icon.
 -
Examine workflow instance details: click any workflow in the list to open its details, or select a workflow and click Details in the action menu. This opens the workflow details view.
-
Customize the column arrangement: click Select columns, then select or deselect items and drag them up or down to rearrange the columns in the table based on what matters most to you.
-
Sort rows in the table view: click Sort rows and select the columns used to sort, as well as their sort order.
Workflow details view
The workflow details view features a workflow history diagram and a workflow details section.
By default, this section shows general information about the workflow instance. To examine a specific step’s details, click on one of the step icons in the diagram. To return to the overall instance details, simply click on a blank space around the diagram.
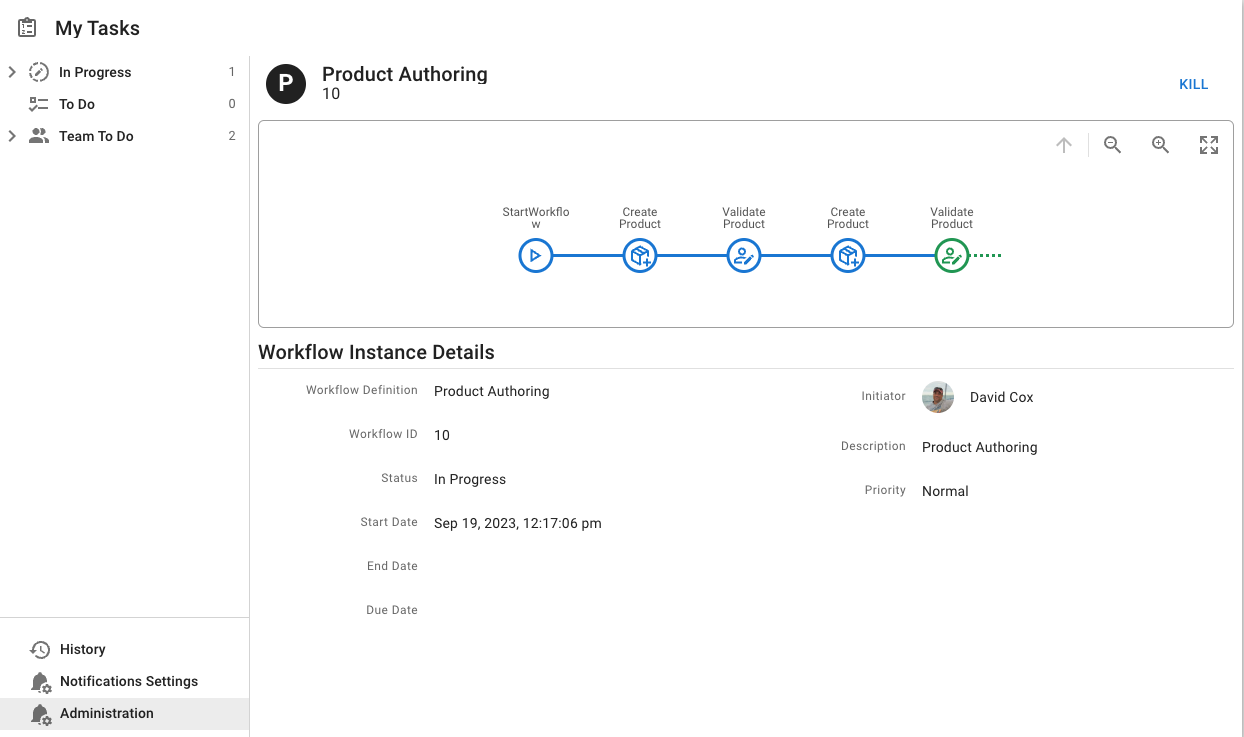
Workflow history diagram
This graphical view is titled with the label of the selected workflow, and displays the completed and ongoing step(s) of the workflow instance as a diagram.
Click a step to view its details. The selected step appears with a scaled-up icon.
In the diagram, you can perform the following actions:
-
 Back to workflow instance: unselect a selected step and return to the workflow instance.
 -
 Zoom out: zoom out of the diagram.
 -
 Zoom in: zoom in on the diagram.
 -
 Fit to page: fit the diagram into the page.
Workflow instance details
This panel displays the details of a workflow instance:
| Property | Description |
|---|---|
Workflow Definition |
Label of the workflow definition. |
Workflow ID |
Identifier of the workflow instance. |
Status |
Status of the workflow instance (see the list of possible values). |
Start Date |
Date and time when the workflow instance was initiated. |
End Date |
Date and time when the workflow instance was completed. |
Due Date |
Date and time when the workflow is expected to be completed. |
Initiator |
The avatar and name (or username) of the user who initiated the instance. |
Description |
Description of the instance that can be specified in the workflow startup dialog. |
Priority |
Priority of the instance, defined by the initiator in the workflow startup dialog (see the list of possible values). |
Step details
This panel is titled with the name of the selected step, and presents the following information:
| Property | Description |
|---|---|
Step Type |
Type of step as defined in the workflow. |
Step ID |
Identifier of the step in the workflow. |
Status |
Status of the step. Possible values are Initializing, Completed, In Progress, Killed, or In Error. |
Error |
(Only available if the status of the step is In Error.) |
Start Date |
Date and time when the user started working on the step. |
End Date |
Date and time when the step was completed. |
The following details are displayed for start events:
| Property | Description |
|---|---|
Initiator |
Name of the user who initiated the workflow. |
Description |
Description added by the initiator when starting the workflow. |
The following details are displayed for user tasks:
| Property | Description |
|---|---|
Creation Date |
Date and time when the step was created. |
Assignee |
Name of the user to whom the step is currently assigned. |
Candidate Assignee(s) |
Name of the users who can claim this user task. |
Transition |
(Empty if the user task is in progress.) |
The following detail is displayed for routes:
| Property | Description |
|---|---|
Selected Route |
Name of the route into which the workflow progressed. |
The following details are displayed for parallel blocks:
| Property | Description |
|---|---|
Parallel Block |
Name of the parallel block. |
Branches |
Names of the branches in the parallel block. |
Depending on the selected step, the following actions may be available:
| Action | Description |
|---|---|
|
This action is available for a step in error within a workflow that has not been killed. The administrator can restart the workflow from the failed step. |
|
This action is available for unassigned user tasks. The administrator can refresh the list of potential candidates following updates to assignment criteria or changes in user roles or eligibility since the task’s creation. |
|
This action is available for assigned user tasks. The administrator can release a task to assign it to another user. |
|
This action is available for a user task that has been released (i.e., no longer assigned to a user). The administrator can assign the task to another candidate. |
Workflow administration REST API
The following API endpoints are available to administer workflows:
-
Workflow Definitions:
-
Start workflow instances.
-
-
Workflow Instances:
-
List and get workflow instances.
-
Kill a workflow instance.
-
Retry a specific failed step of a workflow instance.
-
-
User Task Instances:
-
List and get user task instances.
-
Assign a user task.
-
Release a user task.
-
Refresh the list of candidates for a given user task.
-
| For a complete description of each API endpoint, see the REST API documentation. |
Workflow data and metadata purge
The purge schedule of workflow metadata and workflow step data depends on the retention policy of a given workflow definition.
By default, workflow metadata and workflow step data are configured to be purged every day at midnight.
To override the default purge schedule, workflow designers can configure the xdm.workflow.purgejobs.cronSchedule property in the startup configuration using cron expressions.
Example
xdm.workflow.purgejobs.cronSchedule = 0 0 0 LW * ? *This configuration schedules purges on the last weekday of the month at midnight for all data locations.
|
If you choose to set the startup configuration using Java system properties, make sure to use the appropriate syntax (i.e., single quotes around the cron expression, and no spaces before and after the equal sign). For example, the following parameter will schedule purges in all data locations on the first day of every month at midnight:
|