Automations
Automation steps perform automated actions in workflows.
|
Data-driven workflows, available in Semarchy xDM 2023.1 and later, are subject to specific licensing requirements; please confirm your eligibility to use such new functionality by consulting your license agreement or by contacting your Semarchy account representative prior to use. All customers can still use the workflow feature available in previous versions (now known as legacy workflows). For more information, see Workflows (legacy). |
The operations performed by an automation depend on its type. The following automation types are available in Semarchy xDM:
-
Call Procedure: invokes a predefined database procedure to incorporate custom data manipulations within the workflow.
-
Delete Data: flags records for deletion within a specific root entity in the current workflow dataset.
-
Send Email: sends customizable emails to one or multiple recipients. The email subject, body, and recipients are data-driven.
-
Set Workflow Metadata: dynamically sets one or multiple specified workflow properties.
-
Submit Data: publishes data to the hub by running the certification process.
Add an automation step
To add an automation step:
-
Click
 Create Step.
The Add a Step dialog appears. -
From the Type drop-down list, select Automation.
-
In the Name field, enter a name for this automation step.
-
Click Create.
A new step icon appears on the workspace:
-
Double-click the step you just added.
A side panel sweeps in. -
Set the general properties:
Automation step general properties Property Required Description Label
Required
Label displayed for the automation step.
Icon
Optional
Image displayed on the automation step in the workflow diagram. The
 Select an image button allows browsing and selecting an image from the image library.
Automation Type
Required
Type of automation. Available options are:
-
Call Procedure: invokes a database procedure that is declared within the model.
-
Delete Data: flags records in the current dataset for deletion. Workflow designers can define precise criteria using SemQL conditions to target specific records or data for deletion.
-
Send Email: sends a configurable email to a list of recipients. Emails are sent using the first default SMTP notification server.
-
Set Workflow Metadata: dynamically sets specified workflow properties within the workflow definition using SemQL.
-
Submit Data: runs the current dataset through the certification process.
-
-
Set the specific properties depending on the selected automation type. See Configure a Send Email automation or Configure a Submit Data automation.
-
Set the Transition properties:
Automation step transition properties Property Required Description To Step
Required
Step that should follow the current automation step.
Label
Optional
Label displayed for the transition of the automation step. This label appears in the workflow diagram.
Configure a Call Procedure automation
The following properties are available to configure a Call Procedure automation:
| Property | Required | Description | ||
|---|---|---|---|---|
Procedure Name |
Required |
Name of the database procedure to execute.
|
||
Procedure Arguments |
Required |
One or more parameters passed to the procedure when it is called.
|
Configure a Delete Data automation
The following properties are available to configure a Delete Data automation:
| Property | Required | Description | ||
|---|---|---|---|---|
Root Entity |
Required |
Root entity of the records to delete.
|
||
Condition For Deletion |
Optional |
Condition the records must meet to be deleted. |
||
Delete Type |
Required |
Type of deletion to perform. Available options are:
For more information, see Record deletion. |
||
Delete Author |
Required |
Username of the user identified as responsible for initiating the deletion process on the deleted records. |
The Delete Data automation enables the creation of workflows dedicated to reviewing and approving record deletion requested by end-users. In its most basic form, a workflow definition for this process would consist of the following steps:
-
A start event configured to initiate the workflow from a selection of records.
-
A user task for reviewing the deletion requests, configured as follows:
-
Task Type: select Data Authoring.
-
Stepper: select a stepper with its Form Fields Mode property set to Force-Read-Only for all steps.
This configuration would allow task assignees to examine the content of the records marked for deletion while preventing unintended alterations to the data that are about to be deleted.
-
-
A Delete Data automation that identifies the data to delete and initiates the appropriate actions based on the corresponding entity’s record deletion configuration.
-
A Submit Data automation to remove the deleted data from the hub.
-
An end event to conclude the deletion approval process.
Configure a Send Email automation
The following properties are available to configure a Send Email automation:
| Property | Required | Description |
|---|---|---|
Application |
Required |
Application that sends this email. The application branding is used in the layout of emails using the HTML - Preformatted content type. |
Reply-To |
Optional |
Sender’s email address. If this property is not set, the From User property of the default SMTP notification server is used. |
Sender Name |
Optional |
Sender’s display name. |
Recipients |
Required |
List of email recipients. At least one recipient must be configured. See Email recipients. |
Recipients Max Count |
Required |
Maximum number of recipients for an email (defaults to 1,000). If Fail On Error is selected and this maximum number is reached while building the list of recipients, the step fails and no email is sent. Fail On Error is not selected, emails are only sent to the first |
Custom Parameters |
Optional |
Allows defining parameters you can use in the email body. See Email parameters. |
Subject |
Required |
Email subject line. It can use built-in and custom parameters. Click |
Content Type |
Required |
Defines the email body content type:
|
Body |
Required |
Email body. The body can contain built-in and custom parameters. Click |
Fail On Error |
Required |
Defines whether the step must fail if an error occurs while building the list of recipients or sending emails. |
Email recipients
You can define one or multiple recipient configurations for a Send Email automation. Each recipient configuration adds one or multiple email recipients.
To add a recipient configuration:
-
Click the
 Create button next to Recipients.
 -
Enter a Name for this recipient configuration and then click Create.
-
Select a Type and then set the type-specific properties:
-
The SemQL - Emails type sends emails to a list of email addresses. This comma-separated list of email addresses is defined in the SemQL Expression property:
Example. Add a list of emails (SemQL literal) to the recipients'adele.mackson@company.com,john.edelman@company.com' -
The SemQL - Usernames type sends emails to a set of platform users identified by their usernames. This comma-separated list of usernames is defined in the SemQL Expression property:
Example. Add a list of named users—plus the initiator—to the recipients'amackson,jedelman,' || WorkflowInstance.InitiatorName -
The Users from Role type sends emails to all the users having a specific role. This role is defined using the Role property.
-
The Workflow Administrators type sends emails to all the workflow administrators. This includes:
-
Users having one role with Grant full access to the model selected in the model privileges.
-
Users having the role defined as the Workflow Administrator Role in the workflow definition.
-
-
Email parameters
You can use email parameters in a Send Email automation step to insert dynamic content in the email subject and body.
Two types of parameters are available:
-
Built-in parameters are available by default and can be used without any configuration.
-
Custom parameters allow designers to insert specific content into emails, such as record chips or values calculated with SemQL.
You can select both types of parameters in the Email editor when composing the email subject and the body.
Built-in parameters
The following table lists the built-in parameters.
| Name | Description |
|---|---|
|
Current recipient’s first name. This parameter returns a value only if the recipient is an xDM user; it returns an empty value if the recipient is added using a SemQL Emails recipient configuration. |
|
Current recipient’s last name. This parameter returns a value only if the recipient is an xDM user; it returns an empty value if the recipient is added using a SemQL Emails recipient configuration. |
|
Current recipient’s username. This parameter returns a value only if the recipient is an xDM user; it returns an empty value if the recipient is added using a SemQL Emails recipient configuration. |
|
Base URL of the xDM instance. |
Custom parameters
Custom parameters are configurable parameters that designers can use to define data-driven content to insert in emails.
To add a custom parameter:
-
Click the
Create button next to Custom Parameters. -
Enter a Name for the parameter and then click Create.
-
Select a Type and enter the related parameters
-
The SemQL type executes a SemQL expression and uses its value. If this type is selected, open the
 SemQL editor to define the expression.Example. SemQL custom parameter using the workflow initiator name
'Initiated by ' || WorkflowInstance.InitiatorName -
The Records (Chips) type shows records from the current dataset as chips. If this type is selected, set the following properties:
-
Entity: entity from which the record chips must be generated.
-
Max Record Count: maximum number of records to show. Defaults to 1 if the cardinality of the selected entity is Single Record in this workflow definition and to 10 if the cardinality is Multi Record.
-
Max Records Per Row: maximum number of chips per row in the generated email.
-
-
Email editor
The Email editor allows editing the subject and body of emails.
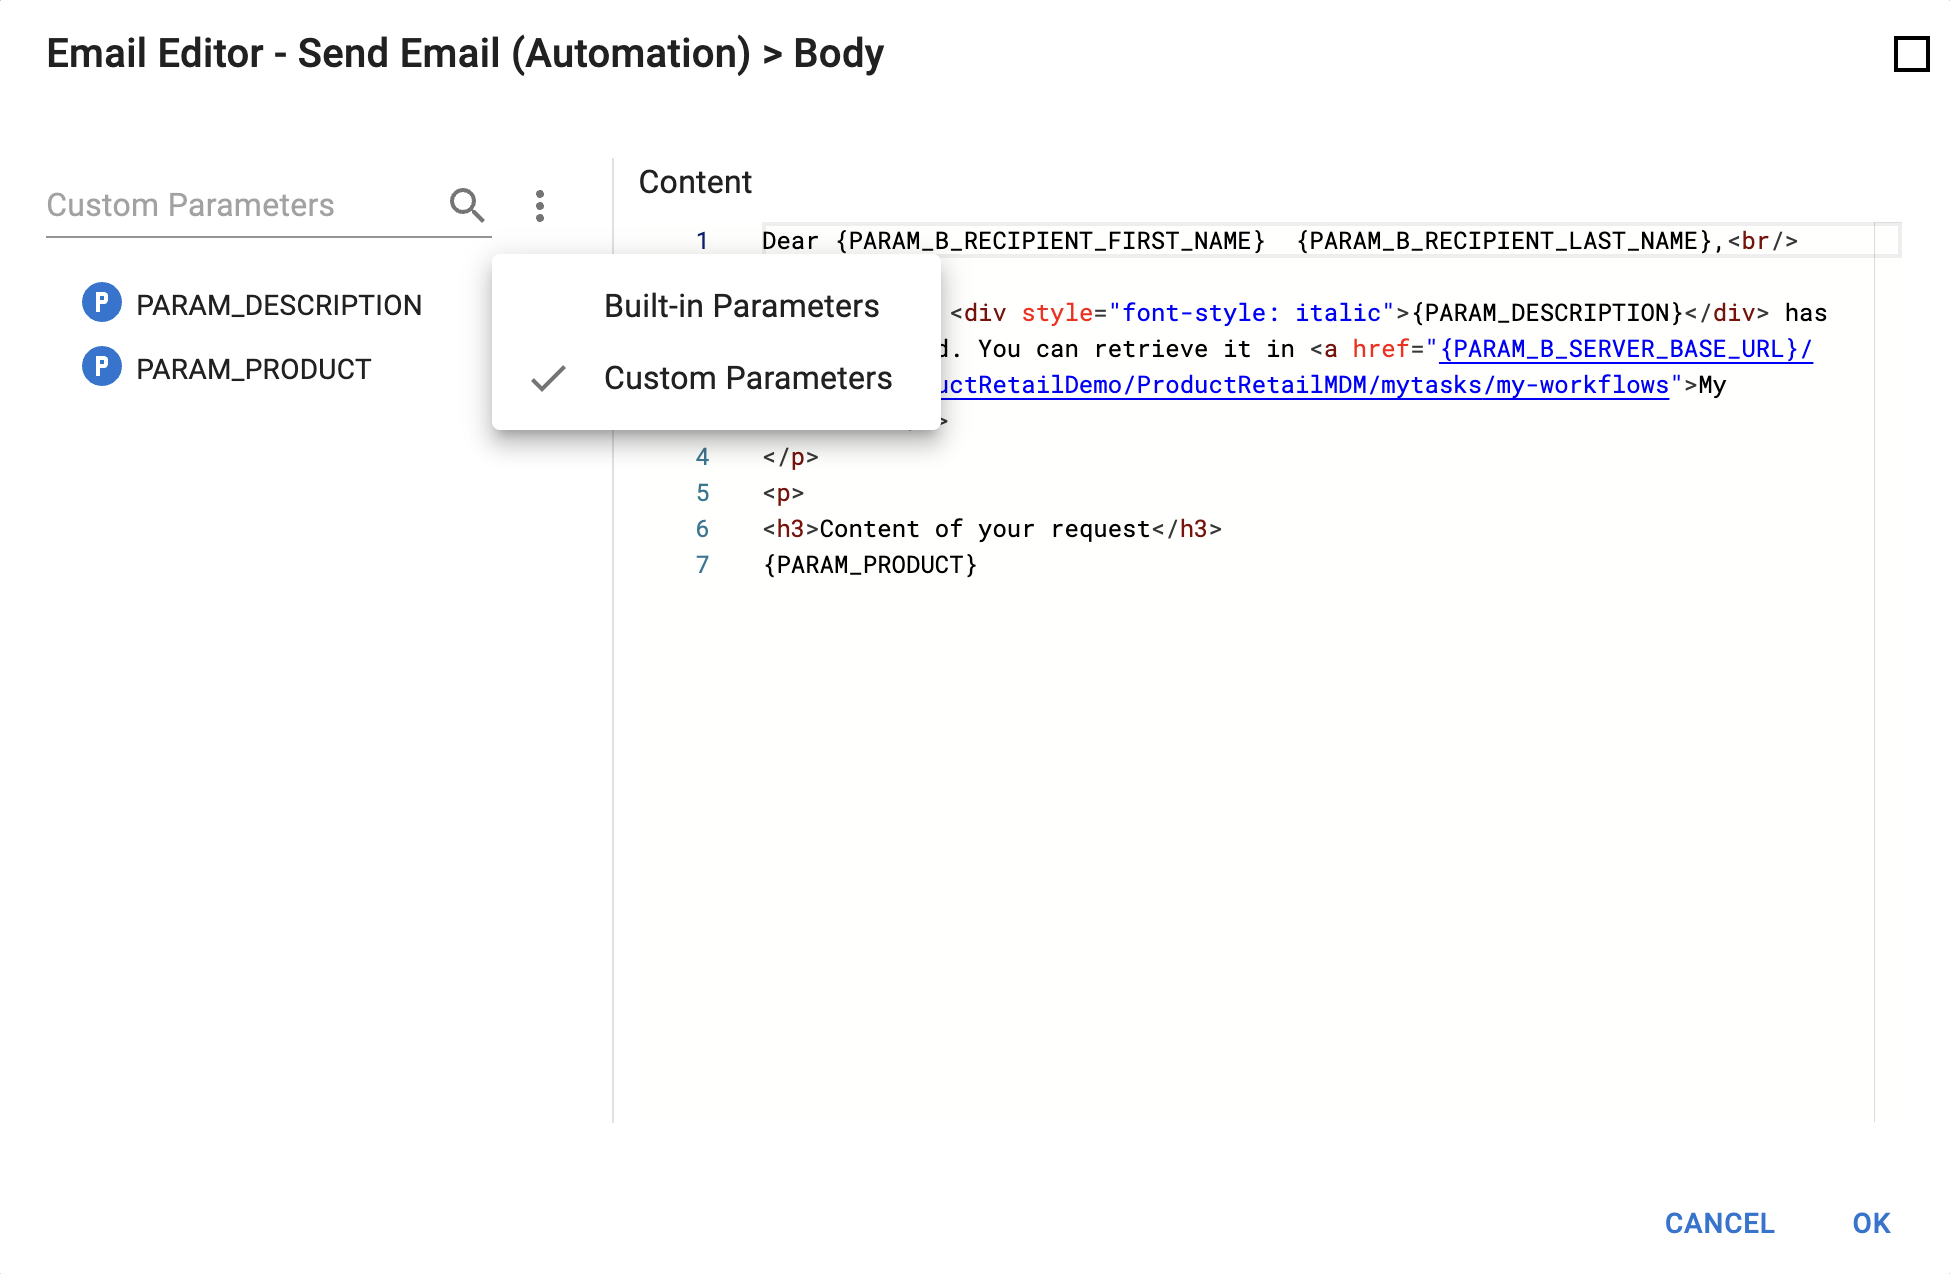
The editor is organized as follows:
-
The left panel displays the Custom Parameters or Built-in Parameters. Double-click a parameter to add it to the condition or the expression.
To switch between custom and built-in parameters, select the corresponding element in the action menu above the tree view. You can enter text in the input field to search among elements of the selected type. -
Problems appear in the right bottom panel, showing parsing errors such as unknown parameters.
Below are examples of custom emails and subject lines that you can configure in the Email editor.
{PARAM_C_WORKFLOW_INITIATOR}, a workflow has just been completed<p>Dear {PARAM_B_RECIPIENT_FIRST_NAME},</p>
<p>The workflow {PARAM_C_WORKFLOW_DEFINITION_NAME} you initiated on {PARAM_C_WORKFLOW_START_DATE} has been successfully completed on {PARAM_C_SUBMIT_STEP_COMPLETION_DATE}.</p>
<p>The following records have been processed:
{PARAM_C_PROCESSED_RECORDS_CHIPS}</p>
<p><a href="{PARAM_B_SERVER_BASE_URL}/mdm-app/YourModelName/YourAppName/browsing/Entity">Open the product inventory</a>to view the updated records.</p><!DOCTYPE html>
<html>
<head>
<meta ...>
<style>
...
</style>
</head>
<body ...>
<table ...>
<...>
<p>Dear {PARAM_B_RECIPIENT_FIRST_NAME},</p>
<p>The workflow {PARAM_C_WORKFLOW_DEFINITION_NAME} you initiated on {PARAM_C_WORKFLOW_START_DATE} has been successfully completed on {PARAM_C_SUBMIT_STEP_COMPLETION_DATE}.</p>
<p>The following records have been processed:<br>
{PARAM_C_PROCESSED_RECORDS_CHIPS}</p>
<p><a href="{PARAM_B_SERVER_BASE_URL}/mdm-app/YourModelName/YourAppName/browsing/Entity">Open the product inventory</a>to view the updated records.</p>
</...>
</table>
</body>
</html>Configure a Set Workflow Metadata automation
The following properties are available to configure a Set Workflow Metadata automation:
| Property | Required | Description |
|---|---|---|
Properties |
Required |
List of metadata properties that can be dynamically configured during workflow execution. At least one property must be configured. See Metadata properties. |
Metadata properties
You can define one or multiple metadata properties to be dynamically set or adjusted using the Set Workflow Metadata automation.
To add a metadata property:
-
Click the
Create button next to Properties.
The Add Workflow Property Change Item dialog opens. -
Select an item from the Property drop-down list.
Available options are:-
Description
-
Due Date
-
Initiator Name
-
Next Task Assignee
-
Priority
-
Start Comment
-
-
Open the
SemQL editor to define an expression for the selected property.
| Workflow designers should add one metadata property for each workflow property that they want the automation to set during execution. |
The primary objective of the Set Workflow Metadata automation is to enhance operational efficiency by dynamically adjusting properties for workflows, particularly those starting automatically from completed batches. This streamlines workflow management while ensuring accuracy and consistency without manual intervention.
Below are some practical scenarios to illustrate the purpose of this feature:
-
Dynamic due dates: adjust due dates dynamically based on the current time, date, or other criteria. For example, set the due date of a task to five days from the start date if it involves data creation, but three days if it involves data correction.
-
Workflow instance priorization: set priorities based on specific conditions. For example, when a workflow instance involves a high-value customer, the priority is automatically set to
High. -
Standardized workflow metadata: ensure consistency in workflow details. For example, automatically provide a standard description based on a workflow’s structure or data (e.g., Product creation, Customer record correction, etc.).
-
Custom start comments: include context-specific start comments with precise instructions tailored to the start event. For example, when initiating a workflow from a selection of erroneous records, automatically insert the following comment in the startup dialog: "This workflow involves reviewing and correcting erroneous records. Please verify each record carefully and correct any inaccuracies. Refer to the data quality guidelines linked here:
<link>."
Configure a Submit Data automation
The following properties are available to configure a Submit Data automation:
| Property | Required | Description | ||
|---|---|---|---|---|
Integration Job |
Optional |
Job used to process the data submitted by the step. If no job is selected, then a job is generated depending on the root entity of the workflow.
|
||
Submit User |
Required |
Name of the user that submits the data to xDM. This username can be used to log in to xDM. Open the For more information about all the attributes, see Workflow attributes. Example. Submit with the name of user 'semadmin'
Example. Submit with the workflow initiator’s name
|