| This is documentation for Semarchy xDI 2023.2, which is no longer supported. For more information, see our Global Support and Maintenance Policy. |
Upgrade the Semarchy xDI Designer
This document provides instructions to upgrade Semarchy xDI Designer.
Pre-upgrade steps
This section describes the operations to perform before upgrading Semarchy xDI Designer.
Review the release notes
The Release Notes provide the latest information about the Semarchy xDI release, including new features, bug fixes, and breaking changes.
System requirements
Review the system requirements for this release.
| Semarchy xDI Designer 5.3 and above requires a JDK 11.0.2 or higher. If you are using an older version, upgrade to Java 11.0.2 or above. The supported Java versions are listed in the system requirements. |
Close the Designer
Before upgrading, completely close the Designer environment:
-
Stop the local runtime.
-
Close all editors.
-
Exit Semarchy xDI Designer.
Backup your installation
Perform a backup of your current installation of Semarchy xDI Designer:
-
Make a zip archive of the current Semarchy xDI Designer installation.
-
Make a zip archive of your workspace(s).
Upgrade the License Server
Semarchy xDI Designer 2023.1.x can only receive its license from a local License Server running version 5.3 or higher.
If you are using a local License Server in your configuration, make sure to upgrade that license server before upgrading Semarchy xDI Designer.
Upgrade steps
Download and install the new version
Download and install the new version of Semarchy xDI Designer from the Semarchy website.
| Do not install the new Designer version on top of an existing one. It is recommended to back up and remove the previous version, or rename it prior to installing the new one. |
Copy modules
Before the first startup, copy the Modules folder from the previous installation to the new one:
-
Under Windows/Linux: the default folder for Modules is
<Designer root folder>/runtime/modules. -
Under macOS: the default folder for Modules is
<Designer root folder>/Contents/Eclipse/runtime/modules.
Run the new version
Perform the following operations for the first startup of the new version:
-
Start the new version of Semarchy xDI Designer (see instructions for Windows, Linux, macOS).
-
Select the workspace directory and click Launch.
-
Review and accept the License Terms, and then click Finish.
-
The Register License dialog opens.
-
If you are using a local license key:
-
Select the License Key File option.
-
Click the
 button next to the License Key File field to select the local key file.
-
-
If you are registering through an on-premises license server:
-
Select the Local License Server option.
-
Enter the License Server URL and the License Key.
-
-
If you are registering through the Semarchy License Server:
-
Select the Semarchy License Server Option.
-
Enter your License Key.
Refer to Manage the Designer License for more information on license modes.
-
-
-
Click Register.
-
On the Welcome Page, click Hide to show the design environment.
-
Launch the Rebuild Cache and Clean Projects operation from the Utilities menu.
Re-install components
To re-install components, follow the procedure described in Install Components and restart the Designer when you are prompted to.
| When the Designer restarts, all Modules copied from the previous installation are automatically updated with the latest version included in the related component (if any). |
Re-install other plugins
If needed, re-install any other plugin used by the previous installation (version control system or other).
Finalize and clean up
Perform the following operations to finalize the upgrade:
-
In the Modules Manager check that all modules have been migrated successfully.
-
Follow the post-upgrade steps.
-
Remove the old installation folder.
| A workspace that has been opened with a newer version of Semarchy xDI Designer should not be re-opened with a previous version of Designer. |
Post-upgrade steps
Version-specific upgrade steps
Depending on the Semarchy xDI version you are upgrading from, you may need to perform certain actions after the upgrade is complete.
Actions are listed incrementally. Please read all the subsections until you reach your current Semarchy xDI product version, and perform all actions up to that point. For example, when upgrading from S19 to 2023.1.6, install version 2023.1.6 then follow post-upgrade steps for S19 to 5.3.x, and then for 5.3.x to 2023.1.x.
If your version is not listed, no further action is needed.
Upgrading from versions prior to 2023.1.0
If you are using a command-line script to run Designer commands, modify the command used to run your scripts with the new Designer CLI syntax, which replaces the legacy java -jar … method.
Upgrading from versions prior to 5.3.0
Follow the upgrade steps detailed in the upgrade guide.
For each workspace that was used in a Designer version prior to 5.3.0, upgrade the workspace by starting Designer from a command line with the -clearPersistedState option.
| Starting from version 5.3.0, the license key contains component and feature permissions. If you notice problems such as unexpectedly disabled components and features, please contact Semarchy. |
Upgrading from Versions S17, S18 or S19
Follow the upgrade steps of all the major intermediate versions.
Rebuild the project cache
After an upgrade, project cache may be invalid, or may have internal references that no longer match. This may cause problems when executing an integration flow. It is a good idea to have Designer rebuild the cache, clean your projects, and rebuild mappings after any version upgrade, especially if you are going to run them right away. Note that this may take a while if you have many complex projects.
To rebuild cache and clean projects:
-
In Designer, open the Utilities menu.
-
Click on Rebuild Cache and Clean Projects.
-
Click OK to confirm.
-
Wait for the rebuild to finish.
Upgrade metadata, mappings and processes
Metadata, mappings and processes have their own internal model and version numbers. They are sometimes updated to add new features, fix issues, or improve performance. These updates are usually available following major releases, but may also be available in patches for Long-Term Support (LTS) releases.
When metadata, mappings or processes need an internal update, a ![]() warning symbol will appear on their icon to indicate their model is out-of-date. A separate warning will also appear in the Problems view with the same icon.
warning symbol will appear on their icon to indicate their model is out-of-date. A separate warning will also appear in the Problems view with the same icon.
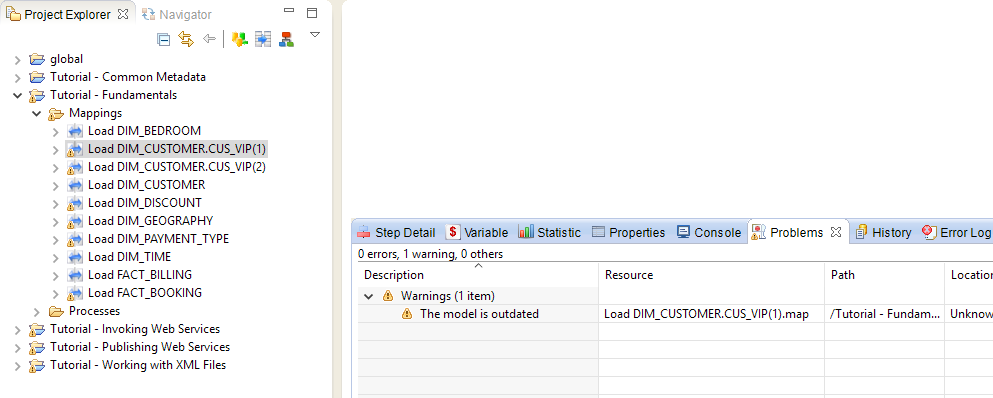
Upgrading older metadata, mapping or process files will happen automatically when they are modified and saved. You can continue using your projects as-is. However, you can run a batch upgrade if you want to upgrade the files immediately and remove the warning.
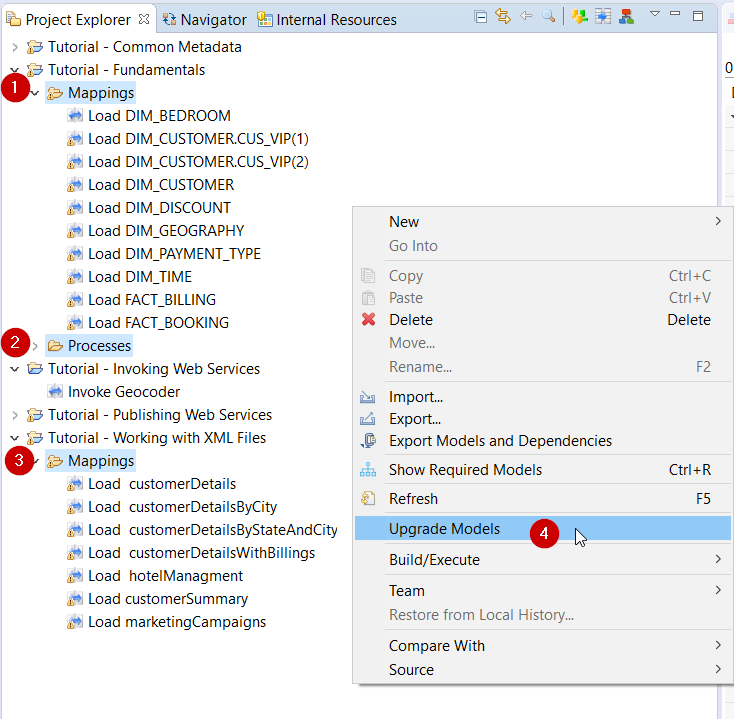
To upgrade the internal model for metadata, mappings or processes:
-
Go to the Designer Project Explorer.
-
Select one or more elements or folders that need an upgrade.
-
Right-click your selection.
-
Select the Upgrade Models option from the context menu.
Note that your selection can contain both upgradable and up-to-date elements. The Upgrade Models option will not have an effect on anything that is already up-to-date.