| This is documentation for Semarchy xDI 2023.3, which is no longer supported. For more information, see our Global Support and Maintenance Policy. |
Getting Started with REST
Overview
The HTTP REST component ships with a wizard to help users reverse-engineer and test REST APIs.
This wizard allows defining the input and output parameters, the endpoint URL and HTTP method. It allows testing the API for a response. It also offers the possibility to define the reverse-engineered metadata.
Create a Metadata
To create a metadata:
-
Right-click a folder in your project and then select New > Metadata.
-
In the Create Metadata dialog, select HTTP REST and then click Next.
-
Name the metadata and click Next.
-
Select the HTTP REST module and click Finish.
A wizard opens to define the HTTP security, proxy settings, and to reverse-engineer the metadata structure. -
In Security Definition, set the following properties:
-
HTTP Security: Select an HTTP Security configuration previously created in a HTTP Security metadata. APIs may be accessed using one of the following methods:
-
None (default): No credentials are required to access the API.
-
User credentials: User credentials are required to access the API. The credentials specified in Semarchy xDI Designer are used by default.
-
OAuth2 security: OAuth2 is required to access the API.
-
-
In HTTP Proxy: Select an HTTP Proxy configuration, previously configured in a Proxy Security metadata.
The above fields display and use Proxy Security and HTTP Security metadata available in the workspace.
-
-
Click Next.
-
In the Reverse step, set the following fields:
-
Reverse URL or File: The component can reverse-engineer the API from an OpenAPI 3 specification. Enter the URL or use the browse button to specify the path to a file containing that specification.
-
HTTP Keystore: Specify the keystore required to access the API. This information must be defined in a Certificate and Keys metadata in the workspace.
-
HTTP Truststore: Specify the truststore required to access the API. This information must be defined in a Certificate and Keys metadata in the workspace.
-
-
Click Next.
-
In the Selective Reverse step, select the nodes that you want to reverse-engineer.
-
Click Finish.
The HTTP REST metadata node is created and the data is reverse-engineered.
The main node contains path nodes that contain operation nodes. Each operation node contains parameter and response nodes.
Test and Reverse-Engineer the API
You can test the REST API and reverse-engineer the data structure after checking the response.
To test the API response:
-
Right-click an operation node. For example, the
GETnode. -
Select Actions > Reverse REST.
-
In the REST Reverse dialog, define the API call: the parameters, headers, body, and authentication.
-
Click
 to call the API.
The response appears in the Response section. -
Review the response, and click Next.
-
In the Selective Reverse page, select the nodes that you want to reverse-engineer and click Finish.
Request Parameters
In the Parameters section, you can define new parameters by clicking the ![]() button.
button.
Value
The value is a test value that is used when performing a test request. It is not saved in the metadata.
Type
The following table lists the types of parameters:
| Type | Description |
|---|---|
HEADER |
Parameter added as an HTTP header. Headers are inputs defined in the metadata and can be set dynamically in the mappings that use the API. |
QUERY |
Parameter appended to the request URL. |
PATH |
Parameter replacing a user-defined mask in the request URL. When using such a parameter, set the mask to be replaced in the request URL. |
FORM |
With this option, the Allow Empty Value checkbox is automatically selected as its values are derived from the fields in the Input section. In the Input section:
|
COOKIE |
With this option, the specified cookies are sent with each request; They are not persisted. |
Request Body
If the API call requires an body, select the associated type and fill in the body expression:
An option to link the selected Media Type with the Content-Type Header is available:
-
When the link is disabled, users can select Media Type and manually select the Content-Type Header.
-
When the link is enabled, after each Media Type selection, the Content-Type Header is automatically updated according to the selected Media Type. However, users can manually change the content type.
Request Authentication
The Authentication section allows you to define the mechanism to authenticate to the API.
| Field | Description | ||
|---|---|---|---|
Authentication Type |
Authentication to use. Possible values are None, Basic, OAuth, OAuth2 and NTLM.
|
||
Security Reference |
Node in the HTTP security metadata containing the API authentication information. |
||
Security Proxy Reference |
Node in the Proxy security metadata to use if the API call is redirected by a proxy.
|
||
Keystore Reference |
Certificate and Keys metadata node to use as keystore reference. |
||
Truststore Reference |
Certificate and Keys metadata node to use as truststore reference. |
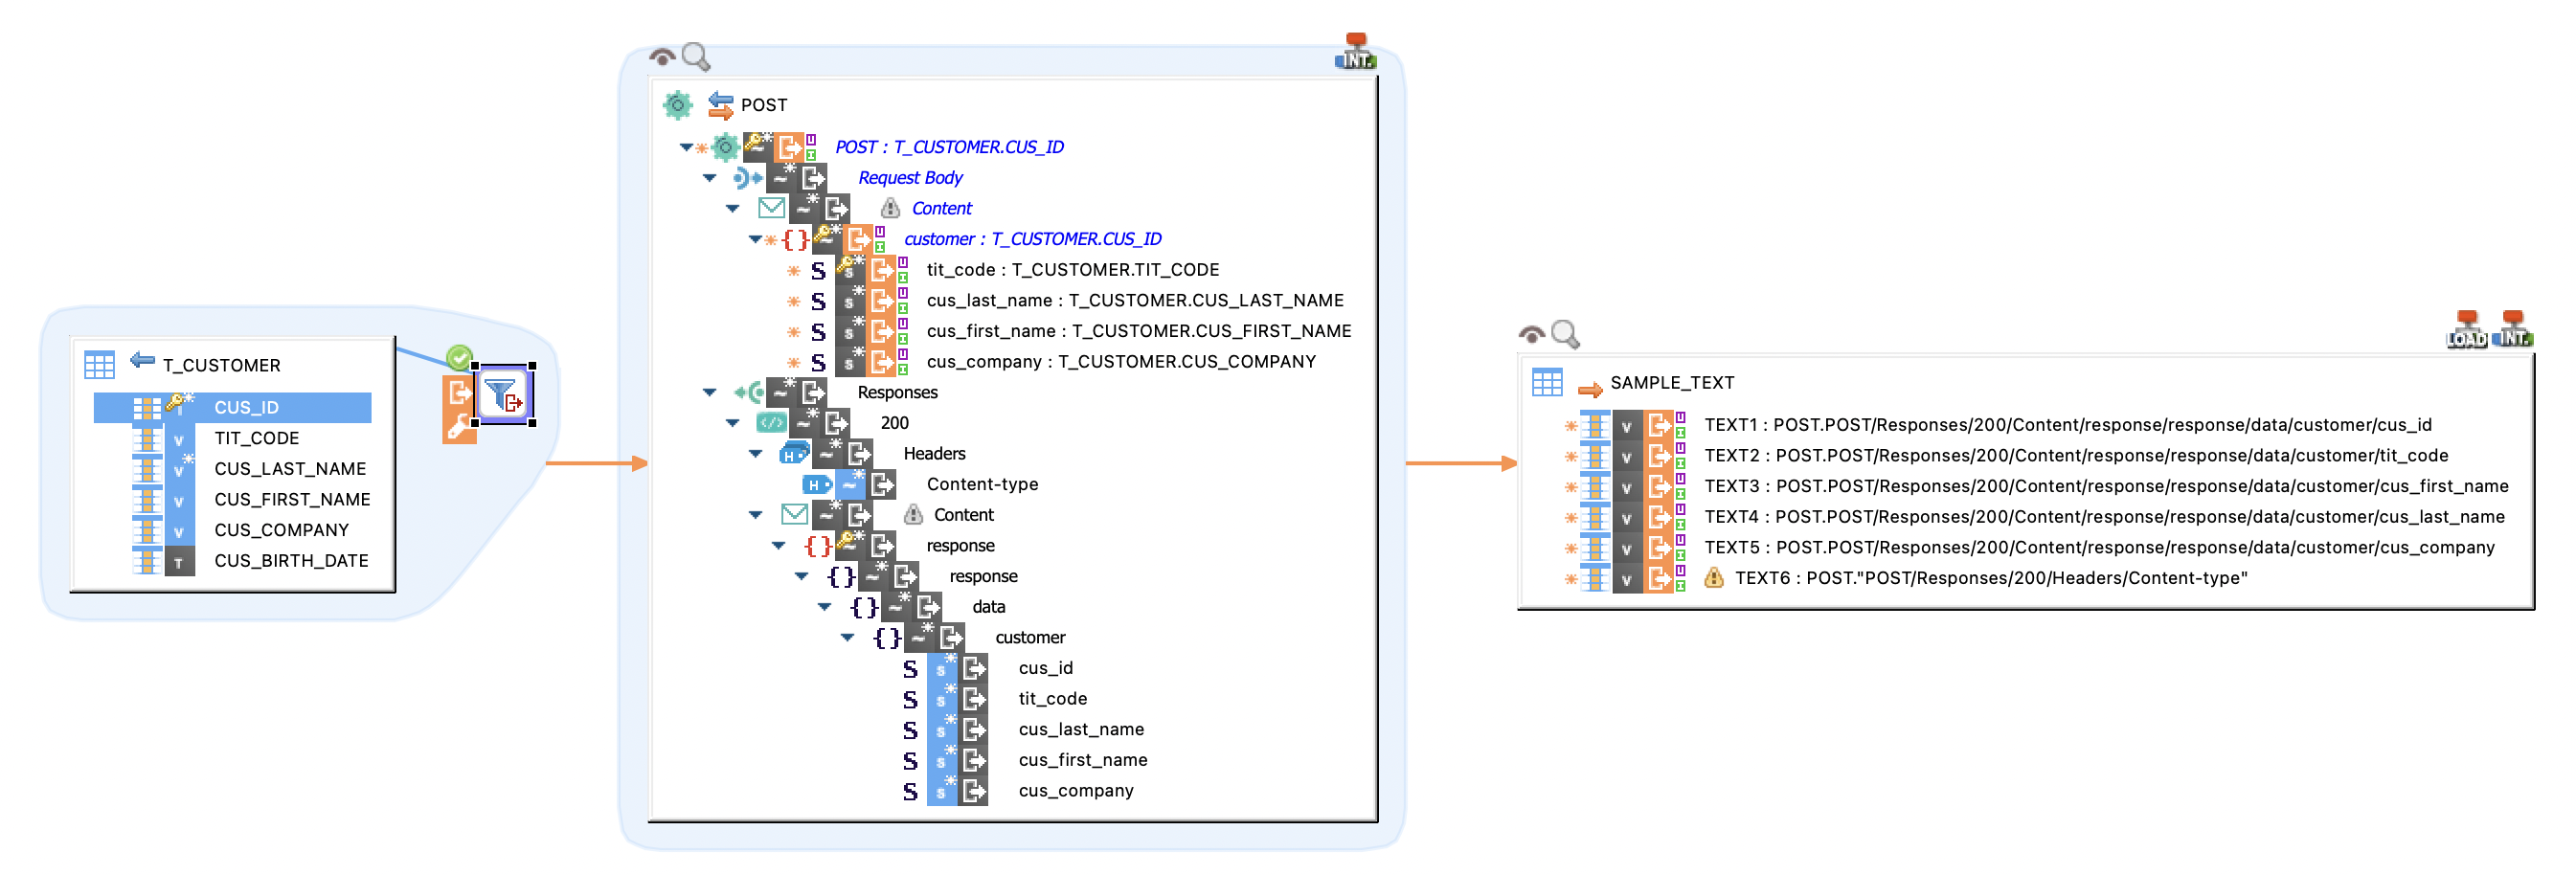
Create Mappings
Once the HTTP REST metadata is ready, you can use it in mappings.
In the following mapping, the columns of the source table are mapped to nodes in the Request Body of the POST method of the API. Nodes from the Responses are mapped to the columns in the target table. This mapping calls the API’s POST method for each source record, building the body with source columns, and loads the response’s content to the target table.