Integrate with Purview
This document explains how to integrate Semarchy xDM with Microsoft Purview.
Purview is a data governance and data catalog available in Microsoft Azure, to store and manage physical as well as logical metadata assets.
Semarchy xDM comes with a Purview Connector to synchronize metadata from Semarchy data hubs into Purview, while linking the logical model assets (entities and attributes) to the corresponding physical assets (tables and columns), and enabling end-to-end data lineage.
Overview
The Purview Connector converts Semarchy metadata into Purview assets in the following way:
-
Semarchy xDM instance, data location, entities, attributes, and relationships are converted into Purview entities, using Semarchy-specific asset types.
-
Entities and attributes are related to the corresponding physical tables (
GD_,MD_, etc) and columns, previously scanned using the built-in Purview scanners for Microsoft SQL Server, PostgreSQL, or Oracle. These tables and columns are enriched with information from Semarchy. -
A process is created to relate the physical tables and represent the certification process for each entity.
Configure Purview
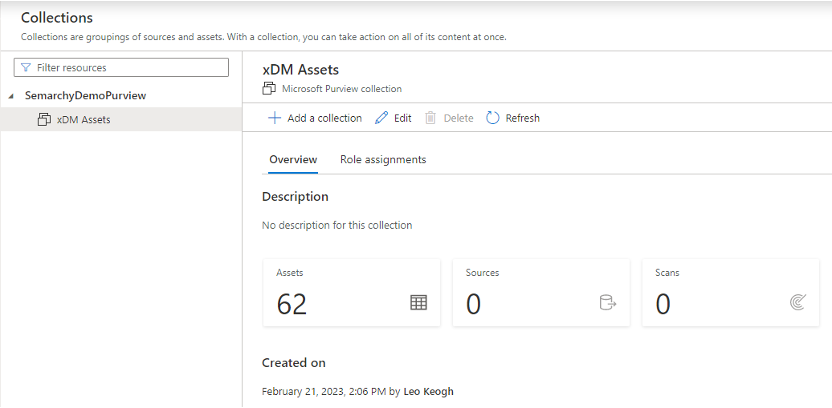
Configure a Collection
The Purview Connector creates the Semarchy xDM assets in a collection. It is recommended to create a dedicated collection for the Semarchy xDM assets, and note the Name of this collection.
Configure the REST API
The Purview Connector creates and updates assets in Purview using the REST API.
To enable this connectivity, follow the instruction in the Purview documentation to configure and use the REST API.
While configuring the REST API, make sure to collect the following information:
-
The Azure Tenant Id: Search for the "Tenant Properties" in the Azure portal. This ID will be available on the tenant properties page.
-
The Purview Account name. For example, SemarchyDemoPurview.
-
The Azure Application Client ID and Azure Application Client Secret of the application registered in Azure Active directory and assigned to a data plane role (Data Curator) for the Microsoft Purview account.
Configure Semarchy xDM
The Purview Connector extracts metadata from Semarchy xDM using a REST API, and authenticates using an API Key.
In Semarchy xDM, create an API Key with the Application Management and Repository Information privileges.
Make sure that you have the following information to connect your Semarchy instance:
-
The API Key.
-
The Semarchy Instance URL, typically
http://<host>:<port>/semarchy.
Scan the Data Location Schema
When running, the Purview Connector searches for the physical assets (tables, columns) of the data locations in the Purview catalog, to relate them to the logical assets.
Before running the Purview Connector, you must scan the xDM data location schemas using the Purview built-in scanners and harvest the physical assets' metadata (table and column definitions).
To scan a data location schema:
-
In Purview, register a new data source pointing to the data location schema.
-
Scan this data source.
After the scan, the table and columns are visible in Purview. -
Search for a
GD_table corresponding to your data location to confirm that the scan was successful. -
Navigate to the schema (the container) hosting the tables, and note the Qualified Name of that schema. For example:
postgresql://servers/176.159.263.21:15432/dbs/postgres/schemas/semarchy_product_retail_mdm
Repeat the previous steps for each data location deployed for the Semarchy xDM instance.
|
Each data source technology has specific configuration steps that are detailed in the Purview documentation. For example, certain sources require that you store the database password in Azure Key Vault. |
Deploy the Purview Connector
The Purview Connector retrieves metadata from deployed model editions in an xDM instance, creates logical assets in the Purview collection that you created, and relates them to the physical assets that you scanned.
The Purview Connector is available as a Docker image, which can be deployed and executed as an Azure function.
Prepare the Configuration File
You configure the Azure Function at deployment time using a JSON configuration file.
To prepare the configuration file:
-
Download the sample Azure Function App configuration file (
create-azure-function-app-settings.json). -
Edit this file and set the configuration properties, listed below.
| Property | Value | ||
|---|---|---|---|
|
The Purview Account name you retreived when configuring the Purview REST API. For example: |
||
|
The Azure Tenant ID you retreived when configuring the Purview REST API. |
||
|
The Azure Client ID created when configuring the Purview REST API. |
||
|
The Azure Client Secret created when configuring the Purview REST API. |
||
|
The qualified name of the Purview entity representing the container (database schema) hosting the tables of the data location named Create one property for each Semarchy xDM data location to synchronize. For example, to synchronize two data locations named |
||
|
The name of the collection you configured for the xDM assets. For example: |
||
|
The Purview Connector creates Semarchy-specific assets types before the Semarchy assets. Set to |
||
|
The Purview Connector updates the tables and columns with descriptions based on Semarchy metadata. Set this property to |
||
|
Set this property to |
||
|
Cron schedule for the Purview Connector execution. For example, |
||
|
The Semarchy instance URL, typically |
||
|
The API key to connect the Semarchy instance. |
||
|
Set to
|
{
  "xdmPurviewAccount": "SemarchyDemoPurview",
  "xdmPurviewTenantId": "758077ec-66b9-441c-9537-b0939cb3dfe8",
  "xdmPurviewClientId": "xxxxxxxxx",
  "xdmPurviewClientSecret": "xxxxxxxxx",
  "xdmDataLocationPurviewQualifiedName_CustomerB2CDemo": "postgresql://servers/176.159.263.21:15432/dbs/postgres/schemas/semarchy_customer_b2c_mdm",
  "xdmDataLocationPurviewQualifiedName_ProductRetailDemo": "postgresql://servers/176.159.263.21:15432/dbs/postgres/schemas/semarchy_product_retail_mdm",
  "xdmPurviewCollectionName": "xDM Assets",
  "xdmPurviewSkipTypes": "true",
  "xdmPurviewSkipPhysicalAssetsUpdate": "true",
  "xdmPurviewDryRun": "true",
  "xdmPurviewConnectorSchedule": "0 * * * * *",
  "xdmInstanceUrl": "http://176.159.263.21:10081/semarchy",
  "xdmInstanceApiKey": "xxxxxxxxx",
  "scheduledXdmPurviewConnectorDisabled": "true",
  "FUNCTIONS_WORKER_RUNTIME": "java"
}
Deploy the Azure Function
-
Download the Azure function creation (
create-azure-function-app.sh) script. -
Review and amend the script depending on your Azure and local environments.
-
Run the script to create all the resources required to run the connector.
|
This script creates or updates the following resources:
|
|
This script expects and uses the |
./azure-function-script.sh
  --name <azure-function-name>
  --storage-account <storage-account-name>
  --resource-group <resource-group-name>
  --docker-image-tag <docker-image-tag>
Main script parameters:
-
--name(required): Name of Azure Function App to deploy. This name must be unique (it is used for the endpoint URL:https://<name>.azurewebsites.net/api/) -
--storage-account(required): Name of the Azure Storage Account to create or update (it must be unique, and contain 3 to 24 characters numbers and lowercase letters only). -
--resource-group(required): Name of Azure Resource Group into which the function is created. If it does not exist, the script creates the group, provided that the account has sufficient privileges. -
--docker-image-tag: Docker image tag to use for the connector (defaults tolatest). The tag must correspond to the version of the xDM instance from which the connector will harvest metadata.
|
To see all available parameters, run |
./create-azure-function-app.sh
  --name xdm-purview-sync
  --storage-account xdmstorageaccount
  --resource-group xdm-group
--docker-image-tag 2023.2.0|
For macOS Users
The script uses the
|
Run the Purview Connector Manually
Once configured with a Cron schedule, the Azure Function runs the Purview Connector automatically.
You can also run operations using the REST endpoints exposed by the function.
To use the Azure Function endpoints:
-
Retrieve the endpoint URL from the Azure Function.

The codequery parameter may be passed as a Request Header namedx-functions-key. -
Use a REST client to perform the request.
-
Review the Semarchy assets created in the collection
To avoid execution conflicts between your manual and the scheduled executions of the Purview Connector, make sure to change the Azure Function configuration and set the scheduledXdmPurviewConnectorDisabled property to false before running Purview Connector manual operations.
|
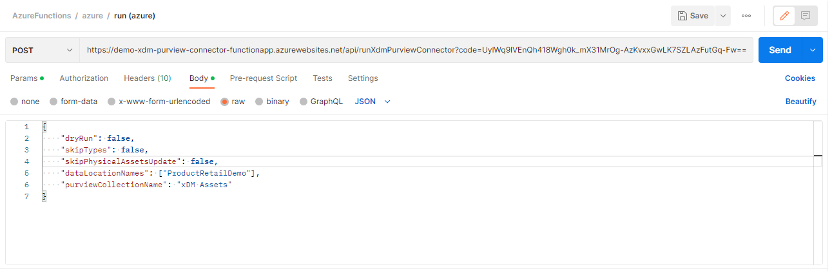
POST Operation
The POST operation runs the Purview Connector manually. It accepts the properties listed below in JSON format in the request body.
| Name | Description | ||
|---|---|---|---|
|
Set this property to |
||
|
Set this property to |
||
|
The Purview Connector updates the tables and columns with descriptions based on Semarchy metadata. Set this property to |
||
|
Array of data location names to synchronize. Use this option to selectively synchronize a subset of the data location. This list defaults to all Semarchy data locations in the
|
||
|
The name of the collection you configured to receive the xDM assets. This parameter defaults to the corresponding property set in the function application configuration. |
{
    "dryRun": true,
    "skipTypes": false,
    "skipPhysicalAssetsUpdate": false,
    "dataLocationNames": ["CustomerB2CDemo"],
    "purviewCollectionName": "Semarchy xDM"
}| The process can take a relatively long time (5-10 min) depending on options and size/number of data locations. |
DELETE Operation
The DELETE operation deletes all assets created by the Purview Connector. It accepts the properties listed below in JSON format in the request body.
| Name | Description | ||
|---|---|---|---|
|
Set this property to |
||
|
Set this property to
|
{
    "dryRun": true,
    "deletePhysicalAssets": false
}| A DELETE operation cannot be undone. |