| This is documentation for Semarchy xDM 5.3 or earlier, which is no longer supported. For more information, see our Global Support and Maintenance Policy. |
Deploy a Semarchy xDM instance on Azure Kubernetes Services (AKS)
You will be guided to deploy Semarchy xDM on AKS. The estimated time to complete these steps is two hours.
It is highly recommended not to use the root user for any deployment or operations described below. You are advised to always follow the policy of least privilege for all access granted as part of the deployment, such as Security Groups.
Step 1. Check the Azure credentials
Before starting the deployment check that the Azure Command Line Interface (CLI) is correctly configured:
-
Run the following command to retrieve your Azure user:
$ az loginExample 1. Command output{ "cloudName": "AzureCloud", "homeTenantId": "XXXXXXXXXXX", "id": "XXXXXXXXXXX", "isDefault": true, "managedByTenants": [], "name": "Semarchy Cloud Deployment", "state": "Enabled", "tenantId": "XXXXXXXXXXX", "user": { "name": "semadmin@semarchy.com", "type": "user" } }, { "cloudName": "AzureCloud", "homeTenantId": "XXXXXXXXXXX", "id": "XXXXXXXXXXX", "isDefault": false, "managedByTenants": [], "name": "Azure subscription Demo", "state": "Enabled", "tenantId": "XXXXXXXXXXX", "user": { "name": "semadmin@semarchy.com", "type": "user" } }If the output is different it means that Azure CLI is not configured correctly. Refer to Getting started with the Azure CLI for more information.
Step 2. (Optional) Create the Azure PostgreSQL instance
This step is optional. If you already have a running database instance, you can proceed to the next section.
| This section explains how to deploy with an Azure PostgreSQL database backend. You can also deploy with any supported database backend, including Azure SQL Database. |
This section provides Azure CLI commands to create the database instance. This can also be achieved using the Azure console UI. Refer to Azure Database for PostgreSQL.
These commands only provide mandatory parameters but you need to ensure they meet your requirements. Refer to Manage PostgreSQL databases for more information.
Start by creating the database instance into which the Semarchy xDM repository and, optionally, the data locations for your applications, are stored.
-
Run the following command to create the Azure PostgreSQL server:
$ az postgres server create --location <region_name> --resource-group <resource_group_name> --admin-user <server_admin_user> --admin-password <server_admin_password> --name <server_name> --sku-name GP_Gen5_2 -
Run the following command to allow the Azure PostgreSQL server to be accessible by all resources in the resource group:
$ az postgres server vnet-rule create --resource-group <resource_group_name> --name <rule_name> --server <server_name> --subnet default --vnet-name <vnet_name> -
Run the following command to create the primary read-write replica:
$ az postgres db create --name semarchy_repository --resource-group <resource_group_name> --server <server_name> -
Optionally, add reader instances to dispatch the load between multiple reader instance(s) for read-only operations such as dashboards and BI tools:
$ az postgres server replica create --name <db_name> --source-server <server_replica_name> --resource-group <resource_group_name> --location <location> -
Run the following command to allow the Azure PostgreSQL replica server to be accessible by all the resources in the resource group:
$ az postgres server vnet-rule create --resource-group <resource_group_name> --name <rule_replica_name> --server <server_replica_name> --subnet default --vnet-name <vnet_name> -
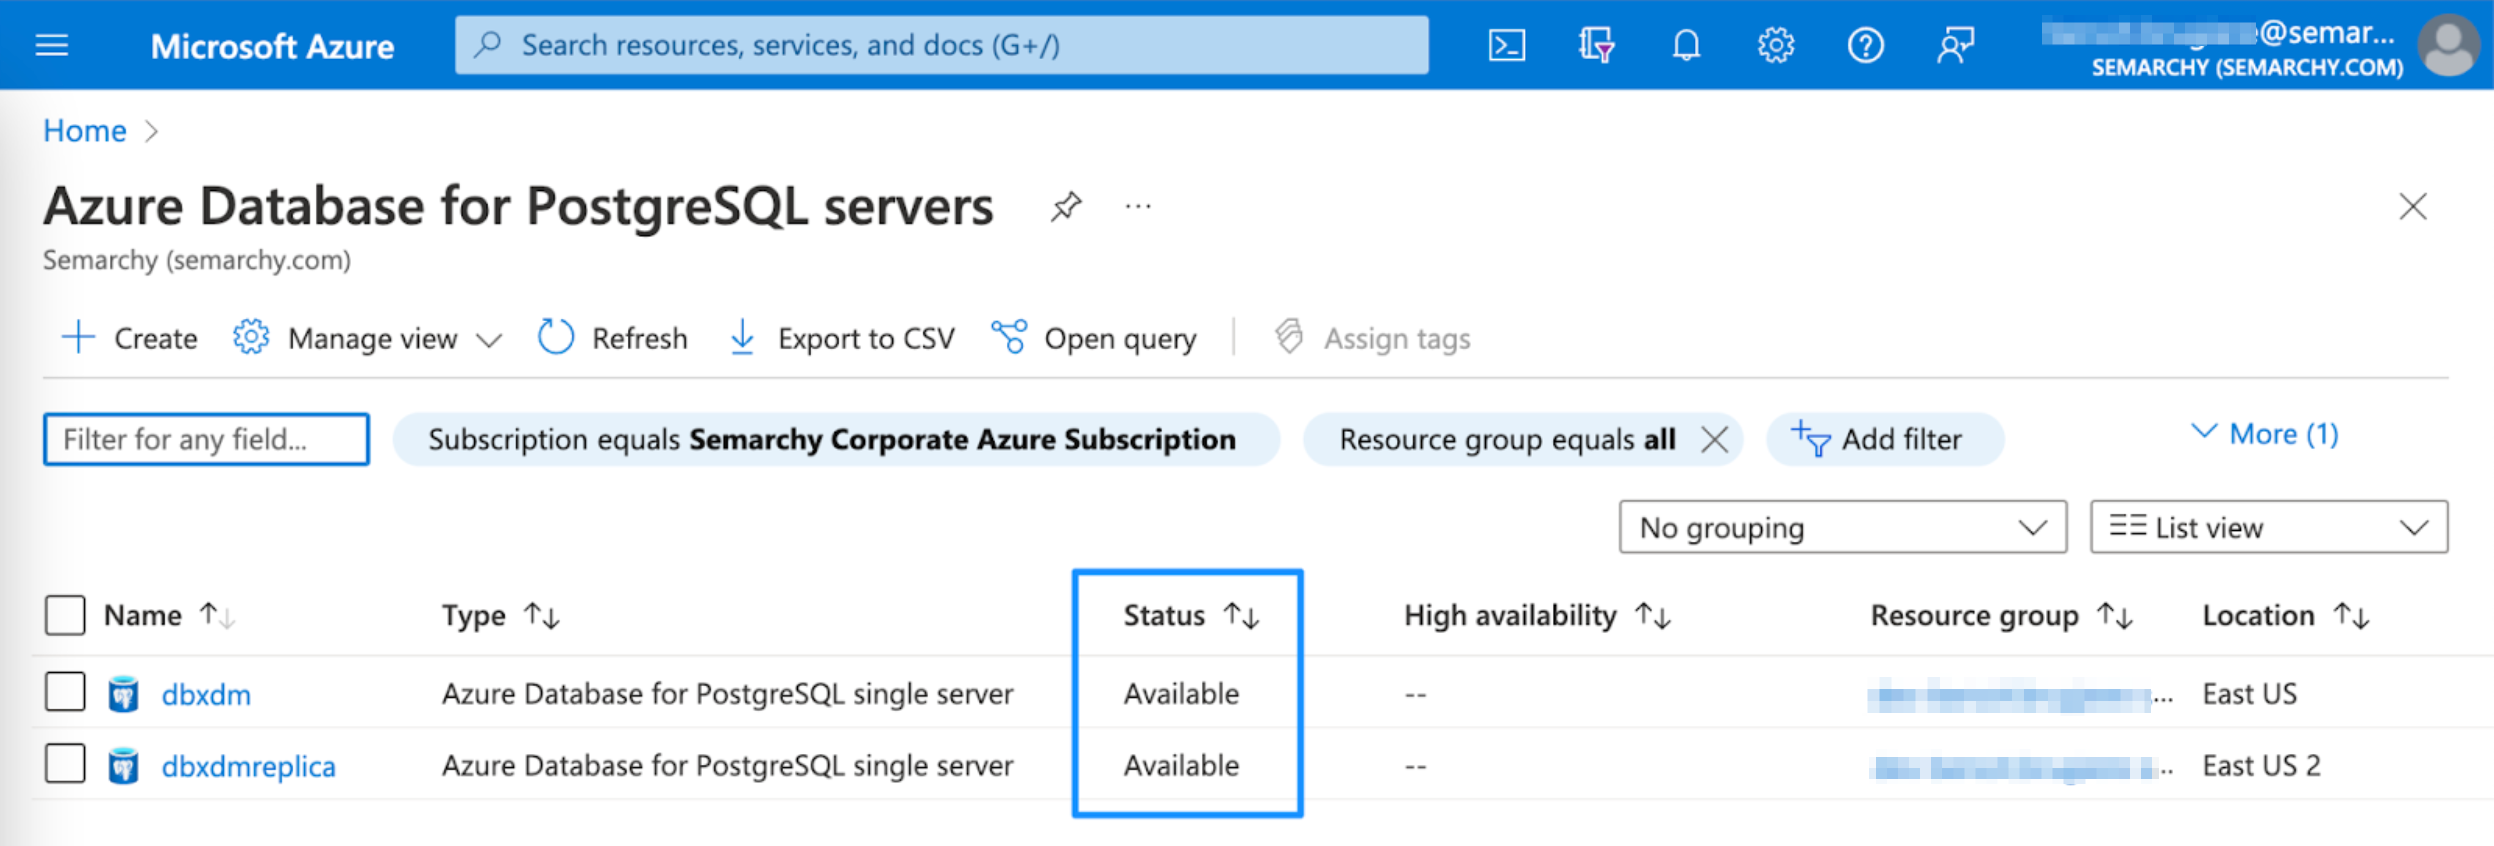
Follow the cluster and instance creation progress using the Azure console and wait for their status to change to Available (estimated time: 10 minutes).
== Step 3. (Optional) Create the AKS cluster This step is optional. If you already have an AKS cluster configured with your Azure account, you can move to the next section.
This section guides you to create the AKS cluster needed to deploy the Semarchy xDM images.
-
Run the following command to create an AKS cluster:
$ az aks create
    --name <cluster_name>
    --resource-group <ressource_group_name>
    --enable-cluster-autoscaler
    --max-count 6
    --min-count 3
    --node-vm-size standard_b2ms
    --kubernetes-version 1.21
The operation takes approximately 10 to 20 minutes.
-
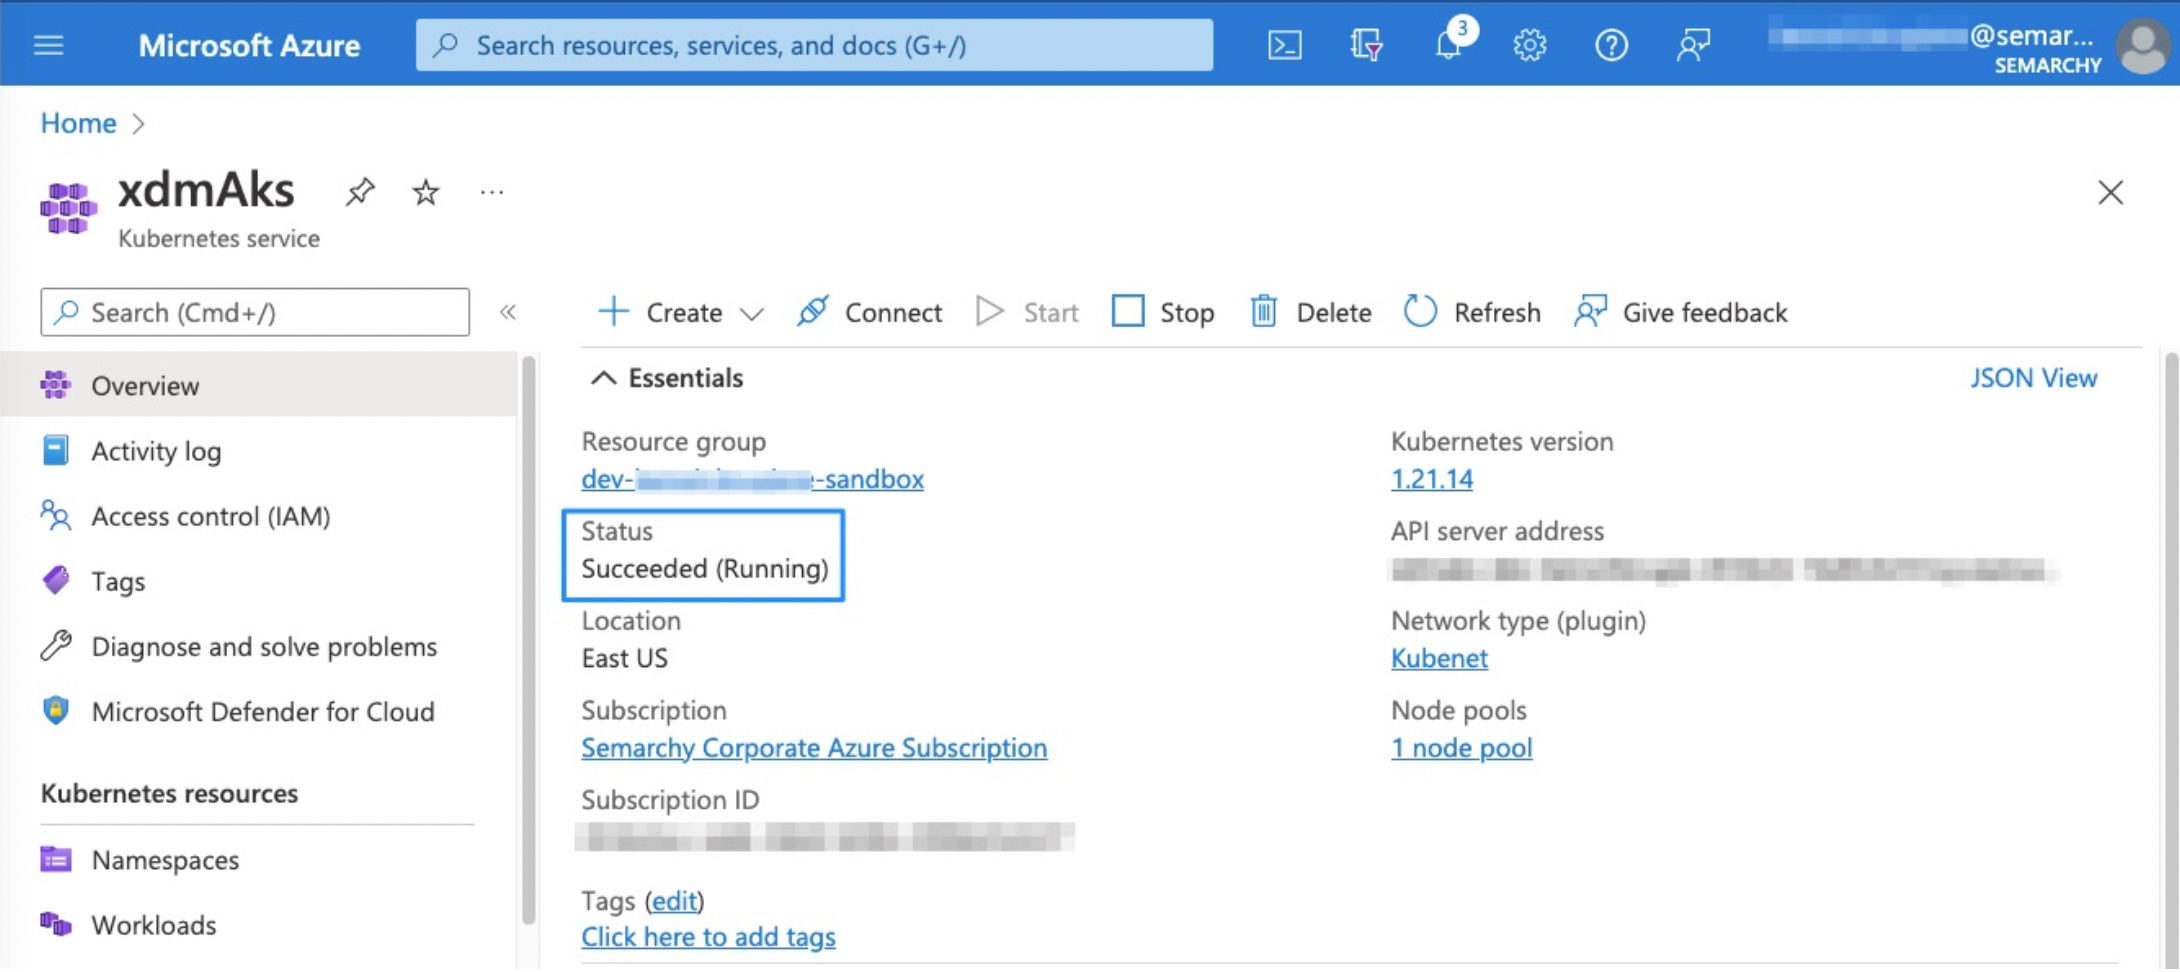
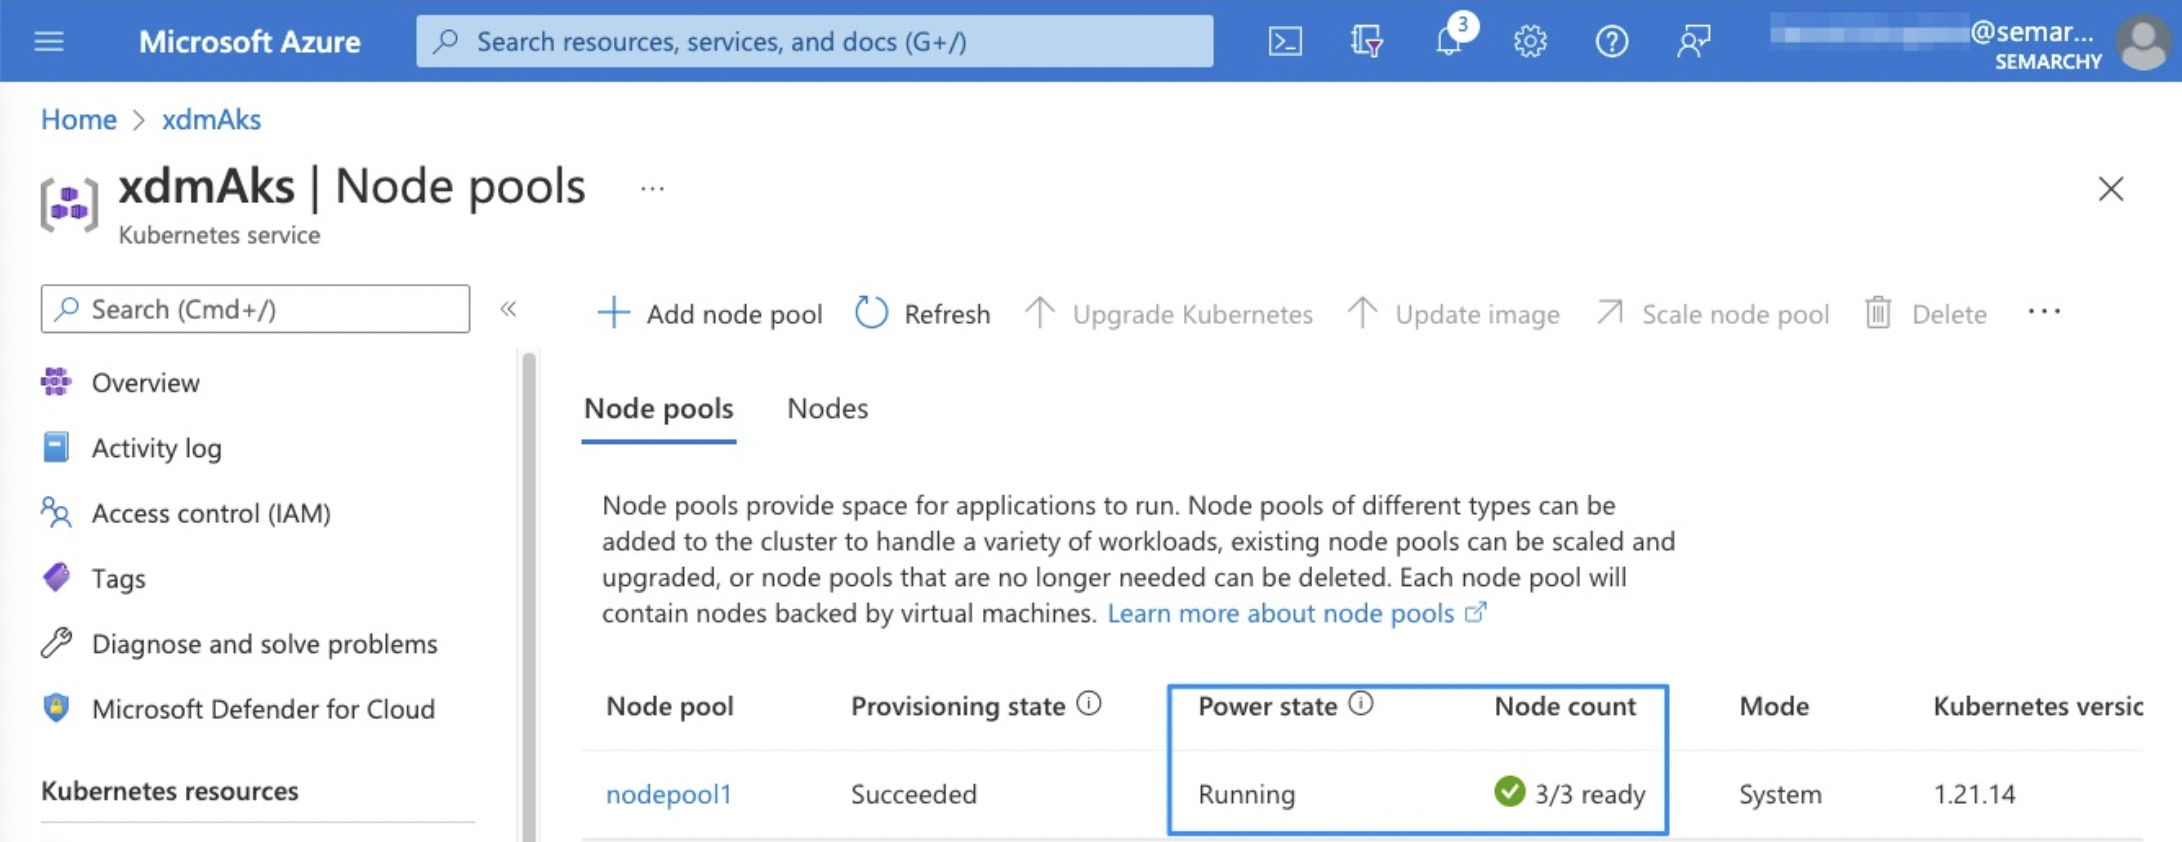
Open the Azure AKS console and check whether the cluster and node pool are created and are respectively in Succeeded and Ready status:
-
Run the following command to configure kubectl with your cluster. Refer to Connect to AKS cluster for more information.
$ az aks get-credentials
    --name <cluster_name>
    --resource-group <ressource_group_name>
Example 2. Command outputMerged "<cluster_name>" as current context in /Users/<username>/.kube/config -
Run the following command to test your kubectl configuration:
$ kubectl get svcExample 3. Command outputNAME TYPE CLUSTER-IP EXTERNAL-IP PORT(S) AGE kubernetes ClusterIP 172.20.0.1 <none> 443/TCP 23m
Step 4. (Optional) Create the Ingress load balancer cluster
This step is optional. If you already have a Load Balancer configured with your AKS cluster, you can proceed to the next section.
The Load Balancer is necessary to route users to the active instance or the passive instances. In the example, you will be using the NGINX Ingress Controller but it can be replaced by any Load Balancer supporting sticky sessions (it is mandatory for the passive instances).
-
Run the following command to install the NGINX Ingress Controller:
$ kubectl apply -f
https://raw.githubusercontent.com/kubernetes/ingress-nginx/controller-v1.1.2/deploy/static/provider/cloud/deploy.yaml
Example 4. Command outputnamespace/ingress-nginx created serviceaccount/ingress-nginx created serviceaccount/ingress-nginx-admission created role.rbac.authorization.k8s.io/ingress-nginx created role.rbac.authorization.k8s.io/ingress-nginx-admission created clusterrole.rbac.authorization.k8s.io/ingress-nginx created clusterrole.rbac.authorization.k8s.io/ingress-nginx-admission created rolebinding.rbac.authorization.k8s.io/ingress-nginx created rolebinding.rbac.authorization.k8s.io/ingress-nginx-admission created clusterrolebinding.rbac.authorization.k8s.io/ingress-nginx created clusterrolebinding.rbac.authorization.k8s.io/ingress-nginx-admission created configmap/ingress-nginx-controller created service/ingress-nginx-controller created service/ingress-nginx-controller-admission created deployment.apps/ingress-nginx-controller created job.batch/ingress-nginx-admission-create created job.batch/ingress-nginx-admission-patch created ingressclass.networking.k8s.io/nginx created validatingwebhookconfiguration.admissionregistration.k8s.io/ingress-nginx-admission created -
Run the following command to retrieve the internal IP of the Load Balancer:
$ kubectl get svc -n ingress-nginx ingress-nginx-controllerExample 5. Command outputNAME TYPE CLUSTER-IP EXTERNAL-IP PORT(S) AGE ingress-nginx-controller LoadBalancer <Cluster_IP> <External_IP> 80:31347/TCP,443:32449/TCP 29sTake note of the cluster Cluster IP; it will be used later to confirm that the deployment was successful.
Step 5. Set the ConfigMap
At this step, you need to define a Kubernetes ConfigMap to set environment variables shared with every pod you deploy.
| All the following Kubernetes commands are executed in the default namespace. |
Seven environment variables are defined and used for the Semarchy xDM startup configuration:
-
SEMARCHY_SETUP_TOKEN: The setup token that you need to enter during the Semarchy Repository creation.
-
XDM_REPOSITORY_DRIVER: JDBC driver class for the repository database. Leave the default value for a Postgres database.
-
XDM_REPOSITORY_URL: JDBC URL for the repository database. It needs to match your Database writer instance endpoint.
-
XDM_REPOSITORY_USERNAME: Database user to connect the repository database.
-
XDM_REPOSITORY_PASSWORD: Database user password.
-
XDM_REPOSITORY_READONLY_USERNAME: Database read-only user to connect the repository database.
-
XDM_REPOSITORY_READONLY_PASSWORD: Database read-only user password.
| It is mandatory to modify the above values (except XDM_REPOSITORY_DRIVER). |
-
Download the sample manifest archive for the ConfigMap and unzip it.
-
Edit the file and save your modifications.
-
Run the following command from the folder containing your manifest file:
$ kubectl apply -f <configmap_file>.yamlExample 6. Command outputconfigmap/semarchy-config created
Step 6. Execute the SQL init script
At this step, you need to configure the database schemas required to create the Semarchy repository. As the Azure Database is not accessible on the internet by default, use the Kubernetes pod to access it and run the SQL initialization script. Refer to Azure SQL Database firewall rules to make it available outside of the Azure Virtual Network.
-
Download the sample manifest archive for the disposable pod (based on a Debian image) and unzip it. This pod will be on the same virtual network as the database instance(s) and will be able to access it.
-
Run the following command to deploy a disposable pod:
$ kubectl apply -f <disposable_pod_file>.yamlExample 7. Command outputpod/semarchy-disposable-pod created -
Run the following command until the pod is started (Status: Running):
$ kubectl get pod semarchy-disposable-podExample 8. Command outputNAME READY STATUS RESTARTS AGE semarchy-disposable-pod 1/1 Running 0 16sThe pod can take about ten to twenty seconds to get running.
-
Download the
init-db.sql.ziparchive and unzip it. -
Edit the
init-db.sqlscript to match the values you have set in the ConfigMap.-
semarchy_repository: Database used for the repository.
-
semarchy_repository_username: Database username to connect to the repository database.
-
semarchy_repository_password: Database user password.
-
semarchy_repository_ro_username: Database read-only user to connect to the repository database.
-
semarchy_repository_ro_password: Database read-only user password.
-
-
Save the file and run the following command to copy the script file to the disposable pod tmp folder:
$ kubectl cp init-db.sql semarchy-disposable-pod:/tmp -
Run the following command to access the disposable pod bash:
$ kubectl exec -it semarchy-disposable-pod -- bash -
Install the following curl command that you will use later:
$ apk add curl -
Run the following command to go to the tmp folder:
$ cd /tmp -
Run the following command to connect to the Database writer instance and to execute the initialization script:
$ psql
    --host "<writer_instance_endpoint>"
    --username "<db_cluster_username>"
    --dbname "semarchy_repository" < init-db.sql
Example 9. Command outputPassword for user <db_cluster_username>: -
Enter the database cluster master password (<db_cluster_password>) and press Enter:
Example 10. Command outputCREATE SCHEMA GRANT ALTER DEFAULT PRIVILEGES ALTER DATABASE CREATE EXTENSION CREATE EXTENSION CREATE ROLE GRANT ROLE CREATE SCHEMA CREATE ROLE GRANT ALTER ROLE GRANT -
Run the following command to connect to the database writer instance with the Semarchy repository user (XDM_REPOSITORY_USERNAME) created with the initialization script:
$ psql
    --host "<writer_instance_endpoints>"
    --username "<xdm_repository_username>"
    --dbname "semarchy_repository"
Example 11. Command outputPassword for user <xdm_repository_username>: -
Enter the database cluster master password (<xdm_repository_password>) and press Enter.
-
Run the following command to list the existing database schemas:
$ \lExample 12. Command outputsemarchy_repository=> \l List of databases Name | Owner | Encoding | Collate | Ctype | Access privileges --------------------+----------+----------+-------------+-------------+---------------------- postgres | postgres | UTF8 | en_US.UTF-8 | en_US.UTF-8 | xxxxxxxx | xxxxxxxx | UTF8 | en_US.UTF-8 | en_US.UTF-8 | xxxxxx=CTc/xxxxxx semarchy_repository | postgres | UTF8 | en_US.UTF-8 | en_US.UTF-8 | =Tc/postgres + … -
Exit from the PSQL command with the following command:
$ exit -
Exit from the disposable pod with the following command. You will re-use this pod later to confirm the deployment completion:
$ exit
Step 7. Deploy the active pod
Once the database instance and AKS cluster are running, you can deploy the docker image of the application server.
You need to start by deploying the active node with a unique pod:
-
Download the sample manifest archive for the application server active node and unzip it.
This file defines the deployment of the application server active node and the service associated with exposing the application. You can edit the content of the file to match your specific requirements. Refer to the Kubernetes documentation for more information. -
Run the following command from the folder containing the manifest file to deploy the active pod:
$ kubectl apply -f <appserver_active_file>.yamlExample 13. Command outputdeployment.apps/semarchy-appserver-active created service/semarchy-appserver-active created -
Run the following command to check the deployment progress until the status becomes Ready (this can take a few minutes):
$ kubectl get deploymentsExample 14. Command outputNAME READY UP-TO-DATE AVAILABLE AGE semarchy-appserver-active 1/1 1 1 13mThe deployment can take about ten to twenty seconds to be ready.
Step 8. Deploy the passive pods
At this step, deploy two instances of the passive application server image for a high availability configuration.
-
Download the sample manifest archive for the application server passive node and unzip it. This file defines the deployment of the application server passive node and the service associated to expose the app. You can edit the content of the file to match your specific requirements. Refer to the Kubernetes documentation for more information.
-
Run the following command from the folder containing the manifest file:
$ kubectl apply -f <appserver_passive_file>.yamlExample 15. Command outputdeployment.apps/semarchy-appserver-passive created service/semarchy-appserver-passive created -
Execute the following command to ensure that the passive nodes are deployed and ready:
$ kubectl get deploymentsExample 16. Command outputNAME READY UP-TO-DATE AVAILABLE AGE semarchy-appserver-active 1/1 1 1 13m semarchy-appserver-passive 2/2 2 2 12m
Step 9. Configure the load balancer
Finally, you need to expose your Kubernetes pods on your networks.
Set a load balancer using sticky sessions to route the users to the active and passive pods:
-
Download the sample Ingress manifest archive and unzip it.
-
Edit
ingress-session-affinity.yamlto match your requirements.
This file deploys an Ingress resource and configures it to use the sticky sessions for the passive instances.
Refer to the Kubernetes documentation for more information. -
Run the following command to apply the configuration:
$ kubectl apply -f <ingress_file>.yamlExample 17. Command outputingress.networking.k8s.io/ingress created
Step 10. Check the platform connection
At this step, you have deployed all the required resources to run Semarchy xDM on Azure with Kubernetes. You need the <cluster_ip> value you have retrieved at Step 4.
By default, the pods are not exposed to the internet. Hence, you have to use the disposable pod to check the platform connection with the active and passive nodes:
-
Run the following command to confirm that the load balancer is routing to the active instance:
$ kubectl exec -it semarchy-disposable-pod -- curl -v --resolve
semarchy-appserver-active:80:<cluster_ip>
semarchy-appserver-active:80/semarchy/api/rest/probes/started
Example 18. Command output* Added semarchy-appserver-active:80:<cluster_ip> to DNS cache * Hostname semarchy-appserver-active was found in DNS cache * Trying <cluster_ip>:80... * Connected to semarchy-appserver-active (<cluster_ip>) port 80 (#0) > GET /semarchy/api/rest/probes/started HTTP/1.1 > Host: semarchy-appserver-active > User-Agent: curl/7.80.0 > Accept: / > * Mark bundle as not supporting multiuse < HTTP/1.1 204 …This command executes a curl command on the disposable pod to query the REST API probe endpoints. -
Run the following command to confirm that the load balancer is routing to the passive instances:
$ kubectl exec -it semarchy-disposable-pod -- curl -v --resolve
semarchy-appserver-passive:80:<cluster_ip>
semarchy-appserver-passive:80/semarchy/api/rest/probes/started
Example 19. Command output* Added semarchy-appserver-passive:80:<cluster_ip> to DNS cache * Hostname semarchy-appserver-passive was found in DNS cache * Trying <cluster_ip>:80... * Connected to semarchy-appserver-passive (<cluster_ip>) port 80 (#0) > GET /semarchy/api/rest/probes/started HTTP/1.1 > Host: semarchy-appserver-passive > User-Agent: curl/7.80.0 > Accept: / > * Mark bundle as not supporting multiuse < HTTP/1.1 204 … -
Delete the disposable pod with the following command:
$ kubectl delete pod semarchy-disposable-podExample 20. Command outputpod "semarchy-disposable-pod" deleted