| This is documentation for Semarchy xDI 2023.1, which is no longer supported. For more information, see our Global Support and Maintenance Policy. |
Choosing your Java instance
It can sometimes be useful to tell Semarchy xDI Designer which Java virtual machine to use, such as on systems with multiple Java installations, or when the default Java installation is not compatible with Semarchy xDI Designer.
There are multiple ways to tell Designer which JVM it should use:
-
Using command line parameters
-
Using INI file parameters
-
Embedding in the Designer directory
-
Changing the system JVM
Designer will choose its JVM from the first available option, in that order.
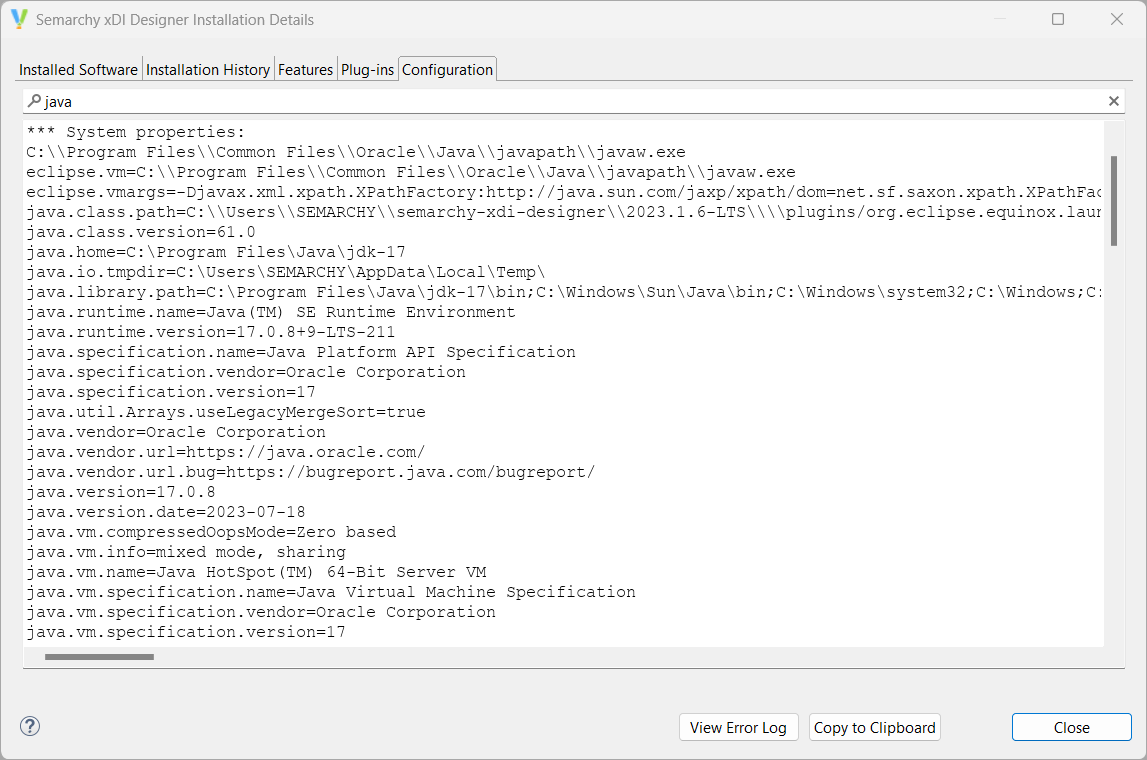
Check the active JVM
To find out which JVM Designer is currently using:
-
Open the Designer Help menu and choose About Semarchy xDI Designer
-
Click the Installation Details button
-
In the window that appears, click the Configuration tab
-
Find the properties that start with
java., or typejavain the text filter box
The java.library.path property will contain either the path to the system-wide Java installation if that is what Designer is using, or the Designer installation path if any other JVM is in use. Properties such as java.version or java.runtime.* will also give you version information for the active JVM.
Using command line parameters
You can start Designer from the command line with the -vm parameter, followed by the path to Java executable files, to use those as your JVM.
Windows example:
semarchy-xdi-designer-windows.exe -vm D:\apps\java\jdk-17.0.2\binLinux example:
./semarchy-xdi-designer-linux -vm /home/semarchy/jdk-17.0.2/bin|
You can create shortcuts or aliases with these commands. |
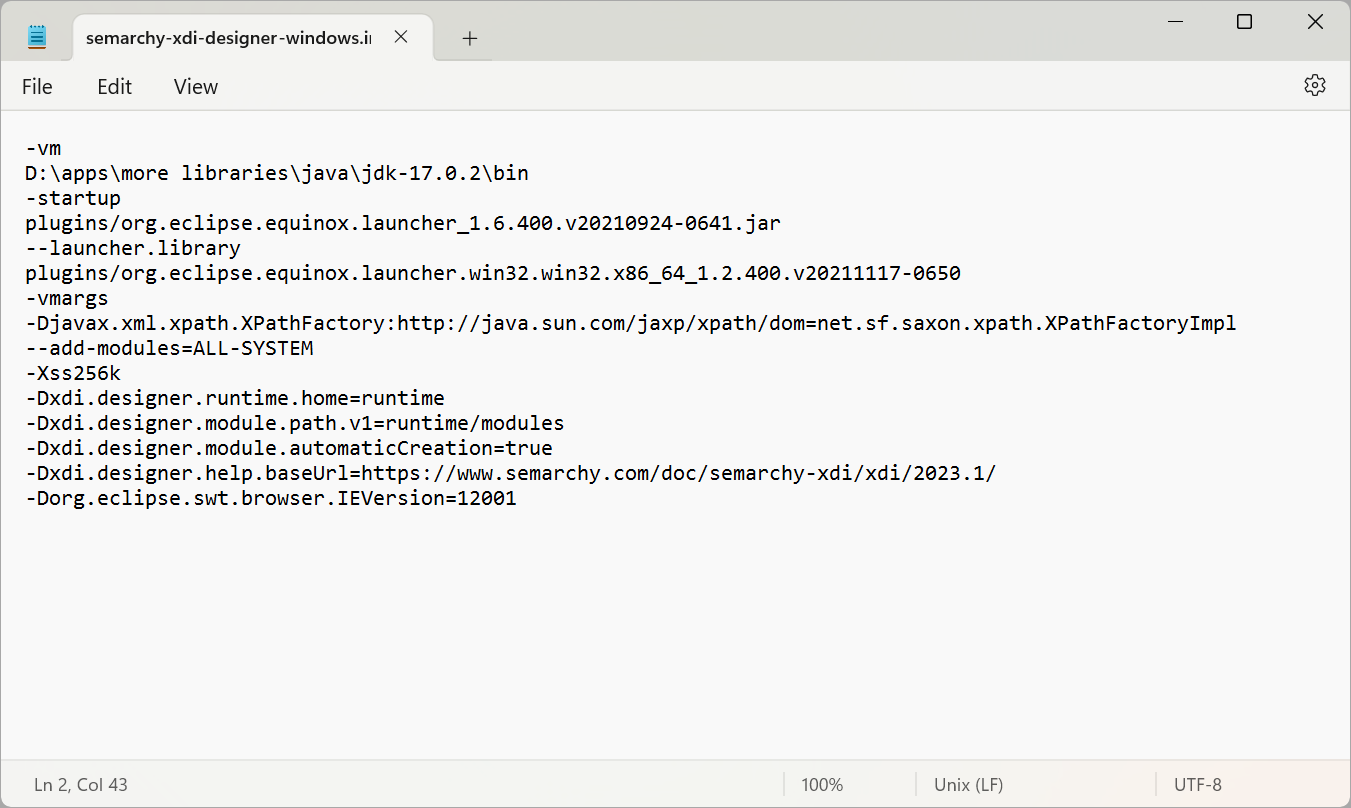
Using INI file parameters
You can also specify a JVM path in the semarchy-xdi-designer.ini configuration file for your operating system. This INI file is found in the Designer installation directory, or in the app package on macOS.
|
The semarchy-xdi-designer.ini file is sensitive to extra spaces or line breaks. We recommend backing up the file before making any changes. You can also find a default version in the Designer download. |
To specify a JVM path in the semarchy-xdi-designer.ini configuration file:
-
Open semarchy-xdi-designer.ini in a text editor
-
Add two empty lines at the start of the file
-
On the first empty line, type
-vm -
On the second empty line, write the full path to the Java executables
-
Remove any extra spaces
Embedding in the Designer directory
Designer can use a JVM from its installation directory. If you prefer not to install Java for an entire system, you can put a standalone version of Java in a particular directory that Designer will find.
-
Download a compressed Java JRE or JDK archive
-
Extract the archive to the main Designer directory, keeping the directory structure
-
Rename the extracted top-level directory to
jre -
The
jredirectory should contain other directories such asbin,conf,lib -
Run Designer as normal
Standalone Java versions are available from providers such as Oracle, or the OpenJDK website.
Changing the system JVM
If nothing else is set, Designer uses the system-wide JVM.
You can modify the PATH environment variable to point to the JVM you want to use by default. This will also affect other software that uses Java, so use this method with caution.
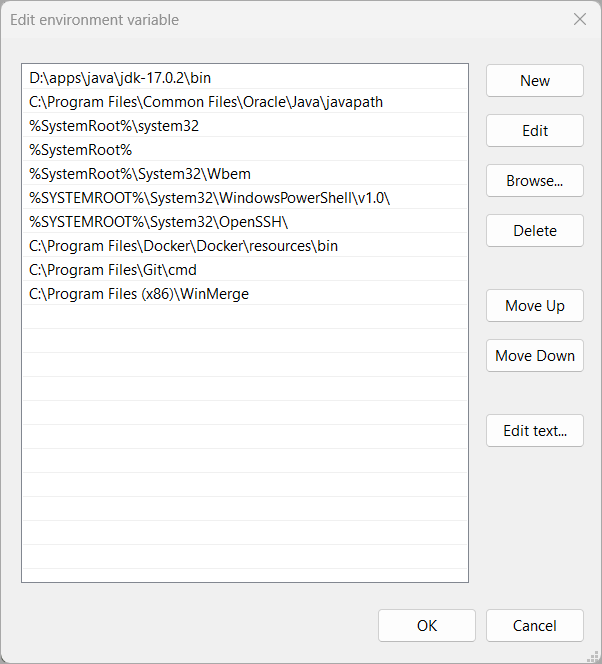
Windows
You can modify the Path user or system variable to point to the JVM you want to use by default.
When editing the variable, add the full path to the desired Java executable files, and move it to the top of the list.
Linux
You can modify the PATH environment variable to point to the JVM you want to use by default.
For distributions that use bash as their default shell, such as Ubuntu Linux, open your ~/.bashrc file in a text editor. Add the following text to the end of the file:
export PATH=<path_to_java>:$PATHReplace <path_to_java> by the full path to your Java executable files. Save the file, log out of your user session, and log back in.
For more information, refer to the documentation for your Linux shell.
macOS
On macOS, system variables usually do not control the active JVM. The macOS system launcher will ignore them and use the greatest installed Java version instead.
To change which JVM the macOS system uses, you need to disable each version greater than the one you need. For example, if you have Java versions 21.0.2, 17.0.9 and 11.0.2 installed, and you want to use version 17.0.9, you would need to disable version 21.0.2.
To disable a JVM:
-
In Finder or the Terminal, go to the
/Library/Java/JavaVirtualMachinesdirectory to see all installed Java versions. -
Enter the directory of the JVM you want to disable.
-
Enter the
Contentsdirectory. -
Rename
Info.plisttoInfo.plist.disabled.
Repeat these steps for every JVM you want to disable.
A disabled JVM can still be used when explicitly referenced in a script or configuration, but the macOS system launcher will ignore it by default.