| This is documentation for Semarchy xDI 2023.1, which is no longer supported. For more information, see our Global Support and Maintenance Policy. |
Getting Started with Semarchy xDM
Use the Semarchy xDM component to publish data and consume data from a Semarchy xDM data hub.
-
Create metadata for the database schema hosting the Semarchy xDM data location; and reverse-engineer the data location tables stored in that schema.
-
Integrate data to and from the data location tables, using templates customized for Semarchy xDM.
-
Make use of xDM-specific tools to manage loads when publishing data to a Semarchy xDM data location.
Connect to your Data
Create metadata for the data location
First, create a metadata object for a Semarchy xDM data location:
-
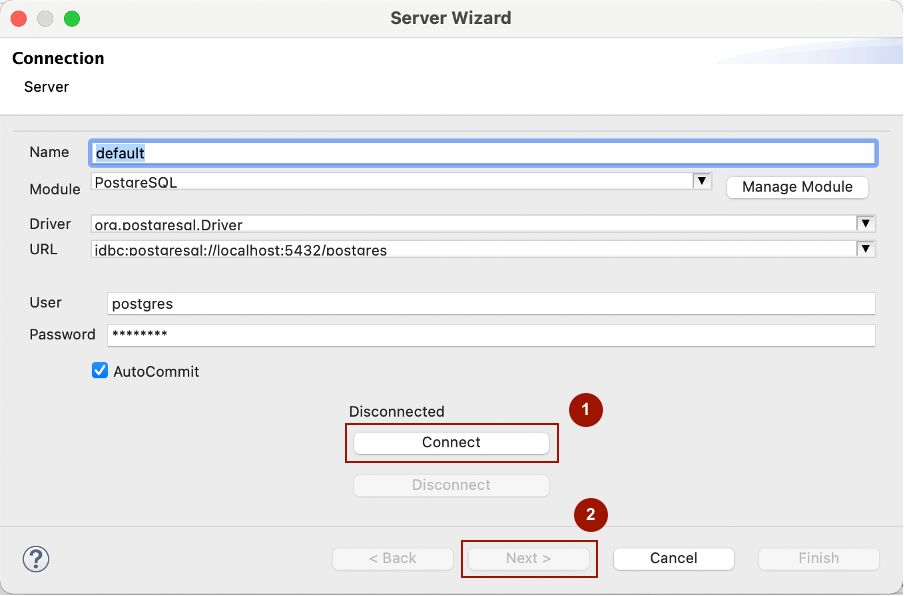
Start the metadata creation wizard.
-
Select the database technology (Oracle, SQL Server, PostgreSQL, or Microsoft Azure SQL) hosting the Semarchy xDM data location.
-
Enter the database connection details and credentials, and click Connect.
-
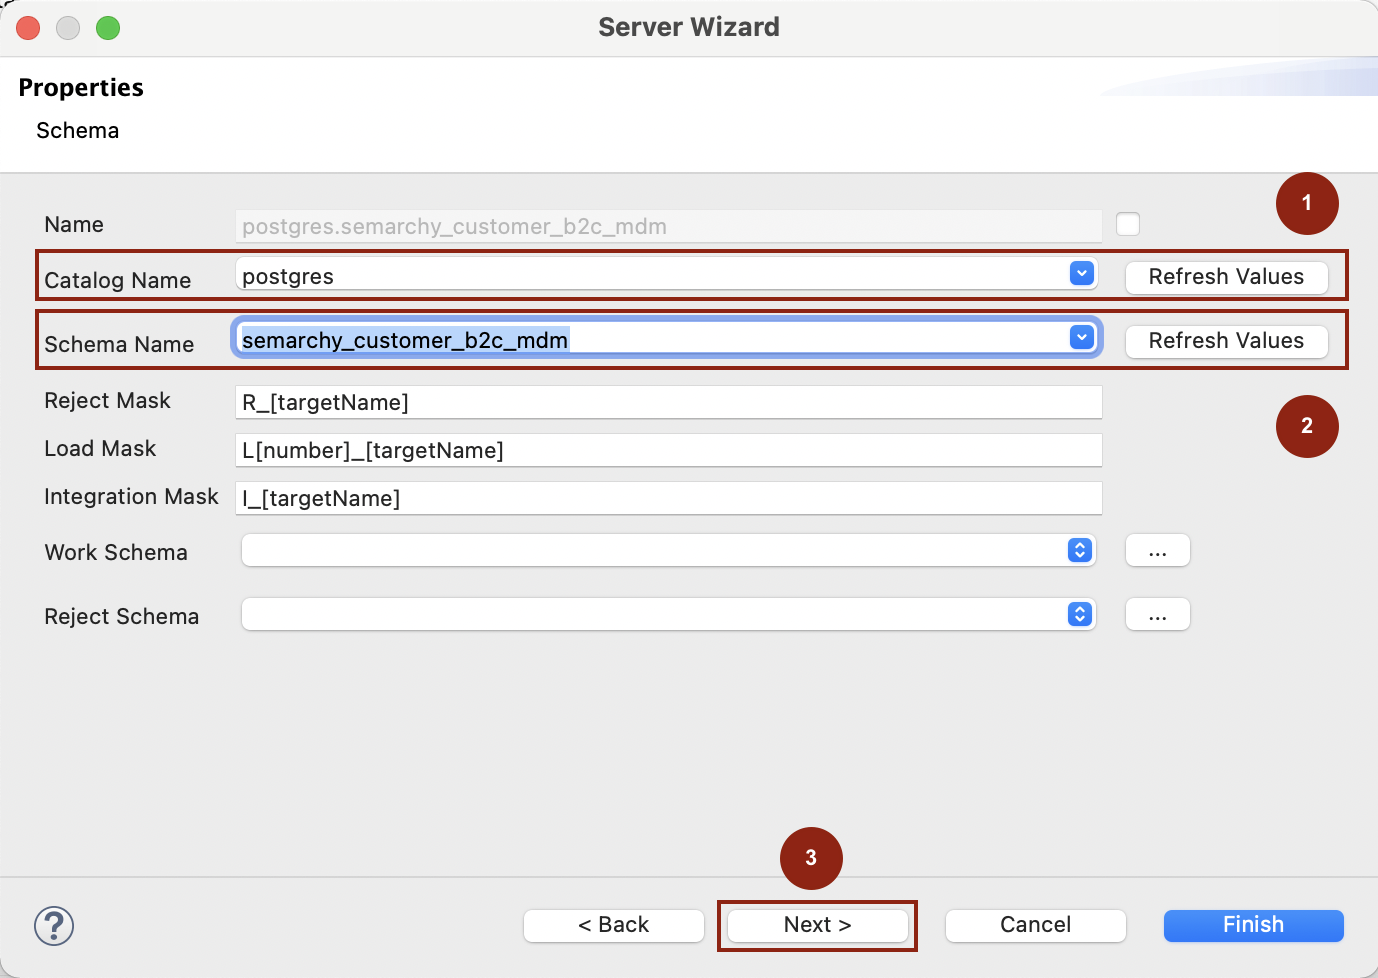
On the next page, on the Catalog Name, click Refresh, then select the name of your database from the list.
-
On Schema Name, click Refresh, and select the schema containing the Semarchy xDM data location from the list.
-
Click Next to refresh the list of tables, and select those to reverse-engineer.
-
Click Finish, and save your metadata.
Create metadata for the repository
Your Semarchy xDM data location may be separate from its repository. If they are separate, and you want to use xDM process actions in xDI, you need metadata for the repository as well.
Repeat the steps for metadata creation, for the Semarchy xDM repository.
Define xDM parameters
The xDM parameters determine Load ID management behavior for mappings that use xDM database metadata with the INTEGRATION Semarchy xDM template.
These parameters are in the xDM finger tab of the top-level database metadata node.
| Parameter | Description |
|---|---|
Is xDM Database |
Defines whether the current metadata hosts an xDM data location. Selecting this option makes the INTEGRATION Semarchy xDM template available when targeting tables in the metadata. It uses the metadata’s xDM parameters by default. |
Default Load ID Management |
Defines how templates manage Load IDs. Possible options are:
|
Default Load ID Type |
This property only applies when the load ID management is set to Autonomous. Defines where the INTEGRATION Semarchy xDM template should get the load ID from:
|
Default Continuous Load Name |
Name of the default Continuous Load to use, when Default Load ID Type is set to Continuous Load ID. By default, this field is set to |
Default xDM User Name |
Name of the user initializing and submitting the load. |
Default Repository Schema |
Name of the database schema hosting the Semarchy xDM repository. |
Default Data Location Name |
Name of the data location hosting the data hub. You can find the name of the data location Semarchy Data Location view. |
Default Data Location Schema |
Name of the database schema hosting the Semarchy xDM data location tables. |
Default Integration Job Name |
Default Integration Job Name used when submitting a Load. |
| The xDM Parameters define default values used by the mappings. You can override them in each mapping by setting the corresponding template parameters. |
User permissions
The user you specify must have at least these permissions:
Data location permissions |
|
Repository permissions |
|
Create your mappings
Next, create mappings with Semarchy xDM tables to extract data from and load data to Semarchy xDM data hubs.
Extract data from Master Data and Golden Data tables
The data location’s golden data (GD) and master data (MD) tables are commonly used to consume records from the data location. To extract data from Semarchy xDM, use these tables as sources in your mappings.
| See Consume Data Using SQL in the Semarchy xDM documentation for more information about the patterns to consume master and golden data from Semarchy xDM. |
Load data into Source Authoring and Source Data tables
The Source Authoring (SA) and Source Data (SD) tables are used to load data into the data location. To load data to Semarchy xDM, use these tables as targets in your mappings.
| See Publish Data Using SQL for more information about loading data into Semarchy xDM using the SD and SA tables. |
|
When designing mappings targeting Semarchy xDM:
|
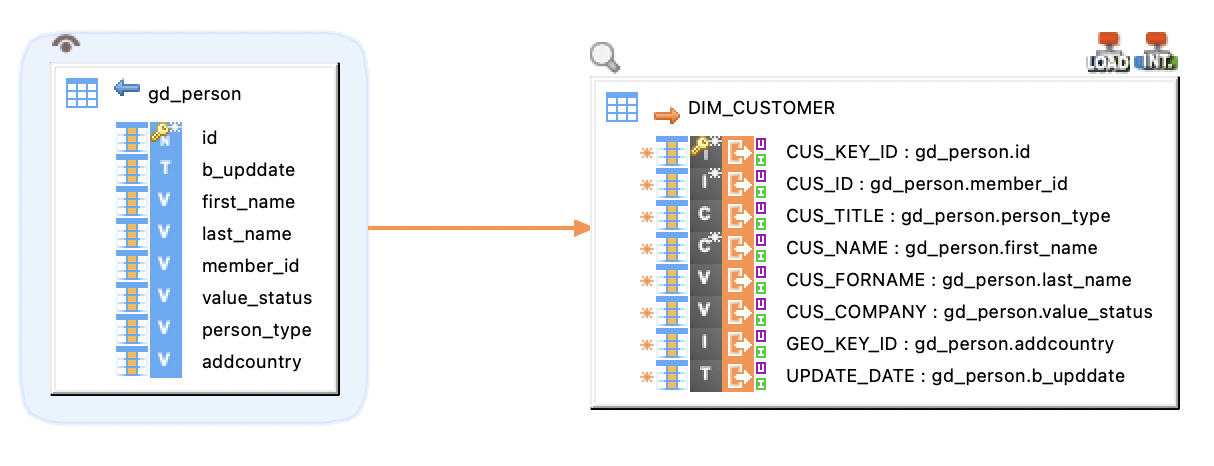
When loading data into a data location’s SD or SA tables, populate the business data columns according to your data flow requirements. You must also map the following columns:
-
B_CLASSNAME: Map this column with a literal value or a column containing the name of the entity that you want to load. -
B_PUBID: For fuzzy and ID-matched entities, map this column to a literal value or a column containing the code of the publisher on behalf of whom you are publishing the data. -
ID column: The ID column to map depends on the type of entity:
-
For Basic entities: Column representing the primary key attribute for the entity.
-
For ID-matched entities: Column representing the primary key attribute for the entity.
-
For Fuzzy matched entities: If the entity uses fuzzy matching, then load the value of the primary key coming from the source system into the
B_SOURCEIDcolumn. If this primary key is composite, concatenate the values of the composite primary key and load them in theB_SOURCEIDcolumn.
-
-
Reference columns: When loading data for entities that are related by a reference relationship, load the referencing entity with the value of the referenced primary key. The columns to load (F_, FS_, and FP_ columns) depend on the entity type of the referenced entity: for more details, refer to the Publish Data > References in the Semarchy xDM documentation.
Manage Load IDs
Records loaded to Semarchy xDM are batched in a Load ID. The Integration Semarchy xDM template supports both automatic and user-managed load IDs.
There are two methods to manage the Load ID:
-
Autonomous: In this mode, Semarchy xDI automatically manages and populates the Load ID with the data. Semarchy xDI generates a Load ID (or retrieves it from a continuous load), uses it while loading the data, and submits or cancels the load it has generated depending on the mapping outcome. This mode is used by default.
-
User-Managed: In this mode, you generate/retrieve the Load ID separately from the mappings, and decide when to submit or cancel. Dedicated Semarchy xDM Tools are available to perform these operations. This is typically useful when you want full control over the load lifecycle. For example, when you want to use the same generated Load ID for multiple mappings.
Two types of Load IDs can be used:
-
Continuous Load ID: Retreives the ID of an existing Semarchy xDM Continous Load. Data loaded using a continuous load is automatically processed on the continuous load’s schedule, using a job defined in the continuous load. You do not need to submit such a load, and cannot cancel it.
-
Standalone Load ID: A Load ID is generated and stored in a variable. Such a load needs to be explicitly submitted after the data is loaded, or canceled.
| You can configure the default mapping behavior in the metadata’s xDM parameters. You can override these values per mappings using the corresponding template parameters. |
| Refer to Publish Data Using SQL to learn more about publishing data into Semarchy xDM. |
Autonomous Load ID
To use Autonomous Load ID management:
-
Create a mapping with Semarchy xDM as a target.
-
Choose the Autonomous Load ID management, either in the Semarchy xDM metadata’s Default Load ID Management property (default behavior), or in the Load ID Management template property.
-
Map your columns, as explained in [Load data into SD and SA tables].
-
Run the mapping.
Data is loaded into Semarchy xDM with a Standalone Load ID that is automatically created, used, and submitted for the mapping, or with the specified Continuous Load ID
User-Managed Load ID
To use the User-Managed Load ID management:
-
Create a process to orchestrate data loading with multiple mappings.
-
In this process, create a Get LoadID action to initialize a Load ID, or retrieve the ID of a continuous load.
-
Create one or multiple mappings, with Semarchy xDM as a target.
In these mappings:-
Set Load ID Management to User-Managed, or leave it blank if this default value is set in the target metadata.
-
Map your columns, as explained in [Load data into SD and SA tables].
-
Add these mappings to the process.
-
-
If you use a Standalone Load ID, add Submit Load and Cancel Load actions to the process after the mappings to submit or cancel loads depending on success or failure conditions.
NOTE: If you use a Continuous Load ID, you do not need to submit. -
Run the process.
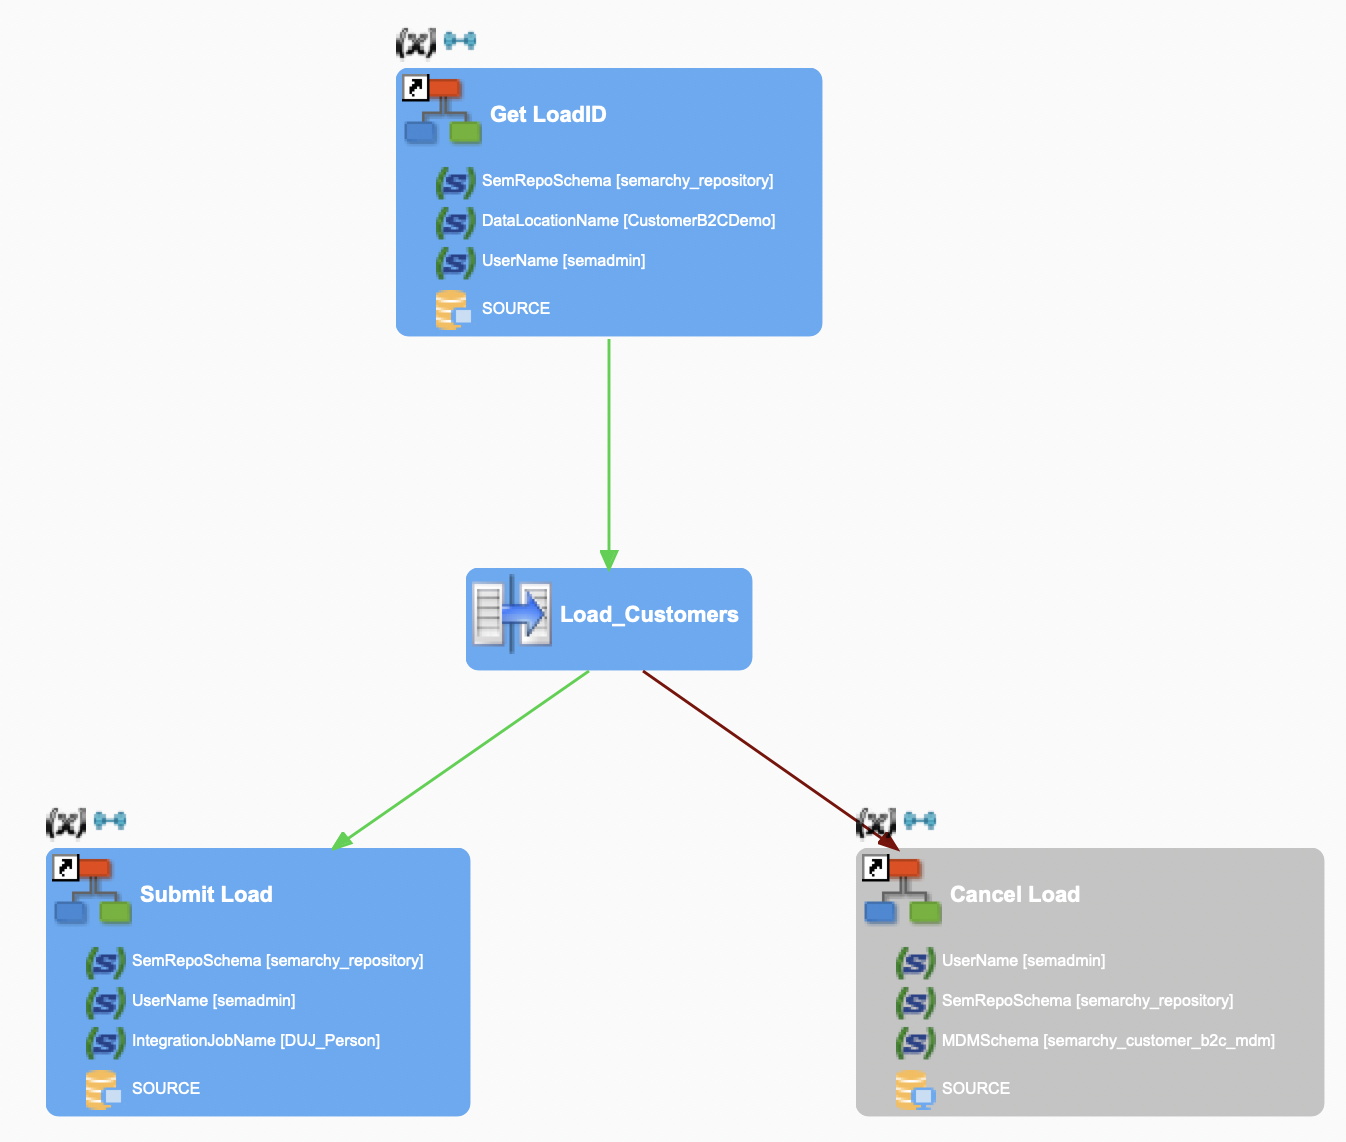
Data loads into Semarchy xDM with the user-managed Load ID.
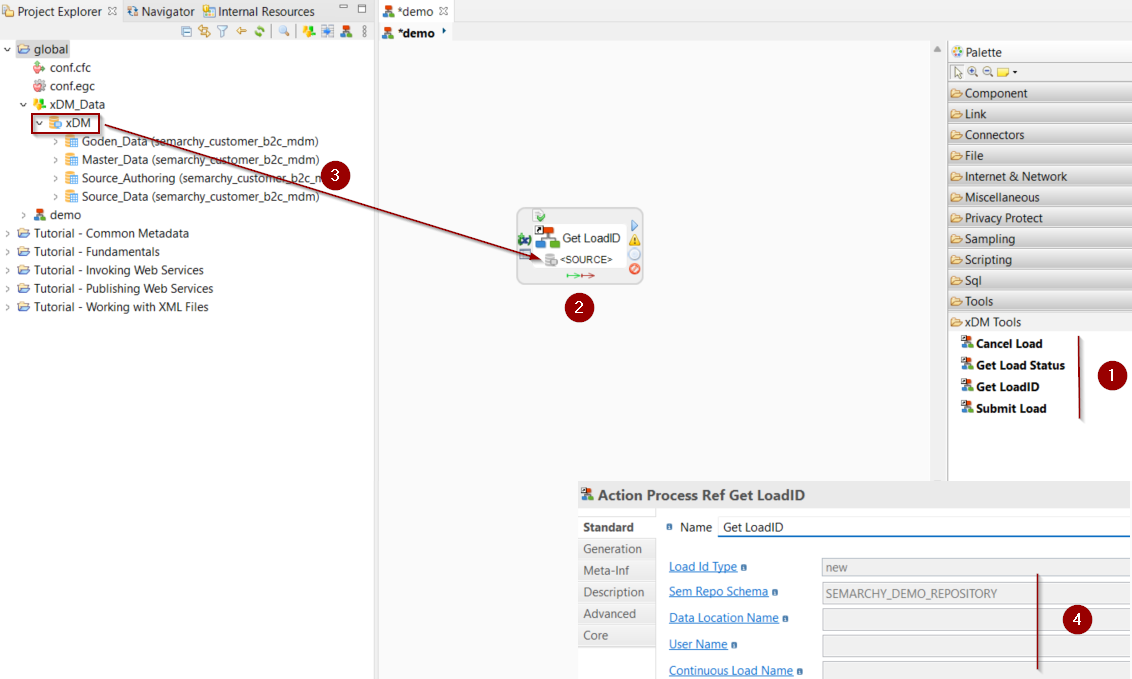
The following image illustrates a process for loading data into a source data table with the user-managed Load ID management:
Semarchy xDM Tools
The Semarchy xDM component provides process actions to manage load operations, as required when publishing data in a Semarchy xDM data location with user-managed Load IDs. The following tools are available:
-
Get LoadID initializes a new load or retrieves a continuous load, and stores the resulting Load ID in a variable.
-
Submit Load submits a load, whose ID is read from a variable.
-
Cancel Load submits a load, whose ID is read from a variable.
-
Get Load Status gets the status of a load after a submit.
To add a Semarchy xDM Action to a process:
-
Select the appropriate tool from the Process Palette, under xDM Tools.
-
Click the process background to add the tool.
-
Drag and drop the database containing the Semarchy xDM repository onto the
REFmetadata link placeholder.Make sure to drag and drop metadata representing the Semarchy xDM repository onto the REFmetadata link. Depending on your implementation of Semarchy xDM, this database may not be the same database as the one containing the data location. -
Fill in the tool parameters. See the actions reference for the complete parameter list.
Example:
The actions use a session variable to store and read Load IDs within a process. Its default value should work in most cases, but you can rename the variable in the actions' Load Id Session Variable Path parameter.