| This is documentation for Semarchy xDI 2023.1, which is no longer supported. For more information, see our Global Support and Maintenance Policy. |
Source control in xDI Designer
In Semarchy xDI Designer, workspace and project resources are all saved as files. You can use a source control system to better track and manage changes to your projects, and improve team collaboration.
xDI Designer comes with the Eclipse EGit plug-in. EGit uses a Git library to manage sources from within Designer.
This article mainly covers source control with Git, in an abbreviated form. Read the official EGit user guide for a detailed configuration and usage guide.
Initial setup
Git tools
For general use cases, xDI Designer comes with the Eclipse EGit plug-in. No further install steps are needed, but you can also install a local copy of Git.
If you want to install EGit plug-ins, such as Git Large File Storage (LFS), install them from inside Designer. Follow these steps:
-
Open the Help menu.
-
Select Install New Software.
-
In the first text field, labeled Work With, enter the URL
https://download.eclipse.org/egit/updates -
Wait for the extension list to refresh.
-
Select the plug-ins you want to install, and click Next or Finish.
You can also update EGit manually from this menu if you do not want to wait for an xDI platform update.
Other tools
You can also add other source control tools such as SVN. You can find their plug-ins on the Eclipse marketplace, with their own installation instructions.
Configure Git in xDI Designer
The main way of configuring the Designer Git integration is through the Preferences window. The configuration files can also be edited directly, and copied to other Designer instances.
Access Git integration settings from the Window > Preferences menu, under Version Control (Team) > Git.
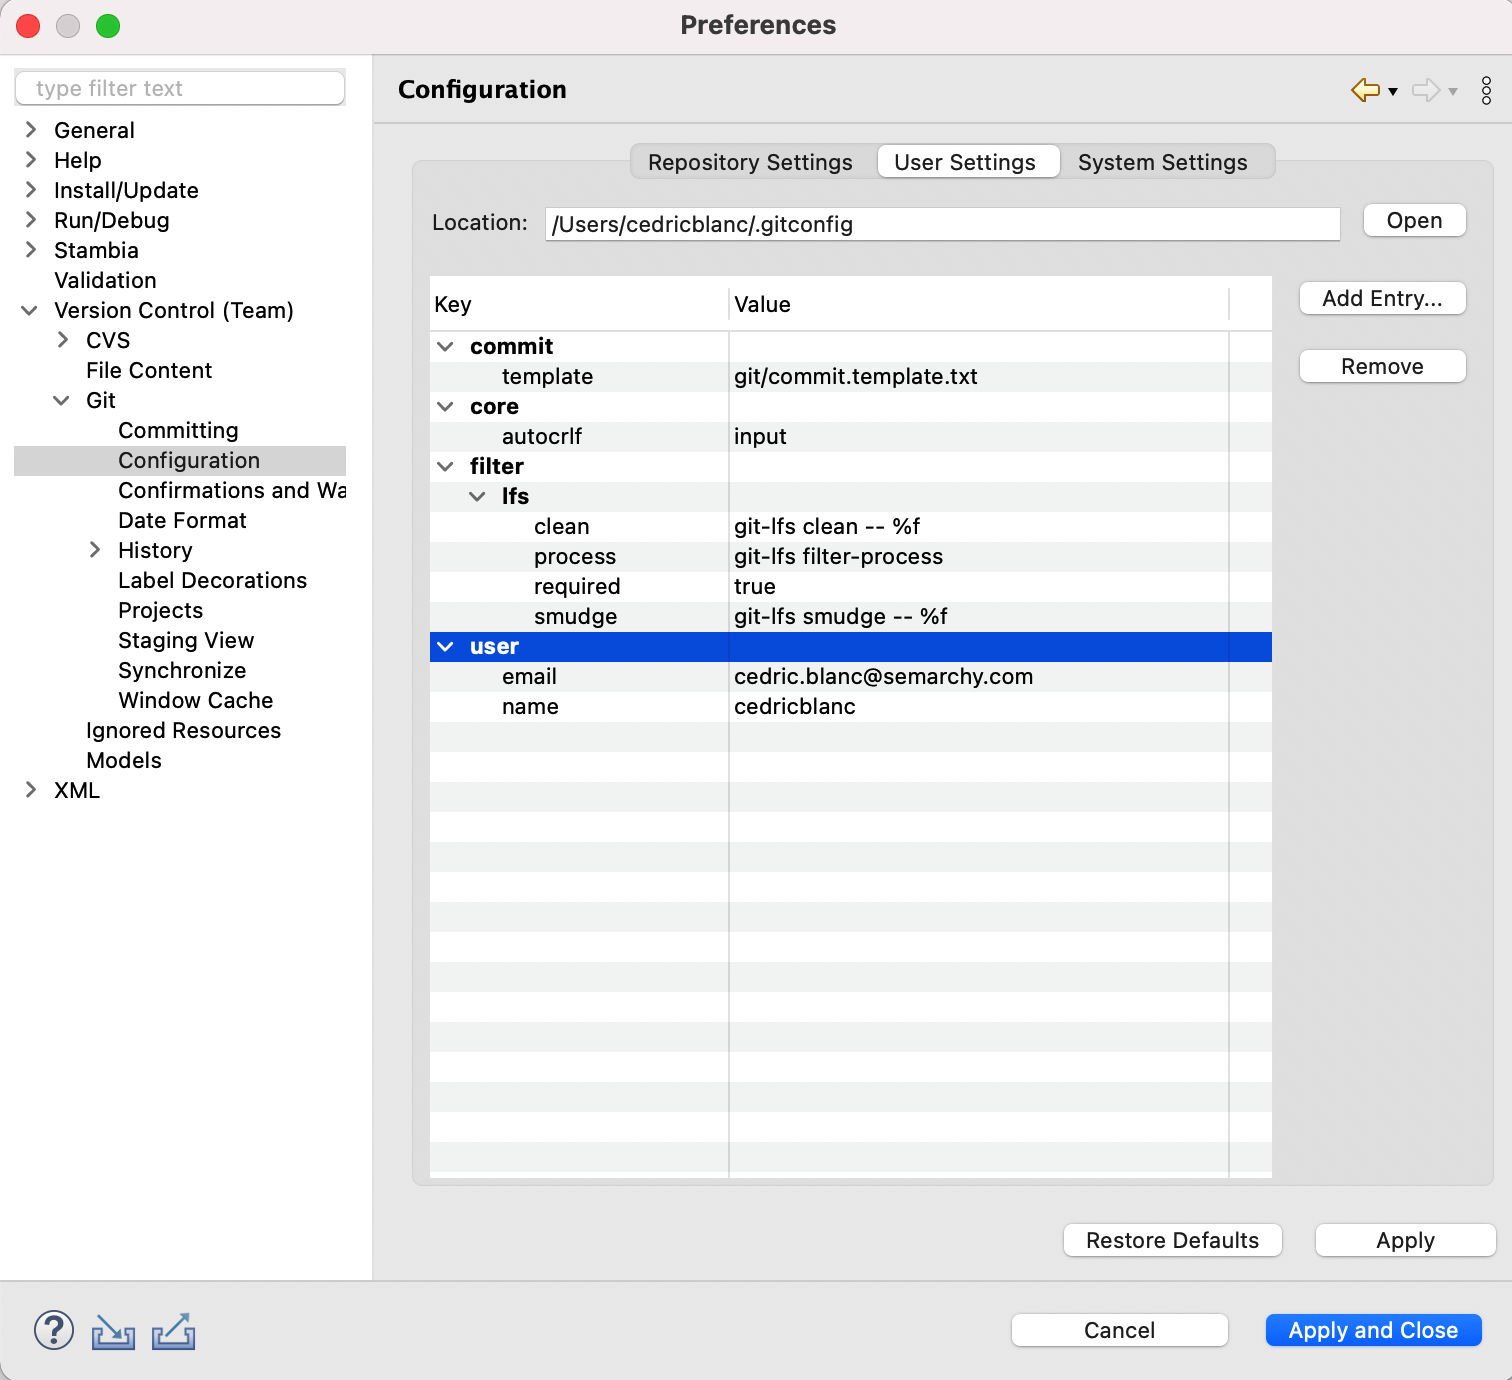
Identify yourself
Start by entering the username and email to use when you commit changes. A dialog appears the first time you create a commit, but you can also add or change these parameters yourself:
-
Open Git settings in Designer.
-
Verify the existence and the value of the following properties. Add or update them if needed:
-
user.email: your email address. -
user.name: your Git username.
-
Set up the home directory
EGit needs a home path to look the user configuration .gitconfig. In your operating system, add the environment variable HOME to your environment variables list.
Restart the application after adding the environment variable.
Point out the system-wide configuration (Windows)
If you use a standalone installation of Git for Windows as a companion to EGit, make sure EGit knows where Git is installed so it can find the system-wide settings.
Go to the Git settings in Designer. Look under Configuration, and then the System Settings tab. If the location of the system-wide settings is filled in with a path, everything is fine. If not, use the Browse button to locate where Git is installed, such as C:\Program Files(x86)\Git.
General usage
Create a repository
-
Create or open a project.
-
In the Project Explorer, open the project context menu and select Team > Share Project.
-
Click Create… to start the repository creation process.
-
Finish the wizard.
Decorator text such as [master] behind the project shows that this project is tracked in a repository. Question mark decorators show files that are not yet under version control.
Manage repositories
To manage repositories from inside Designer, use the Git view that EGit provides.
-
From the Window menu, select Show View > Git Repositories. The graphical environment changes panels.
-
From this view, manage your repositories. You can also add other repositories from this view.
-
To return to the main Designer view, click on Semarchy xDI Designer at the top right of the program window.
Track or ignore changes
Add elements to track
Click Team > Add to Index on the project node. The + decorators show that the project’s files have been added to version control.
Add elements to ignore
Have Git ignore files and folders by marking them in one of two ways:
-
Right-click and select Team > Ignore on a project node or file.
-
Create a file
.gitignorein the project folder, and add the elements to ignore to it.
Add .gitignore to version control with Team > Add. If you cannot see .gitignore, set your view filters:
-
Select the down arrow on the right edge of the Package Explorer tab to display the View menu.
-
Select Filters… from the View Menu to open the Java Element Filters dialog.
-
Clear the top entry to display files that begin with
.such as.gitignore.
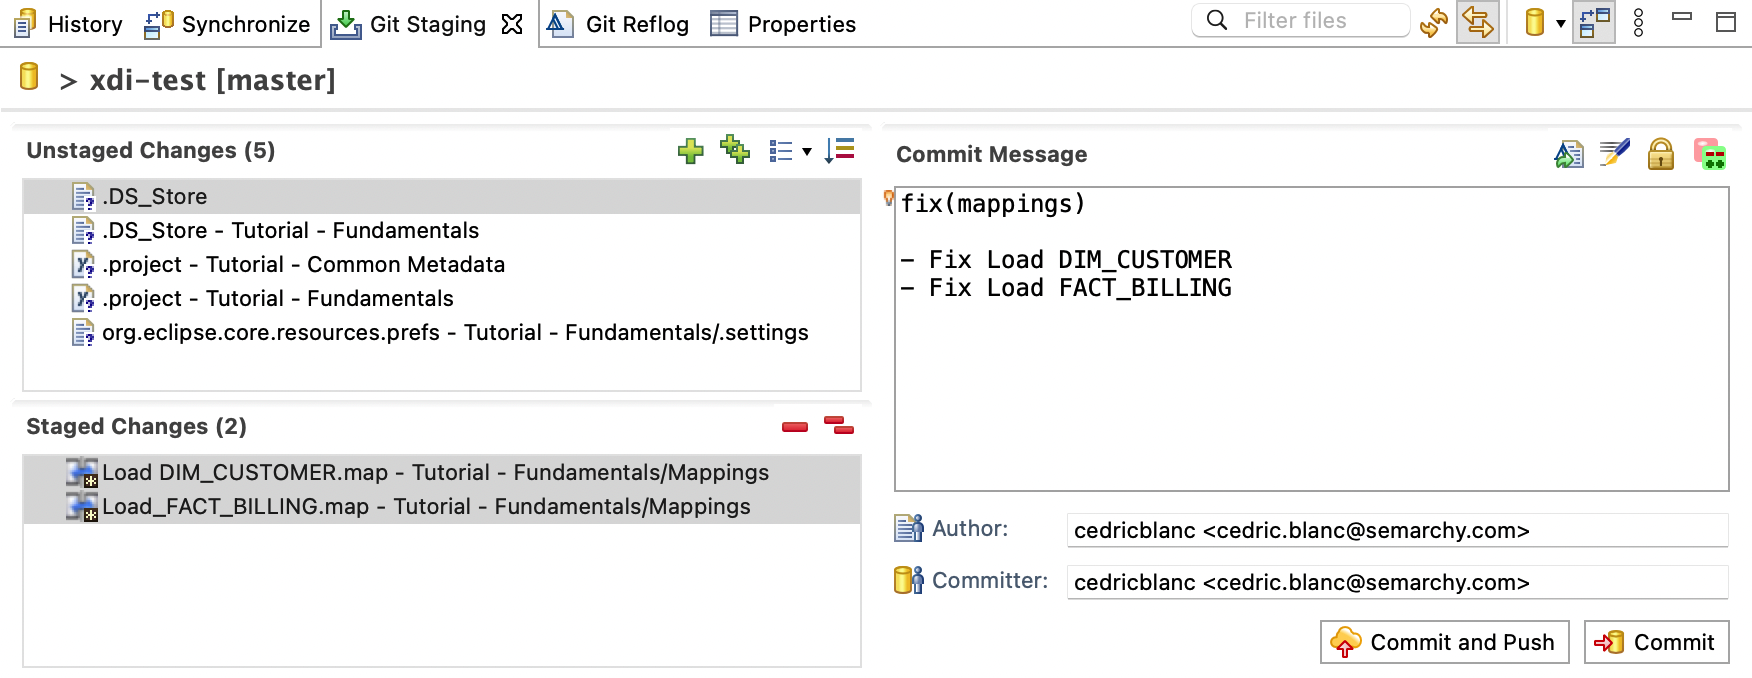
Commit and push changes
To share your changes with other designers working on the same project, you need to stage, commit and push these changes to the Git repository:
-
From the Git or the xDI Designer perspective, open the Git Staging view.
If the Git Staging view is not visible, click Window > Show View > Git Staging. -
Select the Unstaged Changes you want to commit and click the
 button to add them to the list of Staged Changes.
 -
Enter the Commit Message and click:
-
Commit and Push to commit the changes and push them to the remote Git repository.
-
Commit to only commit the changes and push them later.
-
To push changes that have already been committed:
-
From the xDI Designer perspective, in the Project Explorer view, right-click the project in which you have committed changes and click Team > Push Branch {branch name}.
-
Review the Source and Destination parameters (in particular the destination Branch), select the desired merge or rebase method in the When pulling drop-down list and click Preview.
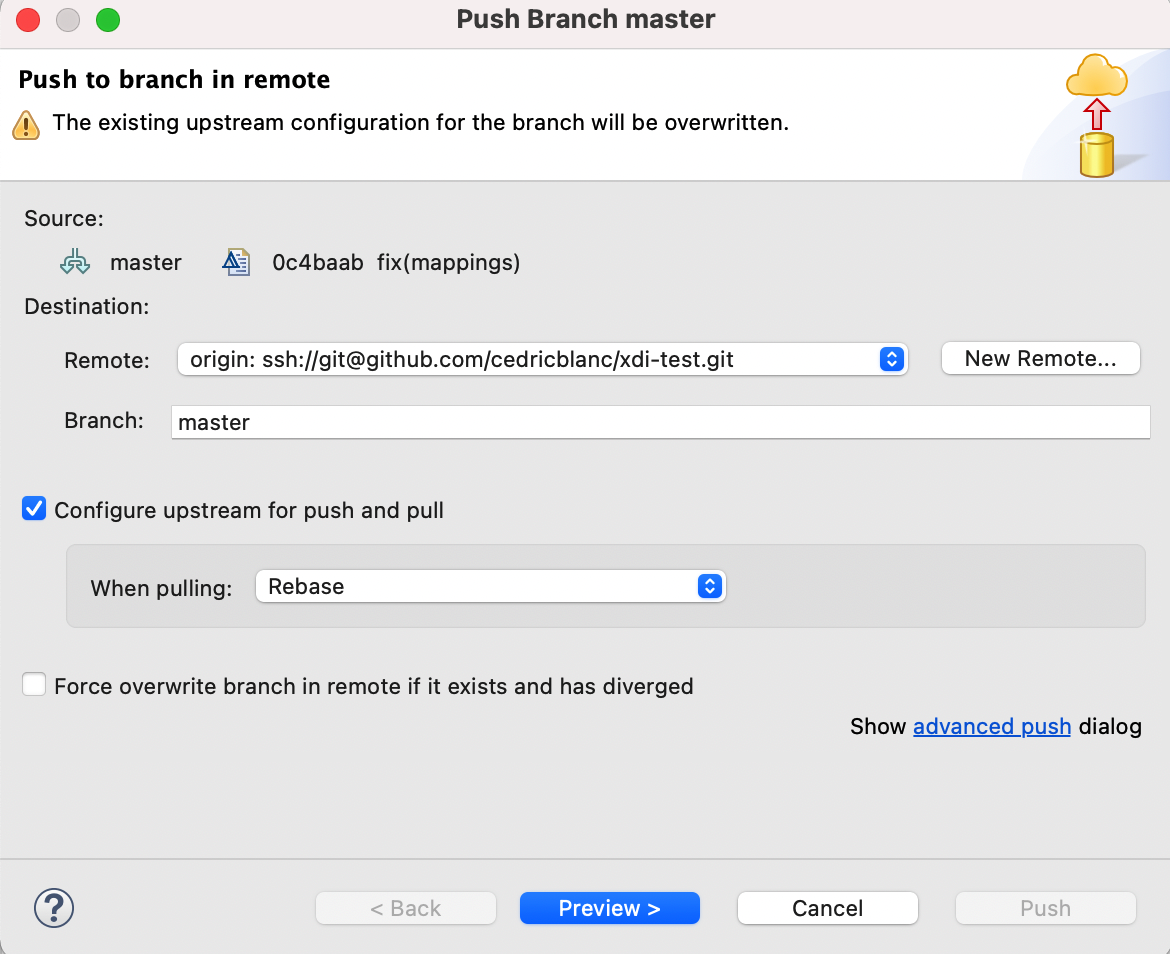
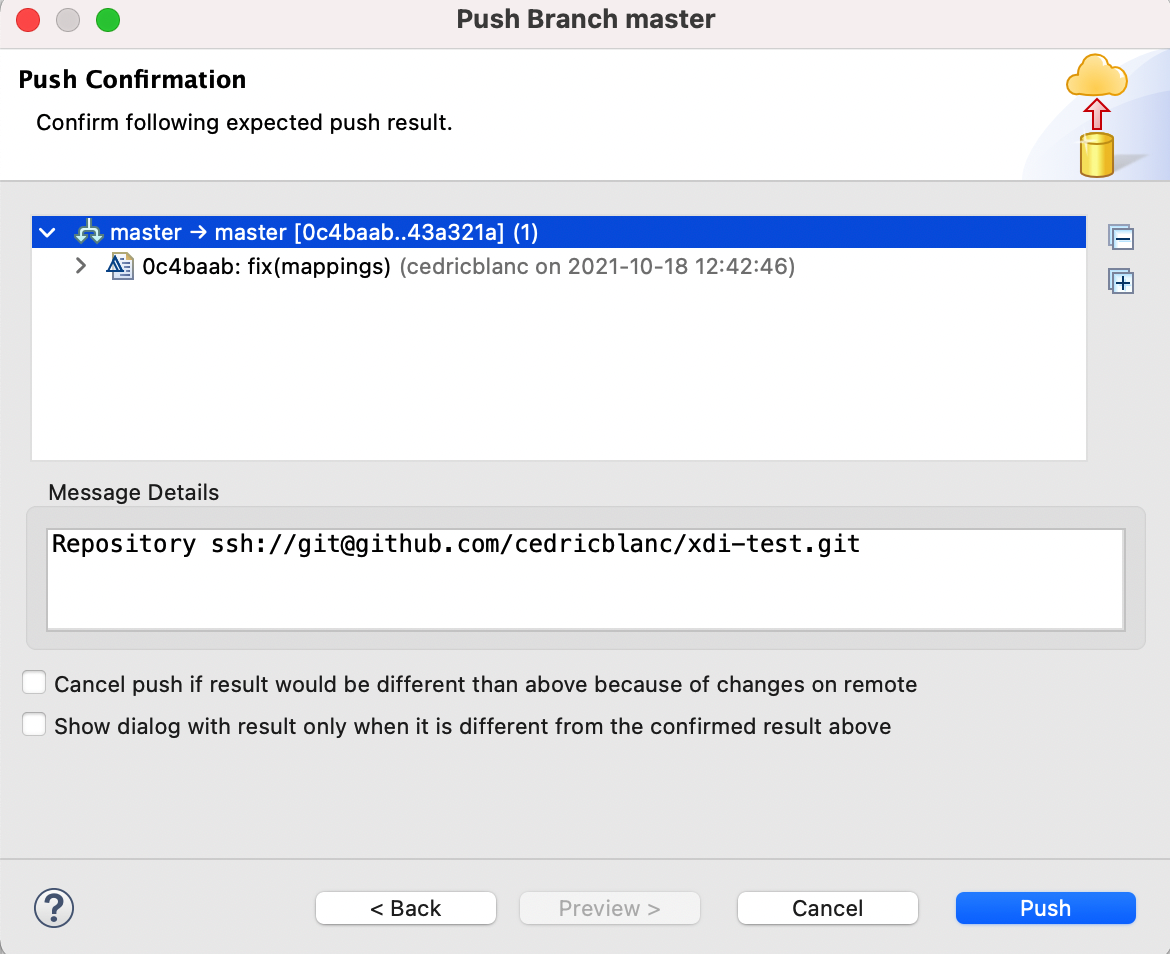
-
After verifying the result of the push preview, click Push.
Configure repositories using the configuration files
Use configuration files directly when working with continuous integration environments, or when preparing a preconfigured instance of Designer. It is easier to first configure Git options in Designer, then edit or move the configuration files directly.
| When editing or adding configuration files directly, make sure your Git repositories exist as defined in the files. |
Git configuration
Git repository configuration is saved in a org.eclipse.egit.core.prefs file.
-
Navigate to the xDI Designer workspace directory.
-
Navigate to the
/.metadata/.plugins/org.eclipse.core.runtime/.settings/subdirectory. -
Find the
org.eclipse.egit.core.prefsfile or create it if it does not exist.
The following keys are needed in the file:
-
eclipse.preferences.version=1 -
GitRepositoriesView.GitDirectories=<Repo File Path 1>;<Repo File Path 2>;… -
GitRepositoriesView.GitDirectories.relative=<Repo File Path 1>;<Repo File Path 2>;…
Replace the file path sections with the full path of your repositories' .git file.
| In Windows, escape the ':' character with a backslash, and double intentional '\' characters. |
eclipse.preferences.version=1
GitRepositoriesView.GitDirectories=C\:\\Users\\sem-demo\\git\\xdi-repository-1\\.git;C\:\\Users\\sem-demo\\git\\xdi-repository-2\\.git
GitRepositoriesView.GitDirectories.relative=C\:\\Users\\sem-demo\\git\\xdi-repository-1\\.git;C\:\\Users\\sem-demo\\git\\xdi-repository-2\\.git
Git over SSH
Git repositories use HTTPS or SSH for access. If your Git repository is reachable through SSH, define SSH information.
In xDI Designer
Verify your SSH connection:
-
In the Window menu, click Preferences.
-
Navigate to General > Network Connections > SSH2.
-
Make sure that SSH2 home is defined (the usual value is ~/.ssh).
-
Make sure that the Private Keys list contains a SSH2 key declared in your repository.
-
If a key is missing, click Add Private Key to add it.
If you need to generate a key, follow these steps:
-
Select the Key Management tab.
-
Click Generate RSA Key.
-
Click Save Private Key. The saved key is automatically added to the list of keys in the General tab.
-
Add this public key to your Git repository.
For GitHub, see the GitHub Authentication page for more information.
In configuration files
Find and define SSH information in a org.eclipse.jsch.core.prefs configuration file.
-
Navigate to the xDI Designer workspace directory.
-
Navigate to the
/.metadata/.plugins/org.eclipse.core.runtime/.settings/subdirectory. -
Find the
org.eclipse.jsch.core.prefsfile or create it if it does not exist.
The following keys are needed in the file:
-
PRIVATEKEY=<Private Key File Name 1>,<Private Key File Name 2>,… -
SH2HOME=<Path to the folder containing the private keys.>
PRIVATEKEY=sem-demo-private-key-file
SSH2HOME=C:\\Users\sem-demo\.ssh