| This is documentation for Semarchy xDI 2023.1, which is no longer supported. For more information, see our Global Support and Maintenance Policy. |
Getting Started with MongoDB Database
Connect to your Data
Metadata creation
The first step is to create the MongoDB Metadata.
Launch the Metadata creation wizard, and select MongoDB.
Then, define the properties of the root node.
| Property | Description |
|---|---|
Name |
A label/alias for this database. |
MongoDB URL |
MongoDB server URL, with the following syntax: Some examples: |
MongoDB home |
Path to the MongoDB server installation directory. |
Below, an example:

Metadata Reverse
Each node of the MongoDB Metadata offers the possibility to reverse its structure.
Simply right click on the desired node and choose: Actions > Reverse [All]
-
On the server node: All databases and collections are reversed
-
On a database node: All the collections of the database are reversed
-
On a collection: The collection is reversed
Define a database node
To add a database node manually, you can right clic on the server node and choose New > Database.
The following properties are available on this node.
| Property | Description |
|---|---|
Name |
A label/alias for the database. |
Database Physical Name |
Physical Name of the database. It will be used during data and reverse operations. |
| You can reverse all the collections of the database with a right click > Actions > Reverse. |
Define a collection node
To add a collection node manually, right-click the server node and choose New > Collection.
| Property | Description |
|---|---|
Name |
A label/alias for the collection |
Collection Physical Name |
Physical Name of the collection. |
| You can then reverse the structure of the collection with a right click > Actions > Reverse. |
Define and Reverse Find queries
Common query
A Find Query is a placeholder that will contain a MongoDB query.
It is used to retrieved data from a predefined query.
To define a Find Query:
-
Right-click the server node
-
Choose New then Find Query.
-
Specify the query properties
-
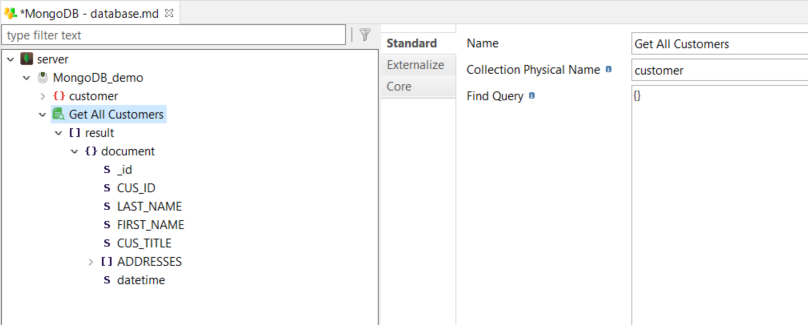
Right-click the find query node and choose Actions > reverse. This runs the query and parses the response to get the metadata structure. This is optional. The results can also be designed manually.
Example:

The following properties are available:
| Property | Description |
|---|---|
Name |
Label for the find query. |
Collection physical name |
Name of the collection on which to perform the Find Query. |
Find Query |
MongoDB query to run, with the JSON format. Refer to the MongoDB documentation for further information on how to design it. |
Parametrized query
The values of find queries can be parametrized with the use of parameters, which allow to dynamically change the query values at run.
To parametrize a query:
-
Right-click the find query.
-
Choose New, then Value.
-
Fill-in its properties.
-
Use it in the query to replace a manually set value.
Example:

The following properties are available:
| Property | Description |
|---|---|
Name |
Label for the parametrized value, to be used in the query. |
Reverse Value |
Default value to be used when reverse-engineering the query. |
Type |
JSON Type (string, boolean, number) |
Size |
Size used for the target staging column when using this value as source in a mapping. |
Scale |
Number of decimals for the target staging column when using this value as source in a mapping. |
Example:

| The parametrized values only work to replace values, not keys. |
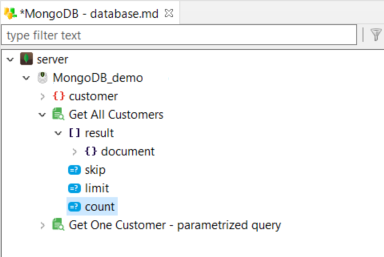
Query extra fields
Multiple query extra fields are supported:
-
skip: Numerical value defining an amount of results to skip when reading the results of a query. This field can be mapped as input in a mapping and is useful for implementing paginated results.
-
limit: Numerical value defining the maximum number of results to return. This field can be mapped as input in a mapping and is useful for implementing paginated results.
-
count: Returns the number of results that match the query. The optional Apply Skip Limit property can be enabled if the count should consider the effects of the skip and limit fields in the calculation. Otherwise, the operation returns the count for the whole query.
To define an extra field:
-
Right-click the find query node.
-
Choose New, then select the extra field to create.
-
Save the metadata.

The extra fields can then be used in mappings.
Create your first Mappings
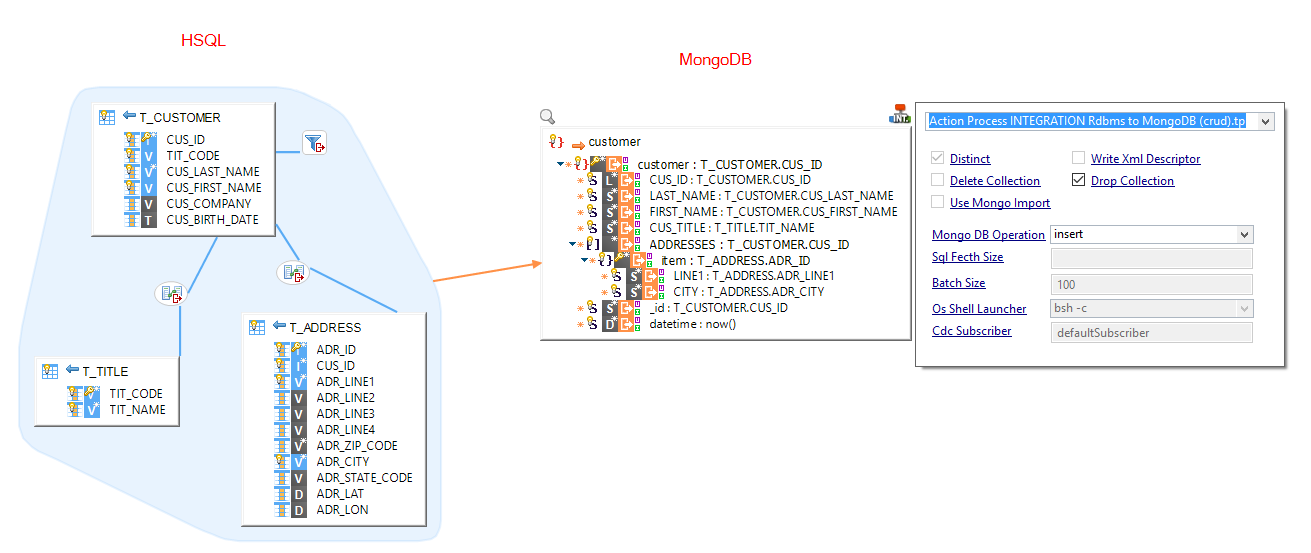
Send data into MongoDB
MongoDB collections can be loaded from any database.
To do this:
-
Create a Mapping
-
Drag and drop your source database table
-
Drag and drop your target MongoDB collection
-
Map the fields between the source and the target
-
Define the 'MongoDB Operation' of the MongoDB Template to the expected value

Read data from MongoDB
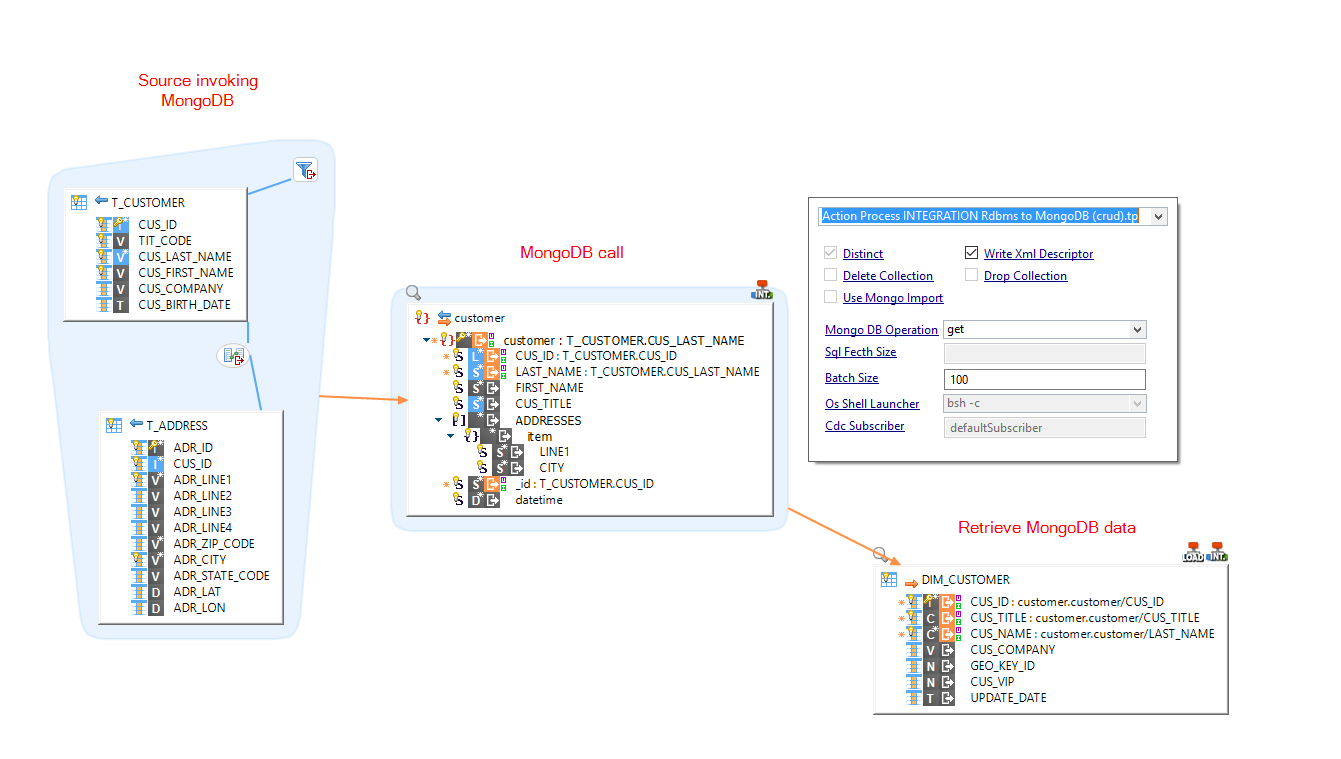
You can extract data from MongoDB and load it into a target table.
To do this:
-
Create a Mapping
-
Drag and drop:
-
A source table that will be used to call MongoDB
-
The MongoDB collection or Query to read
-
A target table to load data into
-
-
Map the root node of the MongoDB collection from the source
-
Map the fields between MongoDB and the target table as usual
-
Define the 'MongoDB Operation' of the MongoDB Template to the 'get' value

| Refer to the Template and parameters descriptions for further details |
| The source table calling MongoDB is used for the repetition key. MongoDB will be called once for each source row. |
Sample Project
The MongoDB Component ships sample project(s) that contain various examples and use cases.
You can have a look at these projects to find samples and examples describing how to use it.
Refer to Install Components to learn how to import sample projects.