| This is documentation for Semarchy xDI 2024.1, which is no longer actively maintained. For more information, see our Global Support and Maintenance Policy. |
Getting started with Snowpipe for Snowflake
The Snowflake connector for xDI allows you to load data to Snowflake continuously using either Snowpipe or the Snowpipe Streaming API with dedicated process tools.
Snowpipe allows data to be loaded from files as soon as they’re available in a stage, rather than manually executing COPY statements to load them. This means you can load data from files in smaller batches continuously, and avoid launching a Virtual Warehouse.
The Snowpipe Streaming API complements Snowpipe. Snowpipe Streaming avoids stage files entirely, and instead streams individual rows directly to Snowflake tables. It allows you to continuously load data streams as the data becomes available, such as when handling real-time data.
Prerequisites
To use Snowpipe or Snowpipe Streaming, you must configure the Snowflake metadata that ingests the data, and set some of its parameters in the Snowpipe finger tab:
| Parameter | Description |
|---|---|
Account URL |
Account URL that should be used to make Snowpipe API calls. For example: |
Snowpipe User |
User account with rights to send |
Private Key Path |
Path to a generated private key for Snowflake key-pair authentication. |
Private Key Password |
Password to decrypt the private key, if it is encrypted. |
Use Snowpipe
Loading files with Snowpipe requires a dedicated replicator action from the Process Palette.
Set up the process
Create a new process, or open a process that you want to modify.
Add the Replicator Rdbms to Snowflake tool from the Tools tab in the Process Palette.
Configure the Snowpipe replicator
Make sure that the Snowflake metadata that represents your target has its Snowpipe parameters filled out, then drag and drop the metadata onto the Snowpipe Streaming action in your process. Add the appropriate target Snowflake schema to the Replicator Rdbms to Snowflake tool, and make sure the source is correct.
Configure the relevant action parameters:
-
Check Drop Snowpipes if you want to drop existing ones.
-
Set Load Method to
snowpipe. -
Set the Create Snowpipes and Snowpipe Acknowledge Mode parameter based on your environment.
-
Configure other parameters as needed.
You can find more parameter information on the Snowpipe replicator reference page.
Use Snowpipe Streaming
The Snowpipe Streaming API uses a dedicated action from the Process Palette, separate from the former Snowpipe process.
Set up the process
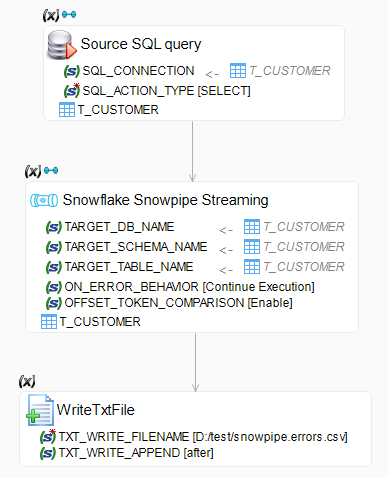
Create a new process, or open a process that you want to modify. Make sure the following items are in the process:
-
An action that will produce source data and return results in a bind link, such as an SQL operation.
-
The Snowpipe Streaming action from the Connectors tab of the Process Palette.
-
One or more actions to process errors returned by Snowpipe. This action is only required if you want to keep processing data when Snowpipe Streaming returns errors.
Create a bind link from the source data action to the Snowpipe Streaming action, then create a bind link from the Snowpipe Streaming action to each of the error handling actions.
Configure the source action
Drag and drop a source table or schema onto the source action, and define your source action properties:
-
Set an action type that will select data on the source, such as an SQL
SELECTor equivalent. -
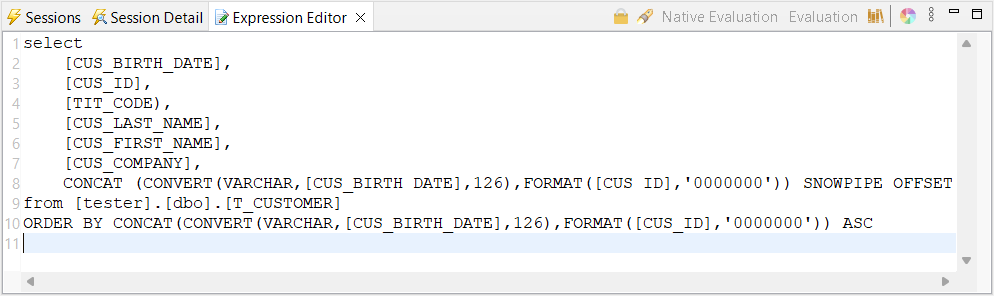
In the Expression Editor for the action, enter a query that selects the source columns to send to Snowflake.
-
Add a numeric, timestamp, or string column to your query that will serve as the offset token.
Aliases for the source data columns must match the column names on the Snowflake target, or the ingest will fail.
The offset token is not inserted in the target. It should be unique for every line that is selected, as it is used to track which data has been inserted already. Duplicate offset tokens may result in duplicate data at the target.
Configure the Snowpipe Streaming action
Make sure that the Snowflake metadata that represents your targets has its Snowpipe parameters filled out, then drag and drop the metadata onto the Snowpipe Streaming action in your process.
Configure the action parameters:
-
Fill out the Target Database Name, Target Schema Name, and Target Table Name parameters. The first two are filled out automatically when you drag and drop a schema, and all of them are filled out automatically if you drag and drop a table.
-
Define error handling parameters. By default, On Error Behavior is set to
Abort Execution, which stops the insert process the moment an error is encountered. -
In Offset Token Column Name, enter the name of the column from your source set that will serve as your offset token column.
-
Choose if you want the action to compare the offset token to the last one committed by Snowflake.
Modify any of the other parameters as needed. You can find more parameter information on the Snowpipe Streaming action reference page.
Define error handling
You can define one or more target actions to manage data that was rejected by the Snowpipe Streaming API. Defining these actions is necessary if you choose to continue execution when an error happens.
The actions you define must handle an incoming reject result set that contains source data columns without the offset token, plus a technical REJECT_MESSAGE column that contains the reason why Snowflake rejected the line. Some possibilities include saving the lines to a local CSV file with a FileWrite action, or saving the data in a purpose-made rejects table in an SQL database.
| If you save rejects information to an SQL table, you can save the information more efficiently by only inserting a record ID and the reject message. Afterward, you can create a join with the source table to see the affected rows. |